Owner's Manual
Page 347
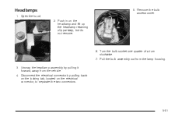
Open the hood. 2. Pull the bulb assembly out from the vehicle. 4. Headlamps 1. Unsnap the headlamp assembly by pulling back on the locking tab, located on the headlamp and lift up the headlamp retaining clip partway, but do not remove. 5. Turn the bulb socket one-quarter of a turn clockwise. 7. Push in on the electrical connector, to separate the two connectors. 5-51 Disconnect the electrical connector by pulling it forward, away from the lamp housing. 3. Remove the bulb access cover. 6.
Open the hood. 2. Pull the bulb assembly out from the vehicle. 4. Headlamps 1. Unsnap the headlamp assembly by pulling back on the locking tab, located on the headlamp and lift up the headlamp retaining clip partway, but do not remove. 5. Turn the bulb socket one-quarter of a turn clockwise. 7. Push in on the electrical connector, to separate the two connectors. 5-51 Disconnect the electrical connector by pulling it forward, away from the lamp housing. 3. Remove the bulb access cover. 6.
Owner's Manual
Page 348
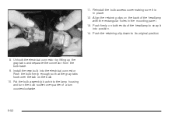
Align the retaining clips on both ends of the headlamp to its original position. 8. Install the new bulb into the lamp housing and turn counterclockwise. 5-52 Put the bulb assembly back into the electrical connector. Push the retaining clip down to snap it is in the mounting panel. 13. Reinstall the bulb ...tabs and separate the connector from the bulb base. 9. 11. Push firmly on the back of a turn the bulb socket one-quarter of the headlamp with the rectangular holes in place. 12. Push the bulb firmly enough so that the gray tabs hook over the tab on the bulb...
Align the retaining clips on both ends of the headlamp to its original position. 8. Install the new bulb into the lamp housing and turn counterclockwise. 5-52 Put the bulb assembly back into the electrical connector. Push the retaining clip down to snap it is in the mounting panel. 13. Reinstall the bulb ...tabs and separate the connector from the bulb base. 9. 11. Push firmly on the back of a turn the bulb socket one-quarter of the headlamp with the rectangular holes in place. 12. Push the bulb firmly enough so that the gray tabs hook over the tab on the bulb...

Owner's Manual
Page 448
... ...Automatic Level Control ...Automatic Transaxle Fluid ...Operation ... 3-15 4-41 5-20 2-22 Bulb Replacement (cont.) Headlamps ...Replacement Bulbs ...Taillamps, Stoplamps and Back-Up Lamps ...Buying New Tires ... 5-51 5-55 5-54 5-71 B Backing Up ...4-47 Battery ...5-41 Battery ... Belts ...5-106 Your CD and DVD Player ...3-118 Your CDs and DVDs ...3-118 Cargo Cover ...2-42 Cargo Lamp ...3-19 Cargo Net System ...2-42 Carrier Assembly-Differential (Rear Drive Module) ...5-49 CD Messages ...3-74, 3-89, 3-102 Center Rear Passenger Position, Safety Belts ...1-32 Chains, Tires ...5-75 Change ...
... ...Automatic Level Control ...Automatic Transaxle Fluid ...Operation ... 3-15 4-41 5-20 2-22 Bulb Replacement (cont.) Headlamps ...Replacement Bulbs ...Taillamps, Stoplamps and Back-Up Lamps ...Buying New Tires ... 5-51 5-55 5-54 5-71 B Backing Up ...4-47 Battery ...5-41 Battery ... Belts ...5-106 Your CD and DVD Player ...3-118 Your CDs and DVDs ...3-118 Cargo Cover ...2-42 Cargo Lamp ...3-19 Cargo Net System ...2-42 Carrier Assembly-Differential (Rear Drive Module) ...5-49 CD Messages ...3-74, 3-89, 3-102 Center Rear Passenger Position, Safety Belts ...1-32 Chains, Tires ...5-75 Change ...
