
Owner's Manual
Page 1
... ...1-2 Rear Seats ...1-7 Safety Belts ...1-8 Child Restraints ...1-28 Airbag System ...1-47 Restraint System Check ...1-58 Features and Controls ...2-1 Keys ...2-2 Doors and Locks ...2-9 Windows ...2-14 Theft-Deterrent Systems ...2-16 Starting and Operating Your Vehicle ...2-20 Mirrors ...2-33 OnStar® System ...2-36 HomeLink® Transmitter ...2-37 Storage Areas ...2-41 Sunroof ...2-42 Instrument Panel ...3-1 Instrument Panel Overview ...3-4 Climate Controls ...3-19 Warning Lights, Gages, and Indicators ...3-24 Driver Information Center (DIC) ...3-36 Audio System(s) ...3-44 M Driving...
... ...1-2 Rear Seats ...1-7 Safety Belts ...1-8 Child Restraints ...1-28 Airbag System ...1-47 Restraint System Check ...1-58 Features and Controls ...2-1 Keys ...2-2 Doors and Locks ...2-9 Windows ...2-14 Theft-Deterrent Systems ...2-16 Starting and Operating Your Vehicle ...2-20 Mirrors ...2-33 OnStar® System ...2-36 HomeLink® Transmitter ...2-37 Storage Areas ...2-41 Sunroof ...2-42 Instrument Panel ...3-1 Instrument Panel Overview ...3-4 Climate Controls ...3-19 Warning Lights, Gages, and Indicators ...3-24 Driver Information Center (DIC) ...3-36 Audio System(s) ...3-44 M Driving...

Owner's Manual
Page 9
... back of the vehicle. • Raise or lower the front of the seat cushion by holding the front of the control up or down . Power Seat Manual Lumbar If your vehicle has this feature, the control is located on the front passenger's seat. Your vehicle may also have manual lumbar on the outboard side of the driver's seat. If your vehicle has this feature, the handle is located on...
... back of the vehicle. • Raise or lower the front of the seat cushion by holding the front of the control up or down . Power Seat Manual Lumbar If your vehicle has this feature, the control is located on the front passenger's seat. Your vehicle may also have manual lumbar on the outboard side of the driver's seat. If your vehicle has this feature, the handle is located on...
Owner's Manual
Page 67
... Your Vehicle ...2-20 New Vehicle Break-In ...2-20 Ignition Positions ...2-20 Retained Accessory Power (RAP) ...2-21 Starting Your Engine ...2-21 Adjustable Throttle and Brake Pedal ...2-22 Engine Coolant Heater ...2-23 Section 2 Features and Controls Automatic Transaxle Operation ...2-24 Parking Brake ...2-28 Shifting Into Park (P) ...2-29 Shifting Out of Park (P) ...2-30 Parking Over Things That Burn ...2-31 Engine Exhaust ...2-31 Running Your Engine While You Are Parked ...2-32 Mirrors ...2-33 Manual Rearview Mirror ...2-33 Manual Rearview Mirror with OnStar® ...2-33 Automatic Dimming...
... Your Vehicle ...2-20 New Vehicle Break-In ...2-20 Ignition Positions ...2-20 Retained Accessory Power (RAP) ...2-21 Starting Your Engine ...2-21 Adjustable Throttle and Brake Pedal ...2-22 Engine Coolant Heater ...2-23 Section 2 Features and Controls Automatic Transaxle Operation ...2-24 Parking Brake ...2-28 Shifting Into Park (P) ...2-29 Shifting Out of Park (P) ...2-30 Parking Over Things That Burn ...2-31 Engine Exhaust ...2-31 Running Your Engine While You Are Parked ...2-32 Mirrors ...2-33 Manual Rearview Mirror ...2-33 Manual Rearview Mirror with OnStar® ...2-33 Automatic Dimming...
Owner's Manual
Page 73
... the vehicle's heating or air conditioning systems and rear window defogger. Your remote keyless entry transmitter, with 10 minutes of operation. Or it on remote starting feature. Remote Vehicle Start Your vehicle may be less while the vehicle is running. The remote start feature provides two separate starts, each with the remote start system is active and the vehicle has an automatic climate control system, it will not operate if the key is in view when doing so...
... the vehicle's heating or air conditioning systems and rear window defogger. Your remote keyless entry transmitter, with 10 minutes of operation. Or it on remote starting feature. Remote Vehicle Start Your vehicle may be less while the vehicle is running. The remote start feature provides two separate starts, each with the remote start system is active and the vehicle has an automatic climate control system, it will not operate if the key is in view when doing so...

Owner's Manual
Page 74
...;rst remote start since last driving, repeat these steps while the engine is running for at the vehicle and press the remote start button until the vehicle's turn signal lights flash or for a 10 minute time extension. To start the vehicle using the remote start , turn the key to the on position to use the remote start feature. If it will be locked. 3. To manually shut off a remote start, do the following : • Aim the remote keyless entry...
...;rst remote start since last driving, repeat these steps while the engine is running for at the vehicle and press the remote start button until the vehicle's turn signal lights flash or for a 10 minute time extension. To start the vehicle using the remote start , turn the key to the on position to use the remote start feature. If it will be locked. 3. To manually shut off a remote start, do the following : • Aim the remote keyless entry...

Owner's Manual
Page 78
...; Turn the fan on your heating or cooling system to ensure it fully latches. 2-12 See Climate Control System in the ignition and a door is open. When closing the trunk, close from the center of the lid to its highest speed and select the control setting that will force outside , use the manual door lock or the remote keyless entry transmitter, you could still lock your key inside your vehicle. You...
...; Turn the fan on your heating or cooling system to ensure it fully latches. 2-12 See Climate Control System in the ignition and a door is open. When closing the trunk, close from the center of the lid to its highest speed and select the control setting that will force outside , use the manual door lock or the remote keyless entry transmitter, you could still lock your key inside your vehicle. You...

Owner's Manual
Page 81
... power window switches for their own window. Pull up the front of the switch is lowering, pull up the switch to lower all the windows and the front passenger can operate their window switches. Each passenger door also has a power window switch for all the way down feature which allows the window to raise the window. 2-15 Power Windows Express-Down Window The driver's window has an express-down and release. This switch is located near the driver's power window switches...
... power window switches for their own window. Pull up the front of the switch is lowering, pull up the switch to lower all the windows and the front passenger can operate their window switches. Each passenger door also has a power window switch for all the way down feature which allows the window to raise the window. 2-15 Power Windows Express-Down Window The driver's window has an express-down and release. This switch is located near the driver's power window switches...

Owner's Manual
Page 83
... minute delay with the remote start feature, will activate the alarm. This will also disarm the system. • Insert the key in the ignition and turn it on. This will stop flashing. • Press the unlock button on the remote keyless entry transmitter. This will also disarm the system. • Insert the key in the driver's door key lock cylinder and turn it counterclockwise. This will...
... minute delay with the remote start feature, will activate the alarm. This will also disarm the system. • Insert the key in the ignition and turn it on. This will stop flashing. • Press the unlock button on the remote keyless entry transmitter. This will also disarm the system. • Insert the key in the driver's door key lock cylinder and turn it counterclockwise. This will...
Owner's Manual
Page 87
... your electrical accessories and to display some instrument panel warning lights. / (START): This position starts the engine. The ignition switch will cause your battery to be pushed or towed, but never try to help avoid draining your battery or damaging your starter. 2. Notice: Holding your key in any door is stopped. Once the key is turned from ON to OFF, the radio and windows will allow the radio and power windows to continue to work...
... your electrical accessories and to display some instrument panel warning lights. / (START): This position starts the engine. The ignition switch will cause your battery to be pushed or towed, but never try to help avoid draining your battery or damaging your starter. 2. Notice: Holding your key in any door is stopped. Once the key is turned from ON to OFF, the radio and windows will allow the radio and power windows to continue to work...
Owner's Manual
Page 94
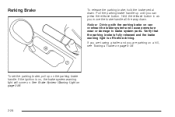
... to brake system parts. If the ignition is off before driving. See Brake System Warning Light on . Verify that the parking brake is fully released and the brake warning light is on, the brake system warning light will come on page 3-28. 2-28 If you are parking on a hill, see Towing a Trailer on page 4-38. Pull the parking brake handle up on can press the release button. Parking Brake To release the parking brake, hold the brake pedal...
... to brake system parts. If the ignition is off before driving. See Brake System Warning Light on . Verify that the parking brake is fully released and the brake warning light is on, the brake system warning light will come on page 3-28. 2-28 If you are parking on a hill, see Towing a Trailer on page 4-38. Pull the parking brake handle up on can press the release button. Parking Brake To release the parking brake, hold the brake pedal...

Owner's Manual
Page 115
... are the following: A. Steering Wheel Controls and Cruise Controls. Hazard Warning Flashers Button. L. N. Accessory Power Outlet. T. See Outlet Adjustment on page 3-23. Instrument Panel Cluster. G. See Outlet Adjustment on page 3-23. Shift Lever. S. D. See Ignition Positions on page 3-44. J. O. Turn Signal/Multifunction Lever. Instrument Panel Brightness Control. M. K. See Audio System(s) on page 2-20. B. See Horn on page 2-41. 3-5 Horn. R. See Glove Box on page 3-6. Center Air Outlets. See Instrument Panel Cluster on page 3-24...
... are the following: A. Steering Wheel Controls and Cruise Controls. Hazard Warning Flashers Button. L. N. Accessory Power Outlet. T. See Outlet Adjustment on page 3-23. Instrument Panel Cluster. G. See Outlet Adjustment on page 3-23. Shift Lever. S. D. See Ignition Positions on page 3-44. J. O. Turn Signal/Multifunction Lever. Instrument Panel Brightness Control. M. K. See Audio System(s) on page 2-20. B. See Horn on page 2-41. 3-5 Horn. R. See Glove Box on page 3-6. Center Air Outlets. See Instrument Panel Cluster on page 3-24...

Owner's Manual
Page 151
... trunk lid of engine coolant. You will also see a low fuel warning light on the instrument panel cluster. SERVICE AIR BAG: There is a problem with the electric power steering. You should refill the tank as soon as possible. You should make sure that the vehicle has reduced engine power to avoid damaging the engine. KEY FOB BATT LOW: This message is displayed if the remote keyless entry transmitter battery is cold enough to drive away. POWER STEERING...
... trunk lid of engine coolant. You will also see a low fuel warning light on the instrument panel cluster. SERVICE AIR BAG: There is a problem with the electric power steering. You should refill the tank as soon as possible. You should make sure that the vehicle has reduced engine power to avoid damaging the engine. KEY FOB BATT LOW: This message is displayed if the remote keyless entry transmitter battery is cold enough to drive away. POWER STEERING...

Owner's Manual
Page 241
...;re starts while you are refueling, do not remove the nozzle. When replacing the fuel cap, turn it to evaporate into the atmosphere. See Malfunction Indicator Lamp on page 5-69. Notice: If you need a new fuel cap, be badly burned. See Malfunction Indicator Lamp on you if you open the fuel cap too quickly. Fuel can happen if your tank is...
...;re starts while you are refueling, do not remove the nozzle. When replacing the fuel cap, turn it to evaporate into the atmosphere. See Malfunction Indicator Lamp on page 5-69. Notice: If you need a new fuel cap, be badly burned. See Malfunction Indicator Lamp on you if you open the fuel cap too quickly. Fuel can happen if your tank is...
Owner's Manual
Page 264
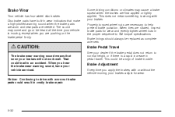
... brake trouble. Disc brake pads have your brakes will not work well. Brake linings should always be replaced as complete axle sets. {CAUTION: The brake wear warning sound means that make a high-pitched warning sound when the brake pads are worn and new pads are rotated, inspect brake pads for wear. 5-32 Properly torqued wheel nuts are first applied or lightly applied. Brake Wear Your vehicle has four-wheel disc brakes. Brake...
... brake trouble. Disc brake pads have your brakes will not work well. Brake linings should always be replaced as complete axle sets. {CAUTION: The brake wear warning sound means that make a high-pitched warning sound when the brake pads are worn and new pads are rotated, inspect brake pads for wear. 5-32 Properly torqued wheel nuts are first applied or lightly applied. Brake Wear Your vehicle has four-wheel disc brakes. Brake...

Owner's Manual
Page 277
... the tire. Tire Size The following illustration shows an example of a typical passenger vehicle tire size. (D) Construction Code: A letter code is used to indicate the type of ply construction in the tire size means a passenger vehicle tire engineered to standards set by the U.S. The load index represents the load carry capacity a tire is certified to carry a load. Accessory Weight: This means the combined weight of optional accessories are, automatic transmission, power steering, power brakes, power windows, power seats, and air conditioning...
... the tire. Tire Size The following illustration shows an example of a typical passenger vehicle tire size. (D) Construction Code: A letter code is used to indicate the type of ply construction in the tire size means a passenger vehicle tire engineered to standards set by the U.S. The load index represents the load carry capacity a tire is certified to carry a load. Accessory Weight: This means the combined weight of optional accessories are, automatic transmission, power steering, power brakes, power windows, power seats, and air conditioning...

Owner's Manual
Page 279
... on passenger cars and some light duty trucks and multipurpose vehicles. Outward Facing Sidewall: The side of an asymmetrical tire that has a particular side that faces outward when mounted on the other sidewall of the tire. Speed Rating: An alphanumeric code assigned to curb weight, accessory weight, occupant weight, and cargo weight. The side of the tire that contains a whitewall, bears white lettering or bears manufacturer, brand, and/or model name...
... on passenger cars and some light duty trucks and multipurpose vehicles. Outward Facing Sidewall: The side of an asymmetrical tire that has a particular side that faces outward when mounted on the other sidewall of the tire. Speed Rating: An alphanumeric code assigned to curb weight, accessory weight, occupant weight, and cargo weight. The side of the tire that contains a whitewall, bears white lettering or bears manufacturer, brand, and/or model name...

Owner's Manual
Page 343
... of Safety Belts ...5-69 Chemical Paint Spotting ...5-72 Cleaning Exterior Lamps/Lenses ...5-69 Fabric/Carpet ...5-66 Finish Care ...5-70 Appearance Care (cont.) Finish Damage ...Glass Surfaces ...Instrument Panel ...Interior Plastic Components ...Leather ...Sheet Metal Damage ...Tires ...Underbody Maintenance ...Vehicle Care/Appearance Materials ...Vinyl ...Washing Your Vehicle ...Weatherstrips ...Windshield and Wiper Blades ...Audio System(s) ...Audio Steering Wheel Controls ...Backglass Antenna ...Care of Your CD and DVD Player ...Care of Your CDs and DVDs ...Radio with...
... of Safety Belts ...5-69 Chemical Paint Spotting ...5-72 Cleaning Exterior Lamps/Lenses ...5-69 Fabric/Carpet ...5-66 Finish Care ...5-70 Appearance Care (cont.) Finish Damage ...Glass Surfaces ...Instrument Panel ...Interior Plastic Components ...Leather ...Sheet Metal Damage ...Tires ...Underbody Maintenance ...Vehicle Care/Appearance Materials ...Vinyl ...Washing Your Vehicle ...Weatherstrips ...Windshield and Wiper Blades ...Audio System(s) ...Audio Steering Wheel Controls ...Backglass Antenna ...Care of Your CD and DVD Player ...Care of Your CDs and DVDs ...Radio with...

Owner's Manual
Page 350
...-Road Recovery ...4-13 Oil Engine ...5-13 Pressure Light ...3-34 Older Children, Restraints ...1-28 Online Owner Center ...7-3 OnStar® System ...2-36 Other Warning Devices ...3-6 Outlet Adjustment ...3-23 Outside Convex Mirror ...2-35 Power Mirrors ...2-35 Overhead Console Reading Lamps ...3-17 Owner Checks and Services ...6-8 Owners, Canadian ...ii PASS-Key® III+ ...2-18 PASS-Key® III+ Operation ...2-18 Power Accessory Outlets ...3-18 Door Locks ...2-10 Electrical System ...5-75 Lift Seat ...1-6 Retained Accessory (RAP) ...2-21 Seat ...1-3 Windows ...2-15 Pretensioners, Safety...
...-Road Recovery ...4-13 Oil Engine ...5-13 Pressure Light ...3-34 Older Children, Restraints ...1-28 Online Owner Center ...7-3 OnStar® System ...2-36 Other Warning Devices ...3-6 Outlet Adjustment ...3-23 Outside Convex Mirror ...2-35 Power Mirrors ...2-35 Overhead Console Reading Lamps ...3-17 Owner Checks and Services ...6-8 Owners, Canadian ...ii PASS-Key® III+ ...2-18 PASS-Key® III+ Operation ...2-18 Power Accessory Outlets ...3-18 Door Locks ...2-10 Electrical System ...5-75 Lift Seat ...1-6 Retained Accessory (RAP) ...2-21 Seat ...1-3 Windows ...2-15 Pretensioners, Safety...

Owner's Manual
Page 351
... Running Your Engine While You Are Parked ...2-32 S Safety Belt Pretensioners ...1-27 Reminder Light ...3-26 Safety Belts Care of ...5-69 Driver Position ...1-13 How to Wear Safety Belts Properly ...1-13 Questions and Answers About Safety Belts ...1-12 Rear Safety Belt Comfort Guides ...1-25 Rear Seat Passengers ...1-21 Right Front Passenger Position ...1-21 Safety Belt Extender ...1-27 Safety Belt Use During Pregnancy ...1-21 Safety Belts Are for Everyone ...1-8 Shoulder Belt Height Adjuster ...1-20 Safety Warnings and Symbols ...iii Scheduled Maintenance ...6-4 Seats 60/40 Split Bench Seat...
... Running Your Engine While You Are Parked ...2-32 S Safety Belt Pretensioners ...1-27 Reminder Light ...3-26 Safety Belts Care of ...5-69 Driver Position ...1-13 How to Wear Safety Belts Properly ...1-13 Questions and Answers About Safety Belts ...1-12 Rear Safety Belt Comfort Guides ...1-25 Rear Seat Passengers ...1-21 Right Front Passenger Position ...1-21 Safety Belt Extender ...1-27 Safety Belt Use During Pregnancy ...1-21 Safety Belts Are for Everyone ...1-8 Shoulder Belt Height Adjuster ...1-20 Safety Warnings and Symbols ...iii Scheduled Maintenance ...6-4 Seats 60/40 Split Bench Seat...
Owner's Manual
Page 352
...) ...3-45 Radios without Radio Data Systems (RDS) ...3-45 Sheet Metal Damage ...5-72 Shifting Into Park (P) ...2-29 Shifting Out of Park (P) ...2-30 Shoulder Belt Height Adjuster ...1-20 Signals, Turn and Lane-Change ...3-8 Spare Tire Installing ...5-59 Removing ...5-57 10 Spare Tire (cont.) Storing ...5-64 Specifications, Capacities ...5-82 Speedometer ...3-26 Split Bench Seat (60/40) ...1-7 Starting Your Engine ...2-21 Steering ...4-11 Steering Wheel Controls, Audio ...3-76 Steering Wheel, Tilt Wheel ...3-6 Storage Areas Center Console Storage Area...
...) ...3-45 Radios without Radio Data Systems (RDS) ...3-45 Sheet Metal Damage ...5-72 Shifting Into Park (P) ...2-29 Shifting Out of Park (P) ...2-30 Shoulder Belt Height Adjuster ...1-20 Signals, Turn and Lane-Change ...3-8 Spare Tire Installing ...5-59 Removing ...5-57 10 Spare Tire (cont.) Storing ...5-64 Specifications, Capacities ...5-82 Speedometer ...3-26 Split Bench Seat (60/40) ...1-7 Starting Your Engine ...2-21 Steering ...4-11 Steering Wheel Controls, Audio ...3-76 Steering Wheel, Tilt Wheel ...3-6 Storage Areas Center Console Storage Area...


