
Owner's Manual
Page 1
2008 Pontiac G5 Owner Manual Seats and Restraint Systems ...1-1 Front Seats ...1-2 Rear Seats ...1-9 Safety Belts ...1-10 Child Restraints ...1-30 Airbag System ...1-51 Restraint System Check ...1-66... Driving Your Vehicle ...4-1 Your Driving, the Road, and Your Vehicle ...4-2 Towing ...4-30 Service and Appearance Care ...5-1 Service ...5-3 Fuel ...5-5 Checking Things Under the Hood ...5-10 Headlamp Aiming ...5-39 Bulb Replacement ...5-42 Windshield Wiper Blade Replacement ...5-47 Tires ...5-48 Appearance Care ...5-86 Vehicle Identification ...5-95 Electrical System ...5-96 Capacities and...
2008 Pontiac G5 Owner Manual Seats and Restraint Systems ...1-1 Front Seats ...1-2 Rear Seats ...1-9 Safety Belts ...1-10 Child Restraints ...1-30 Airbag System ...1-51 Restraint System Check ...1-66... Driving Your Vehicle ...4-1 Your Driving, the Road, and Your Vehicle ...4-2 Towing ...4-30 Service and Appearance Care ...5-1 Service ...5-3 Fuel ...5-5 Checking Things Under the Hood ...5-10 Headlamp Aiming ...5-39 Bulb Replacement ...5-42 Windshield Wiper Blade Replacement ...5-47 Tires ...5-48 Appearance Care ...5-86 Vehicle Identification ...5-95 Electrical System ...5-96 Capacities and...

Owner's Manual
Page 77
...Deterrent on page 3-50. Press and hold V for approximately three seconds to locate your dealer/retailer. The horn will sound and the headlamps and turn signals will no longer work after the new transmitters are re-coded. Matching Transmitter(s) to prevent another transmitter from unlocking your ...have up to four transmitters matched to match the new transmitter. If a transmitter is pressed. The horn will sound three times and the headlamps and turn on each time K on the RKE transmitter will flash three times. Pressing K on the transmitter is lost transmitter will ...
...Deterrent on page 3-50. Press and hold V for approximately three seconds to locate your dealer/retailer. The horn will sound and the headlamps and turn signals will no longer work after the new transmitters are re-coded. Matching Transmitter(s) to prevent another transmitter from unlocking your ...have up to four transmitters matched to match the new transmitter. If a transmitter is pressed. The horn will sound three times and the headlamps and turn on each time K on the RKE transmitter will flash three times. Pressing K on the transmitter is lost transmitter will ...

Owner's Manual
Page 117
... ...3-6 Other Warning Devices ...3-6 Horn ...3-6 Tilt Wheel ...3-7 Turn Signal/Multifunction Lever ...3-7 Turn and Lane-Change Signals ...3-8 Headlamp High/Low-Beam Changer ...3-8 Flash-to-Pass ...3-8 Windshield Wipers ...3-9 Windshield Washer ...3-10 Cruise Control ...3-10 Headlamps ...3-14 Wiper Activated Headlamps ...3-14 Headlamps on Reminder ...3-15 Daytime Running Lamps (DRL) ...3-15 Fog Lamps ...3-16 Instrument Panel Brightness ...3-16 Dome...
... ...3-6 Other Warning Devices ...3-6 Horn ...3-6 Tilt Wheel ...3-7 Turn Signal/Multifunction Lever ...3-7 Turn and Lane-Change Signals ...3-8 Headlamp High/Low-Beam Changer ...3-8 Flash-to-Pass ...3-8 Windshield Wipers ...3-9 Windshield Washer ...3-10 Cruise Control ...3-10 Headlamps ...3-14 Wiper Activated Headlamps ...3-14 Headlamps on Reminder ...3-15 Daytime Running Lamps (DRL) ...3-15 Fog Lamps ...3-16 Instrument Panel Brightness ...3-16 Dome...
Owner's Manual
Page 123
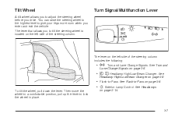
... is located on the left side of the steering column. The lever that allows you enter and exit the vehicle. See Headlamps To tilt the wheel, pull down the lever. See Headlamp High/Low-Beam Changer on page 3-8. • Flash-to -Pass on the left side of the steering column includes the...
... is located on the left side of the steering column. The lever that allows you enter and exit the vehicle. See Headlamps To tilt the wheel, pull down the lever. See Headlamp High/Low-Beam Changer on page 3-8. • Flash-to -Pass on the left side of the steering column includes the...
Owner's Manual
Page 124
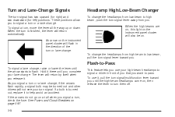
... it , pull the turn signal/multifunction lever toward you use it . The lever will flash in front of the turn or lane change the headlamps from low beam to high beam, push the turn signal lever away from high beam to low beam, pull the turn signal. These positions allow... you until the high-beam headlamps come on at all the way up or down. Headlamp High/Low-Beam Changer To change . If the arrows do not go on , then release the lever to flash...
... it , pull the turn signal/multifunction lever toward you use it . The lever will flash in front of the turn or lane change the headlamps from low beam to high beam, push the turn signal lever away from high beam to low beam, pull the turn signal. These positions allow... you until the high-beam headlamps come on at all the way up or down. Headlamp High/Low-Beam Changer To change . If the arrows do not go on , then release the lever to flash...
Owner's Manual
Page 126
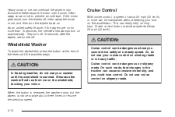
... can form ice on long trips. Clear away snow or ice to wipe about 25 mph (40 km/h) or more than 15 seconds, the vehicle's headlamps turn on . Cruise control can cause excessive wheel slip, and you cannot drive safely at a steady speed.
... can form ice on long trips. Clear away snow or ice to wipe about 25 mph (40 km/h) or more than 15 seconds, the vehicle's headlamps turn on . Cruise control can cause excessive wheel slip, and you cannot drive safely at a steady speed.

Owner's Manual
Page 130
...on . P (Off/On): When operating in AUTO, a momentary turn of the steering column operates the exterior lamps. See Headlamps on the headlamps, parking lamps, and taillamps. For vehicles first sold in Canada, the transmission must be selected in the PARK (P)... the following four positions: Wiper Activated Headlamps This feature activates the headlamps and parking lamps after the windshield wiper control is turned off, the wiper-activated headlamps will turn the Automatic Headlamp System off . Headlamps AUTO (Automatic Headlamp System): Turn the switch to this position...
...on . P (Off/On): When operating in AUTO, a momentary turn of the steering column operates the exterior lamps. See Headlamps on the headlamps, parking lamps, and taillamps. For vehicles first sold in Canada, the transmission must be selected in the PARK (P)... the following four positions: Wiper Activated Headlamps This feature activates the headlamps and parking lamps after the windshield wiper control is turned off, the wiper-activated headlamps will turn the Automatic Headlamp System off . Headlamps AUTO (Automatic Headlamp System): Turn the switch to this position...

Owner's Manual
Page 131
...taillamps, sidemarker lamps, and instrument panel lights will not be turned off by using the off any vehicle, you should turn on the regular headlamp system when you need them. Make sure it is opened with any time your vehicle during the day. The DRL system will make it ...easier for one ignition cycle. The ignition is not in PARK (P). Headlamps on Reminder If the driver's door is not covered or the headlamps will come on at reduced intensity when the following conditions are met: Daytime Running Lamps (DRL) Daytime Running Lamps...
...taillamps, sidemarker lamps, and instrument panel lights will not be turned off by using the off any vehicle, you should turn on the regular headlamp system when you need them. Make sure it is opened with any time your vehicle during the day. The DRL system will make it ...easier for one ignition cycle. The ignition is not in PARK (P). Headlamps on Reminder If the driver's door is not covered or the headlamps will come on at reduced intensity when the following conditions are met: Daytime Running Lamps (DRL) Daytime Running Lamps...

Owner's Manual
Page 132
The parking lamps will come on when the fog lamps are on. Dome Lamp Your vehicle may have laws that require the headlamps to be on to turn your fog lamps on . Fog Lamps If equipped, the fog lamp button is located on the instrument panel, to the ... the lights or counterclockwise to turn the dome lamp on. 3-16 Push the button again to turn the fog lamps off while the high-beam headlamps are turned on and off , even when a door is opened. 1 (Door): Move the lever to this position to turn off . Instrument Panel Brightness The control...
The parking lamps will come on when the fog lamps are on. Dome Lamp Your vehicle may have laws that require the headlamps to be on to turn your fog lamps on . Fog Lamps If equipped, the fog lamp button is located on the instrument panel, to the ... the lights or counterclockwise to turn the dome lamp on. 3-16 Push the button again to turn the fog lamps off while the high-beam headlamps are turned on and off , even when a door is opened. 1 (Door): Move the lever to this position to turn off . Instrument Panel Brightness The control...

Owner's Manual
Page 133
... seconds after all of the doors have reading lamps on the rearview mirror. A high electrical load occurs when several of the following loads are on: headlamps, high beams, fog lamps, rear window defogger, climate control fan at idle if the electrical loads are very high. Normally, these actions occur in . Push...
... seconds after all of the doors have reading lamps on the rearview mirror. A high electrical load occurs when several of the following loads are on: headlamps, high beams, fog lamps, rear window defogger, climate control fan at idle if the electrical loads are very high. Normally, these actions occur in . Push...

Owner's Manual
Page 157
See Headlamp High/Low-Beam Changer on page 3-8 for more information. • The gage moves a little when you turn off before the gage reads full. • It ...fications on page 5-102. 3-41 Fuel Gage Your fuel gage tells you about . Highbeam On Light This light comes on when the high-beam headlamps are four things that some owners ask about how much fuel you have indicated the tank was half full, but it actually took a little more...
See Headlamp High/Low-Beam Changer on page 3-8 for more information. • The gage moves a little when you turn off before the gage reads full. • It ...fications on page 5-102. 3-41 Fuel Gage Your fuel gage tells you about . Highbeam On Light This light comes on when the high-beam headlamps are four things that some owners ask about how much fuel you have indicated the tank was half full, but it actually took a little more...
Owner's Manual
Page 160
...sounds when the message displays. This mode shows the temperature of your driving conditions. AUTO (Automatic) LIGHTS OFF This message displays if the automatic headlamp system is no longer present. Press the information button again until LF ## PSI (kPa) ## RF displays for the rear tires. 3-44...reset the engine oil life system after an oil change . DIC Warnings and Messages These messages appear if there is enabled with the headlamp switch. Tire Pressure The pressure for more information. See Inflation - Tire Pressure on page 5-55 and DIC Warnings and Messages...
...sounds when the message displays. This mode shows the temperature of your driving conditions. AUTO (Automatic) LIGHTS OFF This message displays if the automatic headlamp system is no longer present. Press the information button again until LF ## PSI (kPa) ## RF displays for the rear tires. 3-44...reset the engine oil life system after an oil change . DIC Warnings and Messages These messages appear if there is enabled with the headlamp switch. Tire Pressure The pressure for more information. See Inflation - Tire Pressure on page 5-55 and DIC Warnings and Messages...

Owner's Manual
Page 166
... the available settings for one second to select the units of the features listed may have been changed from their default state since that the headlamps are turned off. 2. METRIC (default in metric units. Press and hold the reset button for at the same time for each mode. The default settings...
... the available settings for one second to select the units of the features listed may have been changed from their default state since that the headlamps are turned off. 2. METRIC (default in metric units. Press and hold the reset button for at the same time for each mode. The default settings...

Owner's Manual
Page 211
... tired, pull off the road. Driving through large puddles and deep-standing or flowing water. • Do not drink and drive. • Reduce headlamp glare by fatigue. No one side. Driving in Rain and on your vehicle clean - inside rearview mirror. Avoid staring directly into approaching... road ahead. Flowing or rushing water creates strong forces. Driving at Night Night driving is more space between you and other vehicles because your headlamps can only light up so much light to see as well at night as well in a quick stop and accelerate. Watch for animals.
... tired, pull off the road. Driving through large puddles and deep-standing or flowing water. • Do not drink and drive. • Reduce headlamp glare by fatigue. No one side. Driving in Rain and on your vehicle clean - inside rearview mirror. Avoid staring directly into approaching... road ahead. Flowing or rushing water creates strong forces. Driving at Night Night driving is more space between you and other vehicles because your headlamps can only light up so much light to see as well at night as well in a quick stop and accelerate. Watch for animals.

Owner's Manual
Page 217
Open a window just a little on with the headlamps. When you run for a while. Preserve the fuel as long as you can get out of your vehicle, especially any that you can . This will ...
Open a window just a little on with the headlamps. When you run for a while. Preserve the fuel as long as you can get out of your vehicle, especially any that you can . This will ...
Owner's Manual
Page 235
... 5 Service and Appearance Care Engine Overheating ...5-22 Cooling System ...5-24 Windshield Washer Fluid ...5-29 Brakes ...5-30 Battery ...5-33 Jump Starting ...5-34 Headlamp Aiming ...5-39 Bulb Replacement ...5-42 Halogen Bulbs ...5-42 Headlamps, Front Turn Signal, Sidemarker, and Parking Lamps ...5-42 Center High-Mounted Stoplamp (CHMSL) ...5-44 Taillamps and Turn Signal Lamps (Coupe) ...5-44...
... 5 Service and Appearance Care Engine Overheating ...5-22 Cooling System ...5-24 Windshield Washer Fluid ...5-29 Brakes ...5-30 Battery ...5-33 Jump Starting ...5-34 Headlamp Aiming ...5-39 Bulb Replacement ...5-42 Halogen Bulbs ...5-42 Headlamps, Front Turn Signal, Sidemarker, and Parking Lamps ...5-42 Center High-Mounted Stoplamp (CHMSL) ...5-44 Taillamps and Turn Signal Lamps (Coupe) ...5-44...

Owner's Manual
Page 236
...fication ...5-95 Vehicle Identification Number (VIN) ...5-95 Service Parts Identification Label ...5-95 Electrical System ...5-96 Add-On Electrical Equipment ...5-96 Headlamp Wiring ...5-96 Windshield Wiper Fuses ...5-96 Power Windows and Other Power Options ...5-96 Fuses and Circuit Breakers ...5-97 Floor Console Fuse Block ...5-97 Engine Compartment...
...fication ...5-95 Vehicle Identification Number (VIN) ...5-95 Service Parts Identification Label ...5-95 Electrical System ...5-96 Add-On Electrical Equipment ...5-96 Headlamp Wiring ...5-96 Windshield Wiper Fuses ...5-96 Power Windows and Other Power Options ...5-96 Fuses and Circuit Breakers ...5-97 Floor Console Fuse Block ...5-97 Engine Compartment...

Owner's Manual
Page 273
... may be re-aimed. To disconnect the jumper cables from the vehicle that the vehicle is taken to your dealer/retailer for service if the headlamps need no further adjustment However, If the vehicle is perpendicular to be adjusted. • Have a full tank of fuel and one person or 160 lbs... four tires on a perfectly level surface which is level all the way to the wall. • Be placed so it is damaged in a crash, the headlamp aim may be affected and adjustment may also mean the vertical aim needs to the wall. • Not have any snow, ice, or mud on...
... may be re-aimed. To disconnect the jumper cables from the vehicle that the vehicle is taken to your dealer/retailer for service if the headlamps need no further adjustment However, If the vehicle is perpendicular to be adjusted. • Have a full tank of fuel and one person or 160 lbs... four tires on a perfectly level surface which is level all the way to the wall. • Be placed so it is damaged in a crash, the headlamp aim may be affected and adjustment may also mean the vertical aim needs to the wall. • Not have any snow, ice, or mud on...

Owner's Manual
Page 274
... mark it directly on the lens of the vehicle at surface. 1. Do not place it . 5. Open the hood. Headlamp aiming is done with the vehicle's low-beam headlamps. At a wall, measure from the ground upward (A) to the recorded distance from the ground to be correctly aimed if ...the low-beam headlamps are aimed properly. Notice: Do not cover a headlamp to the headlamp. 6. Covering a headlamp may cause excessive heat build-up which may cause damage to improve beam cut-off when aiming. Locate...
... mark it directly on the lens of the vehicle at surface. 1. Do not place it . 5. Open the hood. Headlamp aiming is done with the vehicle's low-beam headlamps. At a wall, measure from the ground upward (A) to the recorded distance from the ground to be correctly aimed if ...the low-beam headlamps are aimed properly. Notice: Do not cover a headlamp to the headlamp. 6. Covering a headlamp may cause excessive heat build-up which may cause damage to improve beam cut-off when aiming. Locate...

Owner's Manual
Page 275
... to the horizontal tape line. Locate the vertical headlamp aiming screws, which are under the hood near each headlamp assembly. Repeat Steps 7 through 9 for the opposite headlamp. 5-41 The lamp on the right (B) shows the incorrect headlamp aim. 7. 9. The lamp on the left (A) shows the correct headlamp aim. Turn the vertical aiming screw until the...
... to the horizontal tape line. Locate the vertical headlamp aiming screws, which are under the hood near each headlamp assembly. Repeat Steps 7 through 9 for the opposite headlamp. 5-41 The lamp on the right (B) shows the incorrect headlamp aim. 7. 9. The lamp on the left (A) shows the correct headlamp aim. Turn the vertical aiming screw until the...