
Owner's Manual
Page 1
2004 Saturn L-Series Owner Manual Seats and Restraint Systems ...1-1 Front Seats ...1-3 Rear Seats ...1-8 Safety Belts ...1-11 Child Restraints ...1-35 Air Bag Systems ...1-62 Restraint System Check ...(s) ...3-41 M Driving Your Vehicle ...4-1 Your Driving, the Road, and Your Vehicle ...4-2 Towing ...4-32 Service and Appearance Care ...5-1 Service ...5-3 Fuel ...5-5 Checking Things Under the Hood ...5-10 Bulb Replacement ...5-46 Windshield Wiper Blade Replacement ...5-53 Tires ...5-54 Appearance Care ...5-82 Vehicle Identification ...5-90 Electrical System ...5-91 Capacities and Speci...
2004 Saturn L-Series Owner Manual Seats and Restraint Systems ...1-1 Front Seats ...1-3 Rear Seats ...1-8 Safety Belts ...1-11 Child Restraints ...1-35 Air Bag Systems ...1-62 Restraint System Check ...(s) ...3-41 M Driving Your Vehicle ...4-1 Your Driving, the Road, and Your Vehicle ...4-2 Towing ...4-32 Service and Appearance Care ...5-1 Service ...5-3 Fuel ...5-5 Checking Things Under the Hood ...5-10 Bulb Replacement ...5-46 Windshield Wiper Blade Replacement ...5-53 Tires ...5-54 Appearance Care ...5-82 Vehicle Identification ...5-90 Electrical System ...5-91 Capacities and Speci...
Owner's Manual
Page 102
Plug the cord into a normal, grounded 110-volt AC outlet. 2-22 The retailer can help. Turn off the engine. 2. Open the hood and unwrap the electrical cord. Also, the wrong kind of trying to starting and better fuel economy during engine warm-up. Before starting the engine, ...
Plug the cord into a normal, grounded 110-volt AC outlet. 2-22 The retailer can help. Turn off the engine. 2. Open the hood and unwrap the electrical cord. Also, the wrong kind of trying to starting and better fuel economy during engine warm-up. Before starting the engine, ...
Owner's Manual
Page 129
Air Outlets. C. D. See Windshield Wiper Lever on page 5-10. Trunk Release Button/Dimmer Switch. See Hood Release on page 3-8. Climate Control. See Climate Control System on page 3-24. See Outlet Adjustment on page 3-17. See Instrument Panel Cluster ... Lamps on page 3-6. See Horn on page 3-41. Instrument Panel Cluster. See Audio System(s) on page 3-5. B. See Power Windows on page 3-32. Hood Release. P. See Traction Control System (TCS) Warning Light on page 2-17. See Automatic Transaxle Operation on page 2-23. Fog Lamps (If Equipped). The...
Air Outlets. C. D. See Windshield Wiper Lever on page 5-10. Trunk Release Button/Dimmer Switch. See Hood Release on page 3-8. Climate Control. See Climate Control System on page 3-24. See Outlet Adjustment on page 3-17. See Instrument Panel Cluster ... Lamps on page 3-6. See Horn on page 3-41. Instrument Panel Cluster. See Audio System(s) on page 3-5. B. See Power Windows on page 3-32. Hood Release. P. See Traction Control System (TCS) Warning Light on page 2-17. See Automatic Transaxle Operation on page 2-23. Fog Lamps (If Equipped). The...
Owner's Manual
Page 150
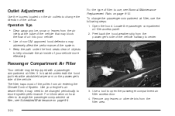
... air inlets at the base of the vehicle that may block the flow of air into your vehicle. • Use of non-GM approved hood deflectors may need to be equipped with a passenger compartment air filter. For the type of the vehicle. Outlet Adjustment Use the louvers... located on the air outlets to change the direction of your vehicle more effectively. Open the hood. It is located underneath the hood just below the windshield wiper arm on the passenger's side of filter to use the following steps: 1.
... air inlets at the base of the vehicle that may block the flow of air into your vehicle. • Use of non-GM approved hood deflectors may need to be equipped with a passenger compartment air filter. For the type of the vehicle. Outlet Adjustment Use the louvers... located on the air outlets to change the direction of your vehicle more effectively. Open the hood. It is located underneath the hood just below the windshield wiper arm on the passenger's side of filter to use the following steps: 1.

Owner's Manual
Page 233
... and IGN 1/2 fuses. Dinghy Towing You may dinghy tow your vehicle from the rear could damage it could be covered by the warranty. Close the hood. 7. Release the parking brake. Once you exceed 65 mph (110 km/h) while towing your vehicle towed from the rear. 4-33 Set the parking brake. 2. Never...
... and IGN 1/2 fuses. Dinghy Towing You may dinghy tow your vehicle from the rear could damage it could be covered by the warranty. Close the hood. 7. Release the parking brake. Once you exceed 65 mph (110 km/h) while towing your vehicle towed from the rear. 4-33 Set the parking brake. 2. Never...
Owner's Manual
Page 247
... ...5-5 Gasoline Octane ...5-5 Gasoline Specifications ...5-6 California Fuel ...5-6 Additives ...5-7 Fuels in Foreign Countries ...5-7 Filling Your Tank ...5-8 Filling a Portable Fuel Container ...5-9 Checking Things Under the Hood ...5-10 Hood Release ...5-10 Engine Compartment Overview ...5-12 Engine Oil ...5-16 Engine Air Cleaner/Filter ...5-20 Automatic Transaxle Fluid ...5-23 Engine Coolant ...5-23 Coolant Surge Tank Pressure...
... ...5-5 Gasoline Octane ...5-5 Gasoline Specifications ...5-6 California Fuel ...5-6 Additives ...5-7 Fuels in Foreign Countries ...5-7 Filling Your Tank ...5-8 Filling a Portable Fuel Container ...5-9 Checking Things Under the Hood ...5-10 Hood Release ...5-10 Engine Compartment Overview ...5-12 Engine Oil ...5-16 Engine Air Cleaner/Filter ...5-20 Automatic Transaxle Fluid ...5-23 Engine Coolant ...5-23 Coolant Surge Tank Pressure...
Owner's Manual
Page 256
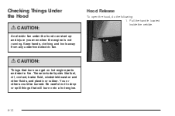
... not to drop or spill things that burn can start a fire. Pull the handle located inside the vehicle. {CAUTION: An electric fan under the hood can get on hot engine parts and start up and injure you even when the engine is not running. Keep hands, clothing and tools away...
... not to drop or spill things that burn can start a fire. Pull the handle located inside the vehicle. {CAUTION: An electric fan under the hood can get on hot engine parts and start up and injure you even when the engine is not running. Keep hands, clothing and tools away...
Owner's Manual
Page 257
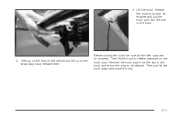
3. Then lift the hood to the front of the vehicle and lift up on the secondary hood release lever. Lift the hood, release the hood prop from the slot in the hood and return the prop to its retainer and put the hood prop into the slot in the hood. 2. Remove the hood prop from its retainer. Then just let the hood down and close it firmly. 5-11 Before closing the hood, be sure all the filler caps are on the hood prop. Then go to relieve pressure on properly.
3. Then lift the hood to the front of the vehicle and lift up on the secondary hood release lever. Lift the hood, release the hood prop from the slot in the hood and return the prop to its retainer and put the hood prop into the slot in the hood. 2. Remove the hood prop from its retainer. Then just let the hood down and close it firmly. 5-11 Before closing the hood, be sure all the filler caps are on the hood prop. Then go to relieve pressure on properly.

Owner's Manual
Page 258
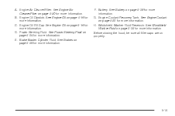
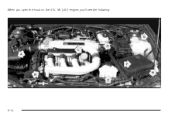
Engine Compartment Overview When you open the hood on the 2.2L L4 (L61) engine, you'll see the following: 5-12
Engine Compartment Overview When you open the hood on the 2.2L L4 (L61) engine, you'll see the following: 5-12
Owner's Manual
Page 259
.... See Battery on page 5-35 for more information. Engine Oil Dipstick. See Windshield Washer Fluid on page 5-39 for more information. Battery. Before closing the hood, be sure all filler caps are on page 5-36 for more information. C. See Brakes on properly. 5-13 H. Engine Coolant Recovery Tank. D. A.
.... See Battery on page 5-35 for more information. Engine Oil Dipstick. See Windshield Washer Fluid on page 5-39 for more information. Battery. Before closing the hood, be sure all filler caps are on page 5-36 for more information. C. See Brakes on properly. 5-13 H. Engine Coolant Recovery Tank. D. A.
Owner's Manual
Page 260
When you open the hood on the 3.0L V6 (L81) engine, you'll see the following: 5-14
When you open the hood on the 3.0L V6 (L81) engine, you'll see the following: 5-14
Owner's Manual
Page 261
... Oil on page 5-36 for more information. D. See Brakes on page 5-16 for more information. E. Power Steering Fluid. Engine Coolant Recovery Tank. Before closing the hood, be sure all filler caps are on properly. 5-15
... Oil on page 5-36 for more information. D. See Brakes on page 5-16 for more information. E. Power Steering Fluid. Engine Coolant Recovery Tank. Before closing the hood, be sure all filler caps are on properly. 5-15
Owner's Manual
Page 273
... is overheated, the liquids in it . Stop your warranty. 5-27 Just turn it off and get out of steam or coolant before you open the hood. Notice: If your engine catches fire because you keep driving when your vehicle can catch fire. The costly repairs would not be badly... burned. If Steam Is Coming From Your Engine {CAUTION: Steam from an overheated engine can burn you badly, even if you just open the hood. You or others could be covered by your engine if it cools down.
... is overheated, the liquids in it . Stop your warranty. 5-27 Just turn it off and get out of steam or coolant before you open the hood. Notice: If your engine catches fire because you keep driving when your vehicle can catch fire. The costly repairs would not be badly... burned. If Steam Is Coming From Your Engine {CAUTION: Steam from an overheated engine can burn you badly, even if you just open the hood. You or others could be covered by your engine if it cools down.
Owner's Manual
Page 274
... and you have the warning, turn it cools down. If you still have not stopped, pull over, stop, and park your heater to lift the hood but see or hear no steam, the problem may decide not to full hot at the highest fan speed and open the window as necessary...
... and you have the warning, turn it cools down. If you still have not stopped, pull over, stop, and park your heater to lift the hood but see or hear no steam, the problem may decide not to full hot at the highest fan speed and open the window as necessary...

Owner's Manual
Page 275
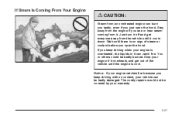
Cooling System When you decide it is safe to lift the hood, here is what you will see: {CAUTION: An electric engine cooling fan under the hood can injure you. A. The vehicle should be parked on a level surface. Electric Engine Fan 5-29 Keep hands, clothing and tools away from any underhood electric fan. If the coolant inside the coolant surge tank is not running and can start up even when the engine is boiling, do not do anything else until it cools down. Coolant Surge Tank with Pressure Cap B.
Cooling System When you decide it is safe to lift the hood, here is what you will see: {CAUTION: An electric engine cooling fan under the hood can injure you. A. The vehicle should be parked on a level surface. Electric Engine Fan 5-29 Keep hands, clothing and tools away from any underhood electric fan. If the coolant inside the coolant surge tank is not running and can start up even when the engine is boiling, do not do anything else until it cools down. Coolant Surge Tank with Pressure Cap B.
Owner's Manual
Page 288
... for more light. If you accidentally get medical help immediately. {CAUTION: An electric fan can start up even when the engine is there. Open the hoods and locate the batteries.
... for more light. If you accidentally get medical help immediately. {CAUTION: An electric fan can start up even when the engine is there. Open the hoods and locate the batteries.
Owner's Manual
Page 293
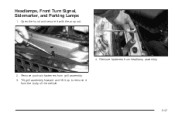
Remove fasteners from the body of the vehicle. 5-47 Open the hood and secure it from headlamp assembly. 2. Tilt grill assembly forward and lift it up to remove it with the prop rod. 4. Remove push-pin fasteners from grill assembly. 3. Headlamps, Front Turn Signal, Sidemarker, and Parking Lamps 1.
Remove fasteners from the body of the vehicle. 5-47 Open the hood and secure it from headlamp assembly. 2. Tilt grill assembly forward and lift it up to remove it with the prop rod. 4. Remove push-pin fasteners from grill assembly. 3. Headlamps, Front Turn Signal, Sidemarker, and Parking Lamps 1.
Owner's Manual
Page 352
...8722; When doing its job, have high effort or excessive wear. Replace parts as needed . See Engine Coolant on weatherstrips with genuine Saturn parts as found in any folding seat hardware. Applying silicone grease on page 5-23 for what to a corrosive environment. Replace blade ... repaired or replaced. (The air bag system does not need regular maintenance.) (f) Lubricate all key lock cylinders, door hinges and latches, hood hinges and latches, glove box hinges, sunroof (if equipped) and any vehicle system could indicate a problem. Also look for damaged or ...
...8722; When doing its job, have high effort or excessive wear. Replace parts as needed . See Engine Coolant on weatherstrips with genuine Saturn parts as found in any folding seat hardware. Applying silicone grease on page 5-23 for what to a corrosive environment. Replace blade ... repaired or replaced. (The air bag system does not need regular maintenance.) (f) Lubricate all key lock cylinders, door hinges and latches, hood hinges and latches, glove box hinges, sunroof (if equipped) and any vehicle system could indicate a problem. Also look for damaged or ...
Owner's Manual
Page 356
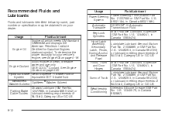
...Hydraulic Brake Delco Supreme 11 Brake Fluid or System equivalent DOT-3 brake fluid. Usage Fluid/Lubricant Power Steering Fluid (Saturn Part Power Steering No. 21007583 or GM Part No. Fluid/Lubricant Engine oil which meets GM Standard GM6094M and displays the...proper viscosity for Gasoline Engines starburst symbol. Windshield ® Washer Solvent Optikleen Washer Solvent. Hood Latch Assembly, Lubriplate Lubricant Aerosol (Saturn Secondary Part No. 21038869 or GM Part No. Pawl Hood, Trunk Multi-Purpose Lubricant, Superlube and Door (GM Part No. Silicone Grease (GM ...
...Hydraulic Brake Delco Supreme 11 Brake Fluid or System equivalent DOT-3 brake fluid. Usage Fluid/Lubricant Power Steering Fluid (Saturn Part Power Steering No. 21007583 or GM Part No. Fluid/Lubricant Engine oil which meets GM Standard GM6094M and displays the...proper viscosity for Gasoline Engines starburst symbol. Windshield ® Washer Solvent Optikleen Washer Solvent. Hood Latch Assembly, Lubriplate Lubricant Aerosol (Saturn Secondary Part No. 21038869 or GM Part No. Pawl Hood, Trunk Multi-Purpose Lubricant, Superlube and Door (GM Part No. Silicone Grease (GM ...
Owner's Manual
Page 374
..., 5-50 Center Rear Passenger Position (Wagon) ...1-31 Chains, Tires ...5-68 Check Engine Light ...3-34 Checking Coolant ...5-25 Checking Engine Oil ...5-16 Checking Things Under the Hood ...5-10 Chemical Paint Spotting ...5-88 2
..., 5-50 Center Rear Passenger Position (Wagon) ...1-31 Chains, Tires ...5-68 Check Engine Light ...3-34 Checking Coolant ...5-25 Checking Engine Oil ...5-16 Checking Things Under the Hood ...5-10 Chemical Paint Spotting ...5-88 2
