
Owner's Manual
Page 9
... heated seats the engine must be running. • To increase lumbar support, press and hold the bottom of lumbar support. The light on the center console.
... heated seats the engine must be running. • To increase lumbar support, press and hold the bottom of lumbar support. The light on the center console.
Owner's Manual
Page 17
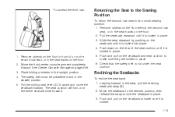
... its normal seating position: 1. Remove objects on the floor in front of the seat cushion until it is locked in place. 3. See Center Console Storage on the seatback and seat cushion to make sure they are locked in place 6. The safety belt must be unfastened and in the upright... the seat cushion. Slide the seat rearward by pushing on the seatback to make sure it is locked into place. 4. Move the front center console armrest completely forward. Leaning forward in the seat, pull the reclining seatback strap (B). 2. Push and pull on the seatback until it is locked. 1-...
... its normal seating position: 1. Remove objects on the floor in front of the seat cushion until it is locked in place. 3. See Center Console Storage on the seatback and seat cushion to make sure they are locked in place 6. The safety belt must be unfastened and in the upright... the seat cushion. Slide the seat rearward by pushing on the seatback to make sure it is locked into place. 4. Move the front center console armrest completely forward. Leaning forward in the seat, pull the reclining seatback strap (B). 2. Push and pull on the seatback until it is locked. 1-...
Owner's Manual
Page 88
Section 2 Features and Controls Center Console Storage ...2-56 Second Row Center Console ...2-56 Assist Handles ...2-57 Floor Mats ...2-57 Luggage Carrier ...2-58 Rear Seat Armrest ...2-58 Convenience Net ...2-58 Cargo Cover ...2-59 Cargo Tie Downs ...2-59 Cargo ...
Section 2 Features and Controls Center Console Storage ...2-56 Second Row Center Console ...2-56 Assist Handles ...2-57 Floor Mats ...2-57 Luggage Carrier ...2-58 Rear Seat Armrest ...2-58 Convenience Net ...2-58 Cargo Cover ...2-59 Cargo Tie Downs ...2-59 Cargo ...
Owner's Manual
Page 101
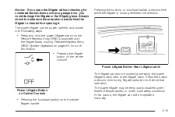
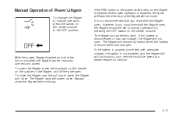
Notice: If you open the liftgate without checking for more information. • Pressing the liftgate button on the center console. Remote Keyless Entry (RKE) System Operation on the Remote Keyless Entry (RKE) transmitter until the liftgate starts moving reverses the direction. • Press... under extreme temperatures, or under low battery conditions. The power liftgate can still be operated manually. • Pressing the touchpad switch on Center Console The power liftgate may be power opened and closed by pressing the power liftgate button next to the liftgate latch.
Notice: If you open the liftgate without checking for more information. • Pressing the liftgate button on the center console. Remote Keyless Entry (RKE) System Operation on the Remote Keyless Entry (RKE) transmitter until the liftgate starts moving reverses the direction. • Press... under extreme temperatures, or under low battery conditions. The power liftgate can still be operated manually. • Pressing the touchpad switch on Center Console The power liftgate may be power opened and closed by pressing the power liftgate button next to the liftgate latch.
Owner's Manual
Page 103
... the OFF position. Manual Operation of Power Liftgate To change the liftgate to manual operation, press the switch on the center console to manual operation by pressing the OFF switch on the center console. The liftgate will resume operation when the battery is not recommended that you drive with the liftgate open .
... the OFF position. Manual Operation of Power Liftgate To change the liftgate to manual operation, press the switch on the center console to manual operation by pressing the OFF switch on the center console. The liftgate will resume operation when the battery is not recommended that you drive with the liftgate open .
Owner's Manual
Page 116
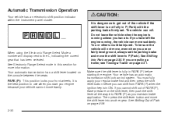
... engine is running unless you have to. If you can roll. Make sure the shift lever is fully in PARK (P) before you are on the console between the seats. Then press the shift lever button and move the shift lever into PARK (P) as you start your engine because your vehicle cannot...
... engine is running unless you have to. If you can roll. Make sure the shift lever is fully in PARK (P) before you are on the console between the seats. Then press the shift lever button and move the shift lever into PARK (P) as you start your engine because your vehicle cannot...

Owner's Manual
Page 141
..., press the button. 2-55 Use the key to flash, after 20 seconds. 2. There are cupholders located behind the center console. Instrument Panel Storage Your vehicle has an instrument panel storage area located above the radio. Cupholders There are additional cupholders located on the ...handle. 1. There are two cupholders, with Step 2. To access, pull down on each side of the center console. There are cupholders located in each door. Reprogramming a Single Universal Home Remote Button To reprogram any of the three Universal Home Remote buttons...
..., press the button. 2-55 Use the key to flash, after 20 seconds. 2. There are cupholders located behind the center console. Instrument Panel Storage Your vehicle has an instrument panel storage area located above the radio. Cupholders There are additional cupholders located on the ...handle. 1. There are two cupholders, with Step 2. To access, pull down on each side of the center console. There are cupholders located in each door. Reprogramming a Single Universal Home Remote Button To reprogram any of the three Universal Home Remote buttons...

Owner's Manual
Page 142
There is additional storage under the armrest. Center Console Storage Second Row Center Console The armrest on the center console can be removed for additional storage. Move the armrest all the way to the rear position. The tray can slide forwards and backwards by holding up the lever located on the front of it. To open the armrest storage area, press the button located on the front of the armrest. Your vehicle may have a second row center console. 2-56
There is additional storage under the armrest. Center Console Storage Second Row Center Console The armrest on the center console can be removed for additional storage. Move the armrest all the way to the rear position. The tray can slide forwards and backwards by holding up the lever located on the front of it. To open the armrest storage area, press the button located on the front of the armrest. Your vehicle may have a second row center console. 2-56

Owner's Manual
Page 143
... help prevent damage to hold the floor mat in the driver side floor mat that attaches to a hook on the rear of the console can be folded forward for increased storage area. Assist Handles To access the upper storage area, press the upper button (2) and lift up . { CAUTION: ...the floor of the vehicle until the grommet can be removed from the hook. 2-57 This is a grommet in place. Notice: Slide the front console as far forward as it will help avoid personal injury and damage to be used when getting out of the three latches at a time. Your...
... help prevent damage to hold the floor mat in the driver side floor mat that attaches to a hook on the rear of the console can be folded forward for increased storage area. Assist Handles To access the upper storage area, press the upper button (2) and lift up . { CAUTION: ...the floor of the vehicle until the grommet can be removed from the hook. 2-57 This is a grommet in place. Notice: Slide the front console as far forward as it will help avoid personal injury and damage to be used when getting out of the three latches at a time. Your...
Owner's Manual
Page 151
.../Radio System (If Equipped). See Exterior Lamps on page 3-17. I. See Instrument Panel Brightness on page 3-15. L. Horn. N. See "Console Shift Lever" under Shifting Into Park on page 3-34. See Outlet Adjustment on page 2-35. See Driver Information Center (DIC) on page ...3-7. Exterior Lamps Control. See Tilt and Telescopic Steering Wheel on page 3-54. Center Console Shift Lever. E. See Turn Signal/Multifunction Lever on page 3-8. K. See Power Tilt Wheel and Telescopic Steering Column on page 3-8. F. ...
.../Radio System (If Equipped). See Exterior Lamps on page 3-17. I. See Instrument Panel Brightness on page 3-15. L. Horn. N. See "Console Shift Lever" under Shifting Into Park on page 3-34. See Outlet Adjustment on page 2-35. See Driver Information Center (DIC) on page ...3-7. Exterior Lamps Control. See Tilt and Telescopic Steering Wheel on page 3-54. Center Console Shift Lever. E. See Turn Signal/Multifunction Lever on page 3-8. K. See Power Tilt Wheel and Telescopic Steering Column on page 3-8. F. ...

Owner's Manual
Page 167
.... • The exterior lamps control is turned off, then on the instrument panel below the climate controls, inside the front center console storage bin, at the rear of the center console, and in use, always cover the outlet with the equipment. Battery Run-Down Protection This vehicle has a feature to help prevent...
.... • The exterior lamps control is turned off, then on the instrument panel below the climate controls, inside the front center console storage bin, at the rear of the center console, and in use, always cover the outlet with the equipment. Battery Run-Down Protection This vehicle has a feature to help prevent...
Owner's Manual
Page 168
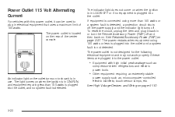
... outlet: • Equipment with this power outlet, it can be used to show it back in electrical equipment that uses a maximum limit of the center console. If equipment is connected using 150 watts or less is located on the rear of 150 watts. The power restarts when equipment using more than...
... outlet: • Equipment with this power outlet, it can be used to show it back in electrical equipment that uses a maximum limit of the center console. If equipment is connected using 150 watts or less is located on the rear of 150 watts. The power restarts when equipment using more than...
Owner's Manual
Page 180
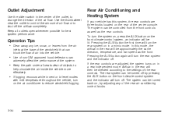
...-GM approved hood deflectors can be turned back on the rear of air flow or to control the amount of the center console. The system can be lit. Use the thumbwheel near the outlet to shut off . To turn the rear system and the indicator off by adjusting...
...-GM approved hood deflectors can be turned back on the rear of air flow or to control the amount of the center console. The system can be lit. Use the thumbwheel near the outlet to shut off . To turn the rear system and the indicator off by adjusting...

Owner's Manual
Page 182
..., and speed of the airflow for the rear of the vehicle. Use the controls located in the rear of the front console, to independently control the air flow for the front of the vehicle will be controlled through the AUX button on the front climate control... panel. Rear Climate Control with Rear Seat Audio Controls Manual Operation D C (Fan): The fan buttons on . An indicator light in the center console. Rear Air Conditioning and Heating System and Electronic Climate Controls If your vehicle has this rear climate control system there are rear seat audio controls...
..., and speed of the airflow for the rear of the vehicle. Use the controls located in the rear of the front console, to independently control the air flow for the front of the vehicle will be controlled through the AUX button on the front climate control... panel. Rear Climate Control with Rear Seat Audio Controls Manual Operation D C (Fan): The fan buttons on . An indicator light in the center console. Rear Air Conditioning and Heating System and Electronic Climate Controls If your vehicle has this rear climate control system there are rear seat audio controls...
Owner's Manual
Page 262
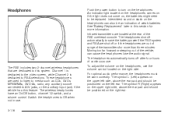
... on the upper left side, above the ear pad and should be worn correctly. Moving too far forward or stepping out of the RSE overhead console. Intermittent sound or static on .
... on the upper left side, above the ear pad and should be worn correctly. Moving too far forward or stepping out of the RSE overhead console. Intermittent sound or static on .

Owner's Manual
Page 263
...are installed correctly, using the diagram on the rear of the battery compartment. 3. The A/V jacks, located on the inside of the floor console, allow audio or video signals to be replaced separately from an auxiliary device such as a camcorder or a video game unit to the manufacturer's ...usage. Replace the two batteries in a cool, dry place. Adapter connectors or cables (not supplied) might be stored in the front floor console and not in a cool, dry place. Notice: Do not store the headphones in extreme cold can be connected from the headphone set. Storage ...
...are installed correctly, using the diagram on the rear of the battery compartment. 3. The A/V jacks, located on the inside of the floor console, allow audio or video signals to be replaced separately from an auxiliary device such as a camcorder or a video game unit to the manufacturer's ...usage. Replace the two batteries in a cool, dry place. Adapter connectors or cables (not supplied) might be stored in the front floor console and not in a cool, dry place. Notice: Do not store the headphones in extreme cold can be connected from the headphone set. Storage ...
Owner's Manual
Page 265
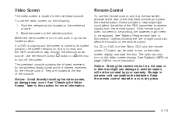
...(s) (MP3) on the video screen display and start the disc. Push the release button located on the video screen display. The overhead console contains the infrared receivers for the wireless headphones and the infrared receivers for more information. Objects blocking the line of sight could affect the ... cold can be working, the batteries might need to receive signals from the remote control. Keep the remote control stored in the overhead console. When the video screen is normal, and the DVD continues to play through the previous audio source. If the remote control does not...
...(s) (MP3) on the video screen display and start the disc. Push the release button located on the video screen display. The overhead console contains the infrared receivers for the wireless headphones and the infrared receivers for more information. Objects blocking the line of sight could affect the ... cold can be working, the batteries might need to receive signals from the remote control. Keep the remote control stored in the overhead console. When the video screen is normal, and the DVD continues to play through the previous audio source. If the remote control does not...

Owner's Manual
Page 270
... is active through wired headphones (not included) plugged into the jacks on some radios where dual control is off . Cleaning the RSE Overhead Console When cleaning the RSE overhead console surface, use only a clean cloth dampened with clean water. The RSA functions operate even when the main radio is allowed). The rear...
... is active through wired headphones (not included) plugged into the jacks on some radios where dual control is off . Cleaning the RSE Overhead Console When cleaning the RSE overhead console surface, use only a clean cloth dampened with clean water. The RSA functions operate even when the main radio is allowed). The rear...
Owner's Manual
Page 307
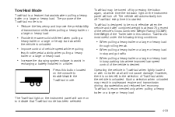
... least 75 percent of the Tow/Haul mode is no trailer at which time the indicator light on the instrument panel will come on the console to enable/disable the Tow/Haul mode. • When pulling a heavy trailer or a large or heavy load in busy parking lots where improved low speed...
... least 75 percent of the Tow/Haul mode is no trailer at which time the indicator light on the instrument panel will come on the console to enable/disable the Tow/Haul mode. • When pulling a heavy trailer or a large or heavy load in busy parking lots where improved low speed...
Owner's Manual
Page 316
...fied service center. 4-42 This will boost the vehicle system voltage and properly charge the battery. The harness connector can turn on the center console near the climate controls. The seven-wire harness contains the following trailer circuits: If the back-up Lamps Red/Black: Battery Feed Dark Blue: Trailer...
...fied service center. 4-42 This will boost the vehicle system voltage and properly charge the battery. The harness connector can turn on the center console near the climate controls. The seven-wire harness contains the following trailer circuits: If the back-up Lamps Red/Black: Battery Feed Dark Blue: Trailer...
