
Owner's Manual
Page 1
... adjustments, please contact the dealer from whom you purchased your SUBARU in the vehicle at the time of printing. Please leave this manual carefully so that you to read this manual in excellent condition and to make the same or similar changes on choosing a SUBARU vehicle. Foreword Congratulations on vehicles previously sold. For information...
... adjustments, please contact the dealer from whom you purchased your SUBARU in the vehicle at the time of printing. Please leave this manual carefully so that you to read this manual in excellent condition and to make the same or similar changes on choosing a SUBARU vehicle. Foreword Congratulations on vehicles previously sold. For information...

Owner's Manual
Page 5
... 11: Maintenance and service This chapter informs you when you need to take your SUBARU to the dealer for the SRS airbags. How to use this owner's manual Using your Owner's manual Before you how to operate the climate control. Chapter 4: Climate control This chapter informs you operate ... 12: Specifications This chapter informs you how to keep your vehicle, follow the instructions in this manual. Each chapter begins with a brief table of your SUBARU looking good. Chapter 2: Keys and doors This chapter informs you want. To protect yourself and extend the service life of contents,...
... 11: Maintenance and service This chapter informs you when you need to take your SUBARU to the dealer for the SRS airbags. How to use this owner's manual Using your Owner's manual Before you how to operate the climate control. Chapter 4: Climate control This chapter informs you operate ... 12: Specifications This chapter informs you how to keep your vehicle, follow the instructions in this manual. Each chapter begins with a brief table of your SUBARU looking good. Chapter 2: Keys and doors This chapter informs you want. To protect yourself and extend the service life of contents,...

Owner's Manual
Page 6
Chapter 14: Index This is an alphabetical listing of all other portions of this manual carefully in this manual. HSF019AA You will find a number of WARNINGs, CAUTIONs and NOTEs in order to gain a better understanding of your vehicle. You can use it in ...well as all that could result in which injury or damage to use of how to your SUBARU vehicle safely. Please read . Safety symbol A WARNING indicates a situation in injury to potential hazards that 's in this manual. These safety warnings alert you to you about Tire information, Uniform tire quality grading standards and...
Chapter 14: Index This is an alphabetical listing of all other portions of this manual carefully in this manual. HSF019AA You will find a number of WARNINGs, CAUTIONs and NOTEs in order to gain a better understanding of your vehicle. You can use it in ...well as all that could result in which injury or damage to use of how to your SUBARU vehicle safely. Please read . Safety symbol A WARNING indicates a situation in injury to potential hazards that 's in this manual. These safety warnings alert you to you about Tire information, Uniform tire quality grading standards and...

Owner's Manual
Page 8
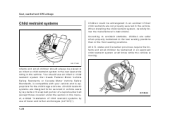
... seatbelts. The passenger cannot protect the child from injury in the rear seat. If a child is moving. Because children are 12 years of this owner's manual for instructions and precautions concerning the seatbelt system and SRS airbag system. ment, the driver should always sit upright and well back in the seat...
... seatbelts. The passenger cannot protect the child from injury in the rear seat. If a child is moving. Because children are 12 years of this owner's manual for instructions and precautions concerning the seatbelt system and SRS airbag system. ment, the driver should always sit upright and well back in the seat...

Owner's Manual
Page 9
... "Seatbelts" in chapter 1 of this procedure could accidentally injure themselves or others through inadvertent operation of it. Avoid remaining in injury to follow this owner's manual for instructions and precautions concerning the child restraint system, seatbelt system and SRS airbag system. If you suspect that the ventilation system always works properly...
... "Seatbelts" in chapter 1 of this procedure could accidentally injure themselves or others through inadvertent operation of it. Avoid remaining in injury to follow this owner's manual for instructions and precautions concerning the child restraint system, seatbelt system and SRS airbag system. If you suspect that the ventilation system always works properly...

Owner's Manual
Page 29
UB1078BA 1-4 Seat, seatbelt and SRS airbags Manual type Seat cushion angle and height adjustment (Power seat only) UB1058BA Pull the lever upward and slide the seat to make sure that it is securely locked into place. Then release the lever and move the seatback and forth to the desired position.
UB1078BA 1-4 Seat, seatbelt and SRS airbags Manual type Seat cushion angle and height adjustment (Power seat only) UB1058BA Pull the lever upward and slide the seat to make sure that it is securely locked into place. Then release the lever and move the seatback and forth to the desired position.

Owner's Manual
Page 52
... if you need service or repair in those areas or near the front seatbelt retractors, have an authorized SUBARU dealer perform the work. Such modifications can interfere with proper operation of the suspension system or front end structure. Precautions against vehicle modification Always consult ... you want to install any accessory parts to the front end. Seat, seatbelt and SRS airbags The front sub sensors are located in this Owner's Manual. NOTE If the front part of the following modifications.
... if you need service or repair in those areas or near the front seatbelt retractors, have an authorized SUBARU dealer perform the work. Such modifications can interfere with proper operation of the suspension system or front end structure. Precautions against vehicle modification Always consult ... you want to install any accessory parts to the front end. Seat, seatbelt and SRS airbags The front sub sensors are located in this Owner's Manual. NOTE If the front part of the following modifications.
Owner's Manual
Page 53
... be secured in vehicle seats by lap belts or the lap belt portion of a lap/shoulder belt (except those covered under the section in this manual, entitled "Installation of lower and tether anchorages (LATCH)"). 1-28 HS1069BA
... be secured in vehicle seats by lap belts or the lap belt portion of a lap/shoulder belt (except those covered under the section in this manual, entitled "Installation of lower and tether anchorages (LATCH)"). 1-28 HS1069BA

Owner's Manual
Page 75
... him or her to the buyer that it is equipped with the hot gas. If you to explain to the applicable section in this owner's manual. 1-50 Seat, seatbelt and SRS airbags When the SRS airbag deploys, some smoke will be released.
... him or her to the buyer that it is equipped with the hot gas. If you to explain to the applicable section in this owner's manual. 1-50 Seat, seatbelt and SRS airbags When the SRS airbag deploys, some smoke will be released.

Owner's Manual
Page 88
Attachment of any equipment (brush bar, winches, snow plow, skid plate, etc.) other than genuine SUBARU accessory parts to the driver's door pillar or specified for individual vehicle models in this Owner's Manual. Installation of a tire of the suspension system or front end structure. Always consult your vehicle. - CONTINUED -... interfere with proper operation of the following modifications. Modification of different size and construction from the tires specified on your SUBARU dealer if you want to install any accessory parts on the vehicle placard attached to the front end.
Attachment of any equipment (brush bar, winches, snow plow, skid plate, etc.) other than genuine SUBARU accessory parts to the driver's door pillar or specified for individual vehicle models in this Owner's Manual. Installation of a tire of the suspension system or front end structure. Always consult your vehicle. - CONTINUED -... interfere with proper operation of the following modifications. Modification of different size and construction from the tires specified on your SUBARU dealer if you want to install any accessory parts on the vehicle placard attached to the front end.
Owner's Manual
Page 110
.... Passive arming When passive arming mode has been programmed by the dealer, arming of your SUBARU dealer. - CONTINUED - Valet mode When you cannot disarm the system using the transmitter (i.e. Note that in this mode, DOORS MUST BE MANUALLY LOCKED. the transmitter is lost, broken or the transmitter battery is automatically accomplished without...
.... Passive arming When passive arming mode has been programmed by the dealer, arming of your SUBARU dealer. - CONTINUED - Valet mode When you cannot disarm the system using the transmitter (i.e. Note that in this mode, DOORS MUST BE MANUALLY LOCKED. the transmitter is lost, broken or the transmitter battery is automatically accomplished without...

Owner's Manual
Page 112
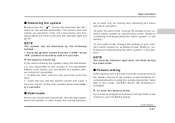
... flash for a short time when the sensed impact is weak, but WILL NOT automatically lock the doors. Failure to lock the doors manually will automatically activate the alarm but it warns of the above indicator light flashings will light for activation or deactivation. Disarming the system sensed...sound and the turn signal lights, both lasting approximately 30 seconds. The alarm system causes the horn to lock the doors you desire, your SUBARU dealer can connect them and set them as - CONTINUED - 2-23 Also, the number of flashes indicates the location of unauthorized intrusion or...
... flash for a short time when the sensed impact is weak, but WILL NOT automatically lock the doors. Failure to lock the doors manually will automatically activate the alarm but it warns of the above indicator light flashings will light for activation or deactivation. Disarming the system sensed...sound and the turn signal lights, both lasting approximately 30 seconds. The alarm system causes the horn to lock the doors you desire, your SUBARU dealer can connect them and set them as - CONTINUED - 2-23 Also, the number of flashes indicates the location of unauthorized intrusion or...

Owner's Manual
Page 131
... or if the key is turned to start it . Reminder chime Key Chime The key can be turned from the ignition switch. Instruments and controls Manual transmission vehicles START Do not turn the ignition switch to the "START" position while the engine is pushed in while turning it . The light remains...
... or if the key is turned to start it . Reminder chime Key Chime The key can be turned from the ignition switch. Instruments and controls Manual transmission vehicles START Do not turn the ignition switch to the "START" position while the engine is pushed in while turning it . The light remains...

Owner's Manual
Page 144
Replace the bulb as soon as possible. Refer to the "Replacing bulbs" section in the manual gate, this indicator shows the currently selected gear. Gear position indicator (Turbo-AT vehicles) Selector lever position indicator (AT vehicles) Position indicator Selector leve Indicatorlever ...
Replace the bulb as soon as possible. Refer to the "Replacing bulbs" section in the manual gate, this indicator shows the currently selected gear. Gear position indicator (Turbo-AT vehicles) Selector lever position indicator (AT vehicles) Position indicator Selector leve Indicatorlever ...

Owner's Manual
Page 159
... briefly appear and then the zone number will exit the zone setting mode. Do not use the convex mirror to judge the distance of this manual to Zone 8. jects that the compass zone setting is displayed. 4. Refer to the "Compass calibration zone" map at the end of vehicles behind you view...
... briefly appear and then the zone number will exit the zone setting mode. Do not use the convex mirror to judge the distance of this manual to Zone 8. jects that the compass zone setting is displayed. 4. Refer to the "Compass calibration zone" map at the end of vehicles behind you view...

Owner's Manual
Page 160
... defogger (if equipped) 1 2 To prevent the battery from being discharged, do not operate the defogger continuously for the right. 2. The mirrors can also be adjusted manually. 1) Indicator light 1 UB4004CB To turn on the outside mirror defogger operates only when the ignition switch is running. - CONTINUED - 3-33 Move the direction control switch...
... defogger (if equipped) 1 2 To prevent the battery from being discharged, do not operate the defogger continuously for the right. 2. The mirrors can also be adjusted manually. 1) Indicator light 1 UB4004CB To turn on the outside mirror defogger operates only when the ignition switch is running. - CONTINUED - 3-33 Move the direction control switch...

Owner's Manual
Page 168
..." section in chapter 3.) Temperature control dial This dial regulates the temperature of air flow from the blue area (cool) to the "ON" position. Climate control Manual heating and air conditioning system Control panel 1 2 3 air outlets over a range from the lets. - CONTINUED - 4-5
..." section in chapter 3.) Temperature control dial This dial regulates the temperature of air flow from the blue area (cool) to the "ON" position. Climate control Manual heating and air conditioning system Control panel 1 2 3 air outlets over a range from the lets. - CONTINUED - 4-5

Owner's Manual
Page 169
... conditioner. At the same time, the air inlet selection is in operation to "Outside air" mode. In this state, you cannot select "recirculation" mode by manually pressing the air inlet selection button. Push it again to the OFF position as soon as the outside dusty condition clears. UG4507BA The air conditioner...
... conditioner. At the same time, the air inlet selection is in operation to "Outside air" mode. In this state, you cannot select "recirculation" mode by manually pressing the air inlet selection button. Push it again to the OFF position as soon as the outside dusty condition clears. UG4507BA The air conditioner...

Owner's Manual
Page 186
... Stereo indicator The stereo indicator "ST" will stop at the first one of the "Preset" buttons for automatic tuning, stations are weak. Tuning (TUNE) Manual tuning (TUNE) Press the " " side of the tuning button (3) to increase the tuning frequency and press the " " side of low frequencies to ... until the desired station frequency is weakened by distance from the low end to decrease it. Press the "SCAN" button or tune the radio manually until a station is received. Automatic tuning may not function properly if the station reception is displayed. 3. Up to six AM, FM1 and...
... Stereo indicator The stereo indicator "ST" will stop at the first one of the "Preset" buttons for automatic tuning, stations are weak. Tuning (TUNE) Manual tuning (TUNE) Press the " " side of the tuning button (3) to increase the tuning frequency and press the " " side of low frequencies to ... until the desired station frequency is weakened by distance from the low end to decrease it. Press the "SCAN" button or tune the radio manually until a station is received. Automatic tuning may not function properly if the station reception is displayed. 3. Up to six AM, FM1 and...

Owner's Manual
Page 198
...increase the tuning frequency and press the " " side of low frequencies to high frequencies only. Press the "SCAN" button (8) or tune the radio manually until a station is pressed for longer than half of the "Preset" buttons (6) for receivable frequencies and will flash once on the display at least 1.5...to change the radio to select that station in the direction of the button to select the desired station. In such a situation, perform manual tuning to decrease it. The frequency of the station will stop on when an FM stereo broadcast is weakened by distance from the low ...
...increase the tuning frequency and press the " " side of low frequencies to high frequencies only. Press the "SCAN" button (8) or tune the radio manually until a station is pressed for longer than half of the "Preset" buttons (6) for receivable frequencies and will flash once on the display at least 1.5...to change the radio to select that station in the direction of the button to select the desired station. In such a situation, perform manual tuning to decrease it. The frequency of the station will stop on when an FM stereo broadcast is weakened by distance from the low ...


