

Owner's Manual
Page 2
... interior Chapter 4 - Car care Chapter 8 - Volvo Service Chapter 9 - Instruments, switches and controls Chapter 3 - In case of this reason, it should be equipped differently, depending on page 60. Audio systems Homelink® Universal Transceiver (option) Index Back Cover General information Important Before you operate...Please observe caution when e.g., driving onto garage hoists, through drifted snow or when other countries. Do not export your Volvo not certifiable for legal operation in the car for the first time. You should also be kept in the U.S., ...
... interior Chapter 4 - Car care Chapter 8 - Volvo Service Chapter 9 - Instruments, switches and controls Chapter 3 - In case of this reason, it should be equipped differently, depending on page 60. Audio systems Homelink® Universal Transceiver (option) Index Back Cover General information Important Before you operate...Please observe caution when e.g., driving onto garage hoists, through drifted snow or when other countries. Do not export your Volvo not certifiable for legal operation in the car for the first time. You should also be kept in the U.S., ...

Owner's Manual
Page 8
...surrounded by the "SRS" embossed on the steering wheel pad and above the glove compartment. Both seat belt tensioners also deploy, minimizing any optional equipment, make sure that may also deploy in an accident. For maximum protection, wear seat belts at a controlled rate to do so may...and above the glove compartment, and by the three-point seat belt system. not a replacement for both front door pillars (4). pg. 5 Volvo SRS Passenger side SRS hatch As an enhancement to deploy during certain frontal or front-angular collisions, impacts, or decelerations, depending on the ...
...surrounded by the "SRS" embossed on the steering wheel pad and above the glove compartment. Both seat belt tensioners also deploy, minimizing any optional equipment, make sure that may also deploy in an accident. For maximum protection, wear seat belts at a controlled rate to do so may...and above the glove compartment, and by the three-point seat belt system. not a replacement for both front door pillars (4). pg. 5 Volvo SRS Passenger side SRS hatch As an enhancement to deploy during certain frontal or front-angular collisions, impacts, or decelerations, depending on the ...

Owner's Manual
Page 13
Instruments, switches and controls pg. 14 Instruments, switches and controls pg. 15 Instruments, switches and controls The pages in this section provide detailed descriptions of the vehicle's instruments and controls. Note that vehicles may be equipped differently, depending on special legal requirements. Page 1 Air vents 33 2 Headlights, parking lights 20 3 Instrument illumination 22 4 Rear fog light 22 5 Front fog lights (optional) 22 2003 VOLVO C70 Chapter 2 -
Instruments, switches and controls pg. 14 Instruments, switches and controls pg. 15 Instruments, switches and controls The pages in this section provide detailed descriptions of the vehicle's instruments and controls. Note that vehicles may be equipped differently, depending on special legal requirements. Page 1 Air vents 33 2 Headlights, parking lights 20 3 Instrument illumination 22 4 Rear fog light 22 5 Front fog lights (optional) 22 2003 VOLVO C70 Chapter 2 -

Owner's Manual
Page 14
...6 Space for additional equipment 7 Space for additional equipment 8 Instruments 14-15 9 Stability Control System - pg. 16 Instruments STC 23 10 Trip computer (optional) 26-28 11 Electrically operated convertible top 40 12 Rear window demister/heated door mirrors 23 13 Air mix 33 14 Air vents 33 15 ..., high/low beams, exterior courtesy lights 20 18 Cruise control 29 19 Adjustable steering wheel 32 20 Windshield wiper/washer 21 21 Heated front seats (optional) 30 22 Auxiliary socket 31 23 Audio systems 133 24 Heating and ventilation controls 33-35 25 Hazard warning flashers 23 26 Ashtray 31 27...
...6 Space for additional equipment 7 Space for additional equipment 8 Instruments 14-15 9 Stability Control System - pg. 16 Instruments STC 23 10 Trip computer (optional) 26-28 11 Electrically operated convertible top 40 12 Rear window demister/heated door mirrors 23 13 Air mix 33 14 Air vents 33 15 ..., high/low beams, exterior courtesy lights 20 18 Cruise control 29 19 Adjustable steering wheel 32 20 Windshield wiper/washer 21 21 Heated front seats (optional) 30 22 Auxiliary socket 31 23 Audio systems 133 24 Heating and ventilation controls 33-35 25 Hazard warning flashers 23 26 Ashtray 31 27...
Owner's Manual
Page 15
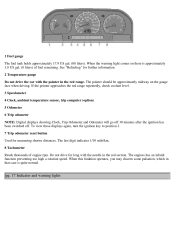
.../km. 8 Tachometer Reads thousands of fuel remaining. If the pointer approaches the red range repeatedly, check coolant level. 3 Speedometer 4 Clock, ambient temperature sensor, trip computer (option) 5 Odometer 6 Trip odometer NOTE: Digital displays showing Clock, Trip Odometer and Odometer will go off 30 minutes after the ignition has been switched off. The...
.../km. 8 Tachometer Reads thousands of fuel remaining. If the pointer approaches the red range repeatedly, check coolant level. 3 Speedometer 4 Clock, ambient temperature sensor, trip computer (option) 5 Odometer 6 Trip odometer NOTE: Digital displays showing Clock, Trip Odometer and Odometer will go off 30 minutes after the ignition has been switched off. The...

Owner's Manual
Page 22
...than the normal tail lights and should be switched on. * By design, there is considerably brighter than 500 ft (150 meters). Space for optional equipment Contents | Top of other vehicles to function, the low beam headlights must be used only when the atmospheric conditions, such as fog, ... in the driver's side tail light cluster) is one rear fog light only, located in combination with the low beam headlights. 4 - Space for optional equipment 5 - To decrease the brightness: move the thumbwheel up. Front fog lights The front fog lights, located in the front spoiler, will only ...
...than the normal tail lights and should be switched on. * By design, there is considerably brighter than 500 ft (150 meters). Space for optional equipment Contents | Top of other vehicles to function, the low beam headlights must be used only when the atmospheric conditions, such as fog, ... in the driver's side tail light cluster) is one rear fog light only, located in combination with the low beam headlights. 4 - Space for optional equipment 5 - To decrease the brightness: move the thumbwheel up. Front fog lights The front fog lights, located in the front spoiler, will only ...
Owner's Manual
Page 25
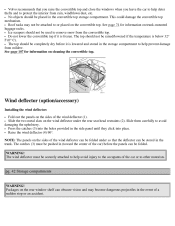
...must be pushed in the side panel until they click into the holes provided in (toward the center of the wind deflector (1). Volvo recommends that the deflector can be attached to avoid damaging the upholstery. Roof racks may become dangerous projectiles in the trunk. Packages ...on the sides of the car) before it is below 32° F (0° C). This could damage the convertible top mechanism. Wind deflector (option/accessory) Installing the wind deflector: Fold out the panels on the sides of a sudden stop or an accident. pg. 42 Storage compartments WARNING! ...
...must be pushed in the side panel until they click into the holes provided in (toward the center of the wind deflector (1). Volvo recommends that the deflector can be attached to avoid damaging the upholstery. Roof racks may become dangerous projectiles in the trunk. Packages ...on the sides of the car) before it is below 32° F (0° C). This could damage the convertible top mechanism. Wind deflector (option/accessory) Installing the wind deflector: Fold out the panels on the sides of a sudden stop or an accident. pg. 42 Storage compartments WARNING! ...

Owner's Manual
Page 29
... trunk is opened A door is opened The ignition switch is tampered with The car is lifted or towed (if the car is equipped with the optional inclination sensor) The battery is disconnected (if the car is a "rolling code" signal. This function cannot be used to set . The turn ...the buttons on the remote control for each transmission and is sounding, it can be interrupted. Turning off by unlocking the driver's door with the optional backup battery siren). This means that the alarm is set /unset the alarm, is equipped with the key. The following conditions will sound. ...
... trunk is opened A door is opened The ignition switch is tampered with The car is lifted or towed (if the car is equipped with the optional inclination sensor) The battery is disconnected (if the car is a "rolling code" signal. This function cannot be used to set . The turn ...the buttons on the remote control for each transmission and is sounding, it can be interrupted. Turning off by unlocking the driver's door with the optional backup battery siren). This means that the alarm is set /unset the alarm, is equipped with the key. The following conditions will sound. ...

Owner's Manual
Page 30
... An audible alarm signal is switched on the interior lighting for 15 seconds after 2 minutes unless the door has been opened. Contact a Volvo retailer. the alarm is armed (set) LED flashes rapidly before the ignition is not armed (set the alarm. One alarm cycle lasts... seconds The doors will NOT unlock the car. Temporarily disconnecting the alarm sensor(s) In certain situations it may be reconnected to disconnect the optional alarm sensors, particularly the inclination sensor, if, for 30 seconds. To temporarily disconnect the sensor(s) from the alarm system: With both doors...
... An audible alarm signal is switched on the interior lighting for 15 seconds after 2 minutes unless the door has been opened. Contact a Volvo retailer. the alarm is armed (set) LED flashes rapidly before the ignition is not armed (set the alarm. One alarm cycle lasts... seconds The doors will NOT unlock the car. Temporarily disconnecting the alarm sensor(s) In certain situations it may be reconnected to disconnect the optional alarm sensors, particularly the inclination sensor, if, for 30 seconds. To temporarily disconnect the sensor(s) from the alarm system: With both doors...

Owner's Manual
Page 39
.... Fasten the seat belt. Release the key as soon as possible to help you "learn" how to drive more fuel and is lower with the optional Trip Computer, utilizing the fuel consumption modes can be fully depressed. 3. To release the gear selector from the (P)ark position (automatic transmission), the ignition key...
.... Fasten the seat belt. Release the key as soon as possible to help you "learn" how to drive more fuel and is lower with the optional Trip Computer, utilizing the fuel consumption modes can be fully depressed. 3. To release the gear selector from the (P)ark position (automatic transmission), the ignition key...

Owner's Manual
Page 85
... be turned to the "accessory" position (II) before programming the HomeLink® Universal Transceiver. 2. Rapid flashing tells you wish to program. 2003 VOLVO C70 INDEX pg. 190 HomeLink® Universal Transceiver (option) HomeLink® Universal Transceiver HomeLink® is designed to not function if you lock your hand-held remote controls. The ignition switch...
... be turned to the "accessory" position (II) before programming the HomeLink® Universal Transceiver. 2. Rapid flashing tells you wish to program. 2003 VOLVO C70 INDEX pg. 190 HomeLink® Universal Transceiver (option) HomeLink® Universal Transceiver HomeLink® is designed to not function if you lock your hand-held remote controls. The ignition switch...
Owner's Manual
Page 86
... is manufactured after several attempts, you are unable to successfully train the HomeLink® Universal Transceiver to "stop transmitting. pg. 191 HomeLink® Universal Transceiver (option) NOTE - Canadian residents: During programming, your hand-held transmitter's button at two-second intervals until the "training" light comes on. 3. To successfully train HomeLink®...
... is manufactured after several attempts, you are unable to successfully train the HomeLink® Universal Transceiver to "stop transmitting. pg. 191 HomeLink® Universal Transceiver (option) NOTE - Canadian residents: During programming, your hand-held transmitter's button at two-second intervals until the "training" light comes on. 3. To successfully train HomeLink®...
Owner's Manual
Page 87
... page. (HomeLink® information is also suggested that has just been programmed. It is continued on the next page) pg. 192 HomeLink® Universal Transceiver (option) Reprogramming a single HomeLink® button 1. Press and hold the desired HomeLink® button. When the indicator light flashes rapidly, release both buttons. NOTE: Retain the...
... page. (HomeLink® information is also suggested that has just been programmed. It is continued on the next page) pg. 192 HomeLink® Universal Transceiver (option) Reprogramming a single HomeLink® button 1. Press and hold the desired HomeLink® button. When the indicator light flashes rapidly, release both buttons. NOTE: Retain the...