

Owners Manual
Page 6
...SAFETY INFORMATION...2-1 DESCRIPTION AND MACHINE IDENTIFICATION ...3-1 Identification number records...3-2 Key identification number...3-2 Vehicle identification number ...3-3 Model label ...3-3 2 3 CONTROL FUNCTIONS...4-1 Main switch ...4-1 Indicator and warning lights ...4-2 Speedometer ...4-4 Fuel gauge ...4-4 Handlebar switches ...4-5 Throttle lever ...4-7 Speed limiter ...4-8 Front brake lever...4-9 Brake pedal and rear brake lever ...4-9 Parking brake...4-10 Shift pedal ...4-11 Reverse knob...4-11 Recoil starter...4-12 Fuel tank cap ...4-13 Fuel cock...4-13 Starter (choke) ...4-14 Seat...
...SAFETY INFORMATION...2-1 DESCRIPTION AND MACHINE IDENTIFICATION ...3-1 Identification number records...3-2 Key identification number...3-2 Vehicle identification number ...3-3 Model label ...3-3 2 3 CONTROL FUNCTIONS...4-1 Main switch ...4-1 Indicator and warning lights ...4-2 Speedometer ...4-4 Fuel gauge ...4-4 Handlebar switches ...4-5 Throttle lever ...4-7 Speed limiter ...4-8 Front brake lever...4-9 Brake pedal and rear brake lever ...4-9 Parking brake...4-10 Shift pedal ...4-11 Reverse knob...4-11 Recoil starter...4-12 Fuel tank cap ...4-13 Fuel cock...4-13 Starter (choke) ...4-14 Seat...
Owners Manual
Page 7
... DC jack...4-19 5 PRE-OPERATION CHECKS ...5-1 Front and rear brakes ...5-3 Fuel ...5-5 Engine oil ...5-7 Final gear oil...5-7 Differential gear oil ...5-8 Throttle lever ...5-8 Fittings and fasteners...5-8 Lights...5-8 Switches...5-8 Tires ...5-9 How to measure tire pressure...5-11 Tire wear limit...5-12 6 OPERATION ...6-1 Starting a cold engine...6-1 Starting a warm engine ...6-3 Warming up ...6-3 Reverse knob operation and reverse driving ...6-4 Shifting...6-5 To start out and accelerate...6-5 To decelerate...6-6 Engine break-in ...6-7 Parking...6-8 Parking on a slope...6-9 Accessories and...
... DC jack...4-19 5 PRE-OPERATION CHECKS ...5-1 Front and rear brakes ...5-3 Fuel ...5-5 Engine oil ...5-7 Final gear oil...5-7 Differential gear oil ...5-8 Throttle lever ...5-8 Fittings and fasteners...5-8 Lights...5-8 Switches...5-8 Tires ...5-9 How to measure tire pressure...5-11 Tire wear limit...5-12 6 OPERATION ...6-1 Starting a cold engine...6-1 Starting a warm engine ...6-3 Warming up ...6-3 Reverse knob operation and reverse driving ...6-4 Shifting...6-5 To start out and accelerate...6-5 To decelerate...6-6 Engine break-in ...6-7 Parking...6-8 Parking on a slope...6-9 Accessories and...
Owners Manual
Page 8
... oil ...8-11 Differential gear oil...8-14 Axle boots...8-16 Spark plug inspection...8-17 Air filter element cleaning...8-18 Spark arrester cleaning ...8-21 Carburetor adjustment...8-22 Idle speed adjustment ...8-23 Valve clearance adjustment ...8-24 Reverse lock release cable adjustment ...8-24 Throttle lever adjustment ...8-24 Front brake pad check ...8-25 Rear brake shoe inspection...8-25 Brake fluid level check ...8-26 Brake fluid replacement ...8-27 Front brake lever free play...8-28 Brake pedal and rear brake lever adjustment ...8-29 Adjusting the rear brake light switch ...8-32 Clutch...
... oil ...8-11 Differential gear oil...8-14 Axle boots...8-16 Spark plug inspection...8-17 Air filter element cleaning...8-18 Spark arrester cleaning ...8-21 Carburetor adjustment...8-22 Idle speed adjustment ...8-23 Valve clearance adjustment ...8-24 Reverse lock release cable adjustment ...8-24 Throttle lever adjustment ...8-24 Front brake pad check ...8-25 Rear brake shoe inspection...8-25 Brake fluid level check ...8-26 Brake fluid replacement ...8-27 Front brake lever free play...8-28 Brake pedal and rear brake lever adjustment ...8-29 Adjusting the rear brake light switch ...8-32 Clutch...

Owners Manual
Page 21
Seat 4. Headlights 8. Parking brake lock plate 16. Starter (choke) 17. Reverse knob 19. On-Command four-wheel drive switch 20. Fuel cock 9. Front wheel 14. Speedometer 18. Front brake lever 21. Spark arrester 2. Rear brake lever 15. Main switch 24. Rear wheel 12. Tail/brake light 11. Fuel gauge 23. Throttle lever 22. EBU00032 DESCRIPTION AND MACHINE IDENTIFICATION 1 2 3 4 5 6 7 1. Recoil starter 10. Shift pedal 13. Front carrier 6. Rear carrier 3. Brake pedal 7. Auxiliary DC jack 5. Left handlebar switches 8 9 10 11 12 13 14...
Seat 4. Headlights 8. Parking brake lock plate 16. Starter (choke) 17. Reverse knob 19. On-Command four-wheel drive switch 20. Fuel cock 9. Front wheel 14. Speedometer 18. Front brake lever 21. Spark arrester 2. Rear brake lever 15. Main switch 24. Rear wheel 12. Tail/brake light 11. Fuel gauge 23. Throttle lever 22. EBU00032 DESCRIPTION AND MACHINE IDENTIFICATION 1 2 3 4 5 6 7 1. Recoil starter 10. Shift pedal 13. Front carrier 6. Rear carrier 3. Brake pedal 7. Auxiliary DC jack 5. Left handlebar switches 8 9 10 11 12 13 14...
Owners Manual
Page 25
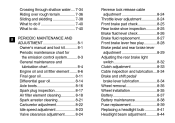
... in the 4WD position. If this light comes on when the transmission is safe to do so and allow the engine to cool down for about 10 minutes. 1 2 3 4 5 6 7 8 9 10 11 CAUTION: _ G 1. 2. 3. 4. Reverse indicator light "REVERSE" Neutral indicator light "NEUTRAL" Oil temperature warning light " " Four-wheel-drive indicator light " " _ G The engine may cause damage to the engine. EBU00802 EBU01140 Indicator and warning lights Oil temperature warning light " " When the oil temperature reaches...
... in the 4WD position. If this light comes on when the transmission is safe to do so and allow the engine to cool down for about 10 minutes. 1 2 3 4 5 6 7 8 9 10 11 CAUTION: _ G 1. 2. 3. 4. Reverse indicator light "REVERSE" Neutral indicator light "NEUTRAL" Oil temperature warning light " " Four-wheel-drive indicator light " " _ G The engine may cause damage to the engine. EBU00802 EBU01140 Indicator and warning lights Oil temperature warning light " " When the oil temperature reaches...

Owners Manual
Page 28
... headlights with the engine turned off all times to starting instructions prior to stop switch is pushed. The engine will not operate properly. Light switch " / /OFF" 2. CAUTION: _ See starting the engine. (See page 6-1 for more than thirty minutes. The engine stop switch " / " 3. Engine stop switch controls ignition and can be used at all the lights. If this switch is set to turn off for details.) _ EBU12510 1. EBU00053 EBU00607 Handlebar switches Start switch " " The starter motor...
... headlights with the engine turned off all times to starting instructions prior to stop switch is pushed. The engine will not operate properly. Light switch " / /OFF" 2. CAUTION: _ See starting the engine. (See page 6-1 for more than thirty minutes. The engine stop switch " / " 3. Engine stop switch controls ignition and can be used at all the lights. If this switch is set to turn off for details.) _ EBU12510 1. EBU00053 EBU00607 Handlebar switches Start switch " " The starter motor...
Owners Manual
Page 30
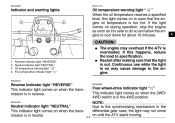
... varying the throttle position. Consult a Yamaha dealer if you start the engine. Before starting the engine, check the throttle to be hard to operate, making it returns to an idle any time the hand is operating smoothly. EBU00062 Throttle lever Once the engine is running, movement of throttle. Correct the problem before you can't find or solve the problem yourself. 1. Regulate the speed of the throttle lever before...
... varying the throttle position. Consult a Yamaha dealer if you start the engine. Before starting the engine, check the throttle to be hard to operate, making it returns to an idle any time the hand is operating smoothly. EBU00062 Throttle lever Once the engine is running, movement of throttle. Correct the problem before you can't find or solve the problem yourself. 1. Regulate the speed of the throttle lever before...

Owners Manual
Page 47
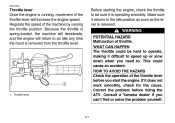
Do not ride the ATV if you find any problem with improperly operating brakes. HOW TO AVOID THE HAZARD Always check the brakes at the start of every ride. WHAT CAN HAPPEN You could lose braking ability, which could lead to an accident. If a problem cannot be corrected by the adjustment procedures provided in this manual, have a Yamaha dealer check for the cause. 5-4 WARNING POTENTIAL HAZARD Riding with the brakes.
Do not ride the ATV if you find any problem with improperly operating brakes. HOW TO AVOID THE HAZARD Always check the brakes at the start of every ride. WHAT CAN HAPPEN You could lose braking ability, which could lead to an accident. If a problem cannot be corrected by the adjustment procedures provided in this manual, have a Yamaha dealer check for the cause. 5-4 WARNING POTENTIAL HAZARD Riding with the brakes.
Owners Manual
Page 56
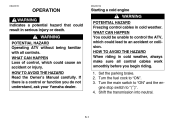
... work smoothly before you do not understand, ask your Yamaha dealer. 6-1 Starting a cold engine WARNING POTENTIAL HAZARD Freezing control cables in serious injury or death. HOW TO AVOID THE HAZARD Read the Owner's Manual carefully. Turn the fuel cock to " ". 4. Set the parking brake. 2. WHAT CAN HAPPEN Loss of control, which could lead to control the ATV, which could cause an accident or injury. Shift the transmission...
... work smoothly before you do not understand, ask your Yamaha dealer. 6-1 Starting a cold engine WARNING POTENTIAL HAZARD Freezing control cables in serious injury or death. HOW TO AVOID THE HAZARD Read the Owner's Manual carefully. Turn the fuel cock to " ". 4. Set the parking brake. 2. WHAT CAN HAPPEN Loss of control, which could lead to control the ATV, which could cause an accident or injury. Shift the transmission...
Owners Manual
Page 57
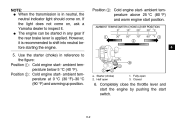
... not come on , ask a Yamaha dealer to inspect it is recommended to the figure: Position 1: Cold engine start- ambient temperature below 5 °C (40 °F). G The engine can be started in reference to shift into neutral before starting the engine. _ _ Position 3: Cold engine start - Fully-open 1. Use the starter (choke) in any gear if the rear brake lever is applied. a. NOTE: G When the transmission is in neutral, the...
... not come on , ask a Yamaha dealer to inspect it is recommended to the figure: Position 1: Cold engine start- ambient temperature below 5 °C (40 °F). G The engine can be started in reference to shift into neutral before starting the engine. _ _ Position 3: Cold engine start - Fully-open 1. Use the starter (choke) in any gear if the rear brake lever is applied. a. NOTE: G When the transmission is in neutral, the...

Owners Manual
Page 59
... reverse driving CAUTION: _ NOTE: When in reverse, the reverse indicator light should be damaged. _ 4. If the light does not come on, ask a Yamaha dealer to inspect the ATV. _ _ Before shifting, stop and return the throttle lever to its closed position with your right hand. 3. While applying the rear brake lever or brake pedal, turn the reverse knob clockwise with the transmission...
... reverse driving CAUTION: _ NOTE: When in reverse, the reverse indicator light should be damaged. _ 4. If the light does not come on, ask a Yamaha dealer to inspect the ATV. _ _ Before shifting, stop and return the throttle lever to its closed position with your right hand. 3. While applying the rear brake lever or brake pedal, turn the reverse knob clockwise with the transmission...
Owners Manual
Page 60
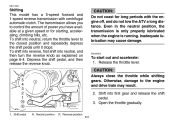
... not coast for starting, accelerating, climbing hills, etc. EBU12951 Shifting This model has a 5-speed forward and 1-speed reverse transmission with the engine off, and do not tow the ATV a long distance. To shift into reverse, first shift into neutral, and then turn the reverse knob as explained on page 6-4. Release the throttle lever. CAUTION: Always close the throttle while shifting gears. Shift pedal N. The transmission allows you have...
... not coast for starting, accelerating, climbing hills, etc. EBU12951 Shifting This model has a 5-speed forward and 1-speed reverse transmission with the engine off, and do not tow the ATV a long distance. To shift into reverse, first shift into neutral, and then turn the reverse knob as explained on page 6-4. Release the throttle lever. CAUTION: Always close the throttle while shifting gears. Shift pedal N. The transmission allows you have...

Owners Manual
Page 88
... ground resulting in a loss of the throttle, brakes, shifting procedures, and turning techniques in contact with these components. Avoid higher speeds until you get on page 6-1 to start to accelerate. Always avoid riding on pavement. Remember that this same procedure as you move the shift pedal. The centrifugal clutch will start the engine. Be sure to coordinate the use only, and handling...
... ground resulting in a loss of the throttle, brakes, shifting procedures, and turning techniques in contact with these components. Avoid higher speeds until you get on page 6-1 to start to accelerate. Always avoid riding on pavement. Remember that this same procedure as you move the shift pedal. The centrifugal clutch will start the engine. Be sure to coordinate the use only, and handling...

Owners Manual
Page 110
.... Check and adjust idle speed/starter operation. Tighten if necessary. Check fuel hose for cracks or damage. However, keep in mind that if the ATV isn't used for a long period of time, the month maintenance intervals should be followed. Check condition. Adjust if necessary. Replace if necessary. Replace gasket if necessary. Clean. EBU15731 Periodic maintenance chart for the emission control system NOTE: _ G G For...
.... Check and adjust idle speed/starter operation. Tighten if necessary. Check fuel hose for cracks or damage. However, keep in mind that if the ATV isn't used for a long period of time, the month maintenance intervals should be followed. Check condition. Adjust if necessary. Replace if necessary. Replace gasket if necessary. Clean. EBU15731 Periodic maintenance chart for the emission control system NOTE: _ G G For...

Owners Manual
Page 139
Rear brake light switch adjusting nut 8-32 To make the brake light come on just before braking takes effect. If necessary, adjust the brake light switch as follows. To make the brake light come on earlier, turn the adjusting nut in direction b. 1. Turn the adjusting nut while holding the rear brake light switch in place. Rear brake light switch 2. EBU00834 Adjusting the rear brake light switch The rear brake light switch, which is activated by the brake pedal and brake levers, is properly...
Rear brake light switch adjusting nut 8-32 To make the brake light come on just before braking takes effect. If necessary, adjust the brake light switch as follows. To make the brake light come on earlier, turn the adjusting nut in direction b. 1. Turn the adjusting nut while holding the rear brake light switch in place. Rear brake light switch 2. EBU00834 Adjusting the rear brake light switch The rear brake light switch, which is activated by the brake pedal and brake levers, is properly...

Owners Manual
Page 141
... and the cable ends. Replace damaged cables. Cables can result when the outer covering of control cables becomes damaged. HOW TO AVOID THE HAZARD Inspect cables frequently. If the cables do not operate smoothly, ask a Yamaha dealer to replace them. Recommended lubricant: Yamaha chain and cable lube or SAE 10W30 motor oil EBU00727 Brake and shift pedal/brake lever lubrication Lubricate the...
... and the cable ends. Replace damaged cables. Cables can result when the outer covering of control cables becomes damaged. HOW TO AVOID THE HAZARD Inspect cables frequently. If the cables do not operate smoothly, ask a Yamaha dealer to replace them. Recommended lubricant: Yamaha chain and cable lube or SAE 10W30 motor oil EBU00727 Brake and shift pedal/brake lever lubrication Lubricate the...

Owners Manual
Page 146
... Fuse replacement 1. Specified fuses: Main fuse: Headlight fuse: Ignition fuse: Auxiliary DC jack fuse: Carburetor warmer fuse: Four-wheel-drive fuse: 1. Ignition fuse 4. If the fuse immediately blows again, consult a Yamaha dealer. Four-wheel-drive fuse 3. Spare fuse (× 2) 8-39 2. Spare main fuse 30 A 15 A 10 A 10 A 10 A 3A 1. Auxiliary DC jack fuse 5. If a fuse is blown, turn on the switches. Then turn off the main switch and install a new fuse of the specified amperage. Main fuse 2. The main fuse case and the fuse...
... Fuse replacement 1. Specified fuses: Main fuse: Headlight fuse: Ignition fuse: Auxiliary DC jack fuse: Carburetor warmer fuse: Four-wheel-drive fuse: 1. Ignition fuse 4. If the fuse immediately blows again, consult a Yamaha dealer. Four-wheel-drive fuse 3. Spare fuse (× 2) 8-39 2. Spare main fuse 30 A 15 A 10 A 10 A 10 A 3A 1. Auxiliary DC jack fuse 5. If a fuse is blown, turn on the switches. Then turn off the main switch and install a new fuse of the specified amperage. Main fuse 2. The main fuse case and the fuse...

Owners Manual
Page 155
... extend the useful life of wheel bearings, brakes, transmission seals and electrical devices. A plastic bag and strong rubber band may cause water seepage and deterioration of many components. 1. Rinse the machine off with clean water and dry all filler caps are properly installed. 2. b. Make sure the spark plug and all surfaces with a paint brush. Many expensive repair bills have resulted from improper high pressure...
... extend the useful life of wheel bearings, brakes, transmission seals and electrical devices. A plastic bag and strong rubber band may cause water seepage and deterioration of many components. 1. Rinse the machine off with clean water and dry all filler caps are properly installed. 2. b. Make sure the spark plug and all surfaces with a paint brush. Many expensive repair bills have resulted from improper high pressure...

Owners Manual
Page 157
... oil. 3. Tie a plastic bag over several times to raise all control cables. 4. Lubricate all wheels off the ground. 5. EBU00530 B. STORAGE Long term storage (60 days or more) of Yamaha Fuel Stabilizer and Conditioner or an equivalent product. If storing in the spark plug hole and reinstall the spark plug. Fill the fuel tank with a light film of SAE 10W30 or 20W40 motor oil in a humid or salt-air...
... oil. 3. Tie a plastic bag over several times to raise all control cables. 4. Lubricate all wheels off the ground. 5. EBU00530 B. STORAGE Long term storage (60 days or more) of Yamaha Fuel Stabilizer and Conditioner or an equivalent product. If storing in the spark plug hole and reinstall the spark plug. Fill the fuel tank with a light film of SAE 10W30 or 20W40 motor oil in a humid or salt-air...

Owners Manual
Page 164
MODEL Specified fuses: Main fuse Headlight fuse Ignition fuse Auxiliary DC jack fuse Carburetor warmer fuse Four-wheel-drive fuse 30 A 15 A 10 A 10 A 10 A 3A YFM400F 10-6
MODEL Specified fuses: Main fuse Headlight fuse Ignition fuse Auxiliary DC jack fuse Carburetor warmer fuse Four-wheel-drive fuse 30 A 15 A 10 A 10 A 10 A 3A YFM400F 10-6