

Owners Manual
Page 6
... Edition models) ...4-7 Switches ...4-10 Accelerator pedal ...4-12 Brake pedal ...4-12 Parking brake lever ...4-13 Drive select lever...4-14 Fuel tank cap...4-14 2 3 4 Fuel level check window ...4-15 Starter (choke) ...4-15 Doors...4-16 Seats ...4-16 Seat belts ...4-17 Glove compartment ...4-18 Cargo bed ...4-18 Front and rear shock absorber adjustment ...4-20 Trailer hitch bracket and receiver ...4-22 Auxiliary DC jack...4-22 5 FOR YOUR SAFETY - PRE-OPERATION CHECKS ...5-1 Front and rear brakes ...5-3 Fuel ...5-4 Engine oil ...5-6 Coolant...5-7 Final gear oil ...5-7 Differential gear oil...
... Edition models) ...4-7 Switches ...4-10 Accelerator pedal ...4-12 Brake pedal ...4-12 Parking brake lever ...4-13 Drive select lever...4-14 Fuel tank cap...4-14 2 3 4 Fuel level check window ...4-15 Starter (choke) ...4-15 Doors...4-16 Seats ...4-16 Seat belts ...4-17 Glove compartment ...4-18 Cargo bed ...4-18 Front and rear shock absorber adjustment ...4-20 Trailer hitch bracket and receiver ...4-22 Auxiliary DC jack...4-22 5 FOR YOUR SAFETY - PRE-OPERATION CHECKS ...5-1 Front and rear brakes ...5-3 Fuel ...5-4 Engine oil ...5-6 Coolant...5-7 Final gear oil ...5-7 Differential gear oil...

Owners Manual
Page 7
... ...5-9 Tires ...5-9 6 OPERATION...6-1 Engine break-in...6-1 Starting a cold engine ...6-2 Starting a warm engine...6-5 Warming up...6-5 Drive select lever operation and reverse driving...6-6 On-Command four-wheel-drive switch and differential gear lock switch ...6-8 Parking ...6-10 Loading ...6-11 BASIC GUIDE FOR SAFE USE...7-1 KNOW YOUR VEHICLE...7-1 Driver requirements ...7-2 7 Passenger requirements ...7-3 Occupant protection system...7-4 Protective structure...7-5 Seat belts...7-6 Doors ...7-8 Passenger handholds...7-9 Seat and hip restraints ...7-10 Floorboard ...7-10 Steering wheel...
... ...5-9 Tires ...5-9 6 OPERATION...6-1 Engine break-in...6-1 Starting a cold engine ...6-2 Starting a warm engine...6-5 Warming up...6-5 Drive select lever operation and reverse driving...6-6 On-Command four-wheel-drive switch and differential gear lock switch ...6-8 Parking ...6-10 Loading ...6-11 BASIC GUIDE FOR SAFE USE...7-1 KNOW YOUR VEHICLE...7-1 Driver requirements ...7-2 7 Passenger requirements ...7-3 Occupant protection system...7-4 Protective structure...7-5 Seat belts...7-6 Doors ...7-8 Passenger handholds...7-9 Seat and hip restraints ...7-10 Floorboard ...7-10 Steering wheel...

Owners Manual
Page 8
... maintenance and lubrication chart ...8-5 Hood ...8-7 Console ...8-9 Engine oil and oil filter cartridge ...8-10 Final gear oil ...8-15 Differential gear oil ...8-17 Coolant...8-19 Axle boots ...8-20 Spark plug inspection ...8-21 Cleaning the air filter elements ...8-24 Drive select lever box check hose ...8-29 V-belt cooling duct check hoses ...8-29 V-belt case drain plug ...8-30 Cleaning the spark arrester ...8-31 Carburetor adjustment ...8-32 Idle speed adjustment...8-33 Valve clearance ...8-33 Brakes...8-34 Front brake pad check ...8-34 Rear brake pad check...8-35 Checking the brake fluid...
... maintenance and lubrication chart ...8-5 Hood ...8-7 Console ...8-9 Engine oil and oil filter cartridge ...8-10 Final gear oil ...8-15 Differential gear oil ...8-17 Coolant...8-19 Axle boots ...8-20 Spark plug inspection ...8-21 Cleaning the air filter elements ...8-24 Drive select lever box check hose ...8-29 V-belt cooling duct check hoses ...8-29 V-belt case drain plug ...8-30 Cleaning the spark arrester ...8-31 Carburetor adjustment ...8-32 Idle speed adjustment...8-33 Valve clearance ...8-33 Brakes...8-34 Front brake pad check ...8-34 Rear brake pad check...8-35 Checking the brake fluid...

Owners Manual
Page 9
SIDE × SIDE VEHICLE LIMITED WARRANTY...11-6 YAMAHA EXTENDED SERVICE (Y.E.S.) ...11-7 Cleaning...9-1 B. Brake pedal and accelerator pedal lubrication ...8-40 Rear knuckle upper and lower pivot lubrication ...8-41 Steering shaft lubrication ...8-41 Wheel removal ...8-42 Tire replacement ...8-42 Wheel installation ...8-43 Battery ...8-45 Battery maintenance ...8-46 Jump-starting ...8-47 Fuse replacement ...8-49 Replacing a headlight bulb ...8-51 Headlight beam adjustment ...8-53 Tail/brake light bulb replacement ...8-54 Troubleshooting ...8-56 Troubleshooting charts ...8-57 9 CLEANING AND ...
SIDE × SIDE VEHICLE LIMITED WARRANTY...11-6 YAMAHA EXTENDED SERVICE (Y.E.S.) ...11-7 Cleaning...9-1 B. Brake pedal and accelerator pedal lubrication ...8-40 Rear knuckle upper and lower pivot lubrication ...8-41 Steering shaft lubrication ...8-41 Wheel removal ...8-42 Tire replacement ...8-42 Wheel installation ...8-43 Battery ...8-45 Battery maintenance ...8-46 Jump-starting ...8-47 Fuse replacement ...8-49 Replacing a headlight bulb ...8-51 Headlight beam adjustment ...8-53 Tail/brake light bulb replacement ...8-54 Troubleshooting ...8-56 Troubleshooting charts ...8-57 9 CLEANING AND ...
Owners Manual
Page 13
... load could change handling unexpectedly or be thrown forward and strike occupants. • Keep weight in the cargo bed centered side to stop. • Turn gradually and go slowly. • Avoid hills and rough terrain. • Read Owner’s Manual before loading, towing, or pulling objects. Topheavy loads increase the risk of control, overturn or other than the trailer hitch bracket or...
... load could change handling unexpectedly or be thrown forward and strike occupants. • Keep weight in the cargo bed centered side to stop. • Turn gradually and go slowly. • Avoid hills and rough terrain. • Read Owner’s Manual before loading, towing, or pulling objects. Topheavy loads increase the risk of control, overturn or other than the trailer hitch bracket or...
Owners Manual
Page 15
... for off-road use only by pressing your dealer or visit www.yamaha-motor.com/rhino YAMAHA 5B4-F1568-01 1-6 Be sure passenger is seated, belted, and holding onto the handholds. • Use care when turning: • • Be Qualified and Responsible This vehicle is unavoidable, drive slowly 16 and turn . Read the Owner’s Manual Contact your feet firmly on the steering wheel or handholds...
... for off-road use only by pressing your dealer or visit www.yamaha-motor.com/rhino YAMAHA 5B4-F1568-01 1-6 Be sure passenger is seated, belted, and holding onto the handholds. • Use care when turning: • • Be Qualified and Responsible This vehicle is unavoidable, drive slowly 16 and turn . Read the Owner’s Manual Contact your feet firmly on the steering wheel or handholds...
Owners Manual
Page 17
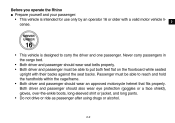
... not drive or ride as passenger after using drugs or alcohol. 2-2 Never carry passengers in the cargo bed. • Both driver and passenger should wear seat belts properly. • Both driver and passenger must be able to put both feet flat on the floorboard while seated upright with a valid motor vehicle license. Before you operate the Rhino G Prepare yourself and your passenger: • This vehicle is...
... not drive or ride as passenger after using drugs or alcohol. 2-2 Never carry passengers in the cargo bed. • Both driver and passenger should wear seat belts properly. • Both driver and passenger must be able to put both feet flat on the floorboard while seated upright with a valid motor vehicle license. Before you operate the Rhino G Prepare yourself and your passenger: • This vehicle is...
Owners Manual
Page 30
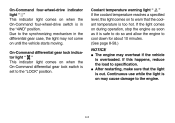
LOCK Coolant temperature warning light " " If the coolant temperature reaches a specified level, this happens, reduce the load to the "LOCK" position. Continuous use while the light is on when the On-Command differential gear lock switch is set to specification. Due to the engine. 4-3 On-Command differential gear lock indicator light " " This indicator light comes on may cause damage to the synchronizing mechanism in the "4WD" position. After restarting, make...
LOCK Coolant temperature warning light " " If the coolant temperature reaches a specified level, this happens, reduce the load to the "LOCK" position. Continuous use while the light is on when the On-Command differential gear lock switch is set to specification. Due to the engine. 4-3 On-Command differential gear lock indicator light " " This indicator light comes on may cause damage to the synchronizing mechanism in the "4WD" position. After restarting, make...
Owners Manual
Page 53
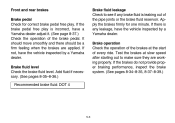
... leaking out of the pipe joints or the brake fluid reservoir. Test the brakes at the start of the brake pedal. EVU00390 Front and rear brakes Brake pedal Check for one minute. If the brake pedal free play . Add fluid if necessary. (See pages 8-35-8-36.) Recommended brake fluid: DOT 4 Brake fluid leakage Check to make sure they are applied. If the brakes do not provide proper braking performance...
... leaking out of the pipe joints or the brake fluid reservoir. Test the brakes at the start of the brake pedal. EVU00390 Front and rear brakes Brake pedal Check for one minute. If the brake pedal free play . Add fluid if necessary. (See pages 8-35-8-36.) Recommended brake fluid: DOT 4 Brake fluid leakage Check to make sure they are applied. If the brakes do not provide proper braking performance...

Owners Manual
Page 55
... bed of the Rhino, be used if ethanol content does not exceed 10%. Fire may cause fuel system damage or vehicle performance problems. Recommended fuel: Unleaded gasoline only Fuel tank capacity: 30.0 L (6.60 Imp gal, 7.93 US gal) Portable gas containers If you longer spark plug life and reduced maintenance cost. The discharge of this build-up of static electricity. Gasohol containing ethanol can cause a spark and ignite...
... bed of the Rhino, be used if ethanol content does not exceed 10%. Fire may cause fuel system damage or vehicle performance problems. Recommended fuel: Unleaded gasoline only Fuel tank capacity: 30.0 L (6.60 Imp gal, 7.93 US gal) Portable gas containers If you longer spark plug life and reduced maintenance cost. The discharge of this build-up of static electricity. Gasohol containing ethanol can cause a spark and ignite...
Owners Manual
Page 58
...Yamaha dealer repair as necessary for proper operation. A crash can damage the restraint systems in a crash. Check for correct tightening torque. 5-8 Each seat belt must also lock up when quickly pulled out. The latch plate should click securely into the buckle and release when the release button is pushed firmly. Have a Yamaha dealer repair... stretched, or damaged. Turn the steering wheel right and left. Take the vehicle to a Yamaha dealer or refer to the Service Manual for excessive free play, abnormal noises, or a rough feeling. EVU00460 Seat belts Make sure that the ...
...Yamaha dealer repair as necessary for proper operation. A crash can damage the restraint systems in a crash. Check for correct tightening torque. 5-8 Each seat belt must also lock up when quickly pulled out. The latch plate should click securely into the buckle and release when the release button is pushed firmly. Have a Yamaha dealer repair... stretched, or damaged. Turn the steering wheel right and left. Take the vehicle to a Yamaha dealer or refer to the Service Manual for excessive free play, abnormal noises, or a rough feeling. EVU00460 Seat belts Make sure that the ...
Owners Manual
Page 63
... half-throttle. Starting a cold engine 1. Apply the brake pedal. 2. G The engine can rid itself of the temporary build-up of heat. Allow a cooling-off period of five to ten minutes after every hour of the vehicle from time to time. G When the drive select lever is noticed during this period, consult a Yamaha dealer. 0-10 hours: Avoid continuous operation above three-quarter throttle. Vary the speed...
... half-throttle. Starting a cold engine 1. Apply the brake pedal. 2. G The engine can rid itself of the temporary build-up of heat. Allow a cooling-off period of five to ten minutes after every hour of the vehicle from time to time. G When the drive select lever is noticed during this period, consult a Yamaha dealer. 0-10 hours: Avoid continuous operation above three-quarter throttle. Vary the speed...

Owners Manual
Page 68
... on until the vehicle starts moving the drive select lever along the shift guide. Apply the brake pedal. 3. Due to proceed, go slowly. When it is safe to the synchronizing mechanism in the engine, the light may not come on, ask a Yamaha dealer to the rear while backing. Check behind the vehicle for people or obstacles, and then release the brake pedal. 5.
... on until the vehicle starts moving the drive select lever along the shift guide. Apply the brake pedal. 3. Due to proceed, go slowly. When it is safe to the synchronizing mechanism in the engine, the light may not come on, ask a Yamaha dealer to the rear while backing. Check behind the vehicle for people or obstacles, and then release the brake pedal. 5.
Owners Manual
Page 103
... (1,500) (3,000) 150 300 ITEM ROUTINE Cooling system Air filter elements (engine and air intake duct) Engine oil Engine oil filter cartridge Final gear oil Differential gear oil Front brake* Rear brake* Accelerator pedal* V-belt* Wheels* Wheel bearings* Front and rear suspension* Steering system* Rear upper and lower knuckle pivots* Check coolant leakage. Replace coolant every 24 months. Replace if necessary. Replace pads if worn to the limit. Replace pads if worn to the limit. Replace if damaged. Clean. Check oil level/oil leakage. Check operation and for wear...
... (1,500) (3,000) 150 300 ITEM ROUTINE Cooling system Air filter elements (engine and air intake duct) Engine oil Engine oil filter cartridge Final gear oil Differential gear oil Front brake* Rear brake* Accelerator pedal* V-belt* Wheels* Wheel bearings* Front and rear suspension* Steering system* Rear upper and lower knuckle pivots* Check coolant leakage. Replace coolant every 24 months. Replace if necessary. Replace pads if worn to the limit. Replace pads if worn to the limit. Replace if damaged. Clean. Check oil level/oil leakage. Check operation and for wear...
Owners Manual
Page 108
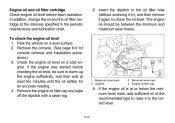
... 3. Remove the console. (See page 8-9 for an accurate reading. 4. Engine oil filler cap 6. Minimum level mark 4. EVU00701 Engine oil and oil filter cartridge Check engine oil level before checking the oil level, be between the minimum and maximum level marks. 1. Insert the dipstick in the oil filler hole (without screwing it in the periodic maintenance and lubrication chart. If the engine was started before each...
... 3. Remove the console. (See page 8-9 for an accurate reading. 4. Engine oil filler cap 6. Minimum level mark 4. EVU00701 Engine oil and oil filter cartridge Check engine oil level before checking the oil level, be between the minimum and maximum level marks. 1. Insert the dipstick in the oil filler hole (without screwing it in the periodic maintenance and lubrication chart. If the engine was started before each...

Owners Manual
Page 137
... Brake light switch adjustment The brake light switch, which is activated by the brake pedal, is properly adjusted when the brake light comes on earlier, turn the adjusting nut in direction b. 3. Open the hood. (See pages 8-7-8-8 for hood opening and closing procedures.) 2. Adjusting nut 8-39 If necessary, adjust the brake light switch as follows. 1. Brake light switch 2. To make the brake light come on just before braking takes effect. Close the hood...
... Brake light switch adjustment The brake light switch, which is activated by the brake pedal, is properly adjusted when the brake light comes on earlier, turn the adjusting nut in direction b. 3. Open the hood. (See pages 8-7-8-8 for hood opening and closing procedures.) 2. Adjusting nut 8-39 If necessary, adjust the brake light switch as follows. 1. Brake light switch 2. To make the brake light come on just before braking takes effect. Close the hood...
Owners Manual
Page 148
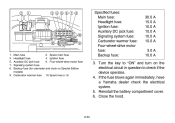
... fuse 10. Spare fuse (× 3) Specified fuses: Main fuse: Headlight fuse: Ignition fuse: Auxiliary DC jack fuse: Signaling system fuse: Carburetor warmer fuse: Four-wheel-drive motor fuse: Backup fuse: 30.0 A 15.0 A 10.0 A 10.0 A 10.0 A 10.0 A 3.0 A 10.0 A 3. 1. 3. 5. 7. 8. Spare main fuse Headlight fuse 4. Reinstall the battery compartment cover. 6. Close the hood. 8-50 If the fuse blows again immediately, have a Yamaha dealer check the electrical system. 5. Ignition fuse Auxiliary DC jack fuse 6. Turn the key to "ON" and turn on Special Edition models) 9. Main fuse...
... fuse 10. Spare fuse (× 3) Specified fuses: Main fuse: Headlight fuse: Ignition fuse: Auxiliary DC jack fuse: Signaling system fuse: Carburetor warmer fuse: Four-wheel-drive motor fuse: Backup fuse: 30.0 A 15.0 A 10.0 A 10.0 A 10.0 A 10.0 A 3.0 A 10.0 A 3. 1. 3. 5. 7. 8. Spare main fuse Headlight fuse 4. Reinstall the battery compartment cover. 6. Close the hood. 8-50 If the fuse blows again immediately, have a Yamaha dealer check the electrical system. 5. Ignition fuse Auxiliary DC jack fuse 6. Turn the key to "ON" and turn on Special Edition models) 9. Main fuse...

Owners Manual
Page 157
... general performance and extend the useful life of wheel bearings, brakes, transmission seals and electrical devices. A plastic bag and strong rubber band may have resulted from improper high-pressure detergent applications, such as those available in coin-operated car washers. 1 2 3 4 5 6 7 8 9 10 11 12 13 14 9-1 Apply the brakes several times at slow speeds to prevent water entry. Wet brakes may be used. b. Make sure the spark plug...
... general performance and extend the useful life of wheel bearings, brakes, transmission seals and electrical devices. A plastic bag and strong rubber band may have resulted from improper high-pressure detergent applications, such as those available in coin-operated car washers. 1 2 3 4 5 6 7 8 9 10 11 12 13 14 9-1 Apply the brakes several times at slow speeds to prevent water entry. Wet brakes may be used. b. Make sure the spark plug...

Owners Manual
Page 166
Model Specified fuses: Main fuse Headlight fuse Ignition fuse Auxiliary DC jack fuse Four-wheel-drive motor fuse Carburetor warmer fuse Signaling system fuse Backup fuse 30.0 A 15.0 A 10.0 A 10.0 A 3.0 A 10.0 A 10.0 A 10.0 A YXR45FX 10-7
Model Specified fuses: Main fuse Headlight fuse Ignition fuse Auxiliary DC jack fuse Four-wheel-drive motor fuse Carburetor warmer fuse Signaling system fuse Backup fuse 30.0 A 15.0 A 10.0 A 10.0 A 3.0 A 10.0 A 10.0 A 10.0 A YXR45FX 10-7

Owners Manual
Page 172
... spark plugs, oil, oil filter, air filter, and brake pads. Give notice to meet these standards within the period listed immediately below. ALL IMPLIED WARRANTIES OF MERCHANTABILITY AND FITNESS FOR A PARTICULAR PURPOSE WHICH EXCEED THE OBLIGATIONS AND TIME LIMITS STATED IN THIS WARRANTY ARE HEREBY DISCLAIMED BY YAMAHA MOTOR CORPORATION, U.S.A. SIDE × SIDE VEHICLE LIMITED WARRANTY Yamaha Motor Corporation, U.S.A. b. Lack of Yamaha Motor Corporation, U.S.A. SPECIFIC EXCLUSIONS from defects in the appropriate Owner's Manual...
... spark plugs, oil, oil filter, air filter, and brake pads. Give notice to meet these standards within the period listed immediately below. ALL IMPLIED WARRANTIES OF MERCHANTABILITY AND FITNESS FOR A PARTICULAR PURPOSE WHICH EXCEED THE OBLIGATIONS AND TIME LIMITS STATED IN THIS WARRANTY ARE HEREBY DISCLAIMED BY YAMAHA MOTOR CORPORATION, U.S.A. SIDE × SIDE VEHICLE LIMITED WARRANTY Yamaha Motor Corporation, U.S.A. b. Lack of Yamaha Motor Corporation, U.S.A. SPECIFIC EXCLUSIONS from defects in the appropriate Owner's Manual...