
Owners Manual
Page 7
... a cold engine ...5-1 Starting a warm engine ...5-2 Shifting ...5-3 Engine break-in ...5-4 Parking ...5-5 PERIODIC MAINTENANCE AND MINOR REPAIR ...6-1 PERIODIC MAINTENANCE ...6-1 Owner's tool kit ...6-1 Periodic maintenance chart for the emission control system ...6-3 General maintenance and lubrication chart ...6-4 Removing and installing the panel ...6-8 Checking the spark plugs ...6-8 Canister (for California only) ...6-10 Engine oil ...6-10 Final gear oil ...6-12 Cleaning the air filter element ...6-13 Carburetors ...6-14 Checking the engine idling speed ...6-14 Checking the throttle cable...
... a cold engine ...5-1 Starting a warm engine ...5-2 Shifting ...5-3 Engine break-in ...5-4 Parking ...5-5 PERIODIC MAINTENANCE AND MINOR REPAIR ...6-1 PERIODIC MAINTENANCE ...6-1 Owner's tool kit ...6-1 Periodic maintenance chart for the emission control system ...6-3 General maintenance and lubrication chart ...6-4 Removing and installing the panel ...6-8 Checking the spark plugs ...6-8 Canister (for California only) ...6-10 Engine oil ...6-10 Final gear oil ...6-12 Cleaning the air filter element ...6-13 Carburetors ...6-14 Checking the engine idling speed ...6-14 Checking the throttle cable...

Owners Manual
Page 8
STREET AND ENDURO MOTORCYCLE LIMITED WARRANTY ...9-7 YAMAHA EXTENDED SERVICE (Y.E.S.) ...9-9 TABLE OF CONTENTS Checking and lubricating the sidestand ...6-27 Lubricating the swingarm pivots ...6-28 Lubricating the rear suspension ...6-28 Checking the front fork ...6-28 Checking the steering ...6-29 Checking the wheel bearings ...6-30 Battery ...6-30 Replacing the fuses ...6-31 Replacing the headlight bulb ...6-33 Replacing a turn signal light bulb or the tail/brake light bulb ...6-34 Supporting the motorcycle ...6-35 Troubleshooting ...6-35 Troubleshooting chart ...6-36 MOTORCYCLE CARE AND...
STREET AND ENDURO MOTORCYCLE LIMITED WARRANTY ...9-7 YAMAHA EXTENDED SERVICE (Y.E.S.) ...9-9 TABLE OF CONTENTS Checking and lubricating the sidestand ...6-27 Lubricating the swingarm pivots ...6-28 Lubricating the rear suspension ...6-28 Checking the front fork ...6-28 Checking the steering ...6-29 Checking the wheel bearings ...6-30 Battery ...6-30 Replacing the fuses ...6-31 Replacing the headlight bulb ...6-33 Replacing a turn signal light bulb or the tail/brake light bulb ...6-34 Supporting the motorcycle ...6-35 Troubleshooting ...6-35 Troubleshooting chart ...6-36 MOTORCYCLE CARE AND...
Owners Manual
Page 11
... both sides of the operator, passenger, accessories and cargo must not exceed the maximum load limit. Keep the following in any way reduce ground clearance or cornering clearance, 1-3 G limit suspension travel, steering travel or control operation, or obscure lights or reflectors. • Accessories fitted to make sure that would impair the performance of non-Yamaha accessories. This improper position limits the...
... both sides of the operator, passenger, accessories and cargo must not exceed the maximum load limit. Keep the following in any way reduce ground clearance or cornering clearance, 1-3 G limit suspension travel, steering travel or control operation, or obscure lights or reflectors. • Accessories fitted to make sure that would impair the performance of non-Yamaha accessories. This improper position limits the...
Owners Manual
Page 12
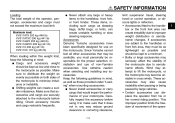
G Never start the engine or let it run for manual type). Always operate your motorcycle in another vehicle, make sure that it could cause a dangerous loss of consciousness and death within a short time. SAFETY INFORMATION tor and may fall over , gasoline may cause loss of lights or engine power. G G Always turn the engine off before leaving the motorcycle unattended and remove the key from...
G Never start the engine or let it run for manual type). Always operate your motorcycle in another vehicle, make sure that it could cause a dangerous loss of consciousness and death within a short time. SAFETY INFORMATION tor and may fall over , gasoline may cause loss of lights or engine power. G G Always turn the engine off before leaving the motorcycle unattended and remove the key from...
Owners Manual
Page 21
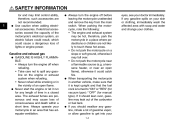
... transmission is not a malfunction. The electrical circuit of the warning light can be checked by turning the key to "ON". If the warning light does not come on when the engine oil level is pushed to "ON". Oil level warning light " " Neutral indicator light " " Turn signal indicator light " Engine trouble warning light " High beam indicator light " " " " Oil level warning light " " This warning light comes on for a few seconds, then go off , have a Yamaha dealer check the electrical circuit. 3 Turn signal...
... transmission is not a malfunction. The electrical circuit of the warning light can be checked by turning the key to "ON". If the warning light does not come on when the engine oil level is pushed to "ON". Oil level warning light " " Neutral indicator light " " Turn signal indicator light " Engine trouble warning light " High beam indicator light " " " " Oil level warning light " " This warning light comes on for a few seconds, then go off , have a Yamaha dealer check the electrical circuit. 3 Turn signal...

Owners Manual
Page 23
... 3 Start switch " " Push this switch to the center position. When released, the switch returns to crank the engine with the starter. To disengage the clutch, pull the lever toward the handlebar grip. EAU12660 Clutch lever Turn signal switch " / " To signal a right-hand turn , push this switch to " " for the low beam. ECA10050 1. Clutch lever CAUTION: See page 5-1 for starting the engine. The lever should be canceled manually by pushing the switch...
... 3 Start switch " " Push this switch to the center position. When released, the switch returns to crank the engine with the starter. To disengage the clutch, pull the lever toward the handlebar grip. EAU12660 Clutch lever Turn signal switch " / " To signal a right-hand turn , push this switch to " " for the low beam. ECA10050 1. Clutch lever CAUTION: See page 5-1 for starting the engine. The lever should be canceled manually by pushing the switch...

Owners Manual
Page 27
... materials that the exhaust system has cooled down before doing any maintenance work. With the fuel cock lever in the exhaust system. INSTRUMENT AND CONTROL FUNCTIONS EAU13441 EAU13550 Catalytic converter This vehicle is hot after operation. G Never park the vehicle near possible fire hazards such as follows and shown in this position, fuel flows to the catalytic converter. Make sure that easily burn. The fuel cock lever positions...
... materials that the exhaust system has cooled down before doing any maintenance work. With the fuel cock lever in the exhaust system. INSTRUMENT AND CONTROL FUNCTIONS EAU13441 EAU13550 Catalytic converter This vehicle is hot after operation. G Never park the vehicle near possible fire hazards such as follows and shown in this position, fuel flows to the catalytic converter. Make sure that easily burn. The fuel cock lever positions...

Owners Manual
Page 35
... the operator, resulting in poor damping performance. NOTE: The built-in sidestand switch is located on each passenger footrest. Yamaha's ignition circuit cut -off . Do not deform or damage the gas cylinder in fulfilling the responsibility of control. INSTRUMENT AND CONTROL FUNCTIONS G G G Do not subject the shock absorber to an open flame or other high heat sources, otherwise it with the sidestand...
... the operator, resulting in poor damping performance. NOTE: The built-in sidestand switch is located on each passenger footrest. Yamaha's ignition circuit cut -off . Do not deform or damage the gas cylinder in fulfilling the responsibility of control. INSTRUMENT AND CONTROL FUNCTIONS G G G Do not subject the shock absorber to an open flame or other high heat sources, otherwise it with the sidestand...

Owners Manual
Page 41
.... 5 1. Start the engine by pushing the start switch, wait a few seconds, and then try again. Turn the fuel cock lever to "ON". 2. Shift the transmission into the neutral position. If the oil level warning light flickers or remains on when the key is adequate ventilation. Never start the engine or operate it could contact the ground and distract the operator, resulting in gear with the clutch lever...
.... 5 1. Start the engine by pushing the start switch, wait a few seconds, and then try again. Turn the fuel cock lever to "ON". 2. Shift the transmission into the neutral position. If the oil level warning light flickers or remains on when the key is adequate ventilation. Never start the engine or operate it could contact the ground and distract the operator, resulting in gear with the clutch lever...

Owners Manual
Page 43
... the throttle, and at the same time, release the clutch lever slowly. 4. NOTE: To shift the transmission into first gear. Shift pedal 2. Shift pedal 2. Shift the transmission into the neutral position.) 6. EAU16680 1. The transmission is properly lubricated only when the engine is running. Neutral position G Even with the engine off, and do not tow the motorcycle for starting off, accelerating, climbing hills, etc. The neutral indicator light should...
... the throttle, and at the same time, release the clutch lever slowly. 4. NOTE: To shift the transmission into first gear. Shift pedal 2. Shift pedal 2. Shift the transmission into the neutral position.) 6. EAU16680 1. The transmission is properly lubricated only when the engine is running. Neutral position G Even with the engine off, and do not tow the motorcycle for starting off, accelerating, climbing hills, etc. The neutral indicator light should...
Owners Manual
Page 48
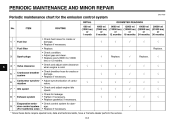
...; Replace gasket(s) if necessary. • Check control system for the emission control system INITIAL No. PERIODIC MAINTENANCE AND MINOR REPAIR EAU17600 Periodic maintenance chart for damage. • Replace if necessary. √ √ 3 Spark plugs Replace. Replace. 6 4 * Valve clearance Crankcase breather system Carburetor synchronization Idle speed 5 * 6 * 7 * 8 * Exhaust system Evaporative emission control system (For California only) 9 * √ * Since these items require special tools, data and technical skills, have a Yamaha dealer perform...
...; Replace gasket(s) if necessary. • Check control system for the emission control system INITIAL No. PERIODIC MAINTENANCE AND MINOR REPAIR EAU17600 Periodic maintenance chart for damage. • Replace if necessary. √ √ 3 Spark plugs Replace. Replace. 6 4 * Valve clearance Crankcase breather system Carburetor synchronization Idle speed 5 * 6 * 7 * 8 * Exhaust system Evaporative emission control system (For California only) 9 * √ * Since these items require special tools, data and technical skills, have a Yamaha dealer perform...

Owners Manual
Page 68
... of air in the hydraulic 6-23 The rear brake light switch, which may result in direction (b). 3. Turn the adjusting nut while holding the rear brake light switch in the hydraulic system, have a Yamaha dealer bleed the system before braking takes effect. Locknut 2. EWA10630 1. To make sure that the brake is working properly. PERIODIC MAINTENANCE AND MINOR REPAIR system. Loosen the locknut at the brake lever. 2. Rear brake light switch adjusting nut WARNING...
... of air in the hydraulic 6-23 The rear brake light switch, which may result in direction (b). 3. Turn the adjusting nut while holding the rear brake light switch in the hydraulic system, have a Yamaha dealer bleed the system before braking takes effect. Locknut 2. EWA10630 1. To make sure that the brake is working properly. PERIODIC MAINTENANCE AND MINOR REPAIR system. Loosen the locknut at the brake lever. 2. Rear brake light switch adjusting nut WARNING...

Owners Manual
Page 76
... individual circuits, is blown, replace it as possible if it if necessary. 3. Keep in a cool, dry place. 2. If the vehicle will not be stored for odometer) Spare fuse Headlight fuse Signaling system fuse Ignition fuse Carburetor heater fuse Ignitor unit fuse If a fuse is located inside the storage compartment. (See page 3-13.) To charge the battery Have a Yamaha dealer charge the battery as soon as follows. Backup...
... individual circuits, is blown, replace it as possible if it if necessary. 3. Keep in a cool, dry place. 2. If the vehicle will not be stored for odometer) Spare fuse Headlight fuse Signaling system fuse Ignition fuse Carburetor heater fuse Ignitor unit fuse If a fuse is located inside the storage compartment. (See page 3-13.) To charge the battery Have a Yamaha dealer charge the battery as soon as follows. Backup...

Owners Manual
Page 77
Quick fastener 3. Turn the key to the electrical system and possibly a fire. 6. Main fuse 1. Remove the quick fasteners shown by pushing the center in question to the right. 4. Specified fuses: Main fuse: 30.0 A Backup fuse: 5.0 A Ignition fuse: 10.0 A Headlight fuse: 15.0 A Carburetor heater fuse: 15.0 A Signaling system fuse: 10.0 A Ignitor unit fuse: 5.0 A ECA10640 1. Remove the blown fuse, and then install a new fuse of a higher amperage rating than recommended to avoid causing extensive...
Quick fastener 3. Turn the key to the electrical system and possibly a fire. 6. Main fuse 1. Remove the quick fasteners shown by pushing the center in question to the right. 4. Specified fuses: Main fuse: 30.0 A Backup fuse: 5.0 A Ignition fuse: 10.0 A Headlight fuse: 15.0 A Carburetor heater fuse: 15.0 A Signaling system fuse: 10.0 A Ignitor unit fuse: 5.0 A ECA10640 1. Remove the blown fuse, and then install a new fuse of a higher amperage rating than recommended to avoid causing extensive...

Owners Manual
Page 86
....0 kg (613 lb) Engine: Engine type: Air cooled 4-stroke, SOHC Cylinder arrangement: V-type 2-cylinder Displacement: 1063.0 cm³ Bore × stroke: 95.0 × 75.0 mm (3.74 × 2.95 in) Compression ratio: 8.30 :1 8 Recommended engine oil grade: API service SG type or higher, JASO standard MA Engine oil quantity: Without oil filter element replacement: 3.00 L (3.17 US qt) (2.64 Imp.qt) With oil filter element replacement: 3.10 L (3.28...
....0 kg (613 lb) Engine: Engine type: Air cooled 4-stroke, SOHC Cylinder arrangement: V-type 2-cylinder Displacement: 1063.0 cm³ Bore × stroke: 95.0 × 75.0 mm (3.74 × 2.95 in) Compression ratio: 8.30 :1 8 Recommended engine oil grade: API service SG type or higher, JASO standard MA Engine oil quantity: Without oil filter element replacement: 3.00 L (3.17 US qt) (2.64 Imp.qt) With oil filter element replacement: 3.10 L (3.28...

Owners Manual
Page 89
...1 Oil level warning light: 12 V, 1.7 W × 1 Turn signal indicator light: 12 V, 1.7 W × 1 Engine trouble warning light: 12 V, 1.7 W × 1 Signaling system fuse: 10.0 A Ignition fuse: 10.0 A Carburetor heater fuse: 15.0 A Ignitor unit fuse: 5.0 A Backup fuse: 5.0 A Front suspension: Type: Telescopic fork Spring/shock absorber type: Coil spring/oil damper Wheel travel: 140.0 mm (5.51 in) Rear suspension: Type: Swingarm (link suspension) Spring/shock absorber type: Coil spring/gas-oil damper Wheel travel: 113.0 mm (4.45 in) 8 Electrical system: Ignition system: Transistorized coil...
...1 Oil level warning light: 12 V, 1.7 W × 1 Turn signal indicator light: 12 V, 1.7 W × 1 Engine trouble warning light: 12 V, 1.7 W × 1 Signaling system fuse: 10.0 A Ignition fuse: 10.0 A Carburetor heater fuse: 15.0 A Ignitor unit fuse: 5.0 A Backup fuse: 5.0 A Front suspension: Type: Telescopic fork Spring/shock absorber type: Coil spring/oil damper Wheel travel: 140.0 mm (5.51 in) Rear suspension: Type: Swingarm (link suspension) Spring/shock absorber type: Coil spring/gas-oil damper Wheel travel: 113.0 mm (4.45 in) 8 Electrical system: Ignition system: Transistorized coil...
Owners Manual
Page 96
... as to conform at the time of sale with no mileage limitation. Give notice to normal wear or routine maintenance. Failures other commercial purposes, and TZ models. CONSUMER INFORMATION EAU26663 YAMAHA MOTOR CORPORATION, U.S.A. THE PERIOD OF WARRANTY for Yamaha motorcycles originally equipped with headlight, stoplight, and turn signals shall be inspected and registered for this warranty shall include parts replaced due to an authorized...
... as to conform at the time of sale with no mileage limitation. Give notice to normal wear or routine maintenance. Failures other commercial purposes, and TZ models. CONSUMER INFORMATION EAU26663 YAMAHA MOTOR CORPORATION, U.S.A. THE PERIOD OF WARRANTY for Yamaha motorcycles originally equipped with headlight, stoplight, and turn signals shall be inspected and registered for this warranty shall include parts replaced due to an authorized...
Owners Manual
Page 97
... this person is expected to Yamaha Motor Corporation, U.S.A. Box 6555 Cypress, California 90630 Attention: Warranty Department This will ensure that failure may not be transferred upon your dealer for his setup, service and warranty repair work. A. These terms are handled at the time of normal maintenance services, non-warranty repairs, accident and collision damages, and oil, oil filters, air filters, spark plugs, and brake shoes. Q. A. CHANGE OF ADDRESS The federal government requires...
... this person is expected to Yamaha Motor Corporation, U.S.A. Box 6555 Cypress, California 90630 Attention: Warranty Department This will ensure that failure may not be transferred upon your dealer for his setup, service and warranty repair work. A. These terms are handled at the time of normal maintenance services, non-warranty repairs, accident and collision damages, and oil, oil filters, air filters, spark plugs, and brake shoes. Q. A. CHANGE OF ADDRESS The federal government requires...

Owners Manual
Page 100
... Maintenance, emission control system...6-3 Maintenance, periodic ...6-1 Maintenance record...9-5 Matte color, caution ...7-1 Model label ...9-2 D Dimmer switch ...3-4 E Engine break-in...5-4 Engine idling speed, checking ...6-14 Engine oil ...6-10 Engine, starting a warm ...5-2 Engine stop switch ...3-4 Engine trouble warning light...3-2 N Neutral indicator light...3-2 Noise regulation...9-4 T Throttle cable free play, checking ...6-15 Throttle grip and cable, checking and lubricating ...6-26 F Final gear oil ...6-12 Front and rear brake pads, checking ...6-24 O Oil level warning light...
... Maintenance, emission control system...6-3 Maintenance, periodic ...6-1 Maintenance record...9-5 Matte color, caution ...7-1 Model label ...9-2 D Dimmer switch ...3-4 E Engine break-in...5-4 Engine idling speed, checking ...6-14 Engine oil ...6-10 Engine, starting a warm ...5-2 Engine stop switch ...3-4 Engine trouble warning light...3-2 N Neutral indicator light...3-2 Noise regulation...9-4 T Throttle cable free play, checking ...6-15 Throttle grip and cable, checking and lubricating ...6-26 F Final gear oil ...6-12 Front and rear brake pads, checking ...6-24 O Oil level warning light...

Owners Manual
Page 101
INDEX Tires (XVS11AWX/XVS11ATX)...6-18 Tires (XVS11X)...6-15 Tool kit ...6-1 Troubleshooting...6-35 Troubleshooting chart ...6-36 Turn signal indicator light...3-2 Turn signal light bulb or tail/brake light bulb, replacing ...6-34 Turn signal switch...3-4 V Valve clearance ...6-15 Vehicle identification number...9-1 W Warranty, extended ...9-9 Warranty, limited...9-7 Wheel bearings, checking ...6-30 Wheels (XVS11AWX/XVS11ATX)...6-20 Wheels (XVS11X)...6-20
INDEX Tires (XVS11AWX/XVS11ATX)...6-18 Tires (XVS11X)...6-15 Tool kit ...6-1 Troubleshooting...6-35 Troubleshooting chart ...6-36 Turn signal indicator light...3-2 Turn signal light bulb or tail/brake light bulb, replacing ...6-34 Turn signal switch...3-4 V Valve clearance ...6-15 Vehicle identification number...9-1 W Warranty, extended ...9-9 Warranty, limited...9-7 Wheel bearings, checking ...6-30 Wheels (XVS11AWX/XVS11ATX)...6-20 Wheels (XVS11X)...6-20