

Owners Manual
Page 6
... and warming up a cold engine ...6-1 Starting a warm engine ...6-2 Shifting ...6-3 Engine break-in ...6-4 Parking ...6-5 PERIODIC MAINTENANCE AND ADJUSTMENT ...7-1 Owner's tool kit ...7-2 Periodic maintenance chart for the emission control system ...7-3 General maintenance and lubrication chart ...7-4 Removing and installing the panel ...7-8 Checking the spark plugs ...7-8 Canister (for California only) ...7-10 Engine oil ...7-10 Final gear oil ...7-12 Cleaning the air filter element ...7-13 Carburetors ...7-14 Checking the engine idling speed ...7-15 Checking the throttle cable free play...
... and warming up a cold engine ...6-1 Starting a warm engine ...6-2 Shifting ...6-3 Engine break-in ...6-4 Parking ...6-5 PERIODIC MAINTENANCE AND ADJUSTMENT ...7-1 Owner's tool kit ...7-2 Periodic maintenance chart for the emission control system ...7-3 General maintenance and lubrication chart ...7-4 Removing and installing the panel ...7-8 Checking the spark plugs ...7-8 Canister (for California only) ...7-10 Engine oil ...7-10 Final gear oil ...7-12 Cleaning the air filter element ...7-13 Carburetors ...7-14 Checking the engine idling speed ...7-15 Checking the throttle cable free play...

Owners Manual
Page 7
... WARRANTY ...10-7 YAMAHA EXTENDED SERVICE (Y.E.S.) ...10-9 TABLE OF CONTENTS Checking and lubricating the brake and clutch levers ...7-26 Checking and lubricating the sidestand ...7-26 Lubricating the swingarm pivots ...7-27 Lubricating the rear suspension ...7-27 Checking the front fork ...7-27 Checking the steering ...7-28 Checking the wheel bearings ...7-28 Battery ...7-29 Replacing the fuses ...7-30 Replacing the headlight bulb ...7-32 Replacing a turn signal light bulb or the tail/brake light bulb ...7-33 Supporting the motorcycle ...7-33 Troubleshooting ...7-34 Troubleshooting...
... WARRANTY ...10-7 YAMAHA EXTENDED SERVICE (Y.E.S.) ...10-9 TABLE OF CONTENTS Checking and lubricating the brake and clutch levers ...7-26 Checking and lubricating the sidestand ...7-26 Lubricating the swingarm pivots ...7-27 Lubricating the rear suspension ...7-27 Checking the front fork ...7-27 Checking the steering ...7-28 Checking the wheel bearings ...7-28 Battery ...7-29 Replacing the fuses ...7-30 Replacing the headlight bulb ...7-32 Replacing a turn signal light bulb or the tail/brake light bulb ...7-33 Supporting the motorcycle ...7-33 Troubleshooting ...7-34 Troubleshooting...

Owners Manual
Page 12
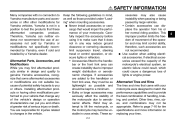
... fork, or front fender. Make sure that has added cargo or accessories. SAFETY INFORMATION G G 2 Do not run engine outdoors where engine exhaust can be drawn into a building through openings such as windows and doors. When loading within this weight limit, keep the following in poorly ventilated or partially enclosed areas such as barns, garages, or carports. Genuine Yamaha accessories, which are available...
... fork, or front fender. Make sure that has added cargo or accessories. SAFETY INFORMATION G G 2 Do not run engine outdoors where engine exhaust can be drawn into a building through openings such as windows and doors. When loading within this weight limit, keep the following in poorly ventilated or partially enclosed areas such as barns, garages, or carports. Genuine Yamaha accessories, which are available...
Owners Manual
Page 13
... caution when adding electrical accessories. If electrical accessories exceed the capacity of the motorcycle's electrical system, an electric failure could result, which could cause a dangerous loss of lights or engine power. 2 Aftermarket Tires and Rims The tires and rims that change any way reduce ground clearance or cornering clearance, limit suspension travel, steering travel or control operation, or obscure lights or reflectors. • Accessories fitted to page 7-16 for Yamaha vehicles. Installing aftermarket products or...
... caution when adding electrical accessories. If electrical accessories exceed the capacity of the motorcycle's electrical system, an electric failure could result, which could cause a dangerous loss of lights or engine power. 2 Aftermarket Tires and Rims The tires and rims that change any way reduce ground clearance or cornering clearance, limit suspension travel, steering travel or control operation, or obscure lights or reflectors. • Accessories fitted to page 7-16 for Yamaha vehicles. Installing aftermarket products or...
Owners Manual
Page 20
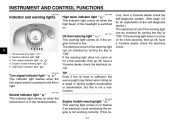
... on . Turn signal indicator light " " This indicator light flashes when the turn signal switch is pushed to "ON". EAU11502 Neutral indicator light " " This indicator light comes on if the engine oil level is low. EAU11060 TIP Even if the oil level is sufficient, the warning light may flicker when riding on or flashes if an electrical circuit monitoring the engine is not working correctly. If the warning light does...
... on . Turn signal indicator light " " This indicator light flashes when the turn signal switch is pushed to "ON". EAU11502 Neutral indicator light " " This indicator light comes on if the engine oil level is low. EAU11060 TIP Even if the oil level is sufficient, the warning light may flicker when riding on or flashes if an electrical circuit monitoring the engine is not working correctly. If the warning light does...
Owners Manual
Page 22
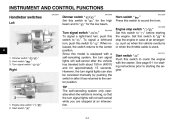
... turn , push this switch to " ". When released, the switch returns to sound the horn. However, the turn signal lights can also be canceled manually by pushing the switch in case of an emergency, such as when the vehicle overturns or when the throttle cable is stuck. EAU12660 4 1. Turn signal switch " / " Right Turn signal switch " / " To signal a right-hand turn , push this switch to " ". EAU12711 Start switch " " Push this switch to " " before starting the engine. 1. Since this model...
... turn , push this switch to " ". When released, the switch returns to sound the horn. However, the turn signal lights can also be canceled manually by pushing the switch in case of an emergency, such as when the vehicle overturns or when the throttle cable is stuck. EAU12660 4 1. Turn signal switch " / " Right Turn signal switch " / " To signal a right-hand turn , push this switch to " ". EAU12711 Start switch " " Push this switch to " " before starting the engine. 1. Since this model...

Owners Manual
Page 25
... close the fuel tank cap. Handle gasoline with a clean, dry, soft cloth, since fuel may deteriorate painted surfaces or plastic parts. [ECA10071] 4. Before refueling, turn off spilled fuel with care. EWA15151 WARNING Gasoline is sitting on the vehicle. TIP The fuel tank cap cannot be sure that the fuel tank cap is not properly installed and locked. Stop filling when the fuel reaches the bottom of water heaters and clothes...
... close the fuel tank cap. Handle gasoline with a clean, dry, soft cloth, since fuel may deteriorate painted surfaces or plastic parts. [ECA10071] 4. Before refueling, turn off spilled fuel with care. EWA15151 WARNING Gasoline is sitting on the vehicle. TIP The fuel tank cap cannot be sure that the fuel tank cap is not properly installed and locked. Stop filling when the fuel reaches the bottom of water heaters and clothes...
Owners Manual
Page 26
... ONLY Fuel tank capacity: 17.0 L (4.49 US gal, 3.74 Imp.gal) Fuel reserve amount: 4.5 L (1.19 US gal, 0.99 Imp.gal) ECA11400 um unleaded fuel. EWA10861 WARNING The exhaust system is equipped with catalytic converters in a place where pedestrians or children are two types of leaded gasoline will extend spark plug life and reduce maintenance costs. To prevent a fire hazard or burns: G Do not park the vehicle...
... ONLY Fuel tank capacity: 17.0 L (4.49 US gal, 3.74 Imp.gal) Fuel reserve amount: 4.5 L (1.19 US gal, 0.99 Imp.gal) ECA11400 um unleaded fuel. EWA10861 WARNING The exhaust system is equipped with catalytic converters in a place where pedestrians or children are two types of leaded gasoline will extend spark plug life and reduce maintenance costs. To prevent a fire hazard or burns: G Do not park the vehicle...
Owners Manual
Page 41
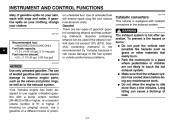
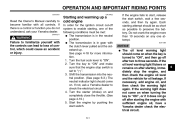
... clutch lever pulled and the sidestand up a cold engine In order for the ignition circuit cut-off after two to enable starting attempt should be met: G The transmission is in the neutral position. Turn the starter (choke) on . G The transmission is in gear with all controls. If not, ask a Yamaha dealer to start, release the start switch. If the engine fails to check the electrical circuit. 4. If the warning light...
... clutch lever pulled and the sidestand up a cold engine In order for the ignition circuit cut-off after two to enable starting attempt should be met: G The transmission is in the neutral position. Turn the starter (choke) on . G The transmission is in gear with all controls. If not, ask a Yamaha dealer to start, release the start switch. If the engine fails to check the electrical circuit. 4. If the warning light...
Owners Manual
Page 43
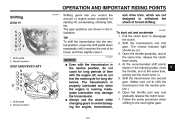
and drive train, which are shown in the following table, close the throttle, and at the same time, release the clutch lever slowly. 4. The transmission is properly lubricated only when the engine is running. The neutral indicator light should go out. 3. The gear positions are not designed to withstand the shock of forced shifting. Follow the same procedure when shifting to disengage the clutch. 2. Shift pedal...
and drive train, which are shown in the following table, close the throttle, and at the same time, release the clutch lever slowly. 4. The transmission is properly lubricated only when the engine is running. The neutral indicator light should go out. 3. The gear positions are not designed to withstand the shock of forced shifting. Follow the same procedure when shifting to disengage the clutch. 2. Shift pedal...
Owners Manual
Page 48
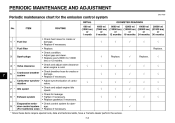
... breather hose for cracks or damage. • Replace if necessary. • Adjust synchronization of carburetors. • Check and adjust engine idle speed. • Check for leakage. • Tighten if necessary. • Replace gasket(s) if necessary. • Check control system for the emission control system INITIAL No. PERIODIC MAINTENANCE AND ADJUSTMENT EAU17600 Periodic maintenance chart for damage. • Replace if necessary. √ √ 3 Spark plugs Replace.
... breather hose for cracks or damage. • Replace if necessary. • Adjust synchronization of carburetors. • Check and adjust engine idle speed. • Check for leakage. • Tighten if necessary. • Replace gasket(s) if necessary. • Check control system for the emission control system INITIAL No. PERIODIC MAINTENANCE AND ADJUSTMENT EAU17600 Periodic maintenance chart for damage. • Replace if necessary. √ √ 3 Spark plugs Replace.

Owners Manual
Page 67
..., turn the brake lever free play and make the brake light come on just before operating the motorcycle. Rear brake light switch adjusting nut WARNING G After adjusting the brake lever free play, check the free play adjusting screw in loss of air in the hydraulic system, have a Yamaha dealer bleed the system before braking takes effect. Air in the hydraulic system will diminish the braking performance...
..., turn the brake lever free play and make the brake light come on just before operating the motorcycle. Rear brake light switch adjusting nut WARNING G After adjusting the brake lever free play, check the free play adjusting screw in loss of air in the hydraulic system, have a Yamaha dealer bleed the system before braking takes effect. Air in the hydraulic system will diminish the braking performance...

Owners Manual
Page 75
...) Spare fuse Headlight fuse Signaling system fuse Ignition fuse Carburetor heater fuse Ignitor unit fuse 3. Pull the ignitor unit panel outward to the right. 7 If a fuse is required. Remove the quick fasteners shown by pushing the center in with a screwdriver, then pulling the fastener out. 1. To charge a VRLA (Valve Regulated Lead Acid) battery, a special (constant-voltage) battery charger is blown, replace it as follows. Remove the rider seat. (See...
...) Spare fuse Headlight fuse Signaling system fuse Ignition fuse Carburetor heater fuse Ignitor unit fuse 3. Pull the ignitor unit panel outward to the right. 7 If a fuse is required. Remove the quick fasteners shown by pushing the center in with a screwdriver, then pulling the fastener out. 1. To charge a VRLA (Valve Regulated Lead Acid) battery, a special (constant-voltage) battery charger is blown, replace it as follows. Remove the rider seat. (See...

Owners Manual
Page 76
... rider seat. 7-31 WARNING! If the fuse immediately blows again, have a Yamaha dealer check the electrical system. 8. PERIODIC MAINTENANCE AND ADJUSTMENT Specified fuses: Main fuse: 30.0 A Backup fuse: 5.0 A Ignition fuse: 10.0 A Headlight fuse: 15.0 A Carburetor heater fuse: 15.0 A Signaling system fuse: 10.0 A Ignitor unit fuse: 5.0 A TIP To install a quick fastener, push its pin back so that it is flush with the fastener head. 1. Place the ignitor unit panel in...
... rider seat. 7-31 WARNING! If the fuse immediately blows again, have a Yamaha dealer check the electrical system. 8. PERIODIC MAINTENANCE AND ADJUSTMENT Specified fuses: Main fuse: 30.0 A Backup fuse: 5.0 A Ignition fuse: 10.0 A Headlight fuse: 15.0 A Carburetor heater fuse: 15.0 A Signaling system fuse: 10.0 A Ignitor unit fuse: 5.0 A TIP To install a quick fastener, push its pin back so that it is flush with the fastener head. 1. Place the ignitor unit panel in...

Owners Manual
Page 84
... prevent the fuel tank from rusting and the fuel from entering them. Remove the spark plug caps from corrosion. Install the spark plug caps onto the spark plugs, and then place the spark plugs on storing the battery, see page 7-29. Store it . a. c. Alternatively, turn the wheels a little every month in order to protect the cylinders, piston rings, etc. Check and, if necessary, correct the tire air pressure, and then lift the...
... prevent the fuel tank from rusting and the fuel from entering them. Remove the spark plug caps from corrosion. Install the spark plug caps onto the spark plugs, and then place the spark plugs on storing the battery, see page 7-29. Store it . a. c. Alternatively, turn the wheels a little every month in order to protect the cylinders, piston rings, etc. Check and, if necessary, correct the tire air pressure, and then lift the...

Owners Manual
Page 85
....0 kg (613 lb) Engine: Engine type: Air cooled 4-stroke, SOHC Cylinder arrangement: V-type 2-cylinder Displacement: 1063.0 cm³ Bore × stroke: 95.0 × 75.0 mm (3.74 × 2.95 in) Compression ratio: 8.30 :1 Recommended engine oil grade: API service SG type or higher, JASO standard MA Engine oil quantity: Without oil filter element replacement: 3.00 L (3.17 US qt, 2.64 Imp.qt) With oil filter element replacement: 3.10 L (3.28...
....0 kg (613 lb) Engine: Engine type: Air cooled 4-stroke, SOHC Cylinder arrangement: V-type 2-cylinder Displacement: 1063.0 cm³ Bore × stroke: 95.0 × 75.0 mm (3.74 × 2.95 in) Compression ratio: 8.30 :1 Recommended engine oil grade: API service SG type or higher, JASO standard MA Engine oil quantity: Without oil filter element replacement: 3.00 L (3.17 US qt, 2.64 Imp.qt) With oil filter element replacement: 3.10 L (3.28...

Owners Manual
Page 88
... light: 12 V, 1.7 W × 1 Oil level warning light: 12 V, 1.7 W × 1 Turn signal indicator light: 12 V, 1.7 W × 1 Engine trouble warning light: 12 V, 1.7 W × 1 Signaling system fuse: 10.0 A Ignition fuse: 10.0 A Carburetor heater fuse: 15.0 A Ignitor unit fuse: 5.0 A Backup fuse: 5.0 A Front suspension: Type: Telescopic fork Spring/shock absorber type: Coil spring/oil damper Wheel travel: 140.0 mm (5.51 in) Rear suspension: Type: Swingarm (link suspension) Spring/shock absorber type: Coil spring/gas-oil damper Wheel travel: 113.0 mm (4.45 in) 9 Electrical system: Ignition...
... light: 12 V, 1.7 W × 1 Oil level warning light: 12 V, 1.7 W × 1 Turn signal indicator light: 12 V, 1.7 W × 1 Engine trouble warning light: 12 V, 1.7 W × 1 Signaling system fuse: 10.0 A Ignition fuse: 10.0 A Carburetor heater fuse: 15.0 A Ignitor unit fuse: 5.0 A Backup fuse: 5.0 A Front suspension: Type: Telescopic fork Spring/shock absorber type: Coil spring/oil damper Wheel travel: 140.0 mm (5.51 in) Rear suspension: Type: Swingarm (link suspension) Spring/shock absorber type: Coil spring/gas-oil damper Wheel travel: 113.0 mm (4.45 in) 9 Electrical system: Ignition...
Owners Manual
Page 95
... purchaser of each Yamaha motorcycle covered by this warranty with all apparent defects within the period listed immediately below. also warrants to remain in materials and workmanship which arise solely as a result of owner abuse and/or lack of purchase, with headlight, stoplight, and turn signals shall be free from the date of proper maintenance, are not qualitatively...
... purchaser of each Yamaha motorcycle covered by this warranty with all apparent defects within the period listed immediately below. also warrants to remain in materials and workmanship which arise solely as a result of owner abuse and/or lack of purchase, with headlight, stoplight, and turn signals shall be free from the date of proper maintenance, are not qualitatively...
Owners Manual
Page 96
... are a qualified mechanic and follow the procedures specified in the Owner's Manual, that Yamaha Motor Corporation, U.S.A. Specific examples include: Running the machine out of sale, and upon request. A. Q. If a question or problem arises regarding the warranty, first contact the owner of normal maintenance services, non-warranty repairs, accident and collision damages, and oil, oil filters, air filters, spark plugs, and brake shoes. Each Yamaha motorcycle dealer is in accordance with a broken or damaged...
... are a qualified mechanic and follow the procedures specified in the Owner's Manual, that Yamaha Motor Corporation, U.S.A. Specific examples include: Running the machine out of sale, and upon request. A. Q. If a question or problem arises regarding the warranty, first contact the owner of normal maintenance services, non-warranty repairs, accident and collision damages, and oil, oil filters, air filters, spark plugs, and brake shoes. Each Yamaha motorcycle dealer is in accordance with a broken or damaged...

Owners Manual
Page 99
... Maintenance, emission control system ...7-3 Maintenance record ...10-5 Matte color, caution...8-1 Model label...10-2 D Dimmer switch ...4-4 E Engine break-in ...6-4 Engine idling speed, checking ...7-15 Engine oil...7-10 Engine, starting a warm...6-2 Engine stop switch...4-4 Engine trouble warning light ...4-2 N Neutral indicator light ...4-2 Noise regulation ...10-4 O Oil level warning light ...4-2 T Throttle cable free play, checking ...7-15 Throttle grip and cable, checking and lubricating ...7-25 Tires (XVS11AWY/XVS11ATY)...7-18 F Final gear oil ...7-12 Front and rear brake pads...
... Maintenance, emission control system ...7-3 Maintenance record ...10-5 Matte color, caution...8-1 Model label...10-2 D Dimmer switch ...4-4 E Engine break-in ...6-4 Engine idling speed, checking ...7-15 Engine oil...7-10 Engine, starting a warm...6-2 Engine stop switch...4-4 Engine trouble warning light ...4-2 N Neutral indicator light ...4-2 Noise regulation ...10-4 O Oil level warning light ...4-2 T Throttle cable free play, checking ...7-15 Throttle grip and cable, checking and lubricating ...7-25 Tires (XVS11AWY/XVS11ATY)...7-18 F Final gear oil ...7-12 Front and rear brake pads...