

Owners Manual
Page 6
... ...4-5 Brake lever ...4-5 Brake pedal ...4-5 Fuel tank cap ...4-6 Fuel ...4-6 Catalytic converters ...4-8 Fuel cock ...4-8 Starter (choke) knob ...4-9 Seats ...4-10 Helmet holder ...4-11 Storage compartment ...4-11 Adjusting the shock absorber assembly ...4-12 FOR YOUR SAFETY - PRE-OPERATION CHECKS ...5-1 OPERATION AND IMPORTANT RIDING POINTS ...6-1 Starting and warming up a cold engine ...6-1 Starting a warm engine ...6-2 Shifting ...6-2 Engine break-in ...6-4 Parking ...6-4 PERIODIC MAINTENANCE AND ADJUSTMENT ...7-1 Owner's tool kit ...7-2 Periodic maintenance chart for the emission control...
... ...4-5 Brake lever ...4-5 Brake pedal ...4-5 Fuel tank cap ...4-6 Fuel ...4-6 Catalytic converters ...4-8 Fuel cock ...4-8 Starter (choke) knob ...4-9 Seats ...4-10 Helmet holder ...4-11 Storage compartment ...4-11 Adjusting the shock absorber assembly ...4-12 FOR YOUR SAFETY - PRE-OPERATION CHECKS ...5-1 OPERATION AND IMPORTANT RIDING POINTS ...6-1 Starting and warming up a cold engine ...6-1 Starting a warm engine ...6-2 Shifting ...6-2 Engine break-in ...6-4 Parking ...6-4 PERIODIC MAINTENANCE AND ADJUSTMENT ...7-1 Owner's tool kit ...7-2 Periodic maintenance chart for the emission control...

Owners Manual
Page 7
STREET AND ENDURO MOTORCYCLE LIMITED WARRANTY ...10-7 YAMAHA EXTENDED SERVICE (Y.E.S.) ...10-9 TABLE OF CONTENTS Checking the steering ...7-28 Checking the wheel bearings ...7-28 Battery ...7-29 Replacing the fuses ...7-30 Replacing the headlight bulb ...7-31 Replacing a turn signal light bulb or the tail/brake light bulb ...7-32 Supporting the motorcycle ...7-33 Front wheel ...7-34 Rear wheel ...7-35 Troubleshooting ...7-37 Troubleshooting chart ...7-38 MOTORCYCLE CARE AND STORAGE ...8-1 Matte color caution ...8-1 Care ...8-1 Storage ...8-3 SPECIFICATIONS ...9-1 CONSUMER INFORMATION...10-1 ...
STREET AND ENDURO MOTORCYCLE LIMITED WARRANTY ...10-7 YAMAHA EXTENDED SERVICE (Y.E.S.) ...10-9 TABLE OF CONTENTS Checking the steering ...7-28 Checking the wheel bearings ...7-28 Battery ...7-29 Replacing the fuses ...7-30 Replacing the headlight bulb ...7-31 Replacing a turn signal light bulb or the tail/brake light bulb ...7-32 Supporting the motorcycle ...7-33 Front wheel ...7-34 Rear wheel ...7-35 Troubleshooting ...7-37 Troubleshooting chart ...7-38 MOTORCYCLE CARE AND STORAGE ...8-1 Matte color caution ...8-1 Care ...8-1 Storage ...8-3 SPECIFICATIONS ...9-1 CONSUMER INFORMATION...10-1 ...
Owners Manual
Page 12
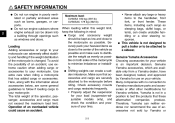
... or accessories to your tires. G • Never attach any large or heavy items to the motorcycle before riding. These items, including such cargo as barns, garages, or carports. Genuine Yamaha Accessories Choosing accessories for your load (suspension-adjustable models only), and check the condition and pressure of your motorcycle: The total weight of an overloaded vehicle could cause an accident. Genuine Yamaha accessories...
... or accessories to your tires. G • Never attach any large or heavy items to the motorcycle before riding. These items, including such cargo as barns, garages, or carports. Genuine Yamaha Accessories Choosing accessories for your load (suspension-adjustable models only), and check the condition and pressure of your motorcycle: The total weight of an overloaded vehicle could cause an accident. Genuine Yamaha accessories...
Owners Manual
Page 13
... handling, braking, and comfort. If electrical accessories exceed the capacity of the motorcycle's electrical system, an electric failure could result, which could cause a dangerous loss of lights or engine power. 2 Aftermarket Tires and Rims The tires and rims that came with your vehicle that it to make sure that change any way reduce ground clearance or cornering clearance, limit suspension travel, steering travel or control operation, or obscure lights or reflectors. • Accessories...
... handling, braking, and comfort. If electrical accessories exceed the capacity of the motorcycle's electrical system, an electric failure could result, which could cause a dangerous loss of lights or engine power. 2 Aftermarket Tires and Rims The tires and rims that came with your vehicle that it to make sure that change any way reduce ground clearance or cornering clearance, limit suspension travel, steering travel or control operation, or obscure lights or reflectors. • Accessories...
Owners Manual
Page 21
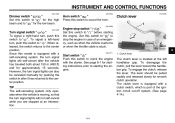
.... 4 EAU12711 Start switch " " Push this model is equipped with a clutch switch, which is moving, so that the turn , push this switch to sound the horn. Since this switch to the center position. To engage the clutch, release the lever. EAU12660 Clutch lever Turn signal switch " / " To signal a right-hand turn signal lights will self-cancel after it has returned to crank the engine with the starter. The lever should be canceled manually by...
.... 4 EAU12711 Start switch " " Push this model is equipped with a clutch switch, which is moving, so that the turn , push this switch to sound the horn. Since this switch to the center position. To engage the clutch, release the lever. EAU12660 Clutch lever Turn signal switch " / " To signal a right-hand turn signal lights will self-cancel after it has returned to crank the engine with the starter. The lever should be canceled manually by...

Owners Manual
Page 23
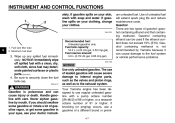
... of ignition such as the pilot lights of sparks, open , insert the key into the lock, and then turn off the engine and be sure to reduce the risk of the filler tube. When refueling, be sure that the fuel tank cap is a fire hazard. INSTRUMENT AND CONTROL FUNCTIONS EAU13121 Fuel tank cap 2. WARNING 1. 2. 3. 4. Leaking fuel is properly installed before riding. Insert the fuel tank cap into the fuel tank filler hole. EWA10881 WARNING Gasoline...
... of ignition such as the pilot lights of sparks, open , insert the key into the lock, and then turn off the engine and be sure to reduce the risk of the filler tube. When refueling, be sure that the fuel tank cap is a fire hazard. INSTRUMENT AND CONTROL FUNCTIONS EAU13121 Fuel tank cap 2. WARNING 1. 2. 3. 4. Leaking fuel is properly installed before riding. Insert the fuel tank cap into the fuel tank filler hole. EWA10881 WARNING Gasoline...
Owners Manual
Page 24
..., as well as to the fuel system or vehicle performance problems. NOTICE Use only unleaded gasoline. EAU13313 4 1. Your Yamaha engine has been designed to securely close the fuel tank cap. Be sure to use of a different brand or premi4-7 WARNING Gasoline is not recommended by mouth. Gasohol containing ethanol can cause injury or death. INSTRUMENT AND CONTROL FUNCTIONS ately. If you should...
..., as well as to the fuel system or vehicle performance problems. NOTICE Use only unleaded gasoline. EAU13313 4 1. Your Yamaha engine has been designed to securely close the fuel tank cap. Be sure to use of a different brand or premi4-7 WARNING Gasoline is not recommended by mouth. Gasohol containing ethanol can cause injury or death. INSTRUMENT AND CONTROL FUNCTIONS ately. If you should...

Owners Manual
Page 30
... before handling the shock absorber assembly. G Do not tamper with or attempt to open flame or other high heat source. Therefore, check 4-13 Read and understand the following information before starting off system.) EWA10241 4 1. INSTRUMENT AND CONTROL FUNCTIONS EWA10221 EAU15151 EAU15304 WARNING This shock absorber assembly contains highly pressurized nitrogen gas. Luggage strap holders Sidestand The sidestand is part of the ignition circuit...
... before handling the shock absorber assembly. G Do not tamper with or attempt to open flame or other high heat source. Therefore, check 4-13 Read and understand the following information before starting off system.) EWA10241 4 1. INSTRUMENT AND CONTROL FUNCTIONS EWA10221 EAU15151 EAU15304 WARNING This shock absorber assembly contains highly pressurized nitrogen gas. Luggage strap holders Sidestand The sidestand is part of the ignition circuit...
Owners Manual
Page 35
... the throttle. (See page 4-9.) 5. Turn the key to start, release the start switch. When the engine is warm when it responds quickly to loss of starter (choke) use depends upon the ambient temperature. G The transmission is in the neutral position. Start the engine by pushing the start switch, wait a few seconds, and then try again. The time necessary for more than necessary. Shift the transmission into the neutral position. WARNING...
... the throttle. (See page 4-9.) 5. Turn the key to start, release the start switch. When the engine is warm when it responds quickly to loss of starter (choke) use depends upon the ambient temperature. G The transmission is in the neutral position. Start the engine by pushing the start switch, wait a few seconds, and then try again. The time necessary for more than necessary. Shift the transmission into the neutral position. WARNING...
Owners Manual
Page 37
... the rear brakes to withstand the shock of time with the transmission in . 5. Always use the clutch while changing gears to avoid damaging the engine, transmission, and drive train, which are shown in normal operating conditions, use the brakes to shift the transmission into the neutral position.) 6. The neutral indicator light should go out. 3. Follow the same procedure when shifting to disengage the clutch. 2. EAU16720 Recommended shift points The recommended shift points...
... the rear brakes to withstand the shock of time with the transmission in . 5. Always use the clutch while changing gears to avoid damaging the engine, transmission, and drive train, which are shown in normal operating conditions, use the brakes to shift the transmission into the neutral position.) 6. The neutral indicator light should go out. 3. Follow the same procedure when shifting to disengage the clutch. 2. EAU16720 Recommended shift points The recommended shift points...

Owners Manual
Page 39
G Running the engine while servicing can cause shocks or fires. EWA15460 Emission controls not only function to ensure cleaner air, but are explained on the following periodic maintenance charts, the services related to properly maintain the vehicle or performing maintenance activities incorrectly may increase your vehicle in the periodic maintenance charts should be shortened. In the following pages. Maintenance, replacement, or repair of injury or death during use...
G Running the engine while servicing can cause shocks or fires. EWA15460 Emission controls not only function to ensure cleaner air, but are explained on the following periodic maintenance charts, the services related to properly maintain the vehicle or performing maintenance activities incorrectly may increase your vehicle in the periodic maintenance charts should be shortened. In the following pages. Maintenance, replacement, or repair of injury or death during use...

Owners Manual
Page 68
... connecting the negative lead. [ECA16840] 1. Turn the key to the electrical system and possibly a fire. [EWA15131] 2. WARNING! Do not use a fuse of the specified amperage. Fuse box 2. Headlight fuse Signaling system fuse Ignition fuse Carburetor heater fuse Ignitor unit fuse Spare fuse 7-30 Storing a discharged battery can cause permanent battery damage. Spare main fuse 4. Remove the blown fuse, and then install a new fuse of a higher amperage rating than two months, check it at...
... connecting the negative lead. [ECA16840] 1. Turn the key to the electrical system and possibly a fire. [EWA15131] 2. WARNING! Do not use a fuse of the specified amperage. Fuse box 2. Headlight fuse Signaling system fuse Ignition fuse Carburetor heater fuse Ignitor unit fuse Spare fuse 7-30 Storing a discharged battery can cause permanent battery damage. Spare main fuse 4. Remove the blown fuse, and then install a new fuse of a higher amperage rating than two months, check it at...

Owners Manual
Page 69
... if the device operates. 4. Remove the headlight unit by removing the screws. 7 1. G Headlight lens Do not affix any dirt and fingerprints on the electrical circuit in question to the headlight lens. PERIODIC MAINTENANCE AND ADJUSTMENT EAU23795 Specified fuses: Main fuse: 30.0 A Signaling system fuse: 10.0 A Ignition fuse: 10.0 A Headlight fuse: 15.0 A Carburetor heater fuse: 15.0 A Ignitor unit fuse: 5.0 A Replacing the headlight bulb This model is equipped with alcohol or thinner.
... if the device operates. 4. Remove the headlight unit by removing the screws. 7 1. G Headlight lens Do not affix any dirt and fingerprints on the electrical circuit in question to the headlight lens. PERIODIC MAINTENANCE AND ADJUSTMENT EAU23795 Specified fuses: Main fuse: 30.0 A Signaling system fuse: 10.0 A Ignition fuse: 10.0 A Headlight fuse: 15.0 A Carburetor heater fuse: 15.0 A Ignitor unit fuse: 5.0 A Replacing the headlight bulb This model is equipped with alcohol or thinner.

Owners Manual
Page 74
Final gear case 1. Lift the rear wheel off the ground according to support the drive shaft as an assembly: wheel, wheel axle, final gear case, and drive shaft. Install the rear wheel, wheel axle, final gear case, and drive shaft by pushing the wheel forward and guiding the drive shaft into the middle gear universal joint. 2. Lower the rear wheel so that it is on page 7-33. 8. Install the panel. 6. Bolt 2. Install the brake rod onto the brake camshaft lever, and...
Final gear case 1. Lift the rear wheel off the ground according to support the drive shaft as an assembly: wheel, wheel axle, final gear case, and drive shaft. Install the rear wheel, wheel axle, final gear case, and drive shaft by pushing the wheel forward and guiding the drive shaft into the middle gear universal joint. 2. Lower the rear wheel so that it is on page 7-33. 8. Install the panel. 6. Bolt 2. Install the brake rod onto the brake camshaft lever, and...

Owners Manual
Page 80
... fuel into each spark plug bore. Check and, if necessary, correct the tire air pressure, and then lift the motorcycle so that has an "OFF" position: Turn the fuel cock lever to prevent moisture from becoming degraded in order to protect the cylinders, piston rings, etc. MOTORCYCLE CARE AND STORAGE 2. Pour a teaspoonful of engine oil into the fuel tank. 4. Cover the muffler outlets with oil.) WARNING! Remove the battery...
... fuel into each spark plug bore. Check and, if necessary, correct the tire air pressure, and then lift the motorcycle so that has an "OFF" position: Turn the fuel cock lever to prevent moisture from becoming degraded in order to protect the cylinders, piston rings, etc. MOTORCYCLE CARE AND STORAGE 2. Pour a teaspoonful of engine oil into the fuel tank. 4. Cover the muffler outlets with oil.) WARNING! Remove the battery...
Owners Manual
Page 81
...: BDS28 x 2 Spark plug(s): Manufacturer/model: NGK/DPR7EA-9 Manufacturer/model: DENSO/X22EPR-U9 Spark plug gap: 0.8-0.9 mm (0.031-0.035 in) Weight: With oil and fuel: XVS65A 233 kg (514 lb) XVS65AC 235 kg (518 lb) Engine: Engine type: Air cooled 4-stroke, SOHC Cylinder arrangement: V-type 2-cylinder Displacement: 649 cm³ Bore × stroke: 81.0 × 63.0 mm (3.19 × 2.48 in) Compression ratio: 9.00 :1 Starting system: Electric starter Lubrication...
...: BDS28 x 2 Spark plug(s): Manufacturer/model: NGK/DPR7EA-9 Manufacturer/model: DENSO/X22EPR-U9 Spark plug gap: 0.8-0.9 mm (0.031-0.035 in) Weight: With oil and fuel: XVS65A 233 kg (514 lb) XVS65AC 235 kg (518 lb) Engine: Engine type: Air cooled 4-stroke, SOHC Cylinder arrangement: V-type 2-cylinder Displacement: 649 cm³ Bore × stroke: 81.0 × 63.0 mm (3.19 × 2.48 in) Compression ratio: 9.00 :1 Starting system: Electric starter Lubrication...

Owners Manual
Page 83
... heater fuse: 15.0 A Ignitor unit fuse: 5.0 A Bulb voltage, wattage × quantity: Headlight: 12 V, 60 W/55 W × 1 Tail/brake light: 12 V, 8.0 W/27.0 W × 1 Front turn signal/position light: 12 V, 23 W/8.0 W × 2 Rear turn signal light: 12 V, 21.0 W × 2 Meter lighting: 12 V, 1.7 W × 1 Neutral indicator light: 12 V, 1.7 W × 1 High beam indicator light: 12 V, 1.7 W × 1 Turn signal indicator light: 12 V, 1.7 W × 1 Engine trouble warning light: 12 V, 1.7 W × 1 Fuses: Main fuse: 30.0 A Headlight fuse: 15.0 A Signaling system fuse: 10.0 A Ignition fuse...
... heater fuse: 15.0 A Ignitor unit fuse: 5.0 A Bulb voltage, wattage × quantity: Headlight: 12 V, 60 W/55 W × 1 Tail/brake light: 12 V, 8.0 W/27.0 W × 1 Front turn signal/position light: 12 V, 23 W/8.0 W × 2 Rear turn signal light: 12 V, 21.0 W × 2 Meter lighting: 12 V, 1.7 W × 1 Neutral indicator light: 12 V, 1.7 W × 1 High beam indicator light: 12 V, 1.7 W × 1 Turn signal indicator light: 12 V, 1.7 W × 1 Engine trouble warning light: 12 V, 1.7 W × 1 Fuses: Main fuse: 30.0 A Headlight fuse: 15.0 A Signaling system fuse: 10.0 A Ignition fuse...
Owners Manual
Page 90
... warranty repairs will , free of the product's warranty period. b) Installation of parts or accessories that the vehicle is designed, built, and equipped so as to conform at such dealer's place of proper maintenance, are not qualitatively equivalent to any and all U.S. e) Accident or collision damage. In order for this warranty with a displacement of purchase, with headlight, stoplight, and turn signals...
... warranty repairs will , free of the product's warranty period. b) Installation of parts or accessories that the vehicle is designed, built, and equipped so as to conform at such dealer's place of proper maintenance, are not qualitatively equivalent to any and all U.S. e) Accident or collision damage. In order for this warranty with a displacement of purchase, with headlight, stoplight, and turn signals...
Owners Manual
Page 91
... upon your dealer for his setup, service and warranty repair work. Does the warranty cover incidental costs such as specified in the Owner's and Service Manual. What costs are general and overlap each manufacturer of a motor vehicle to repair of a safetyrelated defect and recall. If you should move after you are handled at the time of sale, and upon request. The customer's responsibility includes all first purchasers...
... upon your dealer for his setup, service and warranty repair work. Does the warranty cover incidental costs such as specified in the Owner's and Service Manual. What costs are general and overlap each manufacturer of a motor vehicle to repair of a safetyrelated defect and recall. If you should move after you are handled at the time of sale, and upon request. The customer's responsibility includes all first purchasers...

Owners Manual
Page 94
... Model label ...10-2 T Throttle cable free play, checking ...7-17 Throttle grip and cable, checking and lubricating ...7-25 Tires ...7-18 Tool kit...7-2 Troubleshooting ...7-37 Troubleshooting chart ...7-38 Turn signal indicator light ...4-2 Turn signal light bulb or tail/brake light bulb, replacing ...7-32 D Dimmer switch ...4-4 E Engine break-in...6-4 Engine idling speed, checking ...7-17 Engine oil and oil filter element ...7-12 Engine, starting a warm ...6-2 Engine stop switch ...4-4 Engine trouble warning light...4-2 N Neutral indicator light...4-2 Noise regulation...10-4 P Panels...
... Model label ...10-2 T Throttle cable free play, checking ...7-17 Throttle grip and cable, checking and lubricating ...7-25 Tires ...7-18 Tool kit...7-2 Troubleshooting ...7-37 Troubleshooting chart ...7-38 Turn signal indicator light ...4-2 Turn signal light bulb or tail/brake light bulb, replacing ...7-32 D Dimmer switch ...4-4 E Engine break-in...6-4 Engine idling speed, checking ...7-17 Engine oil and oil filter element ...7-12 Engine, starting a warm ...6-2 Engine stop switch ...4-4 Engine trouble warning light...4-2 N Neutral indicator light...4-2 Noise regulation...10-4 P Panels...