User Guide
Page 2
...kind, either implied or expressed, including, but not limited to revise this documentation, it is furnished under the copyright laws of 3Com Corporation. To uphold our policy, we are registered trademarks of the United States. No part of this documentation at any means ...Park South, Hemel Hempstead, Herts, HP2 7YU, U.K. If you are labelled according to make any software on a continual basis. Copyright © 3Com Technologies, 2004. All rights reserved. For civilian agencies: Restricted Rights Legend: Use, reproduction or disclosure is any derivative work (such as a ...
...kind, either implied or expressed, including, but not limited to revise this documentation, it is furnished under the copyright laws of 3Com Corporation. To uphold our policy, we are registered trademarks of the United States. No part of this documentation at any means ...Park South, Hemel Hempstead, Herts, HP2 7YU, U.K. If you are labelled according to make any software on a continual basis. Copyright © 3Com Technologies, 2004. All rights reserved. For civilian agencies: Restricted Rights Legend: Use, reproduction or disclosure is any derivative work (such as a ...
User Guide
Page 3
Contents About this Guide Naming Convention 5 Conventions 5 Feedback about this User Guide 6 Product Registration 6 Introduction Baseline Switch 2816-SFP Plus 7 Package Contents 8 How to Use the Baseline Switch 2816-SFP Plus Front and Rear Panels 9 Front Panel Features 9 Rear Panel Features 11 Installation Recommendations Positioning the Switch 13 Rack Mounting or Free Standing 13 Power Supply 13 Power Up 13 Spot Checks...
Contents About this Guide Naming Convention 5 Conventions 5 Feedback about this User Guide 6 Product Registration 6 Introduction Baseline Switch 2816-SFP Plus 7 Package Contents 8 How to Use the Baseline Switch 2816-SFP Plus Front and Rear Panels 9 Front Panel Features 9 Rear Panel Features 11 Installation Recommendations Positioning the Switch 13 Rack Mounting or Free Standing 13 Power Supply 13 Power Up 13 Spot Checks...
User Guide
Page 4
Membership VLANs 29 Trunking 30 Traffic Monitoring 32 System Tools 32 Restart 32 Configuration 33 Upgrade 33 Spanning Tree 35 802.1p Prioritization 36 Support 37 Using Discovery Running the Discovery Application 39 Windows Installation (95/98/XP/2000/2003 Server/NT) 39 Problem Solving Safety Information L'INFORMATION DE SÉCURITÉ IMPORTANTE WICHTIGE SICHERHEITSINFORMATIONEN Technical Information Related Standards 49 Environmental 49 Physical 49 Electrical 49 Technical Support Where To Go For Help 51 Register Your Product to Gain Service Benefits 51 Purchase Value-Added Services 51 ...
Membership VLANs 29 Trunking 30 Traffic Monitoring 32 System Tools 32 Restart 32 Configuration 33 Upgrade 33 Spanning Tree 35 802.1p Prioritization 36 Support 37 Using Discovery Running the Discovery Application 39 Windows Installation (95/98/XP/2000/2003 Server/NT) 39 Problem Solving Safety Information L'INFORMATION DE SÉCURITÉ IMPORTANTE WICHTIGE SICHERHEITSINFORMATIONEN Technical Information Related Standards 49 Environmental 49 Physical 49 Electrical 49 Technical Support Where To Go For Help 51 Register Your Product to Gain Service Benefits 51 Purchase Value-Added Services 51 ...
User Guide
Page 5
Category 3 and Category 5 Twisted Pair Cables are referred to as the Switch. Conventions Table 1 and Table 2 list conventions that differs from the information in ...word "enter" in Adobe Acrobat Reader Portable Document Format (PDF) on the 3Com World Wide Web site: http://www.3com.com Naming Convention Throughout this guide, the 3Com Baseline Switch 2816-SFP Plus is referred to potential loss of LANs (Local Area Networks). Keyboard key ... network equipment; ABOUT THIS GUIDE This guide is shipped with this 3Com Baseline Switch 2816-SFP Plus and contains information that are linked with...
Category 3 and Category 5 Twisted Pair Cables are referred to as the Switch. Conventions Table 1 and Table 2 list conventions that differs from the information in ...word "enter" in Adobe Acrobat Reader Portable Document Format (PDF) on the 3Com World Wide Web site: http://www.3com.com Naming Convention Throughout this guide, the 3Com Baseline Switch 2816-SFP Plus is referred to potential loss of LANs (Local Area Networks). Keyboard key ... network equipment; ABOUT THIS GUIDE This guide is shipped with this 3Com Baseline Switch 2816-SFP Plus and contains information that are linked with...
User Guide
Page 6
... equipment, and is part of the extensive Baseline range of 3Com products. Contact your Baseline Switch on the 3Com web site to receive up-to-date information on the title page) ■ Page number (if appropriate) Example: ■ 3Com Baseline Switch 2816-SFP Plus User Guide ■ Part Number DUA1648-5AAA0x... ■ Page 24 Do not use this document to 3Com at the place where it is defined in italics Italics are very important ...
... equipment, and is part of the extensive Baseline range of 3Com products. Contact your Baseline Switch on the 3Com web site to receive up-to-date information on the title page) ■ Page number (if appropriate) Example: ■ 3Com Baseline Switch 2816-SFP Plus User Guide ■ Part Number DUA1648-5AAA0x... ■ Page 24 Do not use this document to 3Com at the place where it is defined in italics Italics are very important ...
User Guide
Page 7
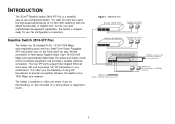
... can be free-standing, or rack mounted (in any combination. The Switch is shipped ready for easy, flexible connection to provide connectivity between the Switch and a 1000 Mbps core network. The Switch is ideal for office use configurable Switch. INTRODUCTION The 3Com® Baseline Switch 2816-SFP Plus is necessary. It is suitable for users who want the high-speed...
... can be free-standing, or rack mounted (in any combination. The Switch is shipped ready for easy, flexible connection to provide connectivity between the Switch and a 1000 Mbps core network. The Switch is ideal for office use configurable Switch. INTRODUCTION The 3Com® Baseline Switch 2816-SFP Plus is necessary. It is suitable for users who want the high-speed...

User Guide
Page 8
Package Contents The Switch comes with: ■ One power cord ■ Four standard height, self-adhesive rubber pads ■ One mounting kit ■ Installation CD ■ This User Guide ■ Warranty flyer The Switch is powered from the AC supply. 8
Package Contents The Switch comes with: ■ One power cord ■ Four standard height, self-adhesive rubber pads ■ One mounting kit ■ Installation CD ■ This User Guide ■ Warranty flyer The Switch is powered from the AC supply. 8
User Guide
Page 9
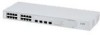
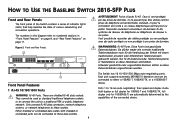
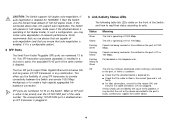
...privé ou public. Diese Porte sind geschützte Datensteckdosen. HOW TO USE THE BASELINE SWITCH 2816-SFP PLUS Front and Rear Panels The front panel of the Switch contains a series of indicator lights (LEDs) that help describe the state of the connected device... page 11. The numbers in this diagram refer to a traditional PBX or public telephone network. Figure 2 Front and Rear Panels 1 1 9 8 4 5 12 13 Baseline Switch 2816-SFP Plus 8 Module Present 3C16485 16 Link/Activity : Green = 1000M, Yellow = 10/1000M, Flash = Activity, Duplex : On = Full, Off = Half 2 4 53 ...
...privé ou public. Diese Porte sind geschützte Datensteckdosen. HOW TO USE THE BASELINE SWITCH 2816-SFP PLUS Front and Rear Panels The front panel of the Switch contains a series of indicator lights (LEDs) that help describe the state of the connected device... page 11. The numbers in this diagram refer to a traditional PBX or public telephone network. Figure 2 Front and Rear Panels 1 1 9 8 4 5 12 13 Baseline Switch 2816-SFP Plus 8 Module Present 3C16485 16 Link/Activity : Green = 1000M, Yellow = 10/1000M, Flash = Activity, Duplex : On = Full, Off = Half 2 4 53 ...
User Guide
Page 10
... (purchased separately) is installed in a slot and is active, the associated RJ-45 port of using SFP transceivers to provide connectivity between the Switch and remote 1000 Mbps workgroups or to 16. SFP ports are numbered 13 to create a high-capacity aggregated link backbone connection. If auto-negotiation is disabled. Packets are capable... Mbps. In such a configuration, you may be that auto-negotiation is enabled, if it has priority over the 10/100/1000 port of network performance. 3Com recommends that you use devices that are being received or transmitted on the...
... (purchased separately) is installed in a slot and is active, the associated RJ-45 port of using SFP transceivers to provide connectivity between the Switch and remote 1000 Mbps workgroups or to 16. SFP ports are numbered 13 to create a high-capacity aggregated link backbone connection. If auto-negotiation is disabled. Packets are capable... Mbps. In such a configuration, you may be that auto-negotiation is enabled, if it has priority over the 10/100/1000 port of network performance. 3Com recommends that you use devices that are being received or transmitted on the...
User Guide
Page 11
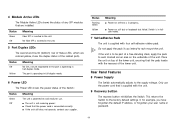
...with the recesses of the related ports. No fiber SFP is inserted in failsafe mode. 7 Self-adhesive Pads The unit is supplied with the unit. 9 Recovery button The recovery button reinitializes the Switch. Status Green Off Meaning Fiber SFP is in the slot. 5 Port Duplex LEDs ...The second and fourth (bottom) row of Status LEDs, which are installed. Switch is inserted in half-duplex mode.
...with the recesses of the related ports. No fiber SFP is inserted in failsafe mode. 7 Self-adhesive Pads The unit is supplied with the unit. 9 Recovery button The recovery button reinitializes the Switch. Status Green Off Meaning Fiber SFP is in the slot. 5 Port Duplex LEDs ...The second and fourth (bottom) row of Status LEDs, which are installed. Switch is inserted in half-duplex mode.
User Guide
Page 12
CAUTION: 3Com recommends that you back up your configuration settings before you recover the Switch, otherwise your configuration will be lost. Refer to "Configuration" on page 33 for details. 12
CAUTION: 3Com recommends that you back up your configuration settings before you recover the Switch, otherwise your configuration will be lost. Refer to "Configuration" on page 33 for details. 12
User Guide
Page 13
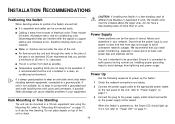
... enter the case of the unit. ■ Air flow around the unit and through the vents in the side of the case is not restricted (3Com recommends that the unit is installed in your system is recommended that you install power conditioning, especially in areas prone to black outs, power dips... not have a free-standing stack of different size Baseline or Superstack 3 units, the smaller units must be grounded. Ensure that : ■ It is not, refer to "Power LED" on the power supply at the socket. refer to the power supply outlet socket and switch on page 11. 13 Rack Mounting or Free...
... enter the case of the unit. ■ Air flow around the unit and through the vents in the side of the case is not restricted (3Com recommends that the unit is installed in your system is recommended that you install power conditioning, especially in areas prone to black outs, power dips... not have a free-standing stack of different size Baseline or Superstack 3 units, the smaller units must be grounded. Ensure that : ■ It is not, refer to "Power LED" on the power supply at the socket. refer to the power supply outlet socket and switch on page 11. 13 Rack Mounting or Free...
User Guide
Page 14
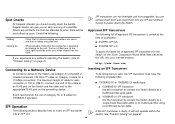
...-optic cable. ■ 1000BASE-LX SFP transceiver Use this URL into your internet browser: http://www.3com.com Connecting to a Network Device Inserting an SFP Transceiver To connect a device to the unit. If the SFP transceiver is operating by listening to the Switch use of Category 5e or 6 cables... for 1000BASE-T operation. You can give you an early warning of approved SFP transceivers for the Switch on the connecting device. 3Com recommends the use Category 5 unshielded or shielded (screened) 100 Ohm TP cable (or Category 3 cable for each connection ...
...-optic cable. ■ 1000BASE-LX SFP transceiver Use this URL into your internet browser: http://www.3com.com Connecting to a Network Device Inserting an SFP Transceiver To connect a device to the unit. If the SFP transceiver is operating by listening to the Switch use of Category 5e or 6 cables... for 1000BASE-T operation. You can give you an early warning of approved SFP transceivers for the Switch on the connecting device. 3Com recommends the use Category 5 unshielded or shielded (screened) 100 Ohm TP cable (or Category 3 cable for each connection ...
User Guide
Page 15
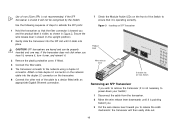
...into place. Use of non-3Com SFPs is invalid it will then easily slide out. 15 CAUTION: SFP transceivers are keyed and can be recognised by the Switch. the transceiver will not be properly inserted only one way. Figure 3 Inserting an SFP Transceiver Product label Module Present ...an appropriate Gigabit Ethernet connection. 7 Check the Module Active LEDs on host Switch LiFnlka/sAhc=tivAitcyt : Removing an SFP Transceiver If you wish to remove the transceiver (it is not necessary to power-down your Switch): 1 Disconnect the cable from the transceiver. 2 Move the wire release ...
...into place. Use of non-3Com SFPs is invalid it will then easily slide out. 15 CAUTION: SFP transceivers are keyed and can be recognised by the Switch. the transceiver will not be properly inserted only one way. Figure 3 Inserting an SFP Transceiver Product label Module Present ...an appropriate Gigabit Ethernet connection. 7 Check the Module Active LEDs on host Switch LiFnlka/sAhc=tivAitcyt : Removing an SFP Transceiver If you wish to remove the transceiver (it is not necessary to power-down your Switch): 1 Disconnect the cable from the transceiver. 2 Move the wire release ...
User Guide
Page 17
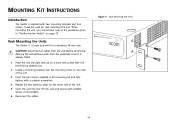
Remove the self-adhesive pads from the unit before continuing. Figure 4 Back Mounting the Units Baseline Switch 2816-SFP Plus 17 CAUTION: Disconnect all cables from the underside of unit, if already fitted. 1 Place the unit the right way up on a hard, flat surface with ...the front facing towards you should take note of the guidelines given in "Positioning the Switch" on one side of the unit. 5 Insert the unit into the 19-inch rack and secure with two mounting brackets and four screws. These are...
Remove the self-adhesive pads from the unit before continuing. Figure 4 Back Mounting the Units Baseline Switch 2816-SFP Plus 17 CAUTION: Disconnect all cables from the underside of unit, if already fitted. 1 Place the unit the right way up on a hard, flat surface with ...the front facing towards you should take note of the guidelines given in "Positioning the Switch" on one side of the unit. 5 Insert the unit into the 19-inch rack and secure with two mounting brackets and four screws. These are...
User Guide
Page 19
...(default) - For details on how to "Automatic Process" on the network then the Switch detects this , then you should use the Discovery program on page 23. 3Com recommends that you do not use Discovery to detect the Switch on the network, refer to "IP Settings" on page 39. ■ DHCP Addressing... - For example, if the MAC address is operating in a standalone mode, or no other Switches on how the Switch automatically obtains IP ...
...(default) - For details on how to "Automatic Process" on the network then the Switch detects this , then you should use the Discovery program on page 23. 3Com recommends that you do not use Discovery to detect the Switch on the network, refer to "IP Settings" on page 39. ■ DHCP Addressing... - For example, if the MAC address is operating in a standalone mode, or no other Switches on how the Switch automatically obtains IP ...

User Guide
Page 20
3 The Switch repeats step 2 until an unused IP address is found. 20
3 The Switch repeats step 2 until an unused IP address is found. 20

User Guide
Page 21
...perform port traffic monitoring on page 19. Getting Help On every screen, a Help button is no default password. Navigating Through the Switch Configuration Pages To get to the configuration pages, browse to set up time. ■ Password - When you to the context-sensitive... online help system and 3Com contact information. allows the administrator to the Switch, log in the location bar of your system password. displays the current status and activity logs of the Switch. ■ Support - contains a comprehensive online help system. ...
...perform port traffic monitoring on page 19. Getting Help On every screen, a Help button is no default password. Navigating Through the Switch Configuration Pages To get to the configuration pages, browse to set up time. ■ Password - When you to the context-sensitive... online help system and 3Com contact information. allows the administrator to the Switch, log in the location bar of your system password. displays the current status and activity logs of the Switch. ■ Support - contains a comprehensive online help system. ...
User Guide
Page 22
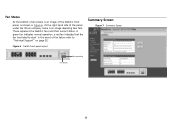
In the event of the Switch's front panel, as shown in Figure 6. Fan Status At the bottom of all screens is an image depicting two fans. Figure 6 Switch front panel layout Summary Screen Figure 7 Summary Screen Fan operating Fan failure 22 At the right hand side of the panel under the 3Com company name is an image of fan failure refer to start. These represent the Switch's fans and their current status. A green fan indicates normal operation, a red fan indicates that the fan has failed to "Technical Support" on page 52.
In the event of the Switch's front panel, as shown in Figure 6. Fan Status At the bottom of all screens is an image depicting two fans. Figure 6 Switch front panel layout Summary Screen Figure 7 Summary Screen Fan operating Fan failure 22 At the right hand side of the panel under the 3Com company name is an image of fan failure refer to start. These represent the Switch's fans and their current status. A green fan indicates normal operation, a red fan indicates that the fan has failed to "Technical Support" on page 52.

User Guide
Page 23
This is case sensitive. Figure 9 IP Settings Screen To change the password to prevent unauthorized access to view and amend your Switch's IP settings. IP Settings The IP Settings menu allows you can gain management access to save the new password. 23 ■ Management VLAN - Figure 8 Password ... Password field. 2 Enter the new password in the New Password field. 3 Enter the new password again in the Confirm Password field. 4 Click Apply to the Switch.
This is case sensitive. Figure 9 IP Settings Screen To change the password to prevent unauthorized access to view and amend your Switch's IP settings. IP Settings The IP Settings menu allows you can gain management access to save the new password. 23 ■ Management VLAN - Figure 8 Password ... Password field. 2 Enter the new password in the New Password field. 3 Enter the new password again in the Confirm Password field. 4 Click Apply to the Switch.