
Getting Started Guide
Page 3
...Units On Top of Each Other 23 Stacking Units 23 The Power-up Sequence 24 Powering-up the Switch 4200 Family 24 Checking for Correct Operation of Hardware Features 12 Switch 4200 Family - CONTENTS ABOUT THIS GUIDE Conventions 8 Related Documentation 9 Accessing Online Documentation 10 1 INTRODUCING THE ...SUPERSTACK 3 SWITCH 4200 FAMILY About the Switch 4200 Family 12 Summary of LEDs 24 Connecting a Redundant Power System 25 Front View Detail 13 10BASE-T/ 100BASE-TX Ports...
...Units On Top of Each Other 23 Stacking Units 23 The Power-up Sequence 24 Powering-up the Switch 4200 Family 24 Checking for Correct Operation of Hardware Features 12 Switch 4200 Family - CONTENTS ABOUT THIS GUIDE Conventions 8 Related Documentation 9 Accessing Online Documentation 10 1 INTRODUCING THE ...SUPERSTACK 3 SWITCH 4200 FAMILY About the Switch 4200 Family 12 Summary of LEDs 24 Connecting a Redundant Power System 25 Front View Detail 13 10BASE-T/ 100BASE-TX Ports...

Getting Started Guide
Page 7
...equipment; This guide is intended for use by network administrators who are shipped with the following Switch 4200 Family models: ■ Switch 4226T (3C17300) - 24 10BASE-T/100BASE-TX ports, 2 10/100...to all the information you need to the following document: ■ SuperStack 3 Switch 4200 Family Getting Started Guide (part number DUA1730-0AAA03) available for download from the information ...SuperStack® 3 Switch 4200 in the release notes. For details on the Switch 4200 26-Port (3C17300A), Switch 4200 50-Port (3C17302A) and Switch 4200 28-Port (3C17304A), refer to install and...
...equipment; This guide is intended for use by network administrators who are shipped with the following Switch 4200 Family models: ■ Switch 4226T (3C17300) - 24 10BASE-T/100BASE-TX ports, 2 10/100...to all the information you need to the following document: ■ SuperStack 3 Switch 4200 Family Getting Started Guide (part number DUA1730-0AAA03) available for download from the information ...SuperStack® 3 Switch 4200 in the release notes. For details on the Switch 4200 26-Port (3C17300A), Switch 4200 50-Port (3C17302A) and Switch 4200 28-Port (3C17304A), refer to install and...

Getting Started Guide
Page 11
... the Switch 26-Port (3C17300A), Switch 50-Port (3C17302A) and Switch 28-Port (3C17304A), refer to the following document: ■ SuperStack 3 Switch 4200 Family Getting Started Guide (part number DUA1730-0AAA03) available for download from the 3Com Web site, www.3Com.com. It covers summaries of hardware and software features and also the following...
... the Switch 26-Port (3C17300A), Switch 50-Port (3C17302A) and Switch 28-Port (3C17304A), refer to the following document: ■ SuperStack 3 Switch 4200 Family Getting Started Guide (part number DUA1730-0AAA03) available for download from the 3Com Web site, www.3Com.com. It covers summaries of hardware and software features and also the following...

Getting Started Guide
Page 12
... or a problem in the "physical" interconnection to any SuperStack® system as your network grows. You can also add the Switch 4200 Family to another port and react accordingly. Traffic Prioritization Supported (IEEE 802.ID): 2 queues per port Ethernet and Fast Ethernet Auto-negotiating...) (3C16071, 3C16071A or 3C16071B) Mounting 19-inch rack or stand-alone mounting 12 CHAPTER 1: INTRODUCING THE SUPERSTACK 3 SWITCH 4200 SERIES About the Switch 4200 Family The Switch 4200 Family are single speed ports. Summary of : ■ 24 or 48 10BASE-T/100BASE-TX ports ■ 2 10/100...
... or a problem in the "physical" interconnection to any SuperStack® system as your network grows. You can also add the Switch 4200 Family to another port and react accordingly. Traffic Prioritization Supported (IEEE 802.ID): 2 queues per port Ethernet and Fast Ethernet Auto-negotiating...) (3C16071, 3C16071A or 3C16071B) Mounting 19-inch rack or stand-alone mounting 12 CHAPTER 1: INTRODUCING THE SUPERSTACK 3 SWITCH 4200 SERIES About the Switch 4200 Family The Switch 4200 Family are single speed ports. Summary of : ■ 24 or 48 10BASE-T/100BASE-TX ports ■ 2 10/100...

Getting Started Guide
Page 13
... 24 48 Power/ Self Test 1 Up Down 2 3 Alert 4 Unit 49 50 Alert LED 10/100/1000BASE-T ports Figure 3 Switch 4228G (3C17304) - About the Switch 4200 Series 13 Switch 4200 Family - front view 10BASE-T / 100BASE-TX RJ-45 Ports Unit LEDs Power / Self Test LED 1 13 2 14 3 15 4 16 5 17 6 18 7 19 8 20...
... 24 48 Power/ Self Test 1 Up Down 2 3 Alert 4 Unit 49 50 Alert LED 10/100/1000BASE-T ports Figure 3 Switch 4228G (3C17304) - About the Switch 4200 Series 13 Switch 4200 Family - front view 10BASE-T / 100BASE-TX RJ-45 Ports Unit LEDs Power / Self Test LED 1 13 2 14 3 15 4 16 5 17 6 18 7 19 8 20...

Getting Started Guide
Page 14
... to the SuperStack 3 Switch 4228G only. Either shielded or unshielded data cables with RJ-45 connectors at both ends. 14 CHAPTER 1: INTRODUCING THE SUPERSTACK 3 SWITCH 4200 SERIES WARNING: RJ-45 Ports. These are shielded RJ-45 data sockets. Alternatively, you the flexibility of a link. These ports provide 10/100/1000 Mbps...
... to the SuperStack 3 Switch 4228G only. Either shielded or unshielded data cables with RJ-45 connectors at both ends. 14 CHAPTER 1: INTRODUCING THE SUPERSTACK 3 SWITCH 4200 SERIES WARNING: RJ-45 Ports. These are shielded RJ-45 data sockets. Alternatively, you the flexibility of a link. These ports provide 10/100/1000 Mbps...

Getting Started Guide
Page 15
.... Green flashing Packets are fixed by LEDs" on the port. For information on the port. alternating Off No link is enabled. (continued) About the Switch 4200 Series 15 Fiber GBIC's. Green / Yellow A 10 or 100 Mbps link is present, but the port is auto-negotiation enabled, where speed, duplex and flow...
.... Green flashing Packets are fixed by LEDs" on the port. For information on the port. alternating Off No link is enabled. (continued) About the Switch 4200 Series 15 Fiber GBIC's. Green / Yellow A 10 or 100 Mbps link is present, but the port is auto-negotiation enabled, where speed, duplex and flow...

Getting Started Guide
Page 16
... Power/Self Test LED Green The Switch is present. Off The Switch is not receiving power or there is a fault with other Switch 4200 Family units the LED indicates the position of the unit in the stack and that a link is enabled. Off The Switch Alert LED has... has failed its Power On Self Test. Unit LED number 1 can also indicate a stand-alone Switch. 16 CHAPTER 1: INTRODUCING THE SUPERSTACK 3 SWITCH 4200 SERIES LED Color Indicates Green flashing Packets are being transmitted/received on the port. Unit LEDs 1-4 Green When the Switch forms a stack with the Power...
... Power/Self Test LED Green The Switch is present. Off The Switch is not receiving power or there is a fault with other Switch 4200 Family units the LED indicates the position of the unit in the stack and that a link is enabled. Off The Switch Alert LED has... has failed its Power On Self Test. Unit LED number 1 can also indicate a stand-alone Switch. 16 CHAPTER 1: INTRODUCING THE SUPERSTACK 3 SWITCH 4200 SERIES LED Color Indicates Green flashing Packets are being transmitted/received on the port. Unit LEDs 1-4 Green When the Switch forms a stack with the Power...

Getting Started Guide
Page 17
... (RPS). See "Connecting a Redundant Power System" on page 25. Console Port The console port allows you can use this socket System Socket to connect a Switch 4200 to connect a terminal and perform remote or local out-of-band management. Rear View Detail Supply Data Warning Label Console (max) 19200,8,1,N Power Socket Redundant... bit. The console port uses a standard null modem cable and is set to any supply voltage in the range 90-240 VAC. About the Switch 4200 Series 17 Switch 4200 Family Figure 4 Switch 4200 Family - rear view -
... (RPS). See "Connecting a Redundant Power System" on page 25. Console Port The console port allows you can use this socket System Socket to connect a Switch 4200 to connect a terminal and perform remote or local out-of-band management. Rear View Detail Supply Data Warning Label Console (max) 19200,8,1,N Power Socket Redundant... bit. The console port uses a standard null modem cable and is set to any supply voltage in the range 90-240 VAC. About the Switch 4200 Series 17 Switch 4200 Family Figure 4 Switch 4200 Family - rear view -

Getting Started Guide
Page 18
... Filtering enabled Rapid Spanning Tree Protocol Enabled Fast Start: Enabled on all other traffic. 18 CHAPTER 1: INTRODUCING THE SUPERSTACK 3 SWITCH 4200 SERIES Default Settings Table 5 shows the default settings for all ports RMON Alarm Enabled Smart Auto-Sensing Enabled LACP (10/100/1000BASE...Service (QoS) All ports prioritize NBX VoIP IP. All ports set to "best effort" for the Switch 4200 Family: Table 5 Default Settings Feature Switch 4200 Family Automatic IP Configuration Enabled Port Status Enabled Port Speed All ports are auto-negotiated Duplex Mode All ports ...
... Filtering enabled Rapid Spanning Tree Protocol Enabled Fast Start: Enabled on all other traffic. 18 CHAPTER 1: INTRODUCING THE SUPERSTACK 3 SWITCH 4200 SERIES Default Settings Table 5 shows the default settings for all ports RMON Alarm Enabled Smart Auto-Sensing Enabled LACP (10/100/1000BASE...Service (QoS) All ports prioritize NBX VoIP IP. All ports set to "best effort" for the Switch 4200 Family: Table 5 Default Settings Feature Switch 4200 Family Automatic IP Configuration Enabled Port Status Enabled Port Speed All ports are auto-negotiated Duplex Mode All ports ...

Getting Started Guide
Page 19
...■ Rack-mounting ■ Placing Units On Top of this guide. VORSICHT: Sicherheitsinformationen. Bevor Sie Komponenten aus dem Switch 4200 entfernen oder dem Switch 4200 hinzufuegen oder Instandhaltungsarbeiten verrichten, lesen Sie die Sicherheitsanweisungen, die in Appendix A (Anhang A) in Appendix A of Each Other ■... you must read the safety information provided in diesem Handbuch aufgefuehrt sind. Avant d'installer ou d'enlever tout composant du Switch 4200 ou d'entamer une procédure de maintenance, lisez les informations relatives à la sécurité qui se...
...■ Rack-mounting ■ Placing Units On Top of this guide. VORSICHT: Sicherheitsinformationen. Bevor Sie Komponenten aus dem Switch 4200 entfernen oder dem Switch 4200 hinzufuegen oder Instandhaltungsarbeiten verrichten, lesen Sie die Sicherheitsanweisungen, die in Appendix A (Anhang A) in Appendix A of Each Other ■... you must read the safety information provided in diesem Handbuch aufgefuehrt sind. Avant d'installer ou d'enlever tout composant du Switch 4200 ou d'entamer une procédure de maintenance, lisez les informations relatives à la sécurité qui se...

Getting Started Guide
Page 21
Remove all cables from the underside of the Switch if they have been fitted. Rack-mounting The Switch 4200 Family are free-standing. To rack-mount your Switch: 1 Place the Switch the right way up on a hard flat surface, with the front facing towards ...
Remove all cables from the underside of the Switch if they have been fitted. Rack-mounting The Switch 4200 Family are free-standing. To rack-mount your Switch: 1 Place the Switch the right way up on a hard flat surface, with the front facing towards ...

Getting Started Guide
Page 23
...of each Switch, sticking one in the stack, from 1 at the bottom to 4 at the top. 3Com recommends that the pads of the upper unit line up with one on the front of the unit as ... 9 21 10 22 11 23 12 24 Power/ Self Test 1 25 / Up 26 / Down 2 3 Alert 4 Unit 27 27 28 3C17304A Superstack 3 Switch 4200 28-Port 28 1 13 2 14 3 15 4 16 5 17 6 18 7 19 8 20 9 21 10 22 11 23 12 24... Power/ Self Test 1 25 / Up 26 / Down 2 3 Alert 4 Unit 27 27 28 3C17304A Superstack 3 Switch 4200 28-Port 28 1 13 2 14 3 15 4 16 5 17 6 18 7 19 8 20 9 21 10 22 11 23 12 24...
...of each Switch, sticking one in the stack, from 1 at the bottom to 4 at the top. 3Com recommends that the pads of the upper unit line up with one on the front of the unit as ... 9 21 10 22 11 23 12 24 Power/ Self Test 1 25 / Up 26 / Down 2 3 Alert 4 Unit 27 27 28 3C17304A Superstack 3 Switch 4200 28-Port 28 1 13 2 14 3 15 4 16 5 17 6 18 7 19 8 20 9 21 10 22 11 23 12 24... Power/ Self Test 1 25 / Up 26 / Down 2 3 Alert 4 Unit 27 27 28 3C17304A Superstack 3 Switch 4200 28-Port 28 1 13 2 14 3 15 4 16 5 17 6 18 7 19 8 20 9 21 10 22 11 23 12 24...

Getting Started Guide
Page 24
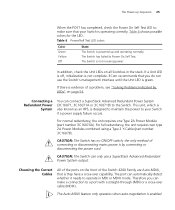
... except when the stack is already 4 units high. If however the unit being added takes the stack height above will renumber. ■ Removing a Switch 4200 Family unit from the middle of LEDs the LEDs light in the stack to divide into two stacks. If you are disabled and Operation of... port on that port again until the link is lost on the remaining stack. 24 CHAPTER 2: INSTALLING THE SWITCH Stack renumbering occurs when another Switch 4200 Family unit is added to the top of the existing stack will be disabled and its Power On Self Test (POST), which takes approximately 10...
... except when the stack is already 4 units high. If however the unit being added takes the stack height above will renumber. ■ Removing a Switch 4200 Family unit from the middle of LEDs the LEDs light in the stack to divide into two stacks. If you are disabled and Operation of... port on that port again until the link is lost on the remaining stack. 24 CHAPTER 2: INSTALLING THE SWITCH Stack renumbering occurs when another Switch 4200 Family unit is added to the top of the existing stack will be disabled and its Power On Self Test (POST), which takes approximately 10...
Getting Started Guide
Page 25
... the Switch. The Auto-MDIX feature only operates when auto-negotiation is designed to maintain the power to your Switch is not complete. 3Com recommends that you can connect a SuperStack Advanced Redundant Power System (3C16071, 3C16071A or 3C16071B) to operate in the stack. For normal ... the front of a problem, see "Solving Problems Indicated by connecting or disconnecting the power cord. If there is evidence of the Switch 4200 Family are Auto-MDIX, that your Switch if a power supply failure occurs. Therefore you do not use a SuperStack Advanced Redundant Power System...
... the Switch. The Auto-MDIX feature only operates when auto-negotiation is designed to maintain the power to your Switch is not complete. 3Com recommends that you can connect a SuperStack Advanced Redundant Power System (3C16071, 3C16071A or 3C16071B) to operate in the stack. For normal ... the front of a problem, see "Solving Problems Indicated by connecting or disconnecting the power cord. If there is evidence of the Switch 4200 Family are Auto-MDIX, that your Switch if a power supply failure occurs. Therefore you do not use a SuperStack Advanced Redundant Power System...

Getting Started Guide
Page 26
... to Hub (MDIX to MDIX) ✓ Switch to PC (NIC) ✕ (MDIX to use multimode or single-mode fiber optic cables. See Table 7. 3Com recommends that you do not, the cables Electrostatic Discharge (ESD) may damage the Switch's port. Many ports on workstations and servers are configured as MDI...devices if auto-negotiation is now a grounded port. The RJ-45 connector is disabled Cross-over cable. Table 7 Cables required to connect the Switch 4200 Family to other end to a female RJ-45 connector located, for this type of a UTP cable to multimode fiber cables only. ■ The...
... to Hub (MDIX to MDIX) ✓ Switch to PC (NIC) ✕ (MDIX to use multimode or single-mode fiber optic cables. See Table 7. 3Com recommends that you do not, the cables Electrostatic Discharge (ESD) may damage the Switch's port. Many ports on workstations and servers are configured as MDI...devices if auto-negotiation is now a grounded port. The RJ-45 connector is disabled Cross-over cable. Table 7 Cables required to connect the Switch 4200 Family to other end to a female RJ-45 connector located, for this type of a UTP cable to multimode fiber cables only. ■ The...

Getting Started Guide
Page 38
... the Command Line Interface physicalInterface - or ■ enter the gettingStarted command. Administer security system - Figure 10 Example top-level command line interface menu Menu options 3Com Superstack 3 Switch 4200 bridge - 38 CHAPTER 3: SETTING UP FOR MANAGEMENT top-level menu of the command line interface is , connected to a network.
... the Command Line Interface physicalInterface - or ■ enter the gettingStarted command. Administer security system - Figure 10 Example top-level command line interface menu Menu options 3Com Superstack 3 Switch 4200 bridge - 38 CHAPTER 3: SETTING UP FOR MANAGEMENT top-level menu of the command line interface is , connected to a network.

Getting Started Guide
Page 41
... ? At the Enter configuration method prompt enter manual. Manually Configuring IP Information 41 Figure 12 Example top-level command line interface menu Menu options 3Com Superstack 3 Switch 4200 bridge - The screen displays a summary of the Command Line Interface physicalInterface - The initial set up of Managing a Switch" on page 45. Logout of the...
... ? At the Enter configuration method prompt enter manual. Manually Configuring IP Information 41 Figure 12 Example top-level command line interface menu Menu options 3Com Superstack 3 Switch 4200 bridge - The screen displays a summary of the Command Line Interface physicalInterface - The initial set up of Managing a Switch" on page 45. Logout of the...

Getting Started Guide
Page 44
... gettingStarted - If this address is no response from a DHCP server within one minute. Figure 14 Example top-level command line interface menu Menu options 3Com Superstack 3 Switch 4200 bridge - Administer security system - Administer traffic management Type ? 44 CHAPTER 3: SETTING UP FOR MANAGEMENT Viewing IP Information via the Console Port You are now...
... gettingStarted - If this address is no response from a DHCP server within one minute. Figure 14 Example top-level command line interface menu Menu options 3Com Superstack 3 Switch 4200 bridge - Administer security system - Administer traffic management Type ? 44 CHAPTER 3: SETTING UP FOR MANAGEMENT Viewing IP Information via the Console Port You are now...

Getting Started Guide
Page 59
... carefully before you must read the following safety information before carrying out any installation or removal of components, or any maintenance procedures on the Switch 4200 Series. Alle Anweisungen sind sorgfältig zu befolgen. Sie müssen die folgenden Sicherheitsinformationen' sorgfältig durchlesen, bevor Sie das Gerät installieren...
... carefully before you must read the following safety information before carrying out any installation or removal of components, or any maintenance procedures on the Switch 4200 Series. Alle Anweisungen sind sorgfältig zu befolgen. Sie müssen die folgenden Sicherheitsinformationen' sorgfältig durchlesen, bevor Sie das Gerät installieren...