
User Manual
Page 2
... ON/OFF 4 Set Language 4 Sensitivity Calibration 5 Keypad Sensitivity 5 Menu Navigation 6 Understanding Status Icons 6 Basic Operations 7 Recording a Video Clip 7 Taking a Still Picture 7 Projecting Pictures/Videos 8 Connecting Camcorder Projector to Media Devices 11 Advanced Operations 13 Menu Setting Items 13 Battery Life Indicator 15 Converting Video Files 16 Specifications 17 Troubleshooting 19 Limited...
... ON/OFF 4 Set Language 4 Sensitivity Calibration 5 Keypad Sensitivity 5 Menu Navigation 6 Understanding Status Icons 6 Basic Operations 7 Recording a Video Clip 7 Taking a Still Picture 7 Projecting Pictures/Videos 8 Connecting Camcorder Projector to Media Devices 11 Advanced Operations 13 Menu Setting Items 13 Battery Life Indicator 15 Converting Video Files 16 Specifications 17 Troubleshooting 19 Limited...
User Manual
Page 4
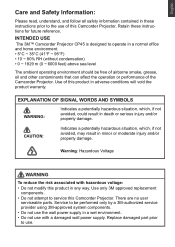
...use the wall power supply in a wet environment. • Do not use of this product in any way. INTENDED USE The 3M™ Camcorder Projector CP45 is designed to use. EXPLANATION OF SIGNAL WORDS AND SYMBOLS WARNING: Indicates a potentially hazardous situation, which , if not ...There are no user serviceable parts. Use only 3M approved replacement components. • Do not attempt to the use with hazardous voltage: • Do not modify this Camcorder Projector. Retain these instructions prior to service this Camcorder Projector. English Care and Safety Information: Please read...
...use the wall power supply in a wet environment. • Do not use of this product in any way. INTENDED USE The 3M™ Camcorder Projector CP45 is designed to use. EXPLANATION OF SIGNAL WORDS AND SYMBOLS WARNING: Indicates a potentially hazardous situation, which , if not ...There are no user serviceable parts. Use only 3M approved replacement components. • Do not attempt to the use with hazardous voltage: • Do not modify this Camcorder Projector. Retain these instructions prior to service this Camcorder Projector. English Care and Safety Information: Please read...
User Manual
Page 5
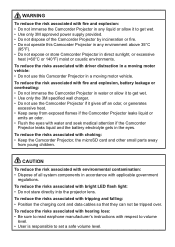
... manufacturer's instructions with respect to volume level. • User is responsible to get wet. • Use only the 3M specified wall charger. • Do not use this Camcorder Projector in any liquid or allow it gives off an odor, or generates excessive heat. • Keep away from young...associated with fire and explosion: • Do not immerse the Camcorder Projector in any environment above 35°C (95°F). • Do not expose or store Camcorder Projector in water or allow it to get wet. • Use only 3M approved power supply provided. • Do not dispose of ...
... manufacturer's instructions with respect to volume level. • User is responsible to get wet. • Use only the 3M specified wall charger. • Do not use this Camcorder Projector in any liquid or allow it gives off an odor, or generates excessive heat. • Keep away from young...associated with fire and explosion: • Do not immerse the Camcorder Projector in any environment above 35°C (95°F). • Do not expose or store Camcorder Projector in water or allow it to get wet. • Use only 3M approved power supply provided. • Do not dispose of ...
User Manual
Page 6
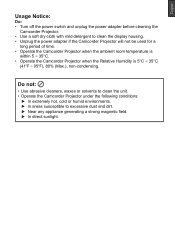
...display housing. • Unplug the power adapter if the Camcorder Projector will not be used for a long period of time. • Operate the Camcorder Projector when the ambient room temperature is within 5 ~ 35°C. • Operate the Camcorder Projector when the Relative Humidity is 5°C ~ 35&#... 80% (Max.), non-condensing. English Usage Notice: Do: • Turn off the power switch and unplug the power adapter before cleaning the Camcorder Projector. • Use a soft dry cloth with mild detergent to excessive dust and dirt. ►► Near any appliance generating a strong ...
...display housing. • Unplug the power adapter if the Camcorder Projector will not be used for a long period of time. • Operate the Camcorder Projector when the ambient room temperature is within 5 ~ 35°C. • Operate the Camcorder Projector when the Relative Humidity is 5°C ~ 35&#... 80% (Max.), non-condensing. English Usage Notice: Do: • Turn off the power switch and unplug the power adapter before cleaning the Camcorder Projector. • Use a soft dry cloth with mild detergent to excessive dust and dirt. ►► Near any appliance generating a strong ...
User Manual
Page 7
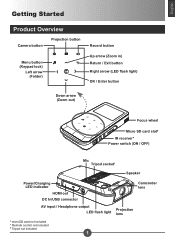
English Getting Started Product Overview Camera button Projection button Menu button (Keypad lock) Left arrow (Folder) Record button Up arrow (Zoom in) Return / Exit button Right arrow (LED flash light) OK / Enter button Down arrow (Zoom out) Focus wheel Micro SD card slot# IR receiver* Power switch (ON / OFF) Mic Tripod socket† Speaker Power/Charging LED Indicator HDMI out DC In/USB connector Camcorder lens AV input / Headphone output LED flash light Projection lens # microSD card not included * Remote control not included † Tripod not included 1
English Getting Started Product Overview Camera button Projection button Menu button (Keypad lock) Left arrow (Folder) Record button Up arrow (Zoom in) Return / Exit button Right arrow (LED flash light) OK / Enter button Down arrow (Zoom out) Focus wheel Micro SD card slot# IR receiver* Power switch (ON / OFF) Mic Tripod socket† Speaker Power/Charging LED Indicator HDMI out DC In/USB connector Camcorder lens AV input / Headphone output LED flash light Projection lens # microSD card not included * Remote control not included † Tripod not included 1
User Manual
Page 9
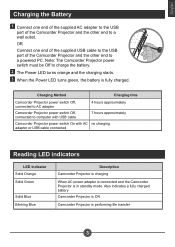
... standby mode. English Charging the Battery 1 Connect one end of the supplied USB cable to the USB port of the Camcorder Projector and the other end to a powered PC. Note: The Camcorder Projector power switch must be Off to a wall outlet. OR Connect one end of the supplied AC adapter to the... USB port of the Camcorder Projector and the other end to charge the battery. 2 The Power LED turns orange and the charging starts. 3 When the Power LED turns green, the ...
... standby mode. English Charging the Battery 1 Connect one end of the supplied USB cable to the USB port of the Camcorder Projector and the other end to a powered PC. Note: The Camcorder Projector power switch must be Off to a wall outlet. OR Connect one end of the supplied AC adapter to the... USB port of the Camcorder Projector and the other end to charge the battery. 2 The Power LED turns orange and the charging starts. 3 When the Power LED turns green, the ...
User Manual
Page 10
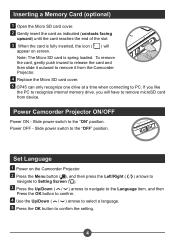
... as indicated (contacts facing upward) until the card reaches the end of the slot. 3 When the card is fully inserted, the icon ( appear on the Camcorder Projector. 2 Press the Menu button ( ), and then press the Left/Right ( / ) arrows to navigate to Setting Screen ( ). 3 Press the Up/Down ( / ...the OK button to confirm. 4 Use the Up/Down ( / ) arrows to select a language. 5 Press the OK button to the "OFF" position. Power Camcorder Projector ON/OFF Power ON - Power OFF - Slide power switch to confirm the setting. 4 Set Language 1 Power on screen. ) will have to remove microSD ...
... as indicated (contacts facing upward) until the card reaches the end of the slot. 3 When the card is fully inserted, the icon ( appear on the Camcorder Projector. 2 Press the Menu button ( ), and then press the Left/Right ( / ) arrows to navigate to Setting Screen ( ). 3 Press the Up/Down ( / ...the OK button to confirm. 4 Use the Up/Down ( / ) arrows to select a language. 5 Press the OK button to the "OFF" position. Power Camcorder Projector ON/OFF Power ON - Power OFF - Slide power switch to confirm the setting. 4 Set Language 1 Power on screen. ) will have to remove microSD ...
User Manual
Page 11
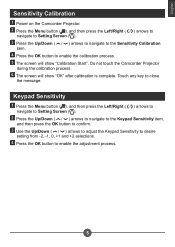
... to adjust the Keypad Sensitivity to desire setting from -2, -1, 0, +1 and +2 selections. 4 Press the OK button to close the message. English Sensitivity Calibration 1 Power on the Camcorder Projector. 2 Press the Menu button ( ), and then press the Left/Right ( / ) arrows to navigate to Setting Screen ( ). 3 Press the Up/Down ( / ) ... Calibration item. 4 Press the OK button to enable the calibration process. 5 The screen will show "Calibration Start". Do not touch the Camcorder Projector during the calibration process. 6 The screen will show "OK" after calibration is complete.
... to adjust the Keypad Sensitivity to desire setting from -2, -1, 0, +1 and +2 selections. 4 Press the OK button to close the message. English Sensitivity Calibration 1 Power on the Camcorder Projector. 2 Press the Menu button ( ), and then press the Left/Right ( / ) arrows to navigate to Setting Screen ( ). 3 Press the Up/Down ( / ) ... Calibration item. 4 Press the OK button to enable the calibration process. 5 The screen will show "Calibration Start". Do not touch the Camcorder Projector during the calibration process. 6 The screen will show "OK" after calibration is complete.
User Manual
Page 12
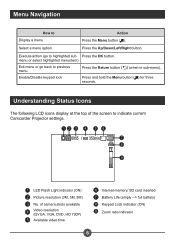
... highlighted sub Press the OK button. Enable/Disable keypad lock Press and hold the Menu button ( ) for three seconds. Menu Navigation How to indicate current Camcorder Projector settings. 0005 / 353min LED Flash Light indicator (ON) Picture resolution (3M, 5M, 8M) No. of the screen to Action Display a menu Press the Menu button ( ).
... highlighted sub Press the OK button. Enable/Disable keypad lock Press and hold the Menu button ( ) for three seconds. Menu Navigation How to indicate current Camcorder Projector settings. 0005 / 353min LED Flash Light indicator (ON) Picture resolution (3M, 5M, 8M) No. of the screen to Action Display a menu Press the Menu button ( ).
User Manual
Page 17
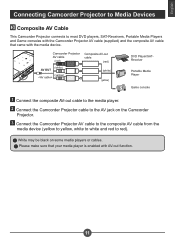
... AV cable (supplied) and the composite AV cable that your media player is enabled with the media device. Camcorder Projector AV cable (red) (white) AV OUT (yellow) Composite AV-out cable (red) (white) (yellow) DVD Player/SATReceiver Portable Media Player Game console 1 Connect the ...composite AV-out cable to the media player. 2 Connect the Camcorder Projector cable to the AV jack on some media players or cables. Please make sure that came with AV-out function. 11
... AV cable (supplied) and the composite AV cable that your media player is enabled with the media device. Camcorder Projector AV cable (red) (white) AV OUT (yellow) Composite AV-out cable (red) (white) (yellow) DVD Player/SATReceiver Portable Media Player Game console 1 Connect the ...composite AV-out cable to the media player. 2 Connect the Camcorder Projector cable to the AV jack on some media players or cables. Please make sure that came with AV-out function. 11
User Manual
Page 18
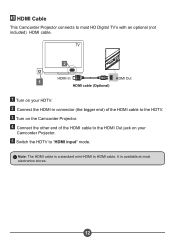
It is a standard mini-HDMI to HDMI cable. Note: The HDMI cable is available at most HD Digital TV's with an optional (not included) HDMI cable. TV HDMI In HDMI cable (Optional) HDMI Out 1 Turn on your HDTV. 2 Connect the HDMI-in connector (the bigger end) of the HDMI cable to the HDTV. 3 Turn on the Camcorder Projector. 4 Connect the other end of the HDMI cable to the HDMI Out jack on your Camcorder Projector. 5 Switch the HDTV to "HDMI input" mode. HDMI Cable This Camcorder Projector connects to most electronics stores. 12
It is a standard mini-HDMI to HDMI cable. Note: The HDMI cable is available at most HD Digital TV's with an optional (not included) HDMI cable. TV HDMI In HDMI cable (Optional) HDMI Out 1 Turn on your HDTV. 2 Connect the HDMI-in connector (the bigger end) of the HDMI cable to the HDTV. 3 Turn on the Camcorder Projector. 4 Connect the other end of the HDMI cable to the HDMI Out jack on your Camcorder Projector. 5 Switch the HDTV to "HDMI input" mode. HDMI Cable This Camcorder Projector connects to most electronics stores. 12
User Manual
Page 21
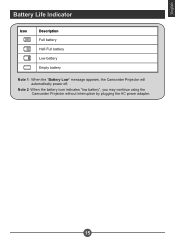
Note 2: When the battery icon indicates "low battery", you may continue using the Camcorder Projector without interruption by plugging the AC power adapter. 15 English Battery Life Indicator Icon Description Full battery Half-Full battery Low battery Empty battery Note 1: When the "Battery Low" message appears, the Camcorder Projector will automatically power off.
Note 2: When the battery icon indicates "low battery", you may continue using the Camcorder Projector without interruption by plugging the AC power adapter. 15 English Battery Life Indicator Icon Description Full battery Half-Full battery Low battery Empty battery Note 1: When the "Battery Low" message appears, the Camcorder Projector will automatically power off.
User Manual
Page 22
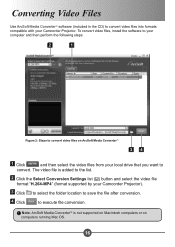
...to the list. 2 Click the Select Conversion Settings list ( ) button and select the video file format "H.264-MP4" (format supported by your Camcorder Projector. To convert video files, install the software to your local drive that you want to convert. Converting Video Files Use ArcSoft Media Converter™...; software (included in the CD) to convert video files into formats compatible with your Camcorder Projector). 3 Click to select the folder location to save the file after conversion. 4 Click to execute file conversion.
...to the list. 2 Click the Select Conversion Settings list ( ) button and select the video file format "H.264-MP4" (format supported by your Camcorder Projector. To convert video files, install the software to your local drive that you want to convert. Converting Video Files Use ArcSoft Media Converter™...; software (included in the CD) to convert video files into formats compatible with your Camcorder Projector). 3 Click to select the folder location to save the file after conversion. 4 Click to execute file conversion.
User Manual
Page 23
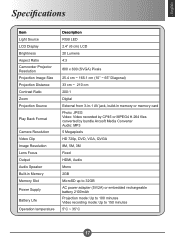
English Specifications Item Light Source LCD Display Brightness Aspect Ratio Camcorder Projector Resolution Projection Image Size Projection Distance Contrast Ratio Zoom Projection Source Play Back Format Camera Resolution Video Clip Image Resolution Lens Focus Output Audio ... Video: Video recorded by CP45 or MPEG4 H.264 files converted by bundle Arcsoft Media Converter Audio: MP3 5 Megapixels HD 720p, DVD, VGA, QVGA 8M, 5M, 3M Fixed HDMI, Audio Mono 2GB MicroSD up to 32GB AC power adapter (5V/2A) or embedded rechargeable battery 2100mAh Projection mode: Up to 100 minutes...
English Specifications Item Light Source LCD Display Brightness Aspect Ratio Camcorder Projector Resolution Projection Image Size Projection Distance Contrast Ratio Zoom Projection Source Play Back Format Camera Resolution Video Clip Image Resolution Lens Focus Output Audio ... Video: Video recorded by CP45 or MPEG4 H.264 files converted by bundle Arcsoft Media Converter Audio: MP3 5 Megapixels HD 720p, DVD, VGA, QVGA 8M, 5M, 3M Fixed HDMI, Audio Mono 2GB MicroSD up to 32GB AC power adapter (5V/2A) or embedded rechargeable battery 2100mAh Projection mode: Up to 100 minutes...
User Manual
Page 24
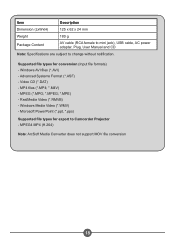
... 180 g Package Content AV cable (RCA female to mini jack), USB cable, AC power adapter, Plug, User Manual and CD Note: Specifications are subject to Camcorder Projector -
... 180 g Package Content AV cable (RCA female to mini jack), USB cable, AC power adapter, Plug, User Manual and CD Note: Specifications are subject to Camcorder Projector -
User Manual
Page 25
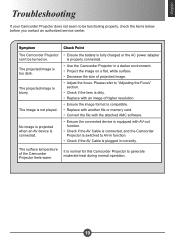
...not played. Please refer to "Adjusting the Focus" section. • Check if the lens is dirty. • Replace with an image of the Camcorder Projector feels warm. The image is blurry. The surface temperature of higher resolution. • Ensure the image format is compatible. • Replace with... AMC software. • Ensure the connected device is equipped with AV-out function. • Check if the AV Cable is connected, and the Camcorder Projector is switched to be turned on a flat, white surface. • Decrease the size of projected image. • Adjust the focus. The...
...not played. Please refer to "Adjusting the Focus" section. • Check if the lens is dirty. • Replace with an image of the Camcorder Projector feels warm. The image is blurry. The surface temperature of higher resolution. • Ensure the image format is compatible. • Replace with... AMC software. • Ensure the connected device is equipped with AV-out function. • Check if the AV Cable is connected, and the Camcorder Projector is switched to be turned on a flat, white surface. • Decrease the size of projected image. • Adjust the focus. The...
User Manual
Page 26
... to the above stated warranties within the applicable warranty period, your local 3M company for warranty information. • The 3M™ Camcorder Projector CP45 (the "3M product") is repaired, 3M will replace the 3M product with the same or equivalent model and with the 3M product are warranted to be free from defects in material or manufacture...
... to the above stated warranties within the applicable warranty period, your local 3M company for warranty information. • The 3M™ Camcorder Projector CP45 (the "3M product") is repaired, 3M will replace the 3M product with the same or equivalent model and with the 3M product are warranted to be free from defects in material or manufacture...