
User Manual
Page 2
... 1 Product Overview 1 Package Content 2 Charging the Battery 3 Reading LED indicators 3 Inserting a Memory Card (optional 4 Power Camcorder Projector ON/OFF 4 Set Language 4 Sensitivity Calibration 5 Keypad Sensitivity 5 Menu Navigation 6 Understanding Status Icons 6 Basic Operations 7 Recording a Video Clip 7 Taking a Still Picture 7 Projecting Pictures/Videos 8 Connecting Camcorder Projector to Media Devices 11 Advanced Operations 13 Menu Setting Items 13 Battery Life Indicator 15 Converting Video Files 16 Specifications 17 Troubleshooting 19 Limited Warranty 20
... 1 Product Overview 1 Package Content 2 Charging the Battery 3 Reading LED indicators 3 Inserting a Memory Card (optional 4 Power Camcorder Projector ON/OFF 4 Set Language 4 Sensitivity Calibration 5 Keypad Sensitivity 5 Menu Navigation 6 Understanding Status Icons 6 Basic Operations 7 Recording a Video Clip 7 Taking a Still Picture 7 Projecting Pictures/Videos 8 Connecting Camcorder Projector to Media Devices 11 Advanced Operations 13 Menu Setting Items 13 Battery Life Indicator 15 Converting Video Files 16 Specifications 17 Troubleshooting 19 Limited Warranty 20

User Manual
Page 3
... of 3M. S-VGA is connected. -Consult the dealer or an experienced radio/television technician for additional suggestions. Operation is suitable for a Class B digital device, pursuant to radio communications. If the time arises to protect the environment. Batteries and rechargeable batteries are ...installations. This equipment generates, uses, and can help to throw away your local recycling point. Technical Support Contact For technical support, call 1-866-631-1656 or email [email protected] Trademarks and Copyrights 3M is no force or effect unless expressly set...
... of 3M. S-VGA is connected. -Consult the dealer or an experienced radio/television technician for additional suggestions. Operation is suitable for a Class B digital device, pursuant to radio communications. If the time arises to protect the environment. Batteries and rechargeable batteries are ...installations. This equipment generates, uses, and can help to throw away your local recycling point. Technical Support Contact For technical support, call 1-866-631-1656 or email [email protected] Trademarks and Copyrights 3M is no force or effect unless expressly set...
User Manual
Page 4
... part prior to service this Camcorder Projector. English Care and Safety Information: Please read, understand, and follow all safety information contained in these instructions for future reference. Retain these instructions prior to the use . EXPLANATION OF SIGNAL WORDS AND SYMBOLS WARNING: Indicates a potentially hazardous situation, which , if not avoided, may result in any way. Use only 3M approved replacement components...
... part prior to service this Camcorder Projector. English Care and Safety Information: Please read, understand, and follow all safety information contained in these instructions for future reference. Retain these instructions prior to the use . EXPLANATION OF SIGNAL WORDS AND SYMBOLS WARNING: Indicates a potentially hazardous situation, which , if not avoided, may result in any way. Use only 3M approved replacement components...
User Manual
Page 5
... sure to set a safe volume level. To reduce the risk associated with fire and explosion, battery leakage or overheating: • Do not immerse the Camcorder Projector in a moving motor vehicle. To reduce the risks associated with respect to volume level. • User is responsible to read earphone manufacturer's instructions with bright LED flash light: • Do not stare directly into the projector lens.
... sure to set a safe volume level. To reduce the risk associated with fire and explosion, battery leakage or overheating: • Do not immerse the Camcorder Projector in a moving motor vehicle. To reduce the risks associated with respect to volume level. • User is responsible to read earphone manufacturer's instructions with bright LED flash light: • Do not stare directly into the projector lens.
User Manual
Page 6
... direct sunlight. Do not: • Use abrasive cleaners, waxes or solvents to clean the unit. • Operate the Camcorder Projector under the following conditions: ►► In extremely hot, cold or humid environments. ►► In areas susceptible to clean the display housing. • Unplug the power adapter if the Camcorder Projector will not be used for a long period of time. • Operate...
... direct sunlight. Do not: • Use abrasive cleaners, waxes or solvents to clean the unit. • Operate the Camcorder Projector under the following conditions: ►► In extremely hot, cold or humid environments. ►► In areas susceptible to clean the display housing. • Unplug the power adapter if the Camcorder Projector will not be used for a long period of time. • Operate...
User Manual
Page 7
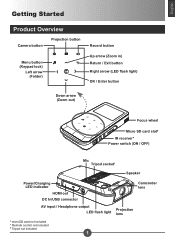
English Getting Started Product Overview Camera button Projection button Menu button (Keypad lock) Left arrow (Folder) Record button Up arrow (Zoom in) Return / Exit button Right arrow (LED flash light) OK / Enter button Down arrow (Zoom out) Focus wheel Micro SD card slot# IR receiver* Power switch (ON / OFF) Mic Tripod socket† Speaker Power/Charging LED Indicator HDMI out DC In/USB connector Camcorder lens AV input / Headphone output LED flash light Projection lens # microSD card not included * Remote control not included † Tripod not included 1
English Getting Started Product Overview Camera button Projection button Menu button (Keypad lock) Left arrow (Folder) Record button Up arrow (Zoom in) Return / Exit button Right arrow (LED flash light) OK / Enter button Down arrow (Zoom out) Focus wheel Micro SD card slot# IR receiver* Power switch (ON / OFF) Mic Tripod socket† Speaker Power/Charging LED Indicator HDMI out DC In/USB connector Camcorder lens AV input / Headphone output LED flash light Projection lens # microSD card not included * Remote control not included † Tripod not included 1
User Manual
Page 9
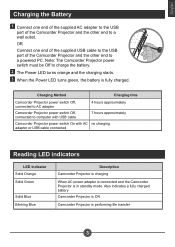
... a fully charged battery Camcorder Projector is ON Camcorder Projector is in standby mode. Note: The Camcorder Projector power switch must be Off to computer with USB cable 7 hours approximately Camcorder Projector power switch On with AC no charging adapter or USB cable connected Reading LED indicators LED Indicator Solid Orange Solid Green Solid Blue Blinking Blue Description Camcorder Projector is charging When AC power adapter is connected and the Camcorder Projector is performing file transfer 3 English Charging the Battery 1 Connect one...
... a fully charged battery Camcorder Projector is ON Camcorder Projector is in standby mode. Note: The Camcorder Projector power switch must be Off to computer with USB cable 7 hours approximately Camcorder Projector power switch On with AC no charging adapter or USB cable connected Reading LED indicators LED Indicator Solid Orange Solid Green Solid Blue Blinking Blue Description Camcorder Projector is charging When AC power adapter is connected and the Camcorder Projector is performing file transfer 3 English Charging the Battery 1 Connect one...
User Manual
Page 10
Set Language 1 Power on screen. ) will have to remove microSD card from the Camcorder Projector. 4 Replace the Micro SD card cover. 5 CP45 can only recognize one drive at a time when connecting to PC. Slide power switch to the "OFF" position. If you like the PC to recognize internal memory drive, you will Note: The Micro SD card is fully inserted, the icon ( appear on the Camcorder Projector. 2 Press the Menu button ( ), and...
Set Language 1 Power on screen. ) will have to remove microSD card from the Camcorder Projector. 4 Replace the Micro SD card cover. 5 CP45 can only recognize one drive at a time when connecting to PC. Slide power switch to the "OFF" position. If you like the PC to recognize internal memory drive, you will Note: The Micro SD card is fully inserted, the icon ( appear on the Camcorder Projector. 2 Press the Menu button ( ), and...
User Manual
Page 11
.... 3 Use the Up/Down ( / ) arrows to adjust the Keypad Sensitivity to desire setting from -2, -1, 0, +1 and +2 selections. 4 Press the OK button to enable the calibration process. 5 The screen will show "Calibration Start". Do not touch the Camcorder Projector during the calibration process. 6 The screen will show "OK" after calibration is complete. English Sensitivity Calibration 1 Power on the Camcorder Projector. 2 Press the Menu button...
.... 3 Use the Up/Down ( / ) arrows to adjust the Keypad Sensitivity to desire setting from -2, -1, 0, +1 and +2 selections. 4 Press the OK button to enable the calibration process. 5 The screen will show "Calibration Start". Do not touch the Camcorder Projector during the calibration process. 6 The screen will show "OK" after calibration is complete. English Sensitivity Calibration 1 Power on the Camcorder Projector. 2 Press the Menu button...
User Manual
Page 12
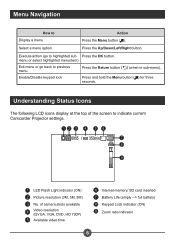
... the OK button. Select a menu option Press the Up/Down/Left/Right button. Understanding Status Icons The following LCD icons display at the top of camera shots available Video resolution (QVGA, VGA, DVD, HD 720P) Available video time 6 Internal memory/ SD card inserted Battery Life (empty --> full battery) Keypad Lock indicator (ON) Zoom ratio indicator menu or select highlighted menu item) Exit menu or go to Action Display a menu Press the Menu button ( ).
... the OK button. Select a menu option Press the Up/Down/Left/Right button. Understanding Status Icons The following LCD icons display at the top of camera shots available Video resolution (QVGA, VGA, DVD, HD 720P) Available video time 6 Internal memory/ SD card inserted Battery Life (empty --> full battery) Keypad Lock indicator (ON) Zoom ratio indicator menu or select highlighted menu item) Exit menu or go to Action Display a menu Press the Menu button ( ).
User Manual
Page 13
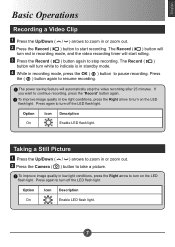
... flash light. 7 English Basic Operations Recording a Video Clip 1 Press the Up/Down ( / ) arrows to zoom in or zoom out. 2 Press the Record ( ) button to turn on the LED flash light. The power saving feature will turn red in or zoom out. 2 Press the Camera ( ) button to resume recording. Taking a Still Picture 1 Press the Up/Down ( / ) arrows to zoom in recording mode, and the video recording timer will start recording. Press the ( ) button again to take a picture. Press again to stop the video recording...
... flash light. 7 English Basic Operations Recording a Video Clip 1 Press the Up/Down ( / ) arrows to zoom in or zoom out. 2 Press the Record ( ) button to turn on the LED flash light. The power saving feature will turn red in or zoom out. 2 Press the Camera ( ) button to resume recording. Taking a Still Picture 1 Press the Up/Down ( / ) arrows to zoom in recording mode, and the video recording timer will start recording. Press the ( ) button again to take a picture. Press again to stop the video recording...
User Manual
Page 15
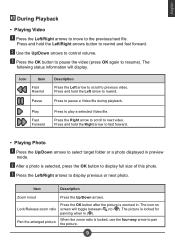
... to pause a Video file during playback. Press to next video. Press and hold the Right arrow to fast forward. • Playing Photo 1 Press the Up/Down arrows to select target folder or a photo displayed in ( ). English During Playback • Playing Video 1 Press the Left/Right arrows to move to resume). When the zoom ratio is selected, press the OK button to display full size of this photo. 3 Press...
... to pause a Video file during playback. Press to next video. Press and hold the Right arrow to fast forward. • Playing Photo 1 Press the Up/Down arrows to select target folder or a photo displayed in ( ). English During Playback • Playing Video 1 Press the Left/Right arrows to move to resume). When the zoom ratio is selected, press the OK button to display full size of this photo. 3 Press...
User Manual
Page 17
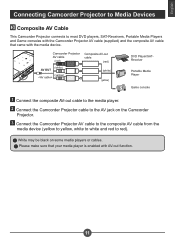
... black on the Camcorder Projector. 3 Connect the Camcorder Projector AV cable to the composite AV cable from the media device (yellow to yellow, white to white and red to most DVD players, SAT-Receivers, Portable Media Players and Game consoles with the Camcorder Projector AV cable (supplied) and the composite AV cable that your media player is enabled with the media device. English Connecting Camcorder Projector to Media Devices Composite AV Cable This Camcorder Projector connects to red). Camcorder...
... black on the Camcorder Projector. 3 Connect the Camcorder Projector AV cable to the composite AV cable from the media device (yellow to yellow, white to white and red to most DVD players, SAT-Receivers, Portable Media Players and Game consoles with the Camcorder Projector AV cable (supplied) and the composite AV cable that your media player is enabled with the media device. English Connecting Camcorder Projector to Media Devices Composite AV Cable This Camcorder Projector connects to red). Camcorder...
User Manual
Page 19
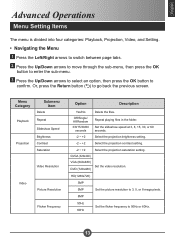
... saturation setting. DVD (720x480) HD(1280x720) 3MP 5MP Set the picture resolution to 3, 5, or 8 mega pixels. 8MP 50Hz 60Hz Set the flicker frequency to confirm. Menu Category Playback Projection Submenu Item Delete Repeat Slideshow Speed Brightness Contrast Saturation Video Resolution Video Picture Resolution Flicker Frequency Option Description Yes/No Off/Single/ All/Random 3/8/15/30/60 seconds -2 ~ +2 Delete the files. English Advanced Operations Menu Setting Items The menu is...
... saturation setting. DVD (720x480) HD(1280x720) 3MP 5MP Set the picture resolution to 3, 5, or 8 mega pixels. 8MP 50Hz 60Hz Set the flicker frequency to confirm. Menu Category Playback Projection Submenu Item Delete Repeat Slideshow Speed Brightness Contrast Saturation Video Resolution Video Picture Resolution Flicker Frequency Option Description Yes/No Off/Single/ All/Random 3/8/15/30/60 seconds -2 ~ +2 Delete the files. English Advanced Operations Menu Setting Items The menu is...
User Manual
Page 20
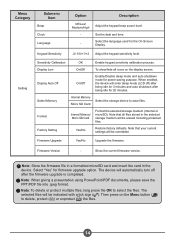
.../Disable sleep mode and auto shutdown mode for firmware upgrade option. Firmware Upgrade Yes/No Upgrade the firmware. When enabled, the device will enter sleep mode (LCD off after being idle for the On Screen Display. Internal Memory/ Micro SD Card Format the selected storage medium (internal or microSD). Note: When giving a presentation using PowerPoint/PDF documents, please save files. Sensitivity Calibration Display Icon Display Auto Off Select Memory Format Factory Setting OK Enable keypad sensitivity calibration process. Internal Memory Micro SD Card...
.../Disable sleep mode and auto shutdown mode for firmware upgrade option. Firmware Upgrade Yes/No Upgrade the firmware. When enabled, the device will enter sleep mode (LCD off after being idle for the On Screen Display. Internal Memory/ Micro SD Card Format the selected storage medium (internal or microSD). Note: When giving a presentation using PowerPoint/PDF documents, please save files. Sensitivity Calibration Display Icon Display Auto Off Select Memory Format Factory Setting OK Enable keypad sensitivity calibration process. Internal Memory Micro SD Card...
User Manual
Page 22
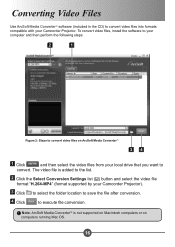
... Conversion Settings list ( ) button and select the video file format "H.264-MP4" (format supported by your Camcorder Projector). 3 Click to select the folder location to save the file after conversion. 4 Click to convert video files into formats compatible with your Camcorder Projector. Converting Video Files Use ArcSoft Media Converter™ software (included in the CD) to execute file conversion. To convert video files, install the software to your local drive that you want to convert video files on...
... Conversion Settings list ( ) button and select the video file format "H.264-MP4" (format supported by your Camcorder Projector). 3 Click to select the folder location to save the file after conversion. 4 Click to convert video files into formats compatible with your Camcorder Projector. Converting Video Files Use ArcSoft Media Converter™ software (included in the CD) to execute file conversion. To convert video files, install the software to your local drive that you want to convert video files on...
User Manual
Page 23
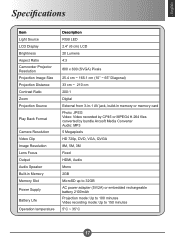
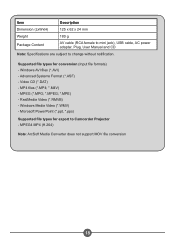
English Specifications Item Light Source LCD Display Brightness Aspect Ratio Camcorder Projector Resolution Projection Image Size Projection Distance Contrast Ratio Zoom Projection Source Play Back Format Camera Resolution Video Clip Image Resolution Lens Focus Output Audio Speaker Built-in Memory Memory Slot Power Supply Battery Life Operation temperature Description RGB LED 2.4" (6 cm) LCD 20 Lumens 4:3 800 x 600 (SVGA) Pixels 25.4 cm ~ 165.1 cm (10" ~ 65" Diagonal) 33 cm ~ 210 cm 200:1 Digital External from 3-in-1 AV jack...
English Specifications Item Light Source LCD Display Brightness Aspect Ratio Camcorder Projector Resolution Projection Image Size Projection Distance Contrast Ratio Zoom Projection Source Play Back Format Camera Resolution Video Clip Image Resolution Lens Focus Output Audio Speaker Built-in Memory Memory Slot Power Supply Battery Life Operation temperature Description RGB LED 2.4" (6 cm) LCD 20 Lumens 4:3 800 x 600 (SVGA) Pixels 25.4 cm ~ 165.1 cm (10" ~ 65" Diagonal) 33 cm ~ 210 cm 200:1 Digital External from 3-in-1 AV jack...
User Manual
Page 24
... Content AV cable (RCA female to mini jack), USB cable, AC power adapter, Plug, User Manual and CD Note: Specifications are subject to Camcorder Projector - Windows AVI files (*.AVI) - RealMedia Video (*.RMVB) - Advanced Systems Format (*.ASF) - Video CD (*.DAT) - MPEG (*.MPG; *.MPEG; *.MPE) - Windows Media Video (*.WMV) - MPEG4 MP4 (H.264) Note: ArcSoft Media Converter does not support MOV file conversion 18 Microsoft PowerPoint (*.ppt, *.pps) Supported file types for conversion (Input file formats) - MP4 files (*.MP4; *.M4V) - Supported file types for export...
... Content AV cable (RCA female to mini jack), USB cable, AC power adapter, Plug, User Manual and CD Note: Specifications are subject to Camcorder Projector - Windows AVI files (*.AVI) - RealMedia Video (*.RMVB) - Advanced Systems Format (*.ASF) - Video CD (*.DAT) - MPEG (*.MPG; *.MPEG; *.MPE) - Windows Media Video (*.WMV) - MPEG4 MP4 (H.264) Note: ArcSoft Media Converter does not support MOV file conversion 18 Microsoft PowerPoint (*.ppt, *.pps) Supported file types for conversion (Input file formats) - MP4 files (*.MP4; *.M4V) - Supported file types for export...
User Manual
Page 25
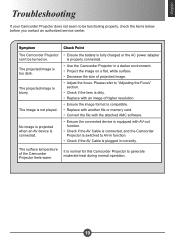
... the image format is compatible. • Replace with another file or memory card. • Convert the file with the attached AMC software. • Ensure the connected device is equipped with AV-out function. • Check if the AV Cable is connected, and the Camcorder Projector is switched to AV-in function. • Check if the AV Cable is dirty. • Replace with an image of projected image. • Adjust the focus. The projected image is not played...
... the image format is compatible. • Replace with another file or memory card. • Convert the file with the attached AMC software. • Ensure the connected device is equipped with AV-out function. • Check if the AV Cable is connected, and the Camcorder Projector is switched to AV-in function. • Check if the AV Cable is dirty. • Replace with an image of projected image. • Adjust the focus. The projected image is not played...
User Manual
Page 26
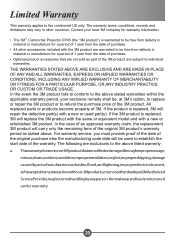
...; The 3M™ Camcorder Projector CP45 (the "3M product") is warranted to individual warranties. In the case of an approved warranty claim, the replacement 3M product will be , at 3M's option, to replace or repair the 3M product or to the above . For warranty service, you must provide proof of the date of the original purchase else the manufacturing code date will carry...
...; The 3M™ Camcorder Projector CP45 (the "3M product") is warranted to individual warranties. In the case of an approved warranty claim, the replacement 3M product will be , at 3M's option, to replace or repair the 3M product or to the above . For warranty service, you must provide proof of the date of the original purchase else the manufacturing code date will carry...
