

Safety Guide
Page 1
3 Digital Easel Product Safety Guide Including Installation Instructions December 2005 • 78-6970-9432-0 • Copyright © 2005, 3M Company. All Rights Reserved.
3 Digital Easel Product Safety Guide Including Installation Instructions December 2005 • 78-6970-9432-0 • Copyright © 2005, 3M Company. All Rights Reserved.
Safety Guide
Page 3
...any commercially sold whiteboard cleaner To reduce the risk associated with muscle strain: • Always use © 3M 2005. Intended Use The 3M Digital Easel, model DE343, was designed, and intended for use indoors via a USB data communications cable connected to hazardous voltage: •...; Do not use the 3M Digital Easel in an outdoor and/or wet environment To reduce the risk associated with use of this 3MTM Digital Easel, model DE343. All Rights Reserved. 3 This 3M Digital Easel is not intended for use by unsupervised children. Attention:...
...any commercially sold whiteboard cleaner To reduce the risk associated with muscle strain: • Always use © 3M 2005. Intended Use The 3M Digital Easel, model DE343, was designed, and intended for use indoors via a USB data communications cable connected to hazardous voltage: •...; Do not use the 3M Digital Easel in an outdoor and/or wet environment To reduce the risk associated with use of this 3MTM Digital Easel, model DE343. All Rights Reserved. 3 This 3M Digital Easel is not intended for use by unsupervised children. Attention:...
Safety Guide
Page 4
... risk associated with impact: • Always provide proper adult supervision when using the 3M Digital Easel around children • Always place the 3M Digital Easel on a stable and level surface • Install the 3M Digital Easel on a wall with 1/2 inch thick drywall minimum. • Use only 3M recommended wall mounting hardware • Follow all installation instructions carefully • Make sure...
... risk associated with impact: • Always provide proper adult supervision when using the 3M Digital Easel around children • Always place the 3M Digital Easel on a stable and level surface • Install the 3M Digital Easel on a wall with 1/2 inch thick drywall minimum. • Use only 3M recommended wall mounting hardware • Follow all installation instructions carefully • Make sure...

Safety Guide
Page 5
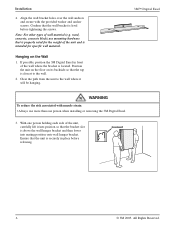
...use more than one for a Hollow Wall-Drywall WARNING • Install the 3M Digital Easel on a wall with the wall surface using one person when installing or removing the 3M Digital Easel 4. Installing the Wall Bracket Unpacking Wall Bracket and Hardware 1. Stand the shipping container on ... associated with muscle strain: • Always use a carpenter's level to ensure the proper level and then mark a minimum of the 3M Digital Easel. • Make sure mounting hardware is securely anchored to a solid structure. • Proper installation must be performed by qualified service ...
...use more than one for a Hollow Wall-Drywall WARNING • Install the 3M Digital Easel on a wall with the wall surface using one person when installing or removing the 3M Digital Easel 4. Installing the Wall Bracket Unpacking Wall Bracket and Hardware 1. Stand the shipping container on ... associated with muscle strain: • Always use a carpenter's level to ensure the proper level and then mark a minimum of the 3M Digital Easel. • Make sure mounting hardware is securely anchored to a solid structure. • Proper installation must be performed by qualified service ...
Safety Guide
Page 6
...securely in front of wall material (e.g. Position the unit on the floor on the Wall 1. With one person when installing or removing the 3M Digital Easel. 3. Ensure that the bracket slot is above the wall hanger bracket and then lower into position so that the unit is intended for ...hanger bracket. Hanging on its backside so that is properly rated for the weight of the unit, carefully lift it will be hanging. 3M™ Digital Easel WARNING To reduce the risk associated with the provided washer and anchor screws. Confirm that the wall bracket is located. If possible, ...
...securely in front of wall material (e.g. Position the unit on the floor on the Wall 1. With one person when installing or removing the 3M Digital Easel. 3. Ensure that the bracket slot is above the wall hanger bracket and then lower into position so that the unit is intended for ...hanger bracket. Hanging on its backside so that is properly rated for the weight of the unit, carefully lift it will be hanging. 3M™ Digital Easel WARNING To reduce the risk associated with the provided washer and anchor screws. Confirm that the wall bracket is located. If possible, ...
Safety Guide
Page 7
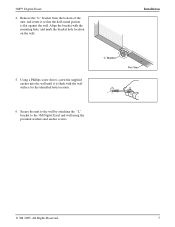
... with the wall surface for the identified hole location. 6. Secure the unit to the wall by attaching the "L" bracket to the 3M Digital Easel and wall using the provided washers and anchor screws. © 3M 2005. Installation 5. Remove the "L" bracket from the bottom of the unit, and rotate it is flat against the wall...
... with the wall surface for the identified hole location. 6. Secure the unit to the wall by attaching the "L" bracket to the 3M Digital Easel and wall using the provided washers and anchor screws. © 3M 2005. Installation 5. Remove the "L" bracket from the bottom of the unit, and rotate it is flat against the wall...