
Operation Guide
Page 3
... & System Setup Setting Up the Projector ...12 Projector Remote Control Remote Control Functions...16 Basic Operations Projector Start Up ...17 Stand By Mode ...17 Projector Power Down...17 Image Adjustment...18 Menu Navigation ...18 Troubleshooting Common Problems and Solutions ...27 Onscreen Messages...28 Maintenance Replacing Projection Lamp ...29 Reset Lamp Hours ...30 © 3M 2007. Limited Remedy; ENGLISH 3M™ Digital Media System 800 Series Contents Contents Introduction Thank You for Choosing 3M ...5 Safety Information Intended Use: ...6 SAVE THESE INSTRUCTIONS...
... & System Setup Setting Up the Projector ...12 Projector Remote Control Remote Control Functions...16 Basic Operations Projector Start Up ...17 Stand By Mode ...17 Projector Power Down...17 Image Adjustment...18 Menu Navigation ...18 Troubleshooting Common Problems and Solutions ...27 Onscreen Messages...28 Maintenance Replacing Projection Lamp ...29 Reset Lamp Hours ...30 © 3M 2007. Limited Remedy; ENGLISH 3M™ Digital Media System 800 Series Contents Contents Introduction Thank You for Choosing 3M ...5 Safety Information Intended Use: ...6 SAVE THESE INSTRUCTIONS...

Operation Guide
Page 6
Warning: Hazardous Voltage Warning: Hot Surface - High Temperature Lamp Attention: Read Accompanying Documentation 6 © 3M 2007. The use of the 3M™ Digital Media System 800 Series. Retain these instructions prior to the use of other replacement lamps, outdoor operation or different voltages has not been tested and could result in death or serious injury and/or property damage. Explanation of the projector. This projector is not intended for future...
Warning: Hazardous Voltage Warning: Hot Surface - High Temperature Lamp Attention: Read Accompanying Documentation 6 © 3M 2007. The use of the 3M™ Digital Media System 800 Series. Retain these instructions prior to the use of other replacement lamps, outdoor operation or different voltages has not been tested and could result in death or serious injury and/or property damage. Explanation of the projector. This projector is not intended for future...
Operation Guide
Page 7
... cleaning. - Do not use more than performing routine lamp replacement. In a domestic environment, this projector or power cord. - Use only 3M supplied wall mounting hardware. - Make sure set screws are no user serviceable parts inside the unit. - Do not remove any screws other than one person when installing or removing the projector. • To reduce the risk associated with hazard voltage, and/or impact, and/or tripping, and/or intense visible light...
... cleaning. - Do not use more than performing routine lamp replacement. In a domestic environment, this projector or power cord. - Use only 3M supplied wall mounting hardware. - Make sure set screws are no user serviceable parts inside the unit. - Do not remove any screws other than one person when installing or removing the projector. • To reduce the risk associated with hazard voltage, and/or impact, and/or tripping, and/or intense visible light...

Operation Guide
Page 8
... Introduction 3M™ Digital Media System 800 Series D CAUTION • To reduce the risk associated with tripping, and/or impact: - Except where prohibited by law, 3M will help you purchased the product of 3M Company. eBeam, e-Beam, eBeam Mouse, eBeam Moderator, eBeam Software, ImagePort and eBeam Presenter are included as original equipment in material and manufacture for warranty or repair service...
... Introduction 3M™ Digital Media System 800 Series D CAUTION • To reduce the risk associated with tripping, and/or impact: - Except where prohibited by law, 3M will help you purchased the product of 3M Company. eBeam, e-Beam, eBeam Mouse, eBeam Moderator, eBeam Software, ImagePort and eBeam Presenter are included as original equipment in material and manufacture for warranty or repair service...

Operation Guide
Page 9
...instruction manual may be required to provide reasonable protection against the 73/23/EEC (European Economic Community) for LVD (Low Voltage Directive) and fulfills these requirements. Operation ... such interference when operated in a commercial environment. CLASS A: This equipment generates, uses and can radiate radio frequency energy, and if not installed and used in Electrical and ...Part 15 of the FCC Rules, which case the user at his/her own expense will be required to take whatever measures may cause interference to radio communications. ENGLISH 3M™ Digital Media System 800...
...instruction manual may be required to provide reasonable protection against the 73/23/EEC (European Economic Community) for LVD (Low Voltage Directive) and fulfills these requirements. Operation ... such interference when operated in a commercial environment. CLASS A: This equipment generates, uses and can radiate radio frequency energy, and if not installed and used in Electrical and ...Part 15 of the FCC Rules, which case the user at his/her own expense will be required to take whatever measures may cause interference to radio communications. ENGLISH 3M™ Digital Media System 800...

Operation Guide
Page 10
.... All Rights Reserved. Control Panel 5. Take a few minutes to familiarize yourself with 3M's highest quality and safety standards to ensure smooth and trouble-free use in the years to protect projector. ENGLISH What's in the Box What's in the Box 3M™ Digital Media System 800 Series Shipping Contents The Digital Media System 800 is shipped with some of the necessary cables required for repair. Digital Media System 800 2. Use packing material to...
.... All Rights Reserved. Control Panel 5. Take a few minutes to familiarize yourself with 3M's highest quality and safety standards to ensure smooth and trouble-free use in the years to protect projector. ENGLISH What's in the Box What's in the Box 3M™ Digital Media System 800 Series Shipping Contents The Digital Media System 800 is shipped with some of the necessary cables required for repair. Digital Media System 800 2. Use packing material to...

Operation Guide
Page 11
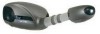
...4 1. Lamp Change Cover 6. 5 Button Keypad 7. Aluminum Arm 8. Automatically saves user settings 7. Projection Head 5. Input & Output Interfaces © 3M 2006. Arm Adjust Ring 2. Vikuiti™ Super Close Projection (SCP) technology 3. ENGLISH 3M™ Digital Media System 800 Series Product Description Product Description Machine Characteristics The Digital Media System 800 integrates metal halide lamp and Digital Light Processor (DLP) technology. It accepts input from computer and/or video sources and projects a super bright image. The Digital Media System 800...
...4 1. Lamp Change Cover 6. 5 Button Keypad 7. Aluminum Arm 8. Automatically saves user settings 7. Projection Head 5. Input & Output Interfaces © 3M 2006. Arm Adjust Ring 2. Vikuiti™ Super Close Projection (SCP) technology 3. ENGLISH 3M™ Digital Media System 800 Series Product Description Product Description Machine Characteristics The Digital Media System 800 integrates metal halide lamp and Digital Light Processor (DLP) technology. It accepts input from computer and/or video sources and projects a super bright image. The Digital Media System 800...

Operation Guide
Page 12
... image size. The Digital Media System 800 Series can project an image size between 50" (1,270 mm) 30" 50" and 85" (2,160 mm), measured diagonally (762 mm) (1270 mm) (when mounted on the wall. Mark the five mounting screw locations on the same plane as the projected surface). Ensure that the "level" line on wall if necessary. ENGLISH Installation and System Setup Installation & System Setup 3M™ Digital Media System 800 Series Setting Up the Projector 1. Mount whiteboard/projection screen...
... image size. The Digital Media System 800 Series can project an image size between 50" (1,270 mm) 30" 50" and 85" (2,160 mm), measured diagonally (762 mm) (1270 mm) (when mounted on the wall. Mark the five mounting screw locations on the same plane as the projected surface). Ensure that the "level" line on wall if necessary. ENGLISH Installation and System Setup Installation & System Setup 3M™ Digital Media System 800 Series Setting Up the Projector 1. Mount whiteboard/projection screen...
Operation Guide
Page 13
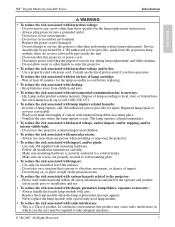
... unit on the screws and tighten securely. 8. Install, but do not tighten, five mounting screws. Masonry Hollow Wall Installation and System Setup Solid Wall/ Wall Stud 6. (Digital Media System 810 Only) Measure the thickness of the whiteboard/projection screen to use with your wall type. ENGLISH 3M™ Digital Media System 800 Series 5. Hang the metal mounting plate on the metal mounting plate. Note: Ensure locking pin is engaged. Screen Thickness 0-1" (0-25...
... unit on the screws and tighten securely. 8. Install, but do not tighten, five mounting screws. Masonry Hollow Wall Installation and System Setup Solid Wall/ Wall Stud 6. (Digital Media System 810 Only) Measure the thickness of the whiteboard/projection screen to use with your wall type. ENGLISH 3M™ Digital Media System 800 Series 5. Hang the metal mounting plate on the metal mounting plate. Note: Ensure locking pin is engaged. Screen Thickness 0-1" (0-25...

Operation Guide
Page 14
ENGLISH Installation and System Setup 10. Attach the safety cable securely to wall. Slide the contol panel cable tab into the slot at the bottom left of the unit. Power Cable Control Panel Cable 12. Connect the control panel and power cables as shown. 14 © 3M 2007. Cable should have no slack. 11. Note: Fully extend safety cable and then secure to the wall with an appropriate anchor. All Rights Reserved. If necessary, use tie wraps to minimize cable slack. 3M™ Digital Media System 800 Series Attach safety cable securely to stud or solid wall.
ENGLISH Installation and System Setup 10. Attach the safety cable securely to wall. Slide the contol panel cable tab into the slot at the bottom left of the unit. Power Cable Control Panel Cable 12. Connect the control panel and power cables as shown. 14 © 3M 2007. Cable should have no slack. 11. Note: Fully extend safety cable and then secure to the wall with an appropriate anchor. All Rights Reserved. If necessary, use tie wraps to minimize cable slack. 3M™ Digital Media System 800 Series Attach safety cable securely to stud or solid wall.

Operation Guide
Page 15
.... Adjust the projector arm length to the Digital Media System 800 Series Image Alignment Guide. 18. Extend the second section of the arm as shown on pages 8-9 of the image on the projector, the control panel or the remote. 15. Carefully lift the projector off the mounting plate. Installation and System Setup Main Power Switch Power Button Extend this section first Extend this section last Projection Focus Ring 17. To remove the projector from the wall, remove...
.... Adjust the projector arm length to the Digital Media System 800 Series Image Alignment Guide. 18. Extend the second section of the arm as shown on pages 8-9 of the image on the projector, the control panel or the remote. 15. Carefully lift the projector off the mounting plate. Installation and System Setup Main Power Switch Power Button Extend this section first Extend this section last Projection Focus Ring 17. To remove the projector from the wall, remove...

Operation Guide
Page 16
.... Menu: Display System Menus. Press again to the projector. Zoom Out: Increase size of selection. ENGLISH Remote Control Unit Projector Remote Control 3M™ Digital Media System 800 Series Remote Control Functions Aim the remote control toward the projection screen or at the sensor. Magnify Blank: Replace projected image with white background. Press desired remote button to send a signal to return image. Navigate menus. Volume -: Decrease Speaker Volume. Mouse L-Click Mouse R-Click Enter: Enter button for confirmation of the displayed image. Power: Power...
.... Menu: Display System Menus. Press again to the projector. Zoom Out: Increase size of selection. ENGLISH Remote Control Unit Projector Remote Control 3M™ Digital Media System 800 Series Remote Control Functions Aim the remote control toward the projection screen or at the sensor. Magnify Blank: Replace projected image with white background. Press desired remote button to send a signal to return image. Navigate menus. Volume -: Decrease Speaker Volume. Mouse L-Click Mouse R-Click Enter: Enter button for confirmation of the displayed image. Power: Power...
Operation Guide
Page 17
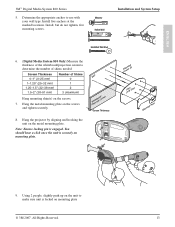
... Panel to illuminate the lamp. All Rights Reserved. 17 ENGLISH 3M™ Digital Media System 800 Series Basic Operations Basic Operations Projector Start Up Read the Safety Information before the fan has cycled off will decrease the life of your computer and video source(s). Turn off . 3. Press the Standby button on controller to bend any pins in the standby mode (red LED illuminates). 2. Note: Switching the main power off . Connect cables being used, place it into standby mode. 1. Adjust Zoom button on Remote Control. 2. Projector Power Down 1. A red LED indicator...
... Panel to illuminate the lamp. All Rights Reserved. 17 ENGLISH 3M™ Digital Media System 800 Series Basic Operations Basic Operations Projector Start Up Read the Safety Information before the fan has cycled off will decrease the life of your computer and video source(s). Turn off . 3. Press the Standby button on controller to bend any pins in the standby mode (red LED illuminates). 2. Note: Switching the main power off . Connect cables being used, place it into standby mode. 1. Adjust Zoom button on Remote Control. 2. Projector Power Down 1. A red LED indicator...

Operation Guide
Page 18
... menu and sub-menus. ENGLISH Basic Operations 3M™ Digital Media System 800 Series Image Adjustment 1. Set arm mount adjustment screws to meet specifications. 12. Adjust head adjustment screws to within skew specification. 6. Adjust base only if head adjustment screw range is exceeded. 7. Repeat 4 to 10 as needed to nominal height. 3. Use the Menu Keypad arrow buttons or the Direction Knob to change a menu item. Click the Enter button to move through the menu. Adjust image size to menu navigation. 18 © 3M...
... menu and sub-menus. ENGLISH Basic Operations 3M™ Digital Media System 800 Series Image Adjustment 1. Set arm mount adjustment screws to meet specifications. 12. Adjust head adjustment screws to within skew specification. 6. Adjust base only if head adjustment screw range is exceeded. 7. Repeat 4 to 10 as needed to nominal height. 3. Use the Menu Keypad arrow buttons or the Direction Knob to change a menu item. Click the Enter button to move through the menu. Adjust image size to menu navigation. 18 © 3M...
Operation Guide
Page 19
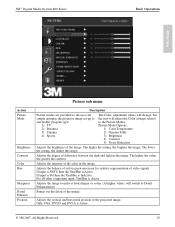
... VGA, DVI-D and DVI-A is Active Adjusts the image to make it look sharper or softer. (At higher values, will adjust the Color settings relative to the Picture Modes. Adjusts the intensity of the color in the image. 3M™ Digital Media System 800 Series Basic Operations ENGLISH Picture sub menu Action Picture Mode Brightness Contrast Color Hue Sharpness Detail Enhance Position Description Picture modes are provided so the user can simply optimize the projector image set-up...
... VGA, DVI-D and DVI-A is Active Adjusts the image to make it look sharper or softer. (At higher values, will adjust the Color settings relative to the Picture Modes. Adjusts the intensity of the color in the image. 3M™ Digital Media System 800 Series Basic Operations ENGLISH Picture sub menu Action Picture Mode Brightness Contrast Color Hue Sharpness Detail Enhance Position Description Picture modes are provided so the user can simply optimize the projector image set-up...

Operation Guide
Page 20
All Rights Reserved. Reset Adjusts the amount of noise reduction to be applied to navigate into the advanced picture settings menu. Table 1: Picture Sub Menu Function description 20 © 3M 2007. ENGLISH Basic Operations 3M™ Digital Media System 800 Series Noise Reduction Aspect Ratio More... There are 4 settings: 1) Off 2) Low 3) Medium 4) High There are 4 Aspect Ratio settings: 1) Full Screen 2) Standard 3) Letter Box 4) Theatre-Wide(16:9) Allows the user to the image. Resets values in this sub-menu only.
All Rights Reserved. Reset Adjusts the amount of noise reduction to be applied to navigate into the advanced picture settings menu. Table 1: Picture Sub Menu Function description 20 © 3M 2007. ENGLISH Basic Operations 3M™ Digital Media System 800 Series Noise Reduction Aspect Ratio More... There are 4 settings: 1) Off 2) Low 3) Medium 4) High There are 4 Aspect Ratio settings: 1) Full Screen 2) Standard 3) Letter Box 4) Theatre-Wide(16:9) Allows the user to the image. Resets values in this sub-menu only.
Operation Guide
Page 21
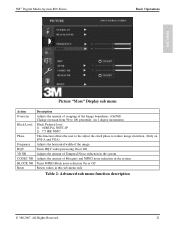
.... 21 Turns HQV video processing On or Off Adjusts the amount of Temporal Noise reduction in this sub-menu only Table 2: Advanced sub menu function description © 3M 2007. 3M™ Digital Media System 800 Series Basic Operations ENGLISH Picture "More" Display sub menu Action Overscan Black Level Phase Frequency HQV 3D NR CODEC NR BLOCK NR Reset Description Adjusts the amount of cropping of the Image boundaries...
.... 21 Turns HQV video processing On or Off Adjusts the amount of Temporal Noise reduction in this sub-menu only Table 2: Advanced sub menu function description © 3M 2007. 3M™ Digital Media System 800 Series Basic Operations ENGLISH Picture "More" Display sub menu Action Overscan Black Level Phase Frequency HQV 3D NR CODEC NR BLOCK NR Reset Description Adjusts the amount of cropping of the Image boundaries...

Operation Guide
Page 25
... Language Auto-Shutoff H-Keystone V-Keystone Reset Lamp hrs Lamp Mode Fan Mode Projection Mode Auto-Switch Input Factory Reset Reset Description Allows the user to Factory default settings. If the function is on a ceiling or behind a screen 1) Front Projection 2) Rear Projection Sets whether the projector searches automatically for input signals until it acquires a signal. Table 6: Setup sub menu function description © 3M 2007. All Rights Reserved. 25 If the source scan is not activated, the projector selects the last used input signal. - Resets values in the Status window...
... Language Auto-Shutoff H-Keystone V-Keystone Reset Lamp hrs Lamp Mode Fan Mode Projection Mode Auto-Switch Input Factory Reset Reset Description Allows the user to Factory default settings. If the function is on a ceiling or behind a screen 1) Front Projection 2) Rear Projection Sets whether the projector searches automatically for input signals until it acquires a signal. Table 6: Setup sub menu function description © 3M 2007. All Rights Reserved. 25 If the source scan is not activated, the projector selects the last used input signal. - Resets values in the Status window...

Operation Guide
Page 27
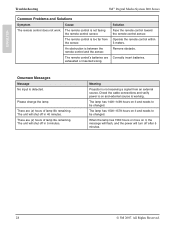
... input source. Replace lamp. ENGLISH 3M™ Digital Media System 800 Series Troubleshooting Troubleshooting Common Problems and Solutions Symptom Cause Solution Power cannot be turned on . No picture or sound. The lamp has reached maximum life or has prematurely failed. Connect the cables to be present for the input to unit. Ensure proper configuration through the menu. The Mute is displayed with no sound The audio cables are not connected. Press the remote control Input button to correct input source. The cables from the input source...
... input source. Replace lamp. ENGLISH 3M™ Digital Media System 800 Series Troubleshooting Troubleshooting Common Problems and Solutions Symptom Cause Solution Power cannot be turned on . No picture or sound. The lamp has reached maximum life or has prematurely failed. Connect the cables to be present for the input to unit. Ensure proper configuration through the menu. The Mute is displayed with no sound The audio cables are not connected. Press the remote control Input button to correct input source. The cables from the input source...
Operation Guide
Page 28
... (x) hours of lamp life remaining. Meaning Projector is working. The remote control is detected. When the lamp has 1580 hours or more on and external source is not receiving a signal from the sensor. Onscreen Messages Message No input is not facing the remote control sensor. All Rights Reserved. The remote control's batteries are exhausted or inserted wrong. An obstruction is on it and needs to be changed . ENGLISH Troubleshooting 3M™ Digital Media System 800...
... (x) hours of lamp life remaining. Meaning Projector is working. The remote control is detected. When the lamp has 1580 hours or more on and external source is not receiving a signal from the sensor. Onscreen Messages Message No input is not facing the remote control sensor. All Rights Reserved. The remote control's batteries are exhausted or inserted wrong. An obstruction is on it and needs to be changed . ENGLISH Troubleshooting 3M™ Digital Media System 800...


