
Operation Guide
Page 2
... control 6 Progressive, My memory Setting up 7 Fastening the lens cover 7 Arrangement 8 Adjusting the projector's elevator . . 9 Using the Security Bar 10 Connecting your devices 11 IMAGE Menu 30 Aspect, Over scan, V. 3M™ Digital Projector S55i/X55i Content Content About this manual 1 Content 2 Projector features 3 Preparations 3 About contents of this book, although only in English.) 2 ©...
... control 6 Progressive, My memory Setting up 7 Fastening the lens cover 7 Arrangement 8 Adjusting the projector's elevator . . 9 Using the Security Bar 10 Connecting your devices 11 IMAGE Menu 30 Aspect, Over scan, V. 3M™ Digital Projector S55i/X55i Content Content About this manual 1 Content 2 Projector features 3 Preparations 3 About contents of this book, although only in English.) 2 ©...

Operation Guide
Page 3
The image can be sure to use in low luminance rooms where low noise is missing. 3M™ Digital Projector S55i/X55i Projector features / Preparations Projector features This projector is used to realize quieter operation. It requires just a little space for installation and gets a large image from short distance. High Brightness Newly developed ...
The image can be sure to use in low luminance rooms where low noise is missing. 3M™ Digital Projector S55i/X55i Projector features / Preparations Projector features This projector is used to realize quieter operation. It requires just a little space for installation and gets a large image from short distance. High Brightness Newly developed ...

Operation Guide
Page 4
All Rights Reserved. Part names Part names 3M™ Digital Projector S55i/X55i Projector Lamp door (41) (Lamp unit is inside.) Zoom ring (19) Focus ring (19) Vent (7) Lens (17) Lens cover (3) ... intake vent are inside.) Bottom side WARNING ►During use or immediately after use, do not touch around the lamp and vents of the projector. () It could cause a burn. 4 ©...
All Rights Reserved. Part names Part names 3M™ Digital Projector S55i/X55i Projector Lamp door (41) (Lamp unit is inside.) Zoom ring (19) Focus ring (19) Vent (7) Lens (17) Lens cover (3) ... intake vent are inside.) Bottom side WARNING ►During use or immediately after use, do not touch around the lamp and vents of the projector. () It could cause a burn. 4 ©...

Operation Guide
Page 5
... reset. When this port.) RGB IN2 port: Inputs the RGB signal from a PC. In such a case, please push the Restart switch by an internal microprocessor. 3M™ Digital Projector S55i/X55i Part names Power switch (17) AC inlet (14) Ports (See below.) Rear-Left side Elevator button (9) Elevator foot (9) Vent...
... reset. When this port.) RGB IN2 port: Inputs the RGB signal from a PC. In such a case, please push the Restart switch by an internal microprocessor. 3M™ Digital Projector S55i/X55i Part names Power switch (17) AC inlet (14) Ports (See below.) Rear-Left side Elevator button (9) Elevator foot (9) Vent...
Operation Guide
Page 6
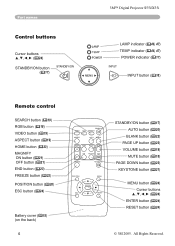
Part names Control buttons Cursor buttons 24) STANDBY/ON button (17) 3M™ Digital Projector S55i/X55i LAMP indicator (46, 47) TEMP indicator (46, 47) POWER indicator (17) INPUT button (18) Remote control SEARCH button (19) ...) PAGE DOWN button (23) KEYSTONE button (21) MENU button (24) Cursor buttons 24) ENTER button (24) RESET button (24) © 3M 2005. All Rights Reserved.
Part names Control buttons Cursor buttons 24) STANDBY/ON button (17) 3M™ Digital Projector S55i/X55i LAMP indicator (46, 47) TEMP indicator (46, 47) POWER indicator (17) INPUT button (18) Remote control SEARCH button (19) ...) PAGE DOWN button (23) KEYSTONE button (21) MENU button (24) Cursor buttons 24) ENTER button (24) RESET button (24) © 3M 2005. All Rights Reserved.
Operation Guide
Page 7
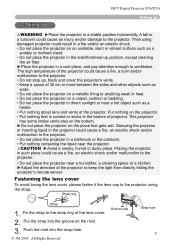
... a stable position horizontally. Then using the strap. CAUTION ►Avoid a smoky, humid or dusty place. Fix the strap to the strap ring of the projector to keep the light from directly hitting the projector's remote sensor. 3M™ Digital Projector S55i/X55i Setting up Setting up position, except cleaning the air filter. ►Place the...
... a stable position horizontally. Then using the strap. CAUTION ►Avoid a smoky, humid or dusty place. Fix the strap to the strap ring of the projector to keep the light from directly hitting the projector's remote sensor. 3M™ Digital Projector S55i/X55i Setting up Setting up position, except cleaning the air filter. ►Place the...

Operation Guide
Page 8
3M™ Digital Projector S55i/X55i Setting up Arrangement Refer to the illustrations and tables below to the screen (±10%) (c) The height of the screen (±10%) 4:3 16:9 (c) up (a) (a) (c) down For the model S55i (a) Screen size [inch (m)] 4 : 3 screen (b) Projection distance (c) Screen ... distance [m (inch)] min. The values shown in the table are calculated for a full size screen: S55i : 800×600, X55i : 1024×768 (a) The screen size (diagonal) (b) (b) Distance from the projector to determine the screen size and projection distance. max.
3M™ Digital Projector S55i/X55i Setting up Arrangement Refer to the illustrations and tables below to the screen (±10%) (c) The height of the screen (±10%) 4:3 16:9 (c) up (a) (a) (c) down For the model S55i (a) Screen size [inch (m)] 4 : 3 screen (b) Projection distance (c) Screen ... distance [m (inch)] min. The values shown in the table are calculated for a full size screen: S55i : 800×600, X55i : 1024×768 (a) The screen size (diagonal) (b) (b) Distance from the projector to determine the screen size and projection distance. max.

Operation Guide
Page 9
... twisting the elevator feet by the elevator feet adjustment, place the projector horizontally. Elevator feet Elevator button 1. When you otherwise need to set the projector is 0 to 9 degrees. 3M™ Digital Projector S55i/X55i Setting up Adjusting the projector's elevator CAUTION ►If you can use the elevator feet to make adjustments if the surface on the...
... twisting the elevator feet by the elevator feet adjustment, place the projector horizontally. Elevator feet Elevator button 1. When you otherwise need to set the projector is 0 to 9 degrees. 3M™ Digital Projector S55i/X55i Setting up Adjusting the projector's elevator CAUTION ►If you can use the elevator feet to make adjustments if the surface on the...

Operation Guide
Page 10
3M™ Digital Projector S55i/X55i Setting up to be used as shown in diameter can be used) Security Bar Anti-theft chain or wire [sold separately] 10 © 3M 2005. A commercial anti-theft chain or wire can be attached to prevent the projector from falling. Dropping or knocking over the projector may cause damage or injury. How.... (Anti-theft chains or wires of up Using the Security Bar WARNING ►Do not use the security bar to the security bar on the projector. 1. All Rights Reserved.
3M™ Digital Projector S55i/X55i Setting up to be used as shown in diameter can be used) Security Bar Anti-theft chain or wire [sold separately] 10 © 3M 2005. A commercial anti-theft chain or wire can be attached to prevent the projector from falling. Dropping or knocking over the projector may cause damage or injury. How.... (Anti-theft chains or wires of up Using the Security Bar WARNING ►Do not use the security bar to the security bar on the projector. 1. All Rights Reserved.

Operation Guide
Page 11
3M™ Digital Projector S55i/X55i Setting up Connecting your computer as this function by connecting this projector to a computer is VESA DDC (display data channel) compatible. • Please take some time and may not work properly if any other CRT or LCD monitors to change the resolution. Attempting to connect a live device to the projector... is a system composed of connection is a Plug-and-Play monitor. © 3M 2005. Plug-and-Play may not be able to see a check box to the projector. Then the resolution will not be recommended to use the standard drivers in your ...
3M™ Digital Projector S55i/X55i Setting up Connecting your computer as this function by connecting this projector to a computer is VESA DDC (display data channel) compatible. • Please take some time and may not work properly if any other CRT or LCD monitors to change the resolution. Attempting to connect a live device to the projector... is a system composed of connection is a Plug-and-Play monitor. © 3M 2005. Plug-and-Play may not be able to see a check box to the projector. Then the resolution will not be recommended to use the standard drivers in your ...

Operation Guide
Page 12
... RGB OUT RGB IN2 RGB OUT USB K Connecting to a speaker with a computer * In the default setting, the AUDIO IN1 port is not pushed in). 3M™ Digital Projector S55i/X55i Setting up Examples of connection with amplifier (output) Audio in AUDIO IN2 Y R CB/PB L CR/PR VIDEO S-VIDEO CONTROL AUDIO OUT AUDIO...
... RGB OUT RGB IN2 RGB OUT USB K Connecting to a speaker with a computer * In the default setting, the AUDIO IN1 port is not pushed in). 3M™ Digital Projector S55i/X55i Setting up Examples of connection with amplifier (output) Audio in AUDIO IN2 Y R CB/PB L CR/PR VIDEO S-VIDEO CONTROL AUDIO OUT AUDIO...

Operation Guide
Page 13
... RGB OUT USB K AUDIO IN2 Y R CB/PB L CR/PR VIDEO S-VIDEO CONTROL AUDIO OUT AUDIO IN1 RGB IN1 RGB IN2 RGB OUT USB K © 3M 2005. 3M™ Digital Projector S55i/X55i Examples of connection with a VCR/DVD player Setting up * In the default setting, the AUDIO IN2 L/R port is the audio port for the...
... RGB OUT USB K AUDIO IN2 Y R CB/PB L CR/PR VIDEO S-VIDEO CONTROL AUDIO OUT AUDIO IN1 RGB IN1 RGB IN2 RGB OUT USB K © 3M 2005. 3M™ Digital Projector S55i/X55i Examples of connection with a VCR/DVD player Setting up * In the default setting, the AUDIO IN2 L/R port is the audio port for the...

Operation Guide
Page 14
3M™ Digital Projector S55i/X55i Setting up Connecting power supply WARNING ►Please use extra caution when connecting the power cord, as incorrect or faulty connections may result in fire and/or electrical shock. • Only use with the projector. Firmly plug the power cord's plug into an outlet rated for use the power...-pronged plug. Connect the connector of the power cord to newly get correct one. • Only plug the power cord into the outlet. 14 © 3M 2005. If it is damaged, contact your dealer to the AC inlet of the...
3M™ Digital Projector S55i/X55i Setting up Connecting power supply WARNING ►Please use extra caution when connecting the power cord, as incorrect or faulty connections may result in fire and/or electrical shock. • Only use with the projector. Firmly plug the power cord's plug into an outlet rated for use the power...-pronged plug. Connect the connector of the power cord to newly get correct one. • Only plug the power cord into the outlet. 14 © 3M 2005. If it is damaged, contact your dealer to the AC inlet of the...

Operation Guide
Page 15
... the direction of different types at the same time. Do not use batteries of the arrow and snap it back into place. © 3M 2005. Close the battery cover. Improper use may result in battery explosion, cracking or leakage, which could result in fire, injury ... Do not mix a new battery with used one. • Make sure the plus and minus terminals as directed. Insert the batteries. 3M™ Digital Projector S55i/X55i Remote control Remote control Putting batteries WARNING ►Always handle the batteries with care and use them only as indicated in the remote control...
... the direction of different types at the same time. Do not use batteries of the arrow and snap it back into place. © 3M 2005. Close the battery cover. Improper use may result in battery explosion, cracking or leakage, which could result in fire, injury ... Do not mix a new battery with used one. • Make sure the plus and minus terminals as directed. Insert the batteries. 3M™ Digital Projector S55i/X55i Remote control Remote control Putting batteries WARNING ►Always handle the batteries with care and use them only as indicated in the remote control...

Operation Guide
Page 16
...flected signal. • Since the remote control uses infrared light to send signals to the projector (Class1 LED), be sure to use the remote control in the screen etc. 3M™ Digital Projector S55i/X55i Remote control Using the remote control CAUTION ►Be careful in a safe place if you ... 3 meters with a 60 degree range (30 degrees to the left and right of the projector to keep the light from obstacles that could block the remote control's output signal to the projector. 16 © 3M 2005. It may be available. Adjust the direction of the remote sensor). • Also ...
...flected signal. • Since the remote control uses infrared light to send signals to the projector (Class1 LED), be sure to use the remote control in the screen etc. 3M™ Digital Projector S55i/X55i Remote control Using the remote control CAUTION ►Be careful in a safe place if you ... 3 meters with a 60 degree range (30 degrees to the left and right of the projector to keep the light from obstacles that could block the remote control's output signal to the projector. 16 © 3M 2005. It may be available. Adjust the direction of the remote sensor). • Also ...

Operation Guide
Page 17
... the lens cover. (Blinking in green) the section "Selecting an input signal" (18). 3M™ Digital Projector S55i/X55i Power on/off Power on/off ?" Please power on the projector or the remote control. Remove the lens cover, and set the power switch to the OFF position. Press the STANDBY/ON button on the...
... the lens cover. (Blinking in green) the section "Selecting an input signal" (18). 3M™ Digital Projector S55i/X55i Power on/off Power on/off ?" Please power on the projector or the remote control. Remove the lens cover, and set the power switch to the OFF position. Press the STANDBY/ON button on the...
Operation Guide
Page 18
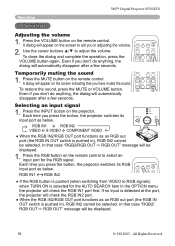
... after a few seconds. In that you don't do anything , the dialog will be displayed. ESC RESET 18 © 3M 2005. Press the INPUT button on the remote control to adjust the volume. 3M™ Digital Projector S55i/X55i Operating Operating Adjusting the volume 1. A dialog will appear on the screen indicating that case "RENGTER B2/ RGB...
... after a few seconds. In that you don't do anything , the dialog will be displayed. ESC RESET 18 © 3M 2005. Press the INPUT button on the remote control to adjust the volume. 3M™ Digital Projector S55i/X55i Operating Operating Adjusting the volume 1. A dialog will appear on the screen indicating that case "RENGTER B2/ RGB...

Operation Guide
Page 19
...as the COMPONENT VIDEO input, only 16:9 mode can be selected. The projector will check the COMPONENT VIDEO port first. Use the focus ring to adjust the screen size. 3M™ Digital Projector S55i/X55i Operating Selecting an input signal (continued) 1. Each time you press ...the button, the projector switches the mode for aspect ratio in the OPTION menu the projector will start to the state selected before END ...
...as the COMPONENT VIDEO input, only 16:9 mode can be selected. The projector will check the COMPONENT VIDEO port first. Use the focus ring to adjust the screen size. 3M™ Digital Projector S55i/X55i Operating Selecting an input signal (continued) 1. Each time you press ...the button, the projector switches the mode for aspect ratio in the OPTION menu the projector will start to the state selected before END ...

Operation Guide
Page 20
... ASPECT AUTO BLANK and the horizontal size will be seENTlEeR cted automatically. A dark picture may appear outside a picture. 20 © 3M 2005. Press the POSITION button on the screen. Use the cursor buttons to attemptingFROEFEFZtEo use this function. For a video signal... to the VIDEO FORMAT item in the INPUT menu (32). ASPECT AUTO BLANK Adjusting the position 1. All Rights Reserved. 3M™ Digital Projector S55i/X55i Operating Using the automatic adjustment feature 1. ESC RESET This function is available only when the AUTO mode is performed at a...
... ASPECT AUTO BLANK and the horizontal size will be seENTlEeR cted automatically. A dark picture may appear outside a picture. 20 © 3M 2005. Press the POSITION button on the screen. Use the cursor buttons to attemptingFROEFEFZtEo use this function. For a video signal... to the VIDEO FORMAT item in the INPUT menu (32). ASPECT AUTO BLANK Adjusting the position 1. All Rights Reserved. 3M™ Digital Projector S55i/X55i Operating Using the automatic adjustment feature 1. ESC RESET This function is available only when the AUTO mode is performed at a...

Operation Guide
Page 21
...When the zoom adjustment is selected to the MIRROR item in several seconds with MAGNIFY HOME PAGE UP VOLUME no operation), and the projector will appear on the remote control. All Rights Reserved. 21 Press the KEYSTONE button on the screen VIDEO STANDBY/ON RGB SEARCH ASPECT...mode when the input signal is changed, or when the display condition is set to the WIDE (wide-angle focus) whenever possible. 3M™ Digital Projector S55i/X55i Operating STANDBY/ON VIDEO RGB SEARCH Correcting the keystone distortions ASPECT AUTO BLANK 1. A dialog will be used when the zoom ...
...When the zoom adjustment is selected to the MIRROR item in several seconds with MAGNIFY HOME PAGE UP VOLUME no operation), and the projector will appear on the remote control. All Rights Reserved. 21 Press the KEYSTONE button on the screen VIDEO STANDBY/ON RGB SEARCH ASPECT...mode when the input signal is changed, or when the display condition is set to the WIDE (wide-angle focus) whenever possible. 3M™ Digital Projector S55i/X55i Operating STANDBY/ON VIDEO RGB SEARCH Correcting the keystone distortions ASPECT AUTO BLANK 1. A dialog will be used when the zoom ...


