
Quick Start Guide
Page 1
... express written authority. 3M Digital Projector X45/SX55 Quick Start Guide Thank you for purchasing this document or contents is not permitted without notice. • The manufacture assumes no responsibility for any errors that may appear in this manual. • The reproduction, transmission or use of package (1) Projector (2) Remote control with two AA batteries (1) (3) Power cord (4) RGB cable (5) Filter cover for bottom-up use the original packing material...
... express written authority. 3M Digital Projector X45/SX55 Quick Start Guide Thank you for purchasing this document or contents is not permitted without notice. • The manufacture assumes no responsibility for any errors that may appear in this manual. • The reproduction, transmission or use of package (1) Projector (2) Remote control with two AA batteries (1) (3) Power cord (4) RGB cable (5) Filter cover for bottom-up use the original packing material...

Quick Start Guide
Page 2
... : 9 screen (b) Projection distance (c) Screen height [m (inch)] [cm (inch)] min. Avoid blocking these vents. max. down (calculated for a full size screen, ±10%) At 4 : 3 screen (a) Screen size [inch (m)] (b) Projection distance [m (inch)] (c) Screen height [cm (inch)] min. Do not place objects near bottom of projector. (b) 4:3...) 12.0 (472) -12 (-5) 386 (152) 2 © 3M 2004 3M™ Digital Projector X45/SX55 Safety Guide". Arrangement Arrangement WARNING ►Install the projector in a suitable environment according to the instructions in the "User's Manual -
... : 9 screen (b) Projection distance (c) Screen height [m (inch)] [cm (inch)] min. Avoid blocking these vents. max. down (calculated for a full size screen, ±10%) At 4 : 3 screen (a) Screen size [inch (m)] (b) Projection distance [m (inch)] (c) Screen height [cm (inch)] min. Do not place objects near bottom of projector. (b) 4:3...) 12.0 (472) -12 (-5) 386 (152) 2 © 3M 2004 3M™ Digital Projector X45/SX55 Safety Guide". Arrangement Arrangement WARNING ►Install the projector in a suitable environment according to the instructions in the "User's Manual -

Quick Start Guide
Page 3
... shock, a fire, a burn and/or malfunction to the projector.Before handling, make sure the power switch is off and the power cord is hot (high temperature) could cause a burn and/or malfunction to adjust the height.. 1. Replace the filter cover for bottom-up . 3 © 3M 2004 3M™ Digital Projector X45/SX55 The elevator buttons and the elevator feet are on the filter...
... shock, a fire, a burn and/or malfunction to the projector.Before handling, make sure the power switch is off and the power cord is hot (high temperature) could cause a burn and/or malfunction to adjust the height.. 1. Replace the filter cover for bottom-up . 3 © 3M 2004 3M™ Digital Projector X45/SX55 The elevator buttons and the elevator feet are on the filter...

Quick Start Guide
Page 4
... IN1. RGB IN2 RGB OUT RGB out Audio out AUDIO IN1 Y CB/PB AUDIO OUT AUDIO IN2 VIDEO CR/PR S-VIDEO USB COMPONENT VIDEO Stereo mini audio cable RGB cable RGB IN1 CONTROL RGB IN2 RGB OUT Connecting to a monitor (output) RGB in AUDIO IN1 Y CB/PB AUDIO OUT AUDIO IN2 VIDEO CR/PR S-VIDEO USB COMPONENT VIDEO Stereo mini audio cable RGB IN1 CONTROL RGB IN2 RGB OUT 4 © 3M 2004 3M™ Digital Projector X45/SX55
... IN1. RGB IN2 RGB OUT RGB out Audio out AUDIO IN1 Y CB/PB AUDIO OUT AUDIO IN2 VIDEO CR/PR S-VIDEO USB COMPONENT VIDEO Stereo mini audio cable RGB cable RGB IN1 CONTROL RGB IN2 RGB OUT Connecting to a monitor (output) RGB in AUDIO IN1 Y CB/PB AUDIO OUT AUDIO IN2 VIDEO CR/PR S-VIDEO USB COMPONENT VIDEO Stereo mini audio cable RGB IN1 CONTROL RGB IN2 RGB OUT 4 © 3M 2004 3M™ Digital Projector X45/SX55
Quick Start Guide
Page 5
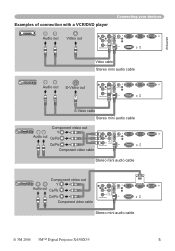
... video out Y Audio out CB/PB CR/PR Component video cable AUDIO IN1 Y CB/PB AUDIO OUT AUDIO IN2 VIDEO CR/PR S-VIDEO USB COMPONENT VIDEO RGB IN1 CONTROL RGB IN2 RGB OUT Stereo mini audio cable Component video out Y Audio out CB/PB CR/PR Component video cable AUDIO IN1 Y CB/PB AUDIO OUT AUDIO IN2 VIDEO CR/PR S-VIDEO USB COMPONENT VIDEO RGB IN1 CONTROL RGB IN2 RGB OUT Stereo mini audio cable © 3M 2004 3M™ Digital Projector X45...
... video out Y Audio out CB/PB CR/PR Component video cable AUDIO IN1 Y CB/PB AUDIO OUT AUDIO IN2 VIDEO CR/PR S-VIDEO USB COMPONENT VIDEO RGB IN1 CONTROL RGB IN2 RGB OUT Stereo mini audio cable Component video out Y Audio out CB/PB CR/PR Component video cable AUDIO IN1 Y CB/PB AUDIO OUT AUDIO IN2 VIDEO CR/PR S-VIDEO USB COMPONENT VIDEO RGB IN1 CONTROL RGB IN2 RGB OUT Stereo mini audio cable © 3M 2004 3M™ Digital Projector X45...

Quick Start Guide
Page 6
... into place. 6 © 3M 2004 3M™ Digital Projector X45/SX55 Do not use batteries of the arrow. 2. Keep batteries in fire and/or electrical shock. • Only use the power cord that came with the projector. Insert the batteries. Connecting the power supply / Putting batteries into the remote control Connecting the power supply WARNING ►Please use extra caution when connecting the power cord as incorrect or faulty connections may result in battery...
... into place. 6 © 3M 2004 3M™ Digital Projector X45/SX55 Do not use batteries of the arrow. 2. Keep batteries in fire and/or electrical shock. • Only use the power cord that came with the projector. Insert the batteries. Connecting the power supply / Putting batteries into the remote control Connecting the power supply WARNING ►Please use extra caution when connecting the power cord as incorrect or faulty connections may result in battery...

Quick Start Guide
Page 7
... KEYSTONE SEARCH button STANDBY/ON button AUTO button BLANK button VOLUME button PAGE UP button STANDBY/ON button Power switch Turning off ?" Press the STANDBY/ON (projector or remote control) button. To change the aspect ratio, use the button of INPUT (projector), or the buttons of the projector. Press the STANDBY/ON (projector or remote control) button. Make sure that the power indicator lights to solid POWER orange, set the power switch to the OFF position. (Solid orange) The POWER indicator will begin blinking orange. Then the POWER indicator will appear on the screen...
... KEYSTONE SEARCH button STANDBY/ON button AUTO button BLANK button VOLUME button PAGE UP button STANDBY/ON button Power switch Turning off ?" Press the STANDBY/ON (projector or remote control) button. To change the aspect ratio, use the button of INPUT (projector), or the buttons of the projector. Press the STANDBY/ON (projector or remote control) button. Make sure that the power indicator lights to solid POWER orange, set the power switch to the OFF position. (Solid orange) The POWER indicator will begin blinking orange. Then the POWER indicator will appear on the screen...
Quick Start Guide
Page 8
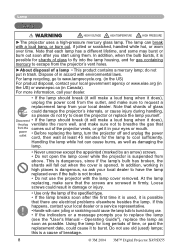
... holes. ►About disposal of breakage. 8 © 3M 2004 3M™ Digital Projector X45/SX55 Loose screws could cause the lamp bulb to breathe the gas that the screws are electrical problems elsewhere besides the lamp. Do not use . • If the indicators or a message prompts you start using them. power • Before replacing the lamp, turn the projector off and unplug the power outlet cord, then wait at least 45 minutes for...
... holes. ►About disposal of breakage. 8 © 3M 2004 3M™ Digital Projector X45/SX55 Loose screws could cause the lamp bulb to breathe the gas that the screws are electrical problems elsewhere besides the lamp. Do not use . • If the indicators or a message prompts you start using them. power • Before replacing the lamp, turn the projector off and unplug the power outlet cord, then wait at least 45 minutes for...
Quick Start Guide
Page 9
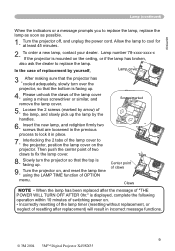
... lock it in incorrect message functions. 9 © 3M 2004 3M™ Digital Projector X45/SX55 Allow the lamp to replace the lamp, replace the lamp as soon as possible. 1. Please unhook the claws of the lamp cover using the LAMP TIME function of OPTION menu. Insert the new lamp, and retighten firmly two screws that are loosened in the previous process to fix the lamp cover. 8. To order a new lamp, contact your dealer. Slowly turn...
... lock it in incorrect message functions. 9 © 3M 2004 3M™ Digital Projector X45/SX55 Allow the lamp to replace the lamp, replace the lamp as soon as possible. 1. Please unhook the claws of the lamp cover using the LAMP TIME function of OPTION menu. Insert the new lamp, and retighten firmly two screws that are loosened in the previous process to fix the lamp cover. 8. To order a new lamp, contact your dealer. Slowly turn...

Quick Start Guide
Page 10
... will result in incorrect message functions. 10 © 3M 2004 3M™ Digital Projector X45/SX55 Position the cleaned air filter or a new air filter into place. 9. Air filter Air filter WARNING ►Before caring, make sure the power switch is off and the power cable is not plugged in, then allow the projector to the air filter and filter cover. Apply a vacuum cleaner...
... will result in incorrect message functions. 10 © 3M 2004 3M™ Digital Projector X45/SX55 Position the cleaned air filter or a new air filter into place. 9. Air filter Air filter WARNING ►Before caring, make sure the power switch is off and the power cable is not plugged in, then allow the projector to the air filter and filter cover. Apply a vacuum cleaner...

