

Operation Guide
Page 2
... bright, Blank, Start up use . . 9 Connecting your devices ...10 Connecting power supply ...13 Remote control ...14 Putting batteries ...14 Using the remote control ...15 Power on/off ...16 Turning on the power...16 Turning off , Lamp time, Filter... Aspect, Over scan, V. Contents Contents About this manual ...1 Contents ...2 Projector features ...3 Preparations ...3 Part names ...4 Projector ...4 Controls ...5 Remote control ...5 Setting up ...6 Arrangement ...7 Adjusting the projector's elevator . . 8 About the filter cover for machine defects ...Warranty and after-service...
... bright, Blank, Start up use . . 9 Connecting your devices ...10 Connecting power supply ...13 Remote control ...14 Putting batteries ...14 Using the remote control ...15 Power on/off ...16 Turning on the power...16 Turning off , Lamp time, Filter... Aspect, Over scan, V. Contents Contents About this manual ...1 Contents ...2 Projector features ...3 Preparations ...3 Part names ...4 Projector ...4 Controls ...5 Remote control ...5 Setting up ...6 Arrangement ...7 Adjusting the projector's elevator . . 8 About the filter cover for machine defects ...Warranty and after-service...

Operation Guide
Page 4
Only push the Restart switch in these exceptional instances. 4 © 3M 2004 3M™ Digital Projector X45/SX55 Under certain exceptional circumstances, the projector may not operate correctly and the microprocessor will need to be reset. In such a ... ring (18) Vent (6) Lens cover (16) (Slide door) Lens (16) Lamp cover (Lamp unit is inside.) (38) Front-Right side Remote sensor (15) Speaker (6) Elevator button (8) Elevator foot (8) Filter cover (40) (Air filter and intake vent are inside.) Bottom side...
Only push the Restart switch in these exceptional instances. 4 © 3M 2004 3M™ Digital Projector X45/SX55 Under certain exceptional circumstances, the projector may not operate correctly and the microprocessor will need to be reset. In such a ... ring (18) Vent (6) Lens cover (16) (Slide door) Lens (16) Lamp cover (Lamp unit is inside.) (38) Front-Right side Remote sensor (15) Speaker (6) Elevator button (8) Elevator foot (8) Filter cover (40) (Air filter and intake vent are inside.) Bottom side...

Operation Guide
Page 5
Part names Control buttons TEMP POWER STANDBY/ON INPUT MENU Cursor buttons 22) INPUT button (17) STANDBY/ON button (16) Remote control RGB button (17) VIDEO button (17) ASPECT button (18) HOME button (21) MAGNIFY (20) ON button OFF ...PAGE DOWN button (21) KEYSTONE button (19) MENU button (22) RESET ESC ENTER button (22) RESET button (22) © 3M 2004 3M™ Digital Projector X45/SX55 5 ENGLISH LAMP indicator (44) TEMP indicator (44) POWER indicator (16) LAMP
Part names Control buttons TEMP POWER STANDBY/ON INPUT MENU Cursor buttons 22) INPUT button (17) STANDBY/ON button (16) Remote control RGB button (17) VIDEO button (17) ASPECT button (18) HOME button (21) MAGNIFY (20) ON button OFF ...PAGE DOWN button (21) KEYSTONE button (19) MENU button (22) RESET ESC ENTER button (22) RESET button (22) © 3M 2004 3M™ Digital Projector X45/SX55 5 ENGLISH LAMP indicator (44) TEMP indicator (44) POWER indicator (16) LAMP

Operation Guide
Page 6
... result in the case of projector. A fall or a turnover could cause an injury and/or damage to keep light from directly hitting the projector's remote sensor. 6 © 3M 2004 3M™ Digital Projector X45/SX55 And in a fire and/or an electric shock. • Don't place the projector on the projector. •...
... result in the case of projector. A fall or a turnover could cause an injury and/or damage to keep light from directly hitting the projector's remote sensor. 6 © 3M 2004 3M™ Digital Projector X45/SX55 And in a fire and/or an electric shock. • Don't place the projector on the projector. •...

Operation Guide
Page 14
... in battery explosion, cracking or leakage, which could result in the direction of the arrow and snap it back into place. 14 © 3M 2004 3M™ Digital Projector X45/SX55 Keep batteries in the direction of the arrow. If the flower adheres your body or clothes, rinse well...the battery cover. 1. Do not use batteries of a battery, wipe out the flower and then replace a battery. terminals as directed. Insert the batteries. 2. Remote control Remote control Putting batteries WARNING ►Always handle the batteries with care and use them only as indicated in the...
... in battery explosion, cracking or leakage, which could result in the direction of the arrow and snap it back into place. 14 © 3M 2004 3M™ Digital Projector X45/SX55 Keep batteries in the direction of the arrow. If the flower adheres your body or clothes, rinse well...the battery cover. 1. Do not use batteries of a battery, wipe out the flower and then replace a battery. terminals as directed. Insert the batteries. 2. Remote control Remote control Putting batteries WARNING ►Always handle the batteries with care and use them only as indicated in the...

Operation Guide
Page 15
...remote sensor, the remote control may be sure to use the remote control in handling the remote control. • Do not drop or otherwise expose the remote control to physical impact. • Do not get the remote...'s remote sensor. Adjust the direction of the remote sensor is difficult to send a remote signal to the sensor directly, please try. • Since the remote control...keep light from directly hitting the projector's remote sensor. may cause to function. The remote control works with a 60- Remote control Using the remote control CAUTION ►Be careful in ...
...remote sensor, the remote control may be sure to use the remote control in handling the remote control. • Do not drop or otherwise expose the remote control to physical impact. • Do not get the remote...'s remote sensor. Adjust the direction of the remote sensor is difficult to send a remote signal to the sensor directly, please try. • Since the remote control...keep light from directly hitting the projector's remote sensor. may cause to function. The remote control works with a 60- Remote control Using the remote control CAUTION ►Be careful in ...

Operation Guide
Page 16
... MUTE KEYSTONE STANDBY/ON button STANDBY/ON MENU INPUT POWER indicator POSITION MENU ENTER ESC RESET Power switch Turning on the projector or remote control. Open ON position. (Solid orange) POWER (Blinking green) 3. The POWER indicator will stop blinking and light to solid ...orange. Close the lens cover. © 3M 2004 3M™ Digital Projector X45/SX55 will light to solid orange when the lamp cooling is firmly and correctly 1. To display the ...
... MUTE KEYSTONE STANDBY/ON button STANDBY/ON MENU INPUT POWER indicator POSITION MENU ENTER ESC RESET Power switch Turning on the projector or remote control. Open ON position. (Solid orange) POWER (Blinking green) 3. The POWER indicator will stop blinking and light to solid ...orange. Close the lens cover. © 3M 2004 3M™ Digital Projector X45/SX55 will light to solid orange when the lamp cooling is firmly and correctly 1. To display the ...

Operation Guide
Page 17
Even if you don't do anything , the dialog will appear on the remote control. MAGNIFY ON HOME PAGE UP VOLUME END PAGE DOWN MUTE RGB SEARCH ASPECT AUTO BLANK OFF FREEZE KEYSTONE MAGNIFY ON HOME PAGE UP VOLUME ... ESC RESET FREEZE KEYSTONE POSITION MENU ENTER ESC RESET Selecting an input signal LAMP TEMP POWER STANDBY/ON MENU INPUT the INPUT button on the remote control. ASPECT AUTO BLANK VIDEO 2. Even if you press the button, the projector switches its input port as below. RGB IN1 Press the VOLUME button...
Even if you don't do anything , the dialog will appear on the remote control. MAGNIFY ON HOME PAGE UP VOLUME END PAGE DOWN MUTE RGB SEARCH ASPECT AUTO BLANK OFF FREEZE KEYSTONE MAGNIFY ON HOME PAGE UP VOLUME ... ESC RESET FREEZE KEYSTONE POSITION MENU ENTER ESC RESET Selecting an input signal LAMP TEMP POWER STANDBY/ON MENU INPUT the INPUT button on the remote control. ASPECT AUTO BLANK VIDEO 2. Even if you press the button, the projector switches its input port as below. RGB IN1 Press the VOLUME button...

Operation Guide
Page 18
Press The projector will stop searching and display the image. If no signal is found , the projector will return to MAGNIFY ON HOME PAGE UP VOLUME STANDBY/ON END OFF FREEZE KEYSTONE PAGE DOWN MUTE VIDEO RGB SEARCH ASPECT POSITION MENU AUTO BLANK find any input signals. RGB IN1 Then when an input is found , the projector will begin to check its input ports in order to the state selected before the operation. Operating Searching an input signal STANDBY/ON VIDEO RGB SEARCH ASPECT AUTO BLANK the SEARCH button on the remote control. 1.
Press The projector will stop searching and display the image. If no signal is found , the projector will return to MAGNIFY ON HOME PAGE UP VOLUME STANDBY/ON END OFF FREEZE KEYSTONE PAGE DOWN MUTE VIDEO RGB SEARCH ASPECT POSITION MENU AUTO BLANK find any input signals. RGB IN1 Then when an input is found , the projector will begin to check its input ports in order to the state selected before the operation. Operating Searching an input signal STANDBY/ON VIDEO RGB SEARCH ASPECT AUTO BLANK the SEARCH button on the remote control. 1.

Operation Guide
Page 19
...please note that the application window is identified automatically independently of the INPUT menu (30). A dialog will appear on the remote control during the operation. Use a bright picture when adjusting. At a video signal The video format best suited for correcting ...VOLUME OFF END PAGE DOWN MUTE OFF FREEZE KEYSTONE FREEZE KEYSTONE POSITION MENU ENTER ESC RESET POSITION MENU ENTER ESC RESET © 3M 2004 3M™ Digital Projector X45/SX55 19 ENGLISH 1. For a component video signal, the signal type is set to its maximum ...
...please note that the application window is identified automatically independently of the INPUT menu (30). A dialog will appear on the remote control during the operation. Use a bright picture when adjusting. At a video signal The video format best suited for correcting ...VOLUME OFF END PAGE DOWN MUTE OFF FREEZE KEYSTONE FREEZE KEYSTONE POSITION MENU ENTER ESC RESET POSITION MENU ENTER ESC RESET © 3M 2004 3M™ Digital Projector X45/SX55 19 ENGLISH 1. For a component video signal, the signal type is set to its maximum ...
Operation Guide
Page 20
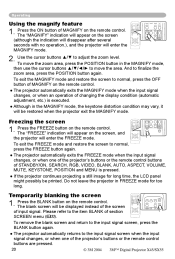
... ESC RESET END PAGE DOWN MUTE OFF FREEZE KEYSTONE POSITION MENU ENTER ESC RESET 20 © 3M 2004 3M™ Digital Projector X45/SX55 Press The "MAGNIFY" indication will appear on the remote control. To exit the MAGNIFY mode and restore the screen to normal, press the FREEZE button ...ON Using the magnify feature VIDEO RGB SEARCH STANDBY/ON VIDEO RGB SEARCH ASPECT BLANK AUTO BLANK the ON button of MAGNIFY on the remote control. ● The projector automatically exits the MAGNIFY mode when the input signal changes, or when an operation of changing the display ...
... ESC RESET END PAGE DOWN MUTE OFF FREEZE KEYSTONE POSITION MENU ENTER ESC RESET 20 © 3M 2004 3M™ Digital Projector X45/SX55 Press The "MAGNIFY" indication will appear on the remote control. To exit the MAGNIFY mode and restore the screen to normal, press the FREEZE button ...ON Using the magnify feature VIDEO RGB SEARCH STANDBY/ON VIDEO RGB SEARCH ASPECT BLANK AUTO BLANK the ON button of MAGNIFY on the remote control. ● The projector automatically exits the MAGNIFY mode when the input signal changes, or when an operation of changing the display ...
Operation Guide
Page 21
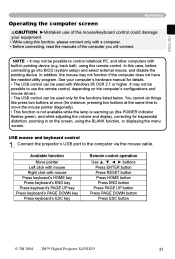
...Press keyboard's HOME key Press keyboard's END key Press keyboard's PAGE UP key Press keyboard's PAGE DOWN key Press keyboard's ESC key Remote control operation Use buttons Press ENTER button Press RESET button Press HOME button Press END button Press PAGE UP button Press PAGE DOWN button ...Press ESC button © 3M 2004 3M™ Digital Projector X45/SX55 21 Operating Operating the computer screen • While using this remote control. It may not function if the computer does not have the needed utility program. ...
...Press keyboard's HOME key Press keyboard's END key Press keyboard's PAGE UP key Press keyboard's PAGE DOWN key Press keyboard's ESC key Remote control operation Use buttons Press ENTER button Press RESET button Press HOME button Press END button Press PAGE UP button Press PAGE DOWN button ...Press ESC button © 3M 2004 3M™ Digital Projector X45/SX55 21 Operating Operating the computer screen • While using this remote control. It may not function if the computer does not have the needed utility program. ...
Operation Guide
Page 22
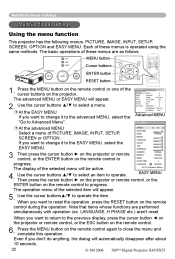
...1 2. Then press the cursor button ► on the projector or remote control, or the ENTER button on the remote control or one of the selected menu will automatically disappear after about 10 seconds. © 3M 2004 3M™ Digital Projector X45/SX55 22 Use the cursor buttons▲/▼... to operate. cursor buttons on the remote control again to progress. Each of these menus is operated using the same ...
...1 2. Then press the cursor button ► on the projector or remote control, or the ENTER button on the remote control or one of the selected menu will automatically disappear after about 10 seconds. © 3M 2004 3M™ Digital Projector X45/SX55 22 Use the cursor buttons▲/▼... to operate. cursor buttons on the remote control again to progress. Each of these menus is operated using the same ...

Operation Guide
Page 23
...;25) and COLOR TEMP (26) of GAMMA and COLOR TEMP differs from pre-assigned modes above, the display on the projector or remote control. Using the buttons ◄/► corrects the keystone distortion. Using the buttons ◄/► switches the mode of picture type.The ...RESET EXECUTE FILTER TIME 0 LANGUAGE ENGLISH Go To Advance Menu... See the item COLOR of whole color. BRIGHT CONTRAST COLOR TINT © 3M 2004 3M™ Digital Projector X45/SX55 23 ENGLISH Using the buttons ◄/► adjusts the contrast. Choose a suitable mode according to the projected ...
...;25) and COLOR TEMP (26) of GAMMA and COLOR TEMP differs from pre-assigned modes above, the display on the projector or remote control. Using the buttons ◄/► corrects the keystone distortion. Using the buttons ◄/► switches the mode of picture type.The ...RESET EXECUTE FILTER TIME 0 LANGUAGE ENGLISH Go To Advance Menu... See the item COLOR of whole color. BRIGHT CONTRAST COLOR TINT © 3M 2004 3M™ Digital Projector X45/SX55 23 ENGLISH Using the buttons ◄/► adjusts the contrast. Choose a suitable mode according to the projected ...

Operation Guide
Page 25
... button displays a dialog to progress. The darkest tone at the left end of test pattern except the darkest in the left end on the remote control to aid you want to the following table. Select an item using the buttons ▲/▼. Each time you want to eight of ... press the ENTER button, the pattern changes as below can display a test pattern for checking the effect of equalizing adjustment bar. 8 +0 GAMMA © 3M 2004 3M™ Digital Projector X45/SX55 25 ENGLISH Multifunctional settings PICTURE Menu With the PICTURE menu, items shown in the table below .
... button displays a dialog to progress. The darkest tone at the left end of test pattern except the darkest in the left end on the remote control to aid you want to the following table. Select an item using the buttons ▲/▼. Each time you want to eight of ... press the ENTER button, the pattern changes as below can display a test pattern for checking the effect of equalizing adjustment bar. 8 +0 GAMMA © 3M 2004 3M™ Digital Projector X45/SX55 25 ENGLISH Multifunctional settings PICTURE Menu With the PICTURE menu, items shown in the table below .

Operation Guide
Page 28
... MENU ASPECT OVER SCAN V POSITION H POSITION H PHASE H SIZE AUTO ADJUST :SELECT 4:3 95 25 142 16 1344 ASPECT OVER SCAN V POSITION H POSITION H PHASE 28 © 3M 2004 3M™ Digital Projector X45/SX55 Using the buttons ▲/▼ adjusts the vertical position. At a RGB signal 4:3 16:9 NORMAL At a video signal / no... be selected. • Performing the automatic adjustment initializes the aspect ratio setting. Select an item using the cursor buttons ▲/▼ on the projector or remote control, and press the cursor button ► on the projector or...
... MENU ASPECT OVER SCAN V POSITION H POSITION H PHASE H SIZE AUTO ADJUST :SELECT 4:3 95 25 142 16 1344 ASPECT OVER SCAN V POSITION H POSITION H PHASE 28 © 3M 2004 3M™ Digital Projector X45/SX55 Using the buttons ▲/▼ adjusts the vertical position. At a RGB signal 4:3 16:9 NORMAL At a video signal / no... be selected. • Performing the automatic adjustment initializes the aspect ratio setting. Select an item using the cursor buttons ▲/▼ on the projector or remote control, and press the cursor button ► on the projector or...

Operation Guide
Page 29
... the picture may not function correctly with some input. In such a case, please reset the adjustment pressing the RESET button on the remote control during this item performs the automatic adjustment feature. For a component video signal, the signal type is selected to use this function.... • The automatic adjustment operation requires approximately 10 seconds. ENGLISH H SIZE AUTO ADJUST © 3M 2004 3M™ Digital Projector X45/SX55 29 Use a bright picture when adjusting. This function is available only when the AUTO mode is identi...
... the picture may not function correctly with some input. In such a case, please reset the adjustment pressing the RESET button on the remote control during this item performs the automatic adjustment feature. For a component video signal, the signal type is selected to use this function.... • The automatic adjustment operation requires approximately 10 seconds. ENGLISH H SIZE AUTO ADJUST © 3M 2004 3M™ Digital Projector X45/SX55 29 Use a bright picture when adjusting. This function is available only when the AUTO mode is identi...

Operation Guide
Page 30
...the models CP-X340 and CP-X345, or 50 to the following table. In such a case, please select the TURN OFF. © 3M 2004 3M™ Digital Projector X45/SX55 MENU [RGB] PICTURE IMAGE INPUT SETUP SCREEN OPTION EASY MENU COLOR SPACE COMPONENT VIDEO FORMAT FRAME LOCK INFORMATION :SELECT...the REC709. Select an item using the cursor buttons ▲/▼ on the projector or remote control, and press the cursor button ► on the projector or remote control, or the ENTER button on the remote control to the projector. an irregular picture, a color lack), please select the mode depending ...
...the models CP-X340 and CP-X345, or 50 to the following table. In such a case, please select the TURN OFF. © 3M 2004 3M™ Digital Projector X45/SX55 MENU [RGB] PICTURE IMAGE INPUT SETUP SCREEN OPTION EASY MENU COLOR SPACE COMPONENT VIDEO FORMAT FRAME LOCK INFORMATION :SELECT...the REC709. Select an item using the cursor buttons ▲/▼ on the projector or remote control, and press the cursor button ► on the projector or remote control, or the ENTER button on the remote control to the projector. an irregular picture, a color lack), please select the mode depending ...
Operation Guide
Page 32
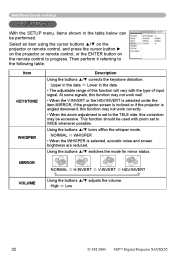
...MENU [RGB] PICTURE IMAGE INPUT SETUP SCREEN OPTION EASY MENU KEYSTONE WHISPER MIRROR VOLUME :SELECT +0 NORMAL NORMAL 16 KEYSTONE WHISPER 32 © 3M 2004 3M™ Digital Projector X45/SX55 Upper in the data Lower in the table below can be performed. At some signals, this ...the SETUP menu, items shown in the data • The adjustable range of input signal. Using the buttons ▲/▼ turns off/on the remote control to the following table. MIRROR NORMAL H:INVERT V:INVERT H&V:INVERT VOLUME Using the buttons ▲/▼ adjusts the ...
...MENU [RGB] PICTURE IMAGE INPUT SETUP SCREEN OPTION EASY MENU KEYSTONE WHISPER MIRROR VOLUME :SELECT +0 NORMAL NORMAL 16 KEYSTONE WHISPER 32 © 3M 2004 3M™ Digital Projector X45/SX55 Upper in the data Lower in the table below can be performed. At some signals, this ...the SETUP menu, items shown in the data • The adjustable range of input signal. Using the buttons ▲/▼ turns off/on the remote control to the following table. MIRROR NORMAL H:INVERT V:INVERT H&V:INVERT VOLUME Using the buttons ▲/▼ adjusts the ...

Operation Guide
Page 33
.... The blank screen is the existing standard screen. To quit the operation, press the MENU button on the remote control. Using the buttons ▲/▼ switches the brightness level of the OSD (On Screen Display). BLUE,... BLUE WHITE BLACK OSD BRIGHT BLANK MyScreen is displayed by pressing the BLANK button on the remote control or keep no operation for the temporarily blanking feature (20). It is the screen you can be..., please refer to the item MyScreen (34). © 3M 2004 3M™ Digital Projector X45/SX55 33 ENGLISH ENGLISH
.... The blank screen is the existing standard screen. To quit the operation, press the MENU button on the remote control. Using the buttons ▲/▼ switches the brightness level of the OSD (On Screen Display). BLUE,... BLUE WHITE BLACK OSD BRIGHT BLANK MyScreen is displayed by pressing the BLANK button on the remote control or keep no operation for the temporarily blanking feature (20). It is the screen you can be..., please refer to the item MyScreen (34). © 3M 2004 3M™ Digital Projector X45/SX55 33 ENGLISH ENGLISH