

Operating Guide
Page 3
...;ʜ20 Displaying The Child Window ʜ21 Selecting An Audio Input ʜʜʜ21 Multifunctional Settings ʜʜʜʜ22 Using The Menu Functions ʜʜ22 MAIN Menu 23 PICTURE-1 Menu 24 PICTURE-2 Menu 26 INPUT Menu 27 AUTO Menu 29 SCREEN Menu 31 OPTION Menu 33 NETWORK Menu 35 Network Setting Up 36 Lamp 37 Replacing The Lamp ʜʜʜʜʜ38 Air Filter 39 Caring For The Air Filterʜʜʜ...
...;ʜ20 Displaying The Child Window ʜ21 Selecting An Audio Input ʜʜʜ21 Multifunctional Settings ʜʜʜʜ22 Using The Menu Functions ʜʜ22 MAIN Menu 23 PICTURE-1 Menu 24 PICTURE-2 Menu 26 INPUT Menu 27 AUTO Menu 29 SCREEN Menu 31 OPTION Menu 33 NETWORK Menu 35 Network Setting Up 36 Lamp 37 Replacing The Lamp ʜʜʜʜʜ38 Air Filter 39 Caring For The Air Filterʜʜʜ...

Operating Guide
Page 6
... Arrangement WARNING • Before installation, make sure that the projector is turned off and the power code is disconnected. • Do not set up and move the projector, while it is hot. • Install the projector in the table are calculated for a full size screen. (±10%) Reference for the 4:3 aspect ratio b C Screen Lens center Side View a Reference for the 16:9 aspect ratio C b Screen Lens center a Side View Screen Size...
... Arrangement WARNING • Before installation, make sure that the projector is turned off and the power code is disconnected. • Do not set up and move the projector, while it is hot. • Install the projector in the table are calculated for a full size screen. (±10%) Reference for the 4:3 aspect ratio b C Screen Lens center Side View a Reference for the 16:9 aspect ratio C b Screen Lens center a Side View Screen Size...

Operating Guide
Page 8
... the laptop's RGB external image output (set . It might be connected. display devices). • This projector is compatible with this projector. • For some RGB input modes, the optional Mac adapter is necessary. • When the image resolution is done, please refer to the instruction manual of this function by connecting this manual for the pin assignment of each device to be recommended to use the standard drivers in...
... the laptop's RGB external image output (set . It might be connected. display devices). • This projector is compatible with this projector. • For some RGB input modes, the optional Mac adapter is necessary. • When the image resolution is done, please refer to the instruction manual of this function by connecting this manual for the pin assignment of each device to be recommended to use the standard drivers in...

Operating Guide
Page 13
... . Using The Remote ID Feature This is controlled by connecting the REMOTE CONTROL ports of a remote sensor). BLANK ASPECT LASER PREVIOUS NEXT MOUSE ESC MENU POSITION RESET AUTO MAGNFY PinP VOLUME ON FREEZE MUTE OFF KEYSTONE SEARCH 1 2 3 ID CHANGE ID CHANGE switch 13 approximately 3 meters approximately 3 meters • Also a remote signal reflected in malfunction. • Remove the batteries from directly hitting the projector's remote sensor. • The remote control works with the projector's remote sensor...
... . Using The Remote ID Feature This is controlled by connecting the REMOTE CONTROL ports of a remote sensor). BLANK ASPECT LASER PREVIOUS NEXT MOUSE ESC MENU POSITION RESET AUTO MAGNFY PinP VOLUME ON FREEZE MUTE OFF KEYSTONE SEARCH 1 2 3 ID CHANGE ID CHANGE switch 13 approximately 3 meters approximately 3 meters • Also a remote signal reflected in malfunction. • Remove the batteries from directly hitting the projector's remote sensor. • The remote control works with the projector's remote sensor...

Operating Guide
Page 14
... devices, after connecting cable. It may not be possible to use the remote control, depending on the right. Connect the M1-D port of the computer. memo The function can be used with Windows 95 OSR 2.1 or higher. BLANK ASPECT LASER PREVIOUS NEXT MOUSE ESC MENU POSITION RESET AUTO MAGNFY PinP VOLUME ON FREEZE MUTE OFF KEYSTONE SEARCH 1 2 3 ID CHANGE (Front) Mouse left button Mouse move...
... devices, after connecting cable. It may not be possible to use the remote control, depending on the right. Connect the M1-D port of the computer. memo The function can be used with Windows 95 OSR 2.1 or higher. BLANK ASPECT LASER PREVIOUS NEXT MOUSE ESC MENU POSITION RESET AUTO MAGNFY PinP VOLUME ON FREEZE MUTE OFF KEYSTONE SEARCH 1 2 3 ID CHANGE (Front) Mouse left button Mouse move...

Operating Guide
Page 15
... the projector before the connected devices. The projector lamp will light up and the standby/on indicator will go off , and the standby/on indicator will begin blinking green. The message "Power off in right order. Then the standby/on LASER INDICATOR STANDBY/ON VIDEO RGB indicator will stop blinking and light green. 4 Use the LENS SHIFT buttons to solid orange. 3 Press the STANDBY/ON button. BLANK ASPECT LASER STANDBY/ON button Power switch (ON position) X80 lens shift LASER INDICATOR STANDBY/ON VIDEO RGB ++ LENS SHIFT FOCUS -- + ZOOM - Turning...
... the projector before the connected devices. The projector lamp will light up and the standby/on indicator will go off , and the standby/on indicator will begin blinking green. The message "Power off in right order. Then the standby/on LASER INDICATOR STANDBY/ON VIDEO RGB indicator will stop blinking and light green. 4 Use the LENS SHIFT buttons to solid orange. 3 Press the STANDBY/ON button. BLANK ASPECT LASER STANDBY/ON button Power switch (ON position) X80 lens shift LASER INDICATOR STANDBY/ON VIDEO RGB ++ LENS SHIFT FOCUS -- + ZOOM - Turning...
Operating Guide
Page 20
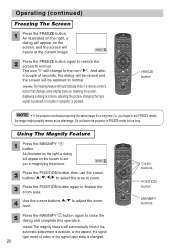
... if a remote control's button that changes some display state (ex. Using The Magnify Feature 1 Press the MAGNIFY ON button. LASER INDICATOR STANDBY/ON VIDEO RGB ++ LENS SHIFT FOCUS -- + ZOOM - you in FREEZE mode for a long time (i.e. memo The magnify feature will FREEZE freeze at the current image. 2 Press the FREEZE button again to restore the screen to the icon " ". BLANK ASPECT LASER PREVIOUS NEXT MOUSE ESC MENU POSITION RESET AUTO MAGNFY...
... if a remote control's button that changes some display state (ex. Using The Magnify Feature 1 Press the MAGNIFY ON button. LASER INDICATOR STANDBY/ON VIDEO RGB ++ LENS SHIFT FOCUS -- + ZOOM - you in FREEZE mode for a long time (i.e. memo The magnify feature will FREEZE freeze at the current image. 2 Press the FREEZE button again to restore the screen to the icon " ". BLANK ASPECT LASER PREVIOUS NEXT MOUSE ESC MENU POSITION RESET AUTO MAGNFY...

Operating Guide
Page 22
..., AUTO, SCREEN, OPTION and NETWORK. The menu will appear. PREVIOUS NEXT MOUSE ESC MENU POSITION RESET AUTO MAGNFY PinP VOLUME ON FREEZE MUTE OFF KEYSTONE SEARCH 1 2 3 ID CHANGE Cursor buttons MENU button RESET button ESC button ex. MENU MAIN PICTURE-1 PICTURE-2 INPUT AUTO SCREEN OPTION NETWORK : SELECT VOLUME SPEAKER IR REMOTE IR REMOTE ID LAMP TIME FILTER TIME SERVICE RESET 16 TURN ON ALL 1234 h 4321 h MENU MAIN PICTURE-1 PICTURE-2 INPUT AUTO SCREEN OPTION NETWORK : SELECT VOLUME SPEAKER IR REMOTE IR REMOTE ID LAMP TIME FILTER TIME SERVICE RESET 16 TURN ON ALL 1234 h 4321 h 3 Use...
..., AUTO, SCREEN, OPTION and NETWORK. The menu will appear. PREVIOUS NEXT MOUSE ESC MENU POSITION RESET AUTO MAGNFY PinP VOLUME ON FREEZE MUTE OFF KEYSTONE SEARCH 1 2 3 ID CHANGE Cursor buttons MENU button RESET button ESC button ex. MENU MAIN PICTURE-1 PICTURE-2 INPUT AUTO SCREEN OPTION NETWORK : SELECT VOLUME SPEAKER IR REMOTE IR REMOTE ID LAMP TIME FILTER TIME SERVICE RESET 16 TURN ON ALL 1234 h 4321 h MENU MAIN PICTURE-1 PICTURE-2 INPUT AUTO SCREEN OPTION NETWORK : SELECT VOLUME SPEAKER IR REMOTE IR REMOTE ID LAMP TIME FILTER TIME SERVICE RESET 16 TURN ON ALL 1234 h 4321 h 3 Use...

Operating Guide
Page 24
... table below . Multifunctional Settings (continued) PICTURE-1 Menu With the PICTURE-1 menu, the items shown in the table below can be performed. MENU MAIN PICTURE-1 PICTURE-2 INPUT AUTO SCREEN OPTION NETWORK : SELECT GAMMA COLOR BAL R COLOR BAL G COLOR BAL B SHARPNESS COLOR TINT MY MEMORY NORMAL +0 +0 +0 +0 +0 +0 LOAD1 Item Description Select a gamma mode using the / buttons. : Strong Weak memo This item can be selected only at a video signal. COLOR Adjust the whole color using the / buttons. : NORMAL CINEMA DYNAMIC...
... table below . Multifunctional Settings (continued) PICTURE-1 Menu With the PICTURE-1 menu, the items shown in the table below can be performed. MENU MAIN PICTURE-1 PICTURE-2 INPUT AUTO SCREEN OPTION NETWORK : SELECT GAMMA COLOR BAL R COLOR BAL G COLOR BAL B SHARPNESS COLOR TINT MY MEMORY NORMAL +0 +0 +0 +0 +0 +0 LOAD1 Item Description Select a gamma mode using the / buttons. : Strong Weak memo This item can be selected only at a video signal. COLOR Adjust the whole color using the / buttons. : NORMAL CINEMA DYNAMIC...
Operating Guide
Page 27
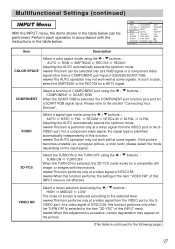
... setting of the item "VIDEO NR" of this INPUT menu. VIDEO Select a signal type mode using the / buttons. : AUTO RGB SMPTE240 REC709 REC601 Selecting the AUTO automatically selects the optimum mode. memo The AUTO operation may not work well at a video signal from the VIDEO port or the SVIDEO port. Please refer to the following page.) 27 At a video signal of NTSC3.58. MENU MAIN PICTURE-1 PICTURE-2 INPUT AUTO SCREEN OPTION NETWORK : SELECT COLOR SPACE AUTO COMPONENT COMPONENT VIDEO AUTO 3D-YCS TURN OFF VIDEO...
... setting of the item "VIDEO NR" of this INPUT menu. VIDEO Select a signal type mode using the / buttons. : AUTO RGB SMPTE240 REC709 REC601 Selecting the AUTO automatically selects the optimum mode. memo The AUTO operation may not work well at a video signal from the VIDEO port or the SVIDEO port. Please refer to the following page.) 27 At a video signal of NTSC3.58. MENU MAIN PICTURE-1 PICTURE-2 INPUT AUTO SCREEN OPTION NETWORK : SELECT COLOR SPACE AUTO COMPONENT COMPONENT VIDEO AUTO 3D-YCS TURN OFF VIDEO...

Operating Guide
Page 28
...) button displays the INPUT INFORMATION menu. RESET Select the EXECUTE using the / buttons. : video S-video memo About the child window, please refer to 60 is not reset. 28 P.IN P. memo This item is working . POSIT. The INPUT INFORMATION menu shows the information about the current signal input as a SCART RGB port. memo The "SCART RGB" message means the COMPONENT port is performs only at the last time. Multifunctional Settings (continued) INPUT Menu (continued...
...) button displays the INPUT INFORMATION menu. RESET Select the EXECUTE using the / buttons. : video S-video memo About the child window, please refer to 60 is not reset. 28 P.IN P. memo This item is working . POSIT. The INPUT INFORMATION menu shows the information about the current signal input as a SCART RGB port. memo The "SCART RGB" message means the COMPONENT port is performs only at the last time. Multifunctional Settings (continued) INPUT Menu (continued...

Operating Guide
Page 29
... refer to use this function. Select the TURN ON or the TURN OFF using the / buttons. : Long (max. 99 minutes) Short (min. 0 minute = DISABLE) AUTO POWER OFF ENABLE AUTO POWER OFF DISABLE ex. 1min 0min When the time is continued to the item "VIDEO" of the INPUT menu. Use a bright screen when adjusting. MENU MAIN PICTURE-1 PICTURE-2 INPUT AUTO SCREEN OPTION NETWORK : SELECT ADJUST POWER OFF POWER ON SEARCH RESET 0 min TURN ON TURN ON Item ADJUST POWER OFF POWER ON Description...
... refer to use this function. Select the TURN ON or the TURN OFF using the / buttons. : Long (max. 99 minutes) Short (min. 0 minute = DISABLE) AUTO POWER OFF ENABLE AUTO POWER OFF DISABLE ex. 1min 0min When the time is continued to the item "VIDEO" of the INPUT menu. Use a bright screen when adjusting. MENU MAIN PICTURE-1 PICTURE-2 INPUT AUTO SCREEN OPTION NETWORK : SELECT ADJUST POWER OFF POWER ON SEARCH RESET 0 min TURN ON TURN ON Item ADJUST POWER OFF POWER ON Description...
Operating Guide
Page 31
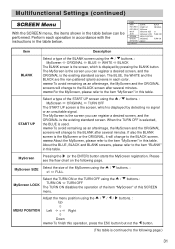
... Adjust the menu position using the / buttons.: TURN ON TURN OFF The TURN ON disables the operation of the item "MyScreen" of this SCREEN menu. MENU MAIN PICTURE-1 PICTURE-2 INPUT AUTO SCREEN OPTION NETWORK : SELECT BLANK BLACK START UP ORIGINAL MyScreen MyScreen SIZE x1 MyScreen LOCK TURN OFF MENU POSITION MESSAGE TURN ON RESET Item Description BLANK Select a type of the START UP screen using the / buttons. : MyScreen ORIGINAL BLUE WHITE BLACK The BLANK screen is the screen, which is displayed by detecting no signal...
... Adjust the menu position using the / buttons.: TURN ON TURN OFF The TURN ON disables the operation of the item "MyScreen" of this SCREEN menu. MENU MAIN PICTURE-1 PICTURE-2 INPUT AUTO SCREEN OPTION NETWORK : SELECT BLANK BLACK START UP ORIGINAL MyScreen MyScreen SIZE x1 MyScreen LOCK TURN OFF MENU POSITION MESSAGE TURN ON RESET Item Description BLANK Select a type of the START UP screen using the / buttons. : MyScreen ORIGINAL BLUE WHITE BLACK The BLANK screen is the screen, which is displayed by detecting no signal...

Operating Guide
Page 33
... ENT IR REMOTE ID LAMP TIME Select a number as an ID number for about 3 seconds displays the LAMP TIME menu. When the ALL is selected, the projector is controlled by the remote control whose ID CHANGE switch is controlled by a remote control irrespective of the position of the current lamp, to display the messages about the lamp. memo Perform this function only when you have cleaned or replaced the air filter. Select the RESET using the ENTER button (2). : (1) 1:FRONT...
... ENT IR REMOTE ID LAMP TIME Select a number as an ID number for about 3 seconds displays the LAMP TIME menu. When the ALL is selected, the projector is controlled by the remote control whose ID CHANGE switch is controlled by a remote control irrespective of the position of the current lamp, to display the messages about the lamp. memo Perform this function only when you have cleaned or replaced the air filter. Select the RESET using the ENTER button (2). : (1) 1:FRONT...

Operating Guide
Page 38
... switching power on the projector. Lamp (continued) Replacing The Lamp If the indicators or a message prompts you to replace the lamp, replace the lamp as soon as knob shown in the Figure. is displayed, complete this operation within 10 minutes of the lamp door is mounted on the ceiling, or if the lamp has broken, also ask the dealer to open the menu. (2) Choose the "OPTION" on the projector, and reset the lamp timer...
... switching power on the projector. Lamp (continued) Replacing The Lamp If the indicators or a message prompts you to replace the lamp, replace the lamp as soon as knob shown in the Figure. is displayed, complete this operation within 10 minutes of the lamp door is mounted on the ceiling, or if the lamp has broken, also ask the dealer to open the menu. (2) Choose the "OPTION" on the projector, and reset the lamp timer...

Operating Guide
Page 41
... time the power is approaching 2000 hours, so a lamp change the lamp, please be displayed. Preparation of this projector. 41 The time the lamp timer has counted is turned on , messages such as described below may thus fail to light even prior to the following appears, please contact your dealer or service company. a lamp may be sure to the section "Lamp". Message CHANGE THE LAMP AFTER REPLACING LAMP, RESET THE LAMP TIMER. After you have changed...
... time the power is approaching 2000 hours, so a lamp change the lamp, please be displayed. Preparation of this projector. 41 The time the lamp timer has counted is turned on , messages such as described below may thus fail to light even prior to the following appears, please contact your dealer or service company. a lamp may be sure to the section "Lamp". Message CHANGE THE LAMP AFTER REPLACING LAMP, RESET THE LAMP TIMER. After you have changed...

Operating Guide
Page 43
standby/on indicator Lighting in Orange Blinking in Green Lighting in Green Blinking in Orange Blinking in Red lamp temp indicator indicator Description Turned Turned The projector is in an on state. Turned off Turned The projector is displayed, please contact your dealer or service company. After the projector has sufficiently cooled down, please make confirmation of the attachment state of the standby/on indicator, the lamp indicator, and the temp indicator have the meanings as reference. After the projector has sufficiently cooled...
standby/on indicator Lighting in Orange Blinking in Green Lighting in Green Blinking in Orange Blinking in Red lamp temp indicator indicator Description Turned Turned The projector is in an on state. Turned off Turned The projector is displayed, please contact your dealer or service company. After the projector has sufficiently cooled down, please make confirmation of the attachment state of the standby/on indicator, the lamp indicator, and the temp indicator have the meanings as reference. After the projector has sufficiently cooled...

Operating Guide
Page 45
... of the lamp and lamp door, and then turn off , and allow the unit to the manual - Correctly connect the connection cables. 8, 9 Signal source does not correctly work. Before requesting repair, please check in . Troubleshooting (continued) Phenomena That May Easily Be Mistaken For Machine Defects WARNING • Never use the projector if abnormal operations such as by referring to cool down , please turn the power on the screen, this is...
... of the lamp and lamp door, and then turn off , and allow the unit to the manual - Correctly connect the connection cables. 8, 9 Signal source does not correctly work. Before requesting repair, please check in . Troubleshooting (continued) Phenomena That May Easily Be Mistaken For Machine Defects WARNING • Never use the projector if abnormal operations such as by referring to cool down , please turn the power on the screen, this is...
Safety Guide
Page 10
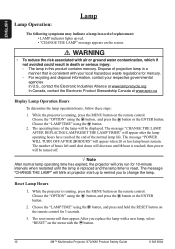
... lamp life. While the projector is running , press the MENU button on the remote control. Choose the "OPTION" using the button. 2. The operating time of the lamp will appear after the lamp operating hours have reached the end of projection lamp in a manner that is reset. The message "CHANGE THE LAMP, AFTER REPLACING LAMP RESET THE LAMP TIMER" will be turned off. √ Note After normal lamp operating time has expired, the projector will blink at www.epsc.ca Display Lamp Operation Hours To determine the lamp operation hours...
... lamp life. While the projector is running , press the MENU button on the remote control. Choose the "OPTION" using the button. 2. The operating time of the lamp will appear after the lamp operating hours have reached the end of projection lamp in a manner that is reset. The message "CHANGE THE LAMP, AFTER REPLACING LAMP RESET THE LAMP TIMER" will be turned off. √ Note After normal lamp operating time has expired, the projector will blink at www.epsc.ca Display Lamp Operation Hours To determine the lamp operation hours...

Safety Guide
Page 13
.... INSTRUCTIONS TO USERS: This equipment complies with any defects in a particular installation. Toshiba is found to which can radiate radio frequency energy, and if not installed and used with 3M's written instructions. However, there is a registered trademark of their respective companies. © 3M 2004 3M™ Multimedia Projector X70/X80 Product Safety Guide 13 Microsoft and Windows 95 & Windows 98 are registered trademarks, and Windows and Windows...
.... INSTRUCTIONS TO USERS: This equipment complies with any defects in a particular installation. Toshiba is found to which can radiate radio frequency energy, and if not installed and used with 3M's written instructions. However, there is a registered trademark of their respective companies. © 3M 2004 3M™ Multimedia Projector X70/X80 Product Safety Guide 13 Microsoft and Windows 95 & Windows 98 are registered trademarks, and Windows and Windows...


