Quick Installation Guide
Page 3
... Up 21 Check Installation and Close the Case 21 Configure your RAID Arrays 21 Chapter 2. Installing the Battery Backup Unit 23 Tools and equipment required 24 Installation Overview 24 Installation Instructions 26 Replacing the Battery 32 www.3ware.com iii Installing an AMCC 3ware 9550SX RAID Controller 1 Before You Begin 1 Contents of Contents Chapter 1.
... Up 21 Check Installation and Close the Case 21 Configure your RAID Arrays 21 Chapter 2. Installing the Battery Backup Unit 23 Tools and equipment required 24 Installation Overview 24 Installation Instructions 26 Replacing the Battery 32 www.3ware.com iii Installing an AMCC 3ware 9550SX RAID Controller 1 Before You Begin 1 Contents of Contents Chapter 1.
Quick Installation Guide
Page 10
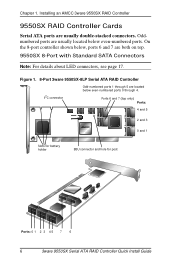
Ports 6 and 7 (top only) Ports: 4 and 5 2 and 3 0 and 1 Slots for battery holder BBU connector and hole for post Ports: 0 1 2 3 4 5 7 6 6 3ware 9550SX Serial ATA RAID Controller Quick Install Guide Oddnumbered ports are usually located below , ports 6 and 7 are both on ...top. 9550SX 8-Port with Standard SATA Connectors Note: For details about LED connectors, see page 17. Chapter 1. Installing an AMCC 3ware 9550SX RAID Controller 9550SX RAID Controller Cards Serial ATA ports are located below even-numbered ports 0 through 5 are usually double-stacked connectors. On the...
Ports 6 and 7 (top only) Ports: 4 and 5 2 and 3 0 and 1 Slots for battery holder BBU connector and hole for post Ports: 0 1 2 3 4 5 7 6 6 3ware 9550SX Serial ATA RAID Controller Quick Install Guide Oddnumbered ports are usually located below , ports 6 and 7 are both on ...top. 9550SX 8-Port with Standard SATA Connectors Note: For details about LED connectors, see page 17. Chapter 1. Installing an AMCC 3ware 9550SX RAID Controller 9550SX RAID Controller Cards Serial ATA ports are located below even-numbered ports 0 through 5 are usually double-stacked connectors. On the...
Quick Installation Guide
Page 11
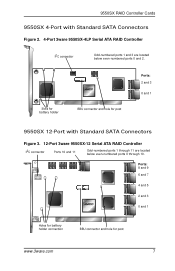
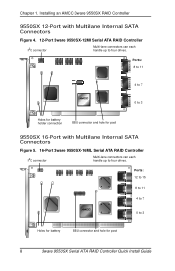
... BBU connector and hole for post www.3ware.com 7 Ports: 8 and 9 6 and 7 4 and 5 2 and 3 0 and 1 Holes for battery holder connection BBU connector and hole for post Ports: 2 and 3 0 and 1 9550SX 12-Port with Standard SATA Connectors Figure 2. 4-Port 3ware 9550SX-4LP Serial ATA RAID Controller I2C connector Odd-numbered ports 1 and 3 are located below...
... BBU connector and hole for post www.3ware.com 7 Ports: 8 and 9 6 and 7 4 and 5 2 and 3 0 and 1 Holes for battery holder connection BBU connector and hole for post Ports: 2 and 3 0 and 1 9550SX 12-Port with Standard SATA Connectors Figure 2. 4-Port 3ware 9550SX-4LP Serial ATA RAID Controller I2C connector Odd-numbered ports 1 and 3 are located below...
Quick Installation Guide
Page 12
...9550SX 12-Port with Multilane Internal SATA Connectors Figure 5. 16-Port 3ware 9550SX-16ML Serial ATA RAID Controller I2C connector Multi-lane connectors can each handle up to 3 Holes for battery BBU connector and hole for post 8 3ware 9550SX Serial ATA RAID Controller Quick Install Guide Ports: 8 to ...11 4 to 7 0 to 3 Holes for battery holder connection BBU connector and hole for post 9550SX 16-Port ...
...9550SX 12-Port with Multilane Internal SATA Connectors Figure 5. 16-Port 3ware 9550SX-16ML Serial ATA RAID Controller I2C connector Multi-lane connectors can each handle up to 3 Holes for battery BBU connector and hole for post 8 3ware 9550SX Serial ATA RAID Controller Quick Install Guide Ports: 8 to ...11 4 to 7 0 to 3 Holes for battery holder connection BBU connector and hole for post 9550SX 16-Port ...
Quick Installation Guide
Page 13
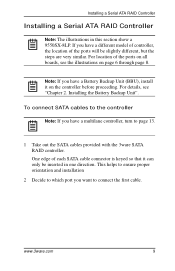
... you want to page 13. 1 Take out the SATA cables provided with the 3ware SATA RAID controller. One edge of the ports will be inserted in this section show a 9550SX-8LP. Note: If you have a Battery Backup Unit (BBU), install it can only be slightly different, but the steps are... very similar. For details, see the illustrations on the controller before proceeding. Installing the Battery Backup Unit". If you have a different model of controller, the location of each SATA cable connector is keyed so that it on page 6 through...
... you want to page 13. 1 Take out the SATA cables provided with the 3ware SATA RAID controller. One edge of the ports will be inserted in this section show a 9550SX-8LP. Note: If you have a Battery Backup Unit (BBU), install it can only be slightly different, but the steps are... very similar. For details, see the illustrations on the controller before proceeding. Installing the Battery Backup Unit". If you have a different model of controller, the location of each SATA cable connector is keyed so that it on page 6 through...
Quick Installation Guide
Page 27
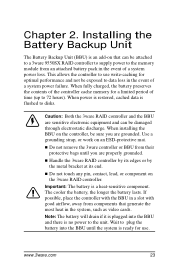
... the controller cache memory for a limited period of a system power loss. Note: The battery will drain if it is ready for optimal performance and not be exposed to the memory module from components that can be attached to a 3ware 9550SX RAID controller to supply power to data loss in the system, such... as video cards. Wait to plug the battery into the BBU and there is an add-on that generate the most heat in...
... the controller cache memory for a limited period of a system power loss. Note: The battery will drain if it is ready for optimal performance and not be exposed to the memory module from components that can be attached to a 3ware 9550SX RAID controller to supply power to data loss in the system, such... as video cards. Wait to plug the battery into the BBU and there is an add-on that generate the most heat in...

Quick Installation Guide
Page 28
... at the points illustrated in Figures 12 through 13: a Clips on the battery module match to slots on the half-height controllers (4-port and 8-port) and holes on the BBU 24 3ware 9550SX Serial ATA RAID Controller Quick Install Guide a) Clips b) BBU connector c)...Points of two pieces: the battery module and the BBU control module. Installing the Battery Backup Unit Tools and equipment required „ Slot-head screwdriver „ Grounding strap „ Battery Backup Unit (BBU) and battery „ 3ware 9550SX series controller Installation Overview The Battery Backup Unit (BBU) is ...
... at the points illustrated in Figures 12 through 13: a Clips on the battery module match to slots on the half-height controllers (4-port and 8-port) and holes on the BBU 24 3ware 9550SX Serial ATA RAID Controller Quick Install Guide a) Clips b) BBU connector c)...Points of two pieces: the battery module and the BBU control module. Installing the Battery Backup Unit Tools and equipment required „ Slot-head screwdriver „ Grounding strap „ Battery Backup Unit (BBU) and battery „ 3ware 9550SX series controller Installation Overview The Battery Backup Unit (BBU) is ...
Quick Installation Guide
Page 30
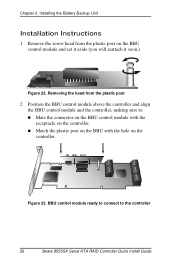
... module and set it aside (you will reattach it soon.) Figure 22. Chapter 2. Removing the head from the plastic post on the controller. Installing the Battery Backup Unit Installation Instructions 1 Remove the screw head from the plastic post 2 Position the BBU control module above the controller and align the BBU control...
... module and set it aside (you will reattach it soon.) Figure 22. Chapter 2. Removing the head from the plastic post on the controller. Installing the Battery Backup Unit Installation Instructions 1 Remove the screw head from the plastic post 2 Position the BBU control module above the controller and align the BBU control...
Quick Installation Guide
Page 32
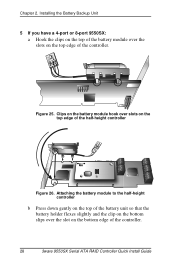
...top edge of the controller. Installing the Battery Backup Unit 5 If you have a 4-port or 8-port 9550SX: a Hook the clips on the top of the battery module over the slot on the bottom edge of the half-height controller Figure 26. Chapter 2. Attaching the battery module to the half-height controller b... Press down gently on the top of the battery unit so that the battery holder flexes slightly and the clip on the bottom slips over the slots on the top...
...top edge of the controller. Installing the Battery Backup Unit 5 If you have a 4-port or 8-port 9550SX: a Hook the clips on the top of the battery module over the slot on the bottom edge of the half-height controller Figure 26. Chapter 2. Attaching the battery module to the half-height controller b... Press down gently on the top of the battery unit so that the battery holder flexes slightly and the clip on the bottom slips over the slots on the top...
Quick Installation Guide
Page 33
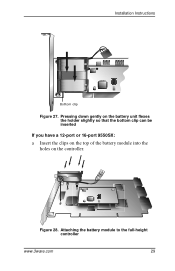
Figure 28. Pressing down gently on the battery unit flexes the holder slightly so that the bottom clip can be inserted If you have a 12-port or 16-port 9550SX: a Insert the clips on the top of the battery module into the holes on the controller. Installation Instructions Bottom clip Figure 27. Attaching the battery module to the full-height controller www.3ware.com 29
Figure 28. Pressing down gently on the battery unit flexes the holder slightly so that the bottom clip can be inserted If you have a 12-port or 16-port 9550SX: a Insert the clips on the top of the battery module into the holes on the controller. Installation Instructions Bottom clip Figure 27. Attaching the battery module to the full-height controller www.3ware.com 29
Quick Installation Guide
Page 34
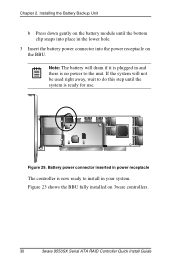
... not be used right away, wait to the unit. Figure 29. Battery power connector inserted in your system. Installing the Battery Backup Unit b Press down gently on the battery module until the system is ready for use. If the system will drain if it is plugged in and there is now... is no power to do this step until the bottom clip snaps into place in the lower hole. 3 Insert the battery power connector into the power receptacle on 3ware controllers. 30 3ware 9550SX Serial ATA RAID Controller Quick Install Guide Chapter 2. Figure 23 shows the BBU fully installed on the BBU.
... not be used right away, wait to the unit. Figure 29. Battery power connector inserted in your system. Installing the Battery Backup Unit b Press down gently on the battery module until the system is ready for use. If the system will drain if it is plugged in and there is now... is no power to do this step until the bottom clip snaps into place in the lower hole. 3 Insert the battery power connector into the power receptacle on 3ware controllers. 30 3ware 9550SX Serial ATA RAID Controller Quick Install Guide Chapter 2. Figure 23 shows the BBU fully installed on the BBU.
Quick Installation Guide
Page 36
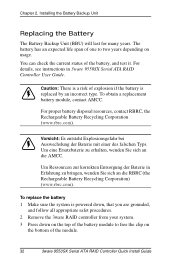
... zu erhalten, wenden Sie sich an die AMCC. Um Ressourcen zur korrekten Entsorgung der Baterie in 3ware 9550SX Serial ATA RAID Controller User Guide. To replace the battery 1 Make sure the system is replaced by an incorrect type. Vorsicht: Es entsteht Explosionsgefahr bei Auswechslung... der Baterie mit einer des falschen Typs. Installing the Battery Backup Unit Replacing the Battery The Battery Backup Unit (BBU) will last for many years. The battery has an expected life span of the module. 32 3ware 9550SX Serial ATA RAID Controller Quick Install Guide
... zu erhalten, wenden Sie sich an die AMCC. Um Ressourcen zur korrekten Entsorgung der Baterie in 3ware 9550SX Serial ATA RAID Controller User Guide. To replace the battery 1 Make sure the system is replaced by an incorrect type. Vorsicht: Es entsteht Explosionsgefahr bei Auswechslung... der Baterie mit einer des falschen Typs. Installing the Battery Backup Unit Replacing the Battery The Battery Backup Unit (BBU) will last for many years. The battery has an expected life span of the module. 32 3ware 9550SX Serial ATA RAID Controller Quick Install Guide
Quick Installation Guide
Page 37
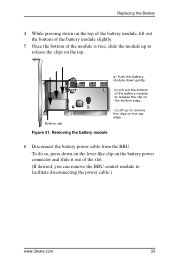
... clip c) Lift up to release the clips on the top edge. a) Push the battery module down gently. Replacing the Battery 4 While pressing down on the top of the battery module, lift out the bottom of the battery module slightly. 5 Once the bottom of the slot. (If desired, you can remove... the BBU control module to facilitate disconnecting the power cable.) www.3ware.com 33 Removing the battery module 6 Disconnect the battery power cable from the ...
... clip c) Lift up to release the clips on the top edge. a) Push the battery module down gently. Replacing the Battery 4 While pressing down on the top of the battery module, lift out the bottom of the battery module slightly. 5 Once the bottom of the slot. (If desired, you can remove... the BBU control module to facilitate disconnecting the power cable.) www.3ware.com 33 Removing the battery module 6 Disconnect the battery power cable from the ...

Quick Installation Guide
Page 38
...from the controller. For detailed instructions, see the 3ware 9550SX Serial ATA RAID Controller User Guide and the 3ware 9000 Series Serial ATA RAID Controller CLI Guide. 34 3ware 9550SX Serial ATA RAID Controller Quick Install Guide Installing the Battery Backup Unit Figure 32 shows how removing the connector... it now. 8 Insert the new battery module and cable it up. 9 Reinstall the 3ware RAID controller, close up your system, and restart it. 10 Run a battery test to compute the estimated battery capacity of either 3BM or 3DM 2, or by using the 3ware CLI. Press down on the lever-...
...from the controller. For detailed instructions, see the 3ware 9550SX Serial ATA RAID Controller User Guide and the 3ware 9000 Series Serial ATA RAID Controller CLI Guide. 34 3ware 9550SX Serial ATA RAID Controller Quick Install Guide Installing the Battery Backup Unit Figure 32 shows how removing the connector... it now. 8 Insert the new battery module and cable it up. 9 Reinstall the 3ware RAID controller, close up your system, and restart it. 10 Run a battery test to compute the estimated battery capacity of either 3BM or 3DM 2, or by using the 3ware CLI. Press down on the lever-...