Quick Installation Guide
Page 3
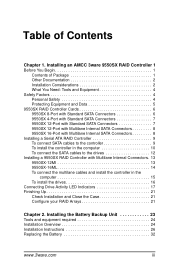
Installing an AMCC 3ware 9550SX RAID Controller 1 Before You Begin 1 Contents of Contents Chapter 1. Installing the Battery Backup Unit 23 Tools and equipment required 24 Installation Overview 24 Installation Instructions 26 Replacing the Battery 32 www.3ware.com iii Table of Package 1 Other Documentation 2 Installation Considerations 2 What You Need: Tools and Equipment 4 Safety Factors 4 Personal...
Installing an AMCC 3ware 9550SX RAID Controller 1 Before You Begin 1 Contents of Contents Chapter 1. Installing the Battery Backup Unit 23 Tools and equipment required 24 Installation Overview 24 Installation Instructions 26 Replacing the Battery 32 www.3ware.com iii Table of Package 1 Other Documentation 2 Installation Considerations 2 What You Need: Tools and Equipment 4 Safety Factors 4 Personal...
Quick Installation Guide
Page 5
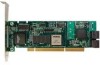
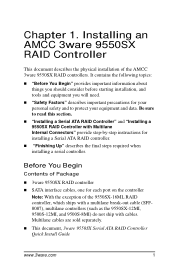
... and data. Before You Begin Contents of Package „ 3ware 9550SX RAID controller „ SATA interface cables, one for each port on the controller Note: With the exception of the AMCC 3ware 9550SX RAID controllers. Installing an AMCC 3ware 9550SX RAID Controller This document describes the physical installation of the 9550SX-16ML RAID controller, which ships with a multilane break...
... and data. Before You Begin Contents of Package „ 3ware 9550SX RAID controller „ SATA interface cables, one for each port on the controller Note: With the exception of the AMCC 3ware 9550SX RAID controllers. Installing an AMCC 3ware 9550SX RAID Controller This document describes the physical installation of the 9550SX-16ML RAID controller, which ships with a multilane break...
Quick Installation Guide
Page 6
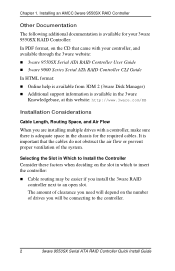
...you will depend on the slot in the chassis for the required cables. Installing an AMCC 3ware 9550SX RAID Controller Other Documentation The following additional documentation is available for your 3ware 9550SX RAID Controller: In PDF format, on the CD that came with your controller, and... available through the 3ware website: „ 3ware 9550SX Serial ATA RAID Controller User Guide „ 3ware 9000 Series Serial ATA RAID Controller CLI Guide ...
...you will depend on the slot in the chassis for the required cables. Installing an AMCC 3ware 9550SX RAID Controller Other Documentation The following additional documentation is available for your 3ware 9550SX RAID Controller: In PDF format, on the CD that came with your controller, and... available through the 3ware website: „ 3ware 9550SX Serial ATA RAID Controller User Guide „ 3ware 9000 Series Serial ATA RAID Controller CLI Guide ...
Quick Installation Guide
Page 7
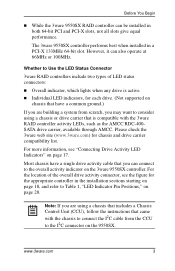
... installation sections starting on page 18, and refer to the I2C connector on the 3ware 9550SX controller. www.3ware.com 3 The 3ware 9550SX controller performs best when installed in both 64-bit PCI and PCI-X slots, not all slots give equal performance. However, it can also operate at... that includes a Chassis Control Unit (CCU), follow the instructions that came with the 3ware RAID controller activity LEDs, such as the AMCC RDC-400SATA drive carrier, available through AMCC. Before You Begin „ While the 3ware 9550SX RAID controller can be installed in a PCI-X 133MHz 64-bit slot.
... installation sections starting on page 18, and refer to the I2C connector on the 3ware 9550SX controller. www.3ware.com 3 The 3ware 9550SX controller performs best when installed in both 64-bit PCI and PCI-X slots, not all slots give equal performance. However, it can also operate at... that includes a Chassis Control Unit (CCU), follow the instructions that came with the 3ware RAID controller activity LEDs, such as the AMCC RDC-400SATA drive carrier, available through AMCC. Before You Begin „ While the 3ware 9550SX RAID controller can be installed in a PCI-X 133MHz 64-bit slot.
Quick Installation Guide
Page 8
...the next few pages to open your computer, you have replaced the covers. 4 3ware 9550SX Serial ATA RAID Controller Quick Install Guide High voltages may want to consider installing drives into an available PCI expansion slot. Personal Safety Warning! If the drives are planning to use RAID ...1, 5, 10, or 50, you may be easily removed in your system's case and install the 3ware RAID controller into hotswappable enclosures, so that is required. Installing an AMCC 3ware 9550SX RAID ...
...the next few pages to open your computer, you have replaced the covers. 4 3ware 9550SX Serial ATA RAID Controller Quick Install Guide High voltages may want to consider installing drives into an available PCI expansion slot. Personal Safety Warning! If the drives are planning to use RAID ...1, 5, 10, or 50, you may be easily removed in your system's case and install the 3ware RAID controller into hotswappable enclosures, so that is required. Installing an AMCC 3ware 9550SX RAID ...
Quick Installation Guide
Page 10
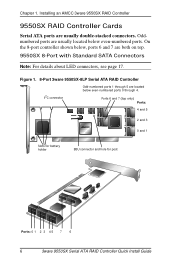
... ports are located below even-numbered ports. Installing an AMCC 3ware 9550SX RAID Controller 9550SX RAID Controller Cards Serial ATA ports are both on top. 9550SX 8-Port with Standard SATA Connectors Note: For details about LED connectors, see page 17. Figure 1. 8-Port 3ware 9550SX-8LP Serial ATA RAID Controller I2C connector Odd-numbered ports...connectors. Chapter 1. Ports 6 and 7 (top only) Ports: 4 and 5 2 and 3 0 and 1 Slots for battery holder BBU connector and hole for post Ports: 0 1 2 3 4 5 7 6 6 3ware 9550SX Serial ATA RAID Controller Quick Install Guide
... ports are located below even-numbered ports. Installing an AMCC 3ware 9550SX RAID Controller 9550SX RAID Controller Cards Serial ATA ports are both on top. 9550SX 8-Port with Standard SATA Connectors Note: For details about LED connectors, see page 17. Figure 1. 8-Port 3ware 9550SX-8LP Serial ATA RAID Controller I2C connector Odd-numbered ports...connectors. Chapter 1. Ports 6 and 7 (top only) Ports: 4 and 5 2 and 3 0 and 1 Slots for battery holder BBU connector and hole for post Ports: 0 1 2 3 4 5 7 6 6 3ware 9550SX Serial ATA RAID Controller Quick Install Guide
Quick Installation Guide
Page 12
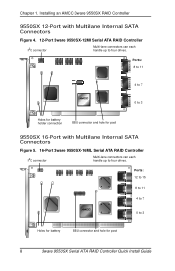
... an AMCC 3ware 9550SX RAID Controller 9550SX 12-Port with Multilane Internal SATA Connectors Figure 5. 16-Port 3ware 9550SX-16ML Serial ATA RAID Controller I2C connector Multi-lane connectors can each handle up to 3 Holes for battery BBU connector and hole for post 9550SX 16-Port with Multilane Internal SATA Connectors Figure 4. 12-Port 3ware 9550SX-12MI ... 15 8 to 11 4 to 7 0 to four drives. Ports: 8 to 11 4 to 7 0 to 3 Holes for battery holder connection BBU connector and hole for post 8 3ware 9550SX Serial ATA RAID Controller Quick Install Guide Chapter 1.
... an AMCC 3ware 9550SX RAID Controller 9550SX 12-Port with Multilane Internal SATA Connectors Figure 5. 16-Port 3ware 9550SX-16ML Serial ATA RAID Controller I2C connector Multi-lane connectors can each handle up to 3 Holes for battery BBU connector and hole for post 9550SX 16-Port with Multilane Internal SATA Connectors Figure 4. 12-Port 3ware 9550SX-12MI ... 15 8 to 11 4 to 7 0 to four drives. Ports: 8 to 11 4 to 7 0 to 3 Holes for battery holder connection BBU connector and hole for post 8 3ware 9550SX Serial ATA RAID Controller Quick Install Guide Chapter 1.
Quick Installation Guide
Page 14
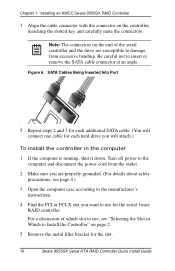
...susceptible to use , see page 4.) 3 Open the computer case according to the manufacturer's instructions. 4 Find the PCI or PCI-X slot you will connect one cable for the serial 3ware RAID controller. For a discussion of the serial controller and the drive are properly grounded. (For details about safety... to Install the Controller" on page 2. 5 Remove the metal filler bracket for the slot. 10 3ware 9550SX Serial ATA RAID Controller Quick Install Guide Installing an AMCC 3ware 9550SX RAID Controller 3 Align the cable connector with the connector on the end of which slot to use for...
...susceptible to use , see page 4.) 3 Open the computer case according to the manufacturer's instructions. 4 Find the PCI or PCI-X slot you will connect one cable for the serial 3ware RAID controller. For a discussion of the serial controller and the drive are properly grounded. (For details about safety... to Install the Controller" on page 2. 5 Remove the metal filler bracket for the slot. 10 3ware 9550SX Serial ATA RAID Controller Quick Install Guide Installing an AMCC 3ware 9550SX RAID Controller 3 Align the cable connector with the connector on the end of which slot to use for...
Quick Installation Guide
Page 16
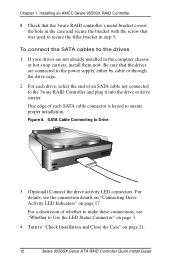
... 1. For details, see "Whether to Use the LED Status Connector" on page 21. 12 3ware 9550SX Serial ATA RAID Controller Quick Install Guide Installing an AMCC 3ware 9550SX RAID Controller 8 Check that the 3ware RAID controller's metal bracket covers the hole in step 5. To connect the SATA cables to the... 3ware RAID Controller and plug it into the drive or drive carrier. Be sure that ...
... 1. For details, see "Whether to Use the LED Status Connector" on page 21. 12 3ware 9550SX Serial ATA RAID Controller Quick Install Guide Installing an AMCC 3ware 9550SX RAID Controller 8 Check that the 3ware RAID controller's metal bracket covers the hole in step 5. To connect the SATA cables to the... 3ware RAID Controller and plug it into the drive or drive carrier. Be sure that ...
Quick Installation Guide
Page 18
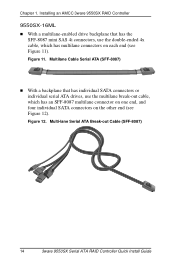
... SAS 4i connectors, use the multilane break-out cable, which has multilane connectors on the other end (see Figure 11). Figure 12. Installing an AMCC 3ware 9550SX RAID Controller 9550SX-16ML „ With a multilane-enabled drive backplane that has individual SATA connectors or individual serial ATA drives, use the double-ended 4x cable, which...
... SAS 4i connectors, use the multilane break-out cable, which has multilane connectors on the other end (see Figure 11). Figure 12. Installing an AMCC 3ware 9550SX RAID Controller 9550SX-16ML „ With a multilane-enabled drive backplane that has individual SATA connectors or individual serial ATA drives, use the double-ended 4x cable, which...
Quick Installation Guide
Page 20
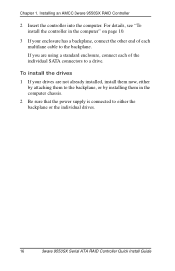
... the computer" on page 10. 3 If your drives are using a standard enclosure, connect each multilane cable to either the backplane or the individual drives. 16 3ware 9550SX Serial ATA RAID Controller Quick Install Guide Installing an AMCC 3ware 9550SX RAID Controller 2 Insert the controller into the computer. Chapter 1.
... the computer" on page 10. 3 If your drives are using a standard enclosure, connect each multilane cable to either the backplane or the individual drives. 16 3ware 9550SX Serial ATA RAID Controller Quick Install Guide Installing an AMCC 3ware 9550SX RAID Controller 2 Insert the controller into the computer. Chapter 1.
Quick Installation Guide
Page 22
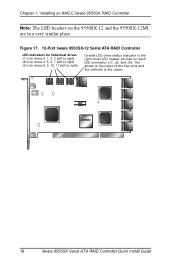
...AMCC 3ware 9550SX RAID Controller Note: The LED headers on each LED connector (J7, J8, and J9). The anode is the lower of the two pins and the cathode is the right-most LED header pin pair on the 9550SX-12 and the 9550SX-12MI are in a very similar place. Figure 17. 12-Port 3ware 9550SX...-12 Serial ATA RAID Controller LED indicators for individual drives J7 is for drives 0, 1, 2, 3 (left to right) J8 is for drives 4, 5, 6, 7 (left to right) J9 is for drives 8, 9, 10, 11 (left to right) Overall LED drive status indicator is the upper. 18 3ware 9550SX Serial ATA ...
...AMCC 3ware 9550SX RAID Controller Note: The LED headers on each LED connector (J7, J8, and J9). The anode is the lower of the two pins and the cathode is the right-most LED header pin pair on the 9550SX-12 and the 9550SX-12MI are in a very similar place. Figure 17. 12-Port 3ware 9550SX...-12 Serial ATA RAID Controller LED indicators for individual drives J7 is for drives 0, 1, 2, 3 (left to right) J8 is for drives 4, 5, 6, 7 (left to right) J9 is for drives 8, 9, 10, 11 (left to right) Overall LED drive status indicator is the upper. 18 3ware 9550SX Serial ATA ...
Quick Installation Guide
Page 24
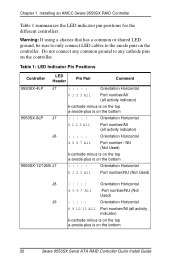
Chapter 1. Installing an AMCC 3ware 9550SX RAID Controller Table 1 ...any cathode pins on the controller. Table 1: LED Indicator Pin Positions Controller LED Header Pin Pair Comment 9550SX-4LP J7 : : : : : Orientation Horizontal 9550SX-8LP J7 J8 0 1 2 3 All Port number/All (all activity indicator) k-cathode-minus is ...is on the bottom : : : : : Orientation Horizontal 0 1 2 3 All Port number/All (all activity indicator) : : : : : Orientation Horizontal 9550SX-12/12MI J7 4 5 6 7 All Port number / NU (Not Used) k-cathode-minus is on the top a-anode-plus is on the bottom : : ...
Chapter 1. Installing an AMCC 3ware 9550SX RAID Controller Table 1 ...any cathode pins on the controller. Table 1: LED Indicator Pin Positions Controller LED Header Pin Pair Comment 9550SX-4LP J7 : : : : : Orientation Horizontal 9550SX-8LP J7 J8 0 1 2 3 All Port number/All (all activity indicator) k-cathode-minus is ...is on the bottom : : : : : Orientation Horizontal 0 1 2 3 All Port number/All (all activity indicator) : : : : : Orientation Horizontal 9550SX-12/12MI J7 4 5 6 7 All Port number / NU (Not Used) k-cathode-minus is on the top a-anode-plus is on the bottom : : ...
Quick Installation Guide
Page 26
Chapter 1. Installing an AMCC 3ware 9550SX RAID Controller 22 3ware 9550SX Serial ATA RAID Controller Quick Install Guide
Chapter 1. Installing an AMCC 3ware 9550SX RAID Controller 22 3ware 9550SX Serial ATA RAID Controller Quick Install Guide
Quick Installation Guide
Page 36
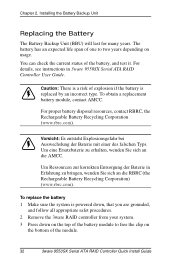
...an expected life span of the module. 32 3ware 9550SX Serial ATA RAID Controller Quick Install Guide Um Ressourcen zur korrekten Entsorgung der Baterie in 3ware 9550SX Serial ATA RAID Controller User Guide. Chapter 2. To obtain a replacement battery module, contact AMCC. You can check the current status of explosion ..., and test it. Um eine Ersatzbaterie zu erhalten, wenden Sie sich an die AMCC. Caution: There is powered down, that you are grounded, and follow all appropriate safet procedures. 2 Remove the 3ware RAID controller from your system. 3 Press down on the top of the battery ...
...an expected life span of the module. 32 3ware 9550SX Serial ATA RAID Controller Quick Install Guide Um Ressourcen zur korrekten Entsorgung der Baterie in 3ware 9550SX Serial ATA RAID Controller User Guide. Chapter 2. To obtain a replacement battery module, contact AMCC. You can check the current status of explosion ..., and test it. Um eine Ersatzbaterie zu erhalten, wenden Sie sich an die AMCC. Caution: There is powered down, that you are grounded, and follow all appropriate safet procedures. 2 Remove the 3ware RAID controller from your system. 3 Press down on the top of the battery ...

