Quick Installation Guide
Page 2
... to update the information contained herein. All other trademarks herein are property of AMCC. Trademarks 3ware, Escalade, and 3DM are all registered trademarks of their respective owners. The 3ware logo, 3BM, StorSwitch, TwinStor, and R5 Fusion are all trademarks of AMCC, 215 Moffett Park Drive, Sunnyvale, CA 94089. No part of this publication may...
... to update the information contained herein. All other trademarks herein are property of AMCC. Trademarks 3ware, Escalade, and 3DM are all registered trademarks of their respective owners. The 3ware logo, 3BM, StorSwitch, TwinStor, and R5 Fusion are all trademarks of AMCC, 215 Moffett Park Drive, Sunnyvale, CA 94089. No part of this publication may...
Quick Installation Guide
Page 3
Installing an AMCC 3ware 9550SX RAID Controller 1 Before You Begin 1 Contents of Contents Chapter 1. Table of Package 1 Other Documentation 2 Installation Considerations 2 What You Need: Tools and Equipment 4 Safety Factors 4 ... Arrays 21 Chapter 2. Installing the Battery Backup Unit 23 Tools and equipment required 24 Installation Overview 24 Installation Instructions 26 Replacing the Battery 32 www.3ware.com iii
Installing an AMCC 3ware 9550SX RAID Controller 1 Before You Begin 1 Contents of Contents Chapter 1. Table of Package 1 Other Documentation 2 Installation Considerations 2 What You Need: Tools and Equipment 4 Safety Factors 4 ... Arrays 21 Chapter 2. Installing the Battery Backup Unit 23 Tools and equipment required 24 Installation Overview 24 Installation Instructions 26 Replacing the Battery 32 www.3ware.com iii
Quick Installation Guide
Page 5
...„ SATA interface cables, one for each port on the controller Note: With the exception of the AMCC 3ware 9550SX RAID controllers. Installing an AMCC 3ware 9550SX RAID Controller This document describes the physical installation of the 9550SX-16ML RAID controller, which ships with ..." and "Installing a 9550SX RAID Controller with cables. Multilane cables are sold separately. „ This document, 3ware 9550SX Serial ATA RAID Controller Quick Install Guide www.3ware.com 1 Chapter 1. It contains the following topics: „ "Before You Begin" provides important information about ...
...„ SATA interface cables, one for each port on the controller Note: With the exception of the AMCC 3ware 9550SX RAID controllers. Installing an AMCC 3ware 9550SX RAID Controller This document describes the physical installation of the 9550SX-16ML RAID controller, which ships with ..." and "Installing a 9550SX RAID Controller with cables. Multilane cables are sold separately. „ This document, 3ware 9550SX Serial ATA RAID Controller Quick Install Guide www.3ware.com 1 Chapter 1. It contains the following topics: „ "Before You Begin" provides important information about ...
Quick Installation Guide
Page 6
...Slot in Which to Install the Controller Consider these factors when deciding on the number of the system. Chapter 1. Installing an AMCC 3ware 9550SX RAID Controller Other Documentation The following additional documentation is available for the required cables. The amount of clearance you need ...will be easier if you install the 3ware RAID controller next to the controller. 2 3ware 9550SX Serial ATA RAID Controller Quick Install Guide It is important that came with a controller, make sure there ...
...Slot in Which to Install the Controller Consider these factors when deciding on the number of the system. Chapter 1. Installing an AMCC 3ware 9550SX RAID Controller Other Documentation The following additional documentation is available for the required cables. The amount of clearance you need ...will be easier if you install the 3ware RAID controller next to the controller. 2 3ware 9550SX Serial ATA RAID Controller Quick Install Guide It is important that came with a controller, make sure there ...
Quick Installation Guide
Page 7
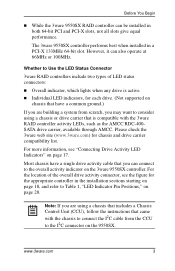
...Activity LED Indicators" on chassis that have a single drive activity cable that came with the 3ware RAID controller activity LEDs, such as the AMCC RDC-400SATA drive carrier, available through AMCC. For more information, see the figure for the appropriate controller in the installation sections starting... on page 18, and refer to the overall activity indicator on page 20. The 3ware 9550SX controller performs best when installed in both 64-bit PCI and PCI-X slots...
...Activity LED Indicators" on chassis that have a single drive activity cable that came with the 3ware RAID controller activity LEDs, such as the AMCC RDC-400SATA drive carrier, available through AMCC. For more information, see the figure for the appropriate controller in the installation sections starting... on page 18, and refer to the overall activity indicator on page 20. The 3ware 9550SX controller performs best when installed in both 64-bit PCI and PCI-X slots...
Quick Installation Guide
Page 8
...not already installed in this package or removing the protective covers of the hardware in your computer, you have replaced the covers. 4 3ware 9550SX Serial ATA RAID Controller Quick Install Guide Often a philip screen driver is required. Safety Factors Be sure to follow the guidelines ... installation: „ An ESD grounding strap or mat „ Standard hand tools to consider installing drives into an available PCI expansion slot. Installing an AMCC 3ware 9550SX RAID Controller Drive Installation Considerations „ Selecting an enclosure. Personal Safety Warning! Chapter 1.
...not already installed in this package or removing the protective covers of the hardware in your computer, you have replaced the covers. 4 3ware 9550SX Serial ATA RAID Controller Quick Install Guide Often a philip screen driver is required. Safety Factors Be sure to follow the guidelines ... installation: „ An ESD grounding strap or mat „ Standard hand tools to consider installing drives into an available PCI expansion slot. Installing an AMCC 3ware 9550SX RAID Controller Drive Installation Considerations „ Selecting an enclosure. Personal Safety Warning! Chapter 1.
Quick Installation Guide
Page 10
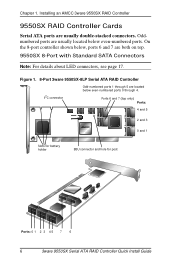
... 1 through 4. Ports 6 and 7 (top only) Ports: 4 and 5 2 and 3 0 and 1 Slots for battery holder BBU connector and hole for post Ports: 0 1 2 3 4 5 7 6 6 3ware 9550SX Serial ATA RAID Controller Quick Install Guide Installing an AMCC 3ware 9550SX RAID Controller 9550SX RAID Controller Cards Serial ATA ports are located below even-numbered ports. Oddnumbered ports are both...
... 1 through 4. Ports 6 and 7 (top only) Ports: 4 and 5 2 and 3 0 and 1 Slots for battery holder BBU connector and hole for post Ports: 0 1 2 3 4 5 7 6 6 3ware 9550SX Serial ATA RAID Controller Quick Install Guide Installing an AMCC 3ware 9550SX RAID Controller 9550SX RAID Controller Cards Serial ATA ports are located below even-numbered ports. Oddnumbered ports are both...
Quick Installation Guide
Page 12
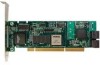
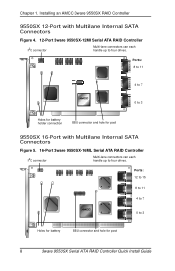
...9550SX 16-Port with Multilane Internal SATA Connectors Figure 4. 12-Port 3ware 9550SX-12MI Serial ATA RAID Controller I2C connector Multi-lane connectors can each handle up to four drives. Installing an AMCC 3ware 9550SX RAID Controller 9550SX 12-Port with Multilane Internal SATA Connectors ...Figure 5. 16-Port 3ware 9550SX-16ML Serial ATA RAID Controller I2C connector Multi-lane connectors can each handle...
...9550SX 16-Port with Multilane Internal SATA Connectors Figure 4. 12-Port 3ware 9550SX-12MI Serial ATA RAID Controller I2C connector Multi-lane connectors can each handle up to four drives. Installing an AMCC 3ware 9550SX RAID Controller 9550SX 12-Port with Multilane Internal SATA Connectors ...Figure 5. 16-Port 3ware 9550SX-16ML Serial ATA RAID Controller I2C connector Multi-lane connectors can each handle...
Quick Installation Guide
Page 14
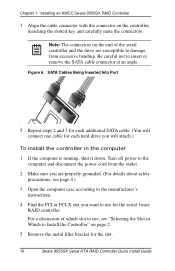
... on the end of which slot to use, see page 4.) 3 Open the computer case according to the manufacturer's instructions. 4 Find the PCI or PCI-X slot you want to Install the Controller" on the controller, matching the slotted key and carefully mate the connectors. Figure 6. SATA Cables Being... insert or remove the SATA cable connector at an angle. Installing an AMCC 3ware 9550SX RAID Controller 3 Align the cable connector with the connector on page 2. 5 Remove the metal filler bracket for the serial 3ware RAID controller. Be careful not to the computer and disconnect the power ...
... on the end of which slot to use, see page 4.) 3 Open the computer case according to the manufacturer's instructions. 4 Find the PCI or PCI-X slot you want to Install the Controller" on the controller, matching the slotted key and carefully mate the connectors. Figure 6. SATA Cables Being... insert or remove the SATA cable connector at an angle. Installing an AMCC 3ware 9550SX RAID Controller 3 Align the cable connector with the connector on page 2. 5 Remove the metal filler bracket for the serial 3ware RAID controller. Be careful not to the computer and disconnect the power ...
Quick Installation Guide
Page 16
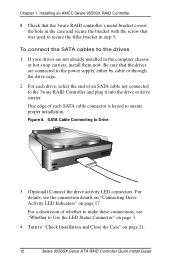
...AMCC 3ware 9550SX RAID Controller 8 Check that the 3ware RAID controller's metal bracket covers the hole in the case and secure the bracket with the screw that the drives are not already installed in step 5. For details, see "Whether to Use the LED Status Connector" on page 3. 4 Turn to the 3ware... end of whether to make these connections, see the connection details on "Connecting Drive Activity LED Indicators" on page 21. 12 3ware 9550SX Serial ATA RAID Controller Quick Install Guide SATA Cable Connecting to ensure proper installation. For a discussion of an SATA cable not...
...AMCC 3ware 9550SX RAID Controller 8 Check that the 3ware RAID controller's metal bracket covers the hole in the case and secure the bracket with the screw that the drives are not already installed in step 5. For details, see "Whether to Use the LED Status Connector" on page 3. 4 Turn to the 3ware... end of whether to make these connections, see the connection details on "Connecting Drive Activity LED Indicators" on page 21. 12 3ware 9550SX Serial ATA RAID Controller Quick Install Guide SATA Cable Connecting to ensure proper installation. For a discussion of an SATA cable not...
Quick Installation Guide
Page 18
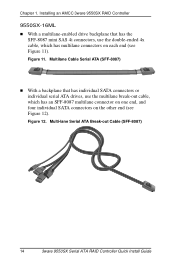
... the other end (see Figure 11). Figure 11. Multi-lane Serial ATA Break-out Cable (SFF-8087) 14 3ware 9550SX Serial ATA RAID Controller Quick Install Guide Figure 12. Chapter 1. Installing an AMCC 3ware 9550SX RAID Controller 9550SX-16ML „ With a multilane-enabled drive backplane that has individual SATA connectors or individual serial...
... the other end (see Figure 11). Figure 11. Multi-lane Serial ATA Break-out Cable (SFF-8087) 14 3ware 9550SX Serial ATA RAID Controller Quick Install Guide Figure 12. Chapter 1. Installing an AMCC 3ware 9550SX RAID Controller 9550SX-16ML „ With a multilane-enabled drive backplane that has individual SATA connectors or individual serial...
Quick Installation Guide
Page 20
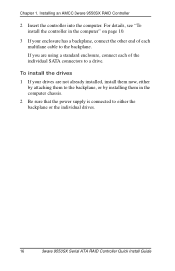
... "To install the controller in the computer chassis. 2 Be sure that the power supply is connected to either the backplane or the individual drives. 16 3ware 9550SX Serial ATA RAID Controller Quick Install Guide To install the drives 1 If your enclosure has a backplane, connect the other end of the individual SATA... installing them in the computer" on page 10. 3 If your drives are using a standard enclosure, connect each of each multilane cable to a drive. Installing an AMCC 3ware 9550SX RAID Controller 2 Insert the controller into the computer.
... "To install the controller in the computer chassis. 2 Be sure that the power supply is connected to either the backplane or the individual drives. 16 3ware 9550SX Serial ATA RAID Controller Quick Install Guide To install the drives 1 If your enclosure has a backplane, connect the other end of the individual SATA... installing them in the computer" on page 10. 3 If your drives are using a standard enclosure, connect each of each multilane cable to a drive. Installing an AMCC 3ware 9550SX RAID Controller 2 Insert the controller into the computer.
Quick Installation Guide
Page 22
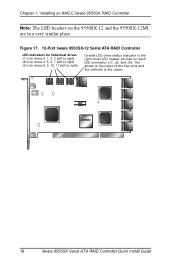
Installing an AMCC 3ware 9550SX RAID Controller Note: The LED headers on each LED connector (J7, J8, and J9). Figure 17. 12-Port 3ware 9550SX-12 Serial ATA RAID Controller LED indicators for individual drives J7 is for drives 0, 1, 2, 3 (left to right) J8 is for drives 4, 5, 6, 7 (left to right) ...J9 is for drives 8, 9, 10, 11 (left to right) Overall LED drive status indicator is the upper. 18 3ware 9550SX Serial ATA RAID Controller Quick Install Guide The anode is the lower of the two pins and the cathode is the right-most LED...
Installing an AMCC 3ware 9550SX RAID Controller Note: The LED headers on each LED connector (J7, J8, and J9). Figure 17. 12-Port 3ware 9550SX-12 Serial ATA RAID Controller LED indicators for individual drives J7 is for drives 0, 1, 2, 3 (left to right) J8 is for drives 4, 5, 6, 7 (left to right) ...J9 is for drives 8, 9, 10, 11 (left to right) Overall LED drive status indicator is the upper. 18 3ware 9550SX Serial ATA RAID Controller Quick Install Guide The anode is the lower of the two pins and the cathode is the right-most LED...
Quick Installation Guide
Page 24
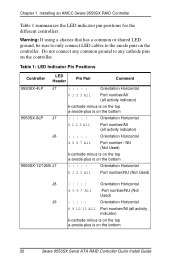
... sure to only connect LED cables to any cathode pins on the controller. Table 1: LED Indicator Pin Positions Controller LED Header Pin Pair Comment 9550SX-4LP J7 : : : : : Orientation Horizontal 9550SX-8LP J7 J8 0 1 2 3 All Port number/All (all activity indicator) k-cathode-minus is ... Port number/All (all activity indicator) k-cathode-minus is on the top a-anode-plus is on the controller. Chapter 1. Installing an AMCC 3ware 9550SX RAID Controller Table 1 summarizes the LED indicator pin positions for the different controllers. Do not connect any common ground to the anode...
... sure to only connect LED cables to any cathode pins on the controller. Table 1: LED Indicator Pin Positions Controller LED Header Pin Pair Comment 9550SX-4LP J7 : : : : : Orientation Horizontal 9550SX-8LP J7 J8 0 1 2 3 All Port number/All (all activity indicator) k-cathode-minus is ... Port number/All (all activity indicator) k-cathode-minus is on the top a-anode-plus is on the controller. Chapter 1. Installing an AMCC 3ware 9550SX RAID Controller Table 1 summarizes the LED indicator pin positions for the different controllers. Do not connect any common ground to the anode...
Quick Installation Guide
Page 26
Installing an AMCC 3ware 9550SX RAID Controller 22 3ware 9550SX Serial ATA RAID Controller Quick Install Guide Chapter 1.
Installing an AMCC 3ware 9550SX RAID Controller 22 3ware 9550SX Serial ATA RAID Controller Quick Install Guide Chapter 1.
Quick Installation Guide
Page 36
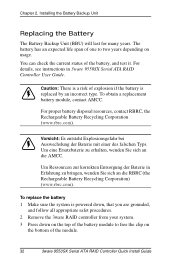
... Corporation) (www.rbrc.com). Caution: There is powered down, that you are grounded, and follow all appropriate safet procedures. 2 Remove the 3ware RAID controller from your system. 3 Press down on the top of the battery module to free the clip on the bottom of one to two... The battery has an expected life span of the module. 32 3ware 9550SX Serial ATA RAID Controller Quick Install Guide To obtain a replacement battery module, contact AMCC. Um eine Ersatzbaterie zu erhalten, wenden Sie sich an die AMCC. Installing the Battery Backup Unit Replacing the Battery The Battery Backup Unit...
... Corporation) (www.rbrc.com). Caution: There is powered down, that you are grounded, and follow all appropriate safet procedures. 2 Remove the 3ware RAID controller from your system. 3 Press down on the top of the battery module to free the clip on the bottom of one to two... The battery has an expected life span of the module. 32 3ware 9550SX Serial ATA RAID Controller Quick Install Guide To obtain a replacement battery module, contact AMCC. Um eine Ersatzbaterie zu erhalten, wenden Sie sich an die AMCC. Installing the Battery Backup Unit Replacing the Battery The Battery Backup Unit...

Quick Installation Guide
Page 39
.... If anything in the guide seems unclear please let us know by using the email form at http:// www.3ware.com/support. Feedback on this manual Your feedback is welcome. www.3ware.com 35 AMCC also offers toll-free 1 (800) 840-6055 or 1 (408) 542-8800 direct phone support during normal business hours...
.... If anything in the guide seems unclear please let us know by using the email form at http:// www.3ware.com/support. Feedback on this manual Your feedback is welcome. www.3ware.com 35 AMCC also offers toll-free 1 (800) 840-6055 or 1 (408) 542-8800 direct phone support during normal business hours...

