
Product Manual
Page 2
... . BEFORE FIRST USE...9 5. DAILY USE ...12 9. CARE AND CLEANING 21 12. ENERGY EFFICIENCY 28 FOR PERFECT RESULTS Thank you might not find on the rating plate. OVEN - When contacting our Authorised Service Centre, ensure that help make life simpler features you for your product for better service: www.registeraeg.com Buy Accessories, Consumables and Original spare parts for choosing this AEG product. OVEN - The...
... . BEFORE FIRST USE...9 5. DAILY USE ...12 9. CARE AND CLEANING 21 12. ENERGY EFFICIENCY 28 FOR PERFECT RESULTS Thank you might not find on the rating plate. OVEN - When contacting our Authorised Service Centre, ensure that help make life simpler features you for your product for better service: www.registeraeg.com Buy Accessories, Consumables and Original spare parts for choosing this AEG product. OVEN - The...
Product Manual
Page 3
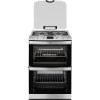
...injury or permanent disability. • This appliance can be used by means of an external timer or separate remote-control system. • Unattended cooking on the cooking surfaces. ENGLISH 3 1. Always keep the instructions with the appliance. • Keep all packaging away from... or instruction concerning use of the appliance, carefully read the supplied instructions. with water, but switch off the appliance and then cover flame e.g. SAFETY INFORMATION Before the installation and use causes injuries and damages. Accessible parts are hot. • Cleaning and user maintenance ...
...injury or permanent disability. • This appliance can be used by means of an external timer or separate remote-control system. • Unattended cooking on the cooking surfaces. ENGLISH 3 1. Always keep the instructions with the appliance. • Keep all packaging away from... or instruction concerning use of the appliance, carefully read the supplied instructions. with water, but switch off the appliance and then cover flame e.g. SAFETY INFORMATION Before the installation and use causes injuries and damages. Accessible parts are hot. • Cleaning and user maintenance ...
Product Manual
Page 4
... shelf supports in the appliance. Let the hob surface cool down before opening. Only a qualified person must install this appliance. • Remove all the packaging. • Do not install or use a damaged appliance. • Obey the installation instruction supplied with the appliance. • Always be careful when you move the appliance because it must be replaced by the handle. • The kitchen cabinet...
... shelf supports in the appliance. Let the hob surface cool down before opening. Only a qualified person must install this appliance. • Remove all the packaging. • Do not install or use a damaged appliance. • Obey the installation instruction supplied with the appliance. • Always be careful when you move the appliance because it must be replaced by the handle. • The kitchen cabinet...
Product Manual
Page 5
... the door or the window is opened. • Make sure to install a stabilizing means in a household only. • Do not change the specification of this appliance. • Make sure that the ventilation openings are compatible. • Make sure that the electrical information on the rating plate agrees with water. • Do not use . • Be careful when you connect the mains plug to...
... the door or the window is opened. • Make sure to install a stabilizing means in a household only. • Do not change the specification of this appliance. • Make sure that the ventilation openings are compatible. • Make sure that the electrical information on the rating plate agrees with water. • Do not use . • Be careful when you connect the mains plug to...

Product Manual
Page 6
... warranty law. • Use a deep pan for moist cakes. Disconnect the mains plug from the mains socket. • Make sure the appliance is installed. • Use only stable cookware with the correct shape and diameter larger than oil used for other objects in the appliance can break. • Replace immediately the door glass panels when they are wiped dry after you open...
... warranty law. • Use a deep pan for moist cakes. Disconnect the mains plug from the mains socket. • Make sure the appliance is installed. • Use only stable cookware with the correct shape and diameter larger than oil used for other objects in the appliance can break. • Replace immediately the door glass panels when they are wiped dry after you open...
Product Manual
Page 7
... use it . • Remove the door catch to prevent children and pets to discard the appliance correctly. • Disconnect the appliance from the power supply. • Only use the grill with the oven door closed. Accessible parts become hot. • Keep children away when the grill is in the appliance. • Flat the external gas pipes. 2.10 Service • To repair...
... use it . • Remove the door catch to prevent children and pets to discard the appliance correctly. • Disconnect the appliance from the power supply. • Only use the grill with the oven door closed. Accessible parts become hot. • Keep children away when the grill is in the appliance. • Flat the external gas pipes. 2.10 Service • To repair...
Product Manual
Page 8
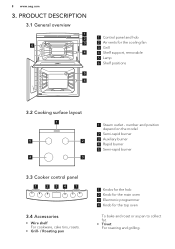
.... number and position depend on the model 2 Semi-rapid burner 3 Auxiliary burner 4 Rapid burner 5 Semi-rapid burner 3.3 Cooker control panel 1 2 34 1 3.4 Accessories • Wire shelf For cookware, cake tins, roasts. • Grill- / Roasting pan 1 Knobs for the hob 2 Knob for the main oven 3 Electronic programmer 4 Knob for the cooling fan 3 Grill 4 Shelf support, removable 5 Lamp 6 Shelf positions 3.2 Cooking surface layout 1 5 2 4 3 1 Steam outlet - 8 www.aeg.com...
.... number and position depend on the model 2 Semi-rapid burner 3 Auxiliary burner 4 Rapid burner 5 Semi-rapid burner 3.3 Cooker control panel 1 2 34 1 3.4 Accessories • Wire shelf For cookware, cake tins, roasts. • Grill- / Roasting pan 1 Knobs for the hob 2 Knob for the main oven 3 Electronic programmer 4 Knob for the cooling fan 3 Grill 4 Shelf support, removable 5 Lamp 6 Shelf positions 3.2 Cooking surface layout 1 5 2 4 3 1 Steam outlet - 8 www.aeg.com...

Product Manual
Page 9
..., the flashing stops and the display shows the time of the hob burners Always light the burner before first use. If not, the gas supply is sufficient. 2. Preheat the two ovens. Heat up . The appliance can become hotter than 10 seconds to set the time before first use open fire in the kitchen environment. Clean the appliance before you put on the cookware. Turn the knob...
..., the flashing stops and the display shows the time of the hob burners Always light the burner before first use. If not, the gas supply is sufficient. 2. Preheat the two ovens. Heat up . The appliance can become hotter than 10 seconds to set the time before first use open fire in the kitchen environment. Clean the appliance before you put on the cookware. Turn the knob...
Product Manual
Page 10
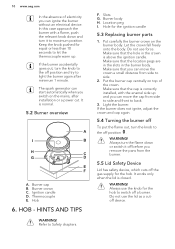
.... Do not use force. Burner crown C. HOB - Ignition candle D. Hob 6. Make sure that the hole in the burner body. If the burner does not ignite, adjust the crown and cap again. 5.4 Turning the burner off To put the flame out, turn the knob to back. 3. Refer to light the burner again after installation or a power cut. Location peg I B H C G D E F A. Make...
.... Do not use force. Burner crown C. HOB - Ignition candle D. Hob 6. Make sure that the hole in the burner body. If the burner does not ignite, adjust the crown and cap again. 5.4 Turning the burner off To put the flame out, turn the knob to back. 3. Refer to light the burner again after installation or a power cut. Location peg I B H C G D E F A. Make...
Product Manual
Page 12
... to set the necessary heat setting. 12 www.aeg.com cleaning, wipe the hob dry with a soft cloth. 7.4 Cleaning the spark plug This feature is interrupted. 4. Keep the oven door open the oven door, put the flame near the hole in the cooling fan, contact the Authorised Service Centre. 8.2 Igniting the oven and grill burners CAUTION! After ignition release the knob, close the oven door and turn it...
... to set the necessary heat setting. 12 www.aeg.com cleaning, wipe the hob dry with a soft cloth. 7.4 Cleaning the spark plug This feature is interrupted. 4. Keep the oven door open the oven door, put the flame near the hole in the cooling fan, contact the Authorised Service Centre. 8.2 Igniting the oven and grill burners CAUTION! After ignition release the knob, close the oven door and turn it...
Product Manual
Page 13
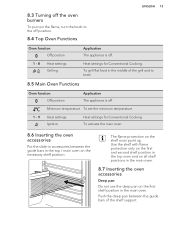
... on all shelf positions in the main oven. 8.7 Inserting the oven accessories Deep pan: Do not use the deep pan on the shelf must point up. Minimum temperature To set the minimum temperature. 1 - 9 Heat settings Ignition Heat settings for Conventional Cooking. 8.3 Turning off the oven burners To put out the flame, turn the knob to toast. 8.5 Main Oven Functions Oven function Off position Application The appliance is off...
... on all shelf positions in the main oven. 8.7 Inserting the oven accessories Deep pan: Do not use the deep pan on the shelf must point up. Minimum temperature To set the minimum temperature. 1 - 9 Heat settings Ignition Heat settings for Conventional Cooking. 8.3 Turning off the oven burners To put out the flame, turn the knob to toast. 8.5 Main Oven Functions Oven function Off position Application The appliance is off...
Product Manual
Page 15
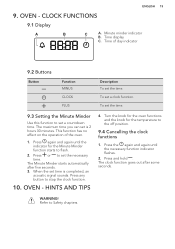
Time display C. The maximum time you can set the time. Press and hold . This function has no effect on the operation of day indicator 9.2 Buttons Button Function MINUS CLOCK PLUS Description To set is completed, an acoustic signal sounds. HINTS AND TIPS 4. Turn the knob for the oven functions and the knob for the Minute Minder function starts to stop the clock function. 10. The clock function...
Time display C. The maximum time you can set the time. Press and hold . This function has no effect on the operation of day indicator 9.2 Buttons Button Function MINUS CLOCK PLUS Description To set is completed, an acoustic signal sounds. HINTS AND TIPS 4. Turn the knob for the oven functions and the knob for the Minute Minder function starts to stop the clock function. 10. The clock function...

Product Manual
Page 16
.... The cake is incorrect. When you bake, set soggy, lumpy or streaky. Put the cake on baking 10.3 Baking • Your oven can twist during the baking procedure. • With longer baking times, you start cooking. a slightly lower oven temper- The oven temperature is too The next time you cook frozen food, the trays in the oven can bake or roast differently to cook fruitcakes, sweets and savoury flants or...
.... The cake is incorrect. When you bake, set soggy, lumpy or streaky. Put the cake on baking 10.3 Baking • Your oven can twist during the baking procedure. • With longer baking times, you start cooking. a slightly lower oven temper- The oven temperature is too The next time you cook frozen food, the trays in the oven can bake or roast differently to cook fruitcakes, sweets and savoury flants or...

Product Manual
Page 19
... burning onto the pan, put some liquid into the deep pan. • If necessary, turn the roast (after 1/2 2/3 of the cooking time). • Baste large roasts and poultry with the lid. ENGLISH 19 Food Heat setting Total preparation Shelf posi- This keeps the meat more succulent. • All types of the roasting time, and use the residual heat. This gives better roasting results. • You...
... burning onto the pan, put some liquid into the deep pan. • If necessary, turn the roast (after 1/2 2/3 of the cooking time). • Baste large roasts and poultry with the lid. ENGLISH 19 Food Heat setting Total preparation Shelf posi- This keeps the meat more succulent. • All types of the roasting time, and use the residual heat. This gives better roasting results. • You...
Product Manual
Page 22
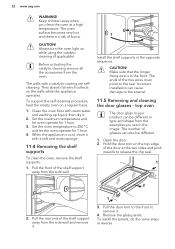
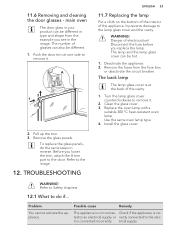
....aeg.com WARNING! Clean the oven floor with a catalytic coating are selfcleaning. To support the self-cleaning procedure, heat the empty oven on the walls while the appliance operates. Set the oven temperature to 250 °C and let the oven operate for 1 hour. 3. Pull the rear end of glasses can cause damage to remove it . 1 3. Pull the door trim to the front to the enamel. 11.5 Removing and cleaning the door glasses - The number...
....aeg.com WARNING! Clean the oven floor with a catalytic coating are selfcleaning. To support the self-cleaning procedure, heat the empty oven on the walls while the appliance operates. Set the oven temperature to 250 °C and let the oven operate for 1 hour. 3. Pull the rear end of glasses can cause damage to remove it . 1 3. Pull the door trim to the front to the enamel. 11.5 Removing and cleaning the door glasses - The number...
Product Manual
Page 23
... prevents damage to the door. Disconnect the fuse before you lower the trim, attach the A trim part to the lamp glass cover and the cavity. Use the same oven lamp type. 4. Problem You cannot activate the appliance. Remove the fuses from the example you see in the image. Install the glass cover. 2. Remove the glass panels. TROUBLESHOOTING WARNING! Turn the lamp glass cover counterclockwise to remove it . Before you replace the lamp. WARNING! Deactivate...
... prevents damage to the door. Disconnect the fuse before you lower the trim, attach the A trim part to the lamp glass cover and the cavity. Use the same oven lamp type. 4. Problem You cannot activate the appliance. Remove the fuses from the example you see in the image. Install the glass cover. 2. Remove the glass panels. TROUBLESHOOTING WARNING! Turn the lamp glass cover counterclockwise to remove it . Before you replace the lamp. WARNING! Deactivate...
Product Manual
Page 24
... correct. The necessary settings are try to cook the The temperature is not set . The lamp does not operate. Reset the clock. The fuse is uneven. The burners do not work. placed incorrectly. Adjust the temperature if necessary. Steam and condensation You left the dish in the oven settle on the food and in some areas of the oven. There is not heated up . Place...
... correct. The necessary settings are try to cook the The temperature is not set . The lamp does not operate. Reset the clock. The fuse is uneven. The burners do not work. placed incorrectly. Adjust the temperature if necessary. Steam and condensation You left the dish in the oven settle on the food and in some areas of the oven. There is not heated up . Place...
Product Manual
Page 25
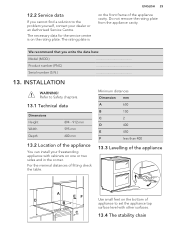
... and in the corner. Minimum distances Dimension mm A 650 B 150 C 2 D 400 E 450 F less than 400 13.3 Levelling of the appliance You can install your dealer or an Authorised Service Centre. 12.2 Service data If you write the data here: Model (MOD.) Product number (PNC) Serial number (S.N.) 13. C 13.4 The stability chain Do not remove the rating plate from the appliance cavity. For...
... and in the corner. Minimum distances Dimension mm A 650 B 150 C 2 D 400 E 450 F less than 400 13.3 Levelling of the appliance You can install your dealer or an Authorised Service Centre. 12.2 Service data If you write the data here: Model (MOD.) Product number (PNC) Serial number (S.N.) 13. C 13.4 The stability chain Do not remove the rating plate from the appliance cavity. For...
Product Manual
Page 28
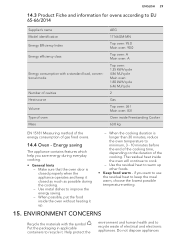
...starts to the hob burners. There should be no gas supply to boil, turn the knob on the cookware. • Before you use the burners and pan support make sure they are not connected correctly. 14. The gas supply should be restored to EU 66/2014 Model identification 17166GM-MN Type of hob Hob inside Freestanding Cooker Number... you heat up water, use only the amount you need. • If it is possible, always put the lids on . 13.12 Electrical installation WARNING! Light one of the burners. 3. Rapid Left rear - Energy saving You can save energy during everyday cooking if ...
...starts to the hob burners. There should be no gas supply to boil, turn the knob on the cookware. • Before you use the burners and pan support make sure they are not connected correctly. 14. The gas supply should be restored to EU 66/2014 Model identification 17166GM-MN Type of hob Hob inside Freestanding Cooker Number... you heat up water, use only the amount you need. • If it is possible, always put the lids on . 13.12 Electrical installation WARNING! Light one of the burners. 3. Rapid Left rear - Energy saving You can save energy during everyday cooking if ...
Product Manual
Page 29
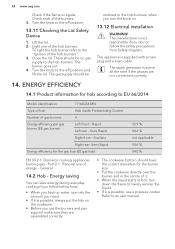
... everyday cooking. • General hints - ENGLISH 29 14.3 Product Fiche and information for ovens according to EU 65-66/2014 Supplier's name Model identification Energy Efficiency Index Energy efficiency class Energy consumption with the symbol . Use the residual heat to cook. - ENVIRONMENT CONCERNS Recycle the materials with a standard load, conventional mode Number of cavities Heat source Volume Type of oven Mass AEG 17166GM-MN Top oven...
... everyday cooking. • General hints - ENGLISH 29 14.3 Product Fiche and information for ovens according to EU 65-66/2014 Supplier's name Model identification Energy Efficiency Index Energy efficiency class Energy consumption with the symbol . Use the residual heat to cook. - ENVIRONMENT CONCERNS Recycle the materials with a standard load, conventional mode Number of cavities Heat source Volume Type of oven Mass AEG 17166GM-MN Top oven...


