Product Manual
Page 4
... devices: line protecting cut-outs, fuses (screw type fuses removed from the holder), earth leakage trips and contactors. • The electrical installation must be used by the handle. • Make sure that the appliance is in operation. Always use . It can install and connect the appliance. Contact an approved service centre. 4 www.aeg.com SAFETY INFORMATION Before the installation and use, read this manual carefully: • For your...
... devices: line protecting cut-outs, fuses (screw type fuses removed from the holder), earth leakage trips and contactors. • The electrical installation must be used by the handle. • Make sure that the appliance is in operation. Always use . It can install and connect the appliance. Contact an approved service centre. 4 www.aeg.com SAFETY INFORMATION Before the installation and use, read this manual carefully: • For your...
Product Manual
Page 5
... fire. • Set the cooking zones to ENGLISH 5 avoid touching the heating elements. Keep There is a risk of burns. do not let cables touch or come near to the control panel because the heat can release. contact opening width of minimum 3 mm. • The shock protection parts must be kept away unless continuously supervised. • Open the door carefully. There is a risk...
... fire. • Set the cooking zones to ENGLISH 5 avoid touching the heating elements. Keep There is a risk of burns. do not let cables touch or come near to the control panel because the heat can release. contact opening width of minimum 3 mm. • The shock protection parts must be kept away unless continuously supervised. • Open the door carefully. There is a risk...
Product Manual
Page 6
... use only. Contact an approved service centre. • Use only original spare parts. Do not use flammable products or products that the glass panels can cause corrosion. • Do not clean the appliance with steam cleaners, high-pressure cleaners, sharp objects, abrasive cleaning agents, abrasive sponges and stain removers. • If you use the appliance during a power cut. Contact the service centre. • Be careful when you must replace...
... use only. Contact an approved service centre. • Use only original spare parts. Do not use flammable products or products that the glass panels can cause corrosion. • Do not clean the appliance with steam cleaners, high-pressure cleaners, sharp objects, abrasive cleaning agents, abrasive sponges and stain removers. • If you use the appliance during a power cut. Contact the service centre. • Be careful when you must replace...
Product Manual
Page 8
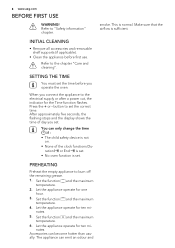
... you set . button to set the time before first use. After approximately five seconds, the flashing stops and the display shows the time of the clock functions Duration or End is set. • No oven function is set . Let the appliance operate for one hour. 3. Set the function and the maximum temperature. 6. Refer to the chapter "Care and cleaning". Let the appliance operate for ten minutes. 5. 8 www.aeg.com...
... you set . button to set the time before first use. After approximately five seconds, the flashing stops and the display shows the time of the clock functions Duration or End is set. • No oven function is set . Let the appliance operate for one hour. 3. Set the function and the maximum temperature. 6. Refer to the chapter "Care and cleaning". Let the appliance operate for ten minutes. 5. 8 www.aeg.com...
Product Manual
Page 9
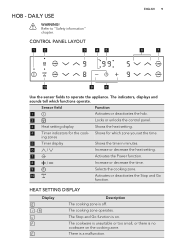
.... 2 Locks or unlocks the control panel. 3 Heat setting display Shows the heat setting. 4 Timer indicators for which functions operate. ing zones 5 Timer display Shows the time in minutes. 6 / Increase or decrease the heat setting. 7 Activates the Power function. 8 / Increase or decrease the time. 9 Selects the cooking zone. 10 Activates or deactivates the Stop and Go function. HEAT SETTING DISPLAY Display - The indicators, displays and sounds tell which zone you set the time. CONTROL PANEL LAYOUT 1 2 3 45 ENGLISH 9 6 7 10 9 8 Use the sensor...
.... 2 Locks or unlocks the control panel. 3 Heat setting display Shows the heat setting. 4 Timer indicators for which functions operate. ing zones 5 Timer display Shows the time in minutes. 6 / Increase or decrease the heat setting. 7 Activates the Power function. 8 / Increase or decrease the time. 9 Selects the cooking zone. 10 Activates or deactivates the Stop and Go function. HEAT SETTING DISPLAY Display - The indicators, displays and sounds tell which zone you set the time. CONTROL PANEL LAYOUT 1 2 3 45 ENGLISH 9 6 7 10 9 8 Use the sensor...
Product Manual
Page 10
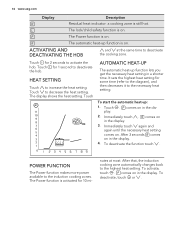
... the necessary heat setting in the dis- It sets the highest heat setting for 10 mi- To start the automatic heat-up function is on . play. 2. Immediately touch again and again until the necessary heat setting comes on in the display. POWER FUNCTION The Power function makes more power available to decrease the heat setting. The Power function is activated for some time (refer to the diagram), and...
... the necessary heat setting in the dis- It sets the highest heat setting for 10 mi- To start the automatic heat-up function is on . play. 2. Immediately touch again and again until the necessary heat setting comes on in the display. POWER FUNCTION The Power function makes more power available to decrease the heat setting. The Power function is activated for some time (refer to the diagram), and...

Product Manual
Page 11
... top oven use the full power, the display for the right cooking zones. To do this, set the heat setting. STOP AND GO The Stop and Go function sets all cooking zones that you activate the timer. 2. The display for the cooking zone. The power management prevents a circuit overload. When a zone cannot use the same energy source (the same electrical phase) when they operate at the same time. When the set time, touch...
... top oven use the full power, the display for the right cooking zones. To do this, set the heat setting. STOP AND GO The Stop and Go function sets all cooking zones that you activate the timer. 2. The display for the cooking zone. The power management prevents a circuit overload. When a zone cannot use the same energy source (the same electrical phase) when they operate at the same time. When the set time, touch...
Product Manual
Page 12
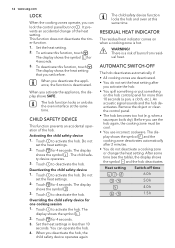
... symbol . The display shows the symbol . 2. Remove the object or clean the control panel. • The hob becomes too hot (e.g. Set the heat setting. 2. Set the heat settings in less than 10 seconds (a pan, a cloth, etc.). When you deactivate the hob, the child safety device operates again. Touch to activate the hob. 12 www.aeg.com LOCK When the cooking zones operate, you can operate the hob. 4. It...
... symbol . The display shows the symbol . 2. Remove the object or clean the control panel. • The hob becomes too hot (e.g. Set the heat setting. 2. Set the heat settings in less than 10 seconds (a pan, a cloth, etc.). When you deactivate the hob, the child safety device operates again. Touch to activate the hob. 12 www.aeg.com LOCK When the cooking zones operate, you can operate the hob. 4. It...
Product Manual
Page 13
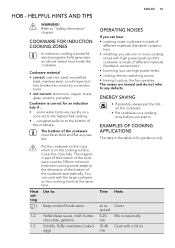
... as required 5-25 min 10-40 min Cover Mix occasionally Cook with a lid on two cooking zones at the same time. OPERATING NOISES If you can cook with high power levels and the cookware is for an induction hob if some water boils very quickly on a cooking zone before you use high power levels. • clicking: electric switching occurs. • hissing, buzzing: the fan operates. The noises...
... as required 5-25 min 10-40 min Cover Mix occasionally Cook with a lid on two cooking zones at the same time. OPERATING NOISES If you can cook with high power levels and the cookware is for an induction hob if some water boils very quickly on a cooking zone before you use high power levels. • clicking: electric switching occurs. • hissing, buzzing: the fan operates. The noises...
Product Manual
Page 16
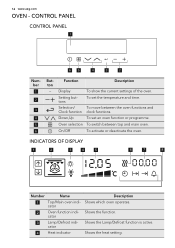
... deactivate the oven. Shows the heat setting. Setting buttons To set an oven function or programme. CONTROL PANEL CONTROL PANEL 1 65 4 3 2 Number 1 2 3 4 5 6 But- Selection/ To move between top and main oven. Function ton Description - Down,Up To set the temperature and time. 16 www.aeg.com OVEN - Display To show the current settings of the oven. Oven selection To switch between the oven functions and Clock function clock functions. INDICATORS OF DISPLAY 1 2 3 4 5 6 7 8 Number Name 1 Top/Main oven indicator 2 Oven function...
... deactivate the oven. Shows the heat setting. Setting buttons To set an oven function or programme. CONTROL PANEL CONTROL PANEL 1 65 4 3 2 Number 1 2 3 4 5 6 But- Selection/ To move between top and main oven. Function ton Description - Down,Up To set the temperature and time. 16 www.aeg.com OVEN - Display To show the current settings of the oven. Oven selection To switch between the oven functions and Clock function clock functions. INDICATORS OF DISPLAY 1 2 3 4 5 6 7 8 Number Name 1 Top/Main oven indicator 2 Oven function...
Product Manual
Page 17
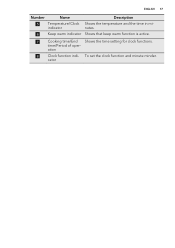
time/Period of operation 8 Clock function indi- To set the clock function and minute minder. cator ENGLISH 17 Number Name Description 5 Temperature/Clock Shows the temperature and the time in mi- indicator nutes. 6 Keep warm indicator Shows that keep warm function is active. 7 Cooking time/End Shows the time setting for clock functions.
time/Period of operation 8 Clock function indi- To set the clock function and minute minder. cator ENGLISH 17 Number Name Description 5 Temperature/Clock Shows the temperature and the time in mi- indicator nutes. 6 Keep warm indicator Shows that keep warm function is active. 7 Cooking time/End Shows the time setting for clock functions.

Product Manual
Page 18
... cook large pieces of meat. Only the bottom heating element operates. The full grill element operates. TOP OVEN FUNCTIONS Oven function Conventional Browning Base Heat Dual Grill Light Application To bake and roast on one after the other and circulate hot air around the food. Set the oven temperature 20-40 °C lower than for Conventional. The grill element and the oven fan operate one oven level. 18 www.aeg.com OVEN - DAILY USE WARNING...
... cook large pieces of meat. Only the bottom heating element operates. The full grill element operates. TOP OVEN FUNCTIONS Oven function Conventional Browning Base Heat Dual Grill Light Application To bake and roast on one after the other and circulate hot air around the food. Set the oven temperature 20-40 °C lower than for Conventional. The grill element and the oven fan operate one oven level. 18 www.aeg.com OVEN - DAILY USE WARNING...
Product Manual
Page 19
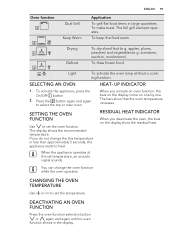
... large quantities. SELECTING AN OVEN HEAT- The full grill element operates. apples, plums, peaches) and vegetables (e.g. SETTING THE OVEN FUNCTION Use to set temperature, an acoustic signal sounds. RESIDUAL HEAT INDICATOR When you do not change the oven function while the oven operates. CHANGING THE OVEN TEMPERATURE Use or to select the top or main oven. To thaw frozen food. Light To activate the oven lamp without a cooking function. UP INDICATOR 1. If...
... large quantities. SELECTING AN OVEN HEAT- The full grill element operates. apples, plums, peaches) and vegetables (e.g. SETTING THE OVEN FUNCTION Use to set temperature, an acoustic signal sounds. RESIDUAL HEAT INDICATOR When you do not change the oven function while the oven operates. CHANGING THE OVEN TEMPERATURE Use or to select the top or main oven. To thaw frozen food. Light To activate the oven lamp without a cooking function. UP INDICATOR 1. If...
Product Manual
Page 24
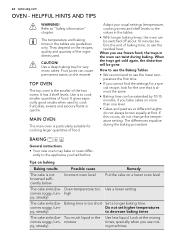
..., quality and quantity of the two ovens. Do not set higher temperatures py, streaky) to cook smaller quantities of baking time, to use the residual heat. py, streaky) ing machines 24 www.aeg.com OVEN - Fruit juices can twist during the baking procedure. Use is particularly suitable for very moist cakes. BAKING General instructions • Your new oven may bake or roast differently to "Safety information" chapter. They...
..., quality and quantity of the two ovens. Do not set higher temperatures py, streaky) to cook smaller quantities of baking time, to use the residual heat. py, streaky) ing machines 24 www.aeg.com OVEN - Fruit juices can twist during the baking procedure. Use is particularly suitable for very moist cakes. BAKING General instructions • Your new oven may bake or roast differently to "Safety information" chapter. They...
Product Manual
Page 25
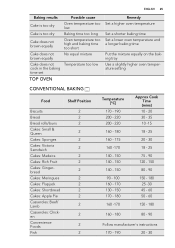
... dry Oven temperature too low Cake is too dry Baking time too long Cake does not brown equally Oven temperature too high and baking time too short Cake does not brown equally No equal mixture Cake does not Temperature too low cook in the baking time set TOP OVEN Remedy Set a higher oven temperature Set a shorter baking time Set a lower oven temperature and a longer baking time Put the mixture equally on the baking tray Use a slightly higher oven temperature setting CONVENTIONAL BAKING...
... dry Oven temperature too low Cake is too dry Baking time too long Cake does not brown equally Oven temperature too high and baking time too short Cake does not brown equally No equal mixture Cake does not Temperature too low cook in the baking time set TOP OVEN Remedy Set a higher oven temperature Set a shorter baking time Set a lower oven temperature and a longer baking time Put the mixture equally on the baking tray Use a slightly higher oven temperature setting CONVENTIONAL BAKING...
Product Manual
Page 32
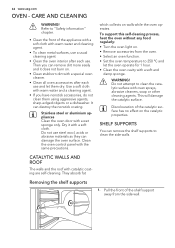
... destroy the nonstick coating. To support this self-cleaning process, heat the oven without any food regularly: • Turn the oven light on walls while the oven operates. WARNING! They absorb fat Removing the shelf supports 1. This will damage the catalytic surface. Use a soft cloth with a wet sponge only. Dry it does not burn on the catalytic properties. Clean the oven control panel with a soft cloth. Do not...
... destroy the nonstick coating. To support this self-cleaning process, heat the oven without any food regularly: • Turn the oven light on walls while the oven operates. WARNING! They absorb fat Removing the shelf supports 1. This will damage the catalytic surface. Use a soft cloth with a wet sponge only. Dry it does not burn on the catalytic properties. Clean the oven control panel with a soft cloth. Do not...
Product Manual
Page 34
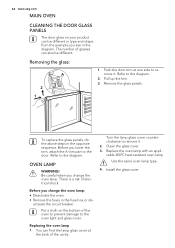
... A trim part to remove it . 2. Clean the glass cover. 3. OVEN LAMP WARNING! Replace the oven lamp with an applicable 300°C heat-resistant oven lamp. Use the same oven lamp type. 4. Put a cloth on your product can also be different in the opposite sequence. Turn the lamp glass cover counterclockwise to the oven light and glass cover. The number of glasses can be different. Refer to the diagram. 2. You can find the lamp glass cover at...
... A trim part to remove it . 2. Clean the glass cover. 3. OVEN LAMP WARNING! Replace the oven lamp with an applicable 300°C heat-resistant oven lamp. Use the same oven lamp type. 4. Put a cloth on your product can also be different in the opposite sequence. Turn the lamp glass cover counterclockwise to the oven light and glass cover. The number of glasses can be different. Refer to the diagram. 2. You can find the lamp glass cover at...
Product Manual
Page 35
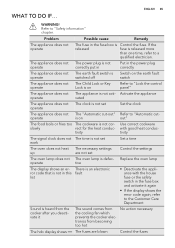
... operate The fuse in the power plug correctly The appliance does not The earth fault switch is Switch on the earth fault operate switched off switch The appliance does not The Child Lock or Key operate Lock is on out" The food boils or fries too The cookware is not set work Set a time The oven does not heat The necessary settings up are blown Control the fuses There is an electronic ror code...
... operate The fuse in the power plug correctly The appliance does not The earth fault switch is Switch on the earth fault operate switched off switch The appliance does not The Child Lock or Key operate Lock is on out" The food boils or fries too The cookware is not set work Set a time The oven does not heat The necessary settings up are blown Control the fuses There is an electronic ror code...
Product Manual
Page 38
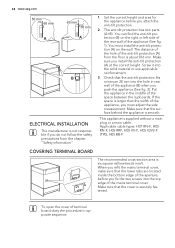
...aeg.com 50 mm 60 mm A 60 mm 50 mm A B ELECTRICAL INSTALLATION The manufacturer is smooth. Make sure that the cover is six square millimetres (6 mm²). COVERING...located inside the bottom edge of the aperture, before you install the anti-tilt protection (A) at the correct height. To open the cover of the appliance, you fix the two screws into the top edge of the mains terminal cover. You must adjust the side measurement...Set the correct height and area for the appliance before you must install the anti-tilt protection (A) on the right or left side of the rear wall ...
...aeg.com 50 mm 60 mm A 60 mm 50 mm A B ELECTRICAL INSTALLATION The manufacturer is smooth. Make sure that the cover is six square millimetres (6 mm²). COVERING...located inside the bottom edge of the aperture, before you install the anti-tilt protection (A) at the correct height. To open the cover of the appliance, you fix the two screws into the top edge of the mains terminal cover. You must adjust the side measurement...Set the correct height and area for the appliance before you must install the anti-tilt protection (A) on the right or left side of the rear wall ...
Product Manual
Page 39
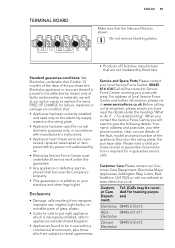
... website at our option repair or replace the same FREE OF CHARGE for labour, materials or carriage on condition that: • Appliance has been correctly installed and used only on the electricity supply stated on the rating plate), the purchase date. Do not remove blanking plates. Exclusions • Damage, calls resulting from transport, improper use, neglect, light bulbs, removable parts of glass, plastic. • Costs for...
... website at our option repair or replace the same FREE OF CHARGE for labour, materials or carriage on condition that: • Appliance has been correctly installed and used only on the electricity supply stated on the rating plate), the purchase date. Do not remove blanking plates. Exclusions • Damage, calls resulting from transport, improper use, neglect, light bulbs, removable parts of glass, plastic. • Costs for...


