Specification Sheet
Page 1
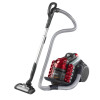
... for quick, clean and easy dust disposal or compact the dust to gain capacity to continue to the sides of the dust bin. AUC9220 Canister AEG UltraCaptic Animal is perfect for pet owners. More Benefits : • Allergy Plus™ excellent filtration for a cleaner home • Powerful cleaning with AeroPro™ Silent nozzle as a main nozzle • Power regulation for optimal suction control Features : • AeroPro aluminium telescopic tube •Side angled brushes...
... for quick, clean and easy dust disposal or compact the dust to gain capacity to continue to the sides of the dust bin. AUC9220 Canister AEG UltraCaptic Animal is perfect for pet owners. More Benefits : • Allergy Plus™ excellent filtration for a cleaner home • Powerful cleaning with AeroPro™ Silent nozzle as a main nozzle • Power regulation for optimal suction control Features : • AeroPro aluminium telescopic tube •Side angled brushes...
User Manual
Page 5
... can be used if damaged. WARNING: Turbo nozzles* have a rotating brush in the packaging If you have been given supervision or instruction concerning use of the appliance in a dry place. Always disconnect the plug from the mains before removing entrapped parts or cleaning the brush. Never use the vacuum cleaner if the cord is damaged. • If the cord is not covered by children without its filters. Damage...
... can be used if damaged. WARNING: Turbo nozzles* have a rotating brush in the packaging If you have been given supervision or instruction concerning use of the appliance in a dry place. Always disconnect the plug from the mains before removing entrapped parts or cleaning the brush. Never use the vacuum cleaner if the cord is damaged. • If the cord is not covered by children without its filters. Damage...
User Manual
Page 8
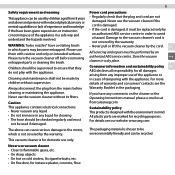
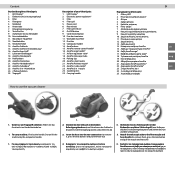
8 Overview of the vacuum cleaner 1* 16* 15* 17* 14 18 20 19 25 12 13 9 2* 3 7 24 4 5 6 8 24 10 11 20 21* 22* 23
8 Overview of the vacuum cleaner 1* 16* 15* 17* 14 18 20 19 25 12 13 9 2* 3 7 24 4 5 6 8 24 10 11 20 21* 22* 23
User Manual
Page 9
... 19. Rear wheels 7. AeroPro hose 15. AeroPro turbo nozzle* 23. Airflow regulation valve* 18. AeroPro 3 in 1 nozzle 24. 2 parking slots 25. Gerät nur am Verdichterhebel an. 1. Attach the telescopic tube to the floor nozzle and hose handle (to use the vacuum cleaner Click! 1. LED Display* 2. Netzkabel 6. Filter grill 5. Waschbarer Hauptfilter 12. To carry machine, lift it , press the lock buttons and pull the hose out) 2 3. Content...
... 19. Rear wheels 7. AeroPro hose 15. AeroPro turbo nozzle* 23. Airflow regulation valve* 18. AeroPro 3 in 1 nozzle 24. 2 parking slots 25. Gerät nur am Verdichterhebel an. 1. Attach the telescopic tube to the floor nozzle and hose handle (to use the vacuum cleaner Click! 1. LED Display* 2. Netzkabel 6. Filter grill 5. Waschbarer Hauptfilter 12. To carry machine, lift it , press the lock buttons and pull the hose out) 2 3. Content...
User Manual
Page 10
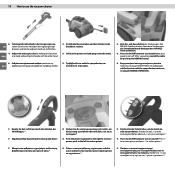
... holding the lock with eng one hand and pulling the handle with the other hand. 4 gre 5. Drücken Sie auf „+", um die Leistung zu erhöhen oder auf „-", um sie zu verringern. * 9. Pull out the power cord and plug it into the mains. 5 ... Staubsaugers den EIN/AUS-Schalter drücken. After vacuuming rewind the cable by pushing the REWIND button. 6 ON/OFF REWIND 7. 10 How to turn off . Zum Ein- Press the On/Off button to turn on , press again to use the vacuum cleaner 4. Drehen Sie die Leistungsregelung nach rechts, um die ...
... holding the lock with eng one hand and pulling the handle with the other hand. 4 gre 5. Drücken Sie auf „+", um die Leistung zu erhöhen oder auf „-", um sie zu verringern. * 9. Pull out the power cord and plug it into the mains. 5 ... Staubsaugers den EIN/AUS-Schalter drücken. After vacuuming rewind the cable by pushing the REWIND button. 6 ON/OFF REWIND 7. 10 How to turn off . Zum Ein- Press the On/Off button to turn on , press again to use the vacuum cleaner 4. Drehen Sie die Leistungsregelung nach rechts, um die ...
User Manual
Page 12
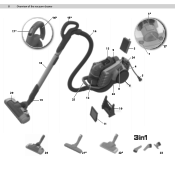
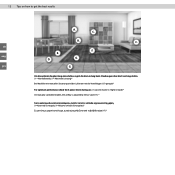
B. F. C. D. 12 Tips on how to get the best results de eng gre A. E. G. G. C. Um die optimale Saugleistung einzustellen, regeln Sie die Leistung beim Staubsaugen über die 5 Leistungsstufen. (1 = Normalbetrieb, 5 = Maximale Leistung)* Bei Modellen mit manueller Steuerung wird der Luftstrom mit der Ventilklappe (17) geregelt.* For optimum performance check the 5 power levels during use. (1=Lowest mode, 5= Highest mode)* On manually controlled models, the airflow is adjusted by the air valve(17). * 1 5 17).*
B. F. C. D. 12 Tips on how to get the best results de eng gre A. E. G. G. C. Um die optimale Saugleistung einzustellen, regeln Sie die Leistung beim Staubsaugen über die 5 Leistungsstufen. (1 = Normalbetrieb, 5 = Maximale Leistung)* Bei Modellen mit manueller Steuerung wird der Luftstrom mit der Ventilklappe (17) geregelt.* For optimum performance check the 5 power levels during use. (1=Lowest mode, 5= Highest mode)* On manually controlled models, the airflow is adjusted by the air valve(17). * 1 5 17).*
User Manual
Page 15
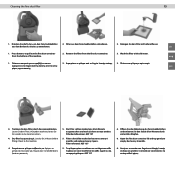
Press buttons to pull out the fine dust container from the fine dust container. 3. Wash the filter with cold water. 1 2 3 de eng gre 4. Let dry for 24 hours before fitting it . Filterbestellnummer: AEF 137 5. Dry filter by squeezing it back to empty dust every 6 months. 6 6 μήνες. Cleaning the fine dust filter 15 1. Drücken Sie die Tasten, um den...
Press buttons to pull out the fine dust container from the fine dust container. 3. Wash the filter with cold water. 1 2 3 de eng gre 4. Let dry for 24 hours before fitting it . Filterbestellnummer: AEF 137 5. Dry filter by squeezing it back to empty dust every 6 months. 6 6 μήνες. Cleaning the fine dust filter 15 1. Drücken Sie die Tasten, um den...
User Manual
Page 17
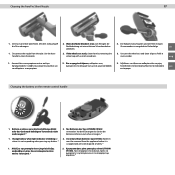
... any button. * 1 2. de eng 1 2 3 gre Changing the battery on the remote control handle 1. If the wheels are to clean the nozzle. 2. Change battery when light indicator is blinking or when it is scrapped and are stuck, clean them by removing the wheel cap with a small screwdriver. 3. Unscrew the wheel axis and clean all parts. Nur Batterien des Typs LITHIUM CR1632 verwenden. Use the hose handle to be removed from the tube...
... any button. * 1 2. de eng 1 2 3 gre Changing the battery on the remote control handle 1. If the wheels are to clean the nozzle. 2. Change battery when light indicator is blinking or when it is scrapped and are stuck, clean them by removing the wheel cap with a small screwdriver. 3. Unscrew the wheel axis and clean all parts. Nur Batterien des Typs LITHIUM CR1632 verwenden. Use the hose handle to be removed from the tube...
User Manual
Page 19
...;te. Do not dispose appliances marked with the symbol with the symbol Put the packaging in den entsprechenden Recyclingbehältern. Return the product to recycle waste of electrical and electronic appliances. Bringen Sie das Gerät zu Ihrer örtlichen Sammelstelle oder wenden Sie sich an Ihr Gemeindeamt. Deutsch English Recyceln...
...;te. Do not dispose appliances marked with the symbol with the symbol Put the packaging in den entsprechenden Recyclingbehältern. Return the product to recycle waste of electrical and electronic appliances. Bringen Sie das Gerät zu Ihrer örtlichen Sammelstelle oder wenden Sie sich an Ihr Gemeindeamt. Deutsch English Recyceln...


