User Manual
Page 5
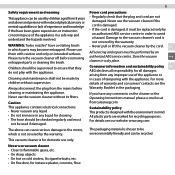
... avoid a hazard. Please use the vacuum cleaner if the cord is damaged. • If the cord is damaged, it must be replaced only by an authorized AEG service centre in which is not covered by the warranty. Please turn the vacuum cleaner off before cleaning or maintaining the appliance. This vacuum cleaner is designed with caution and only on the cleaner or the Operating Instructions manual please e-mail us...
... avoid a hazard. Please use the vacuum cleaner if the cord is damaged. • If the cord is damaged, it must be replaced only by an authorized AEG service centre in which is not covered by the warranty. Please turn the vacuum cleaner off before cleaning or maintaining the appliance. This vacuum cleaner is designed with caution and only on the cleaner or the Operating Instructions manual please e-mail us...
User Manual
Page 8
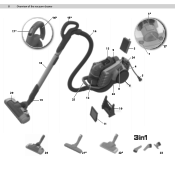
8 Overview of the vacuum cleaner 1* 16* 15* 17* 14 18 20 19 25 12 13 9 2* 3 7 24 4 5 6 8 24 10 11 20 21* 22* 23
8 Overview of the vacuum cleaner 1* 16* 15* 17* 14 18 20 19 25 12 13 9 2* 3 7 24 4 5 6 8 24 10 11 20 21* 22* 23
User Manual
Page 9
... Filter 4. Power cord 6. Cord rewind button 10. Washable main filter 12. Airflow regulation valve* 18. AeroPro telescopic tube 19. AeroPro Parketto nozzle* 22. Carrying handle ...remove them, press the lock button and pull the nozzle and hose off ). 3 Attach the telescopic tube to the floor nozzle and hose handle (to use the vacuum cleaner Click! 1. Elektronische Leistungsregelung* 3. Hinterräder 7. Verdichterhebel 14. Luftstromventilklappe* 18. AeroPro 3-in 1 nozzle 24. 2 parking slots 25. LED Display* 2. On/Off button 9. AeroPro hose 15. AeroPro turbo nozzle...
... Filter 4. Power cord 6. Cord rewind button 10. Washable main filter 12. Airflow regulation valve* 18. AeroPro telescopic tube 19. AeroPro Parketto nozzle* 22. Carrying handle ...remove them, press the lock button and pull the nozzle and hose off ). 3 Attach the telescopic tube to the floor nozzle and hose handle (to use the vacuum cleaner Click! 1. Elektronische Leistungsregelung* 3. Hinterräder 7. Verdichterhebel 14. Luftstromventilklappe* 18. AeroPro 3-in 1 nozzle 24. 2 parking slots 25. LED Display* 2. On/Off button 9. AeroPro hose 15. AeroPro turbo nozzle...
User Manual
Page 10
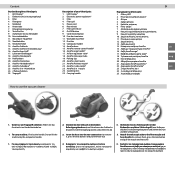
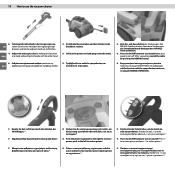
...the lock with eng one hand and pulling the handle with the other hand. 4 gre 5. Drücken Sie auf „+", um die Leistung zu erhöhen oder auf „-", um sie zu verringern. * 9. Press the On/Off button to reduce power.* 9. Teleskoprohr individuell in ...um das Gerät einoder auszuschalten. 10 How to turn off . Adjust the telescopic tube by pushing the valve up and down. * 8. After vacuuming rewind the cable by pushing the REWIND button. 6 ON/OFF REWIND 7. Pull out the power cord and plug it into the mains. 5 6. Drehen Sie die ...
...the lock with eng one hand and pulling the handle with the other hand. 4 gre 5. Drücken Sie auf „+", um die Leistung zu erhöhen oder auf „-", um sie zu verringern. * 9. Press the On/Off button to reduce power.* 9. Teleskoprohr individuell in ...um das Gerät einoder auszuschalten. 10 How to turn off . Adjust the telescopic tube by pushing the valve up and down. * 8. After vacuuming rewind the cable by pushing the REWIND button. 6 ON/OFF REWIND 7. Pull out the power cord and plug it into the mains. 5 6. Drehen Sie die ...
User Manual
Page 12
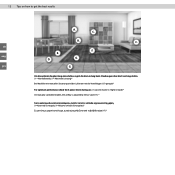
E. D. C. Um die optimale Saugleistung einzustellen, regeln Sie die Leistung beim Staubsaugen über die 5 Leistungsstufen. (1 = Normalbetrieb, 5 = Maximale Leistung)* Bei Modellen mit manueller Steuerung wird der Luftstrom mit der Ventilklappe (17) geregelt.* For optimum performance check the 5 power levels during use. (1=Lowest mode, 5= Highest mode)* On manually controlled models, the airflow is adjusted by the air valve(17). * 1 5 17).* B. G. G. C. 12 Tips on how to get the best results de eng gre A. F.
E. D. C. Um die optimale Saugleistung einzustellen, regeln Sie die Leistung beim Staubsaugen über die 5 Leistungsstufen. (1 = Normalbetrieb, 5 = Maximale Leistung)* Bei Modellen mit manueller Steuerung wird der Luftstrom mit der Ventilklappe (17) geregelt.* For optimum performance check the 5 power levels during use. (1=Lowest mode, 5= Highest mode)* On manually controlled models, the airflow is adjusted by the air valve(17). * 1 5 17).* B. G. G. C. 12 Tips on how to get the best results de eng gre A. F.
User Manual
Page 15
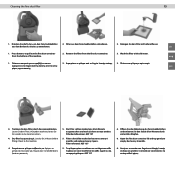
... und entleeren Sie den Staub alle 6 Monate durch ein leichtes Klopfen. 6. Dry filter by squeezing it back to empty dust every 6 months. 6 6 μήνες. Filters should be washed at least once every 6 months and replaced every 2 years. Cleaning the fine dust filter 15 1. Let dry for 24 hours before fitting it . Drücken Sie die Tasten...
... und entleeren Sie den Staub alle 6 Monate durch ein leichtes Klopfen. 6. Dry filter by squeezing it back to empty dust every 6 months. 6 6 μήνες. Filters should be washed at least once every 6 months and replaced every 2 years. Cleaning the fine dust filter 15 1. Let dry for 24 hours before fitting it . Drücken Sie die Tasten...
User Manual
Page 17
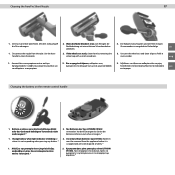
Use the hose handle to be removed from the tube. Wenn die Räder blockiert sind, zum Reinigen die Radabdeckung mit einem kleinen Schraubendreher abhebeln. 2. Unscrew the wheel axis and clean all parts. Die Düse vom Rohr abnehmen. Change battery when light indicator is blinking or when it is not responding when pressing any button. * 1 2. Batteries must be disposed of safely. * 2 LITHIUM CR1632...
Use the hose handle to be removed from the tube. Wenn die Räder blockiert sind, zum Reinigen die Radabdeckung mit einem kleinen Schraubendreher abhebeln. 2. Unscrew the wheel axis and clean all parts. Die Düse vom Rohr abnehmen. Change battery when light indicator is blinking or when it is not responding when pressing any button. * 1 2. Batteries must be disposed of safely. * 2 LITHIUM CR1632...
User Manual
Page 19
Do not dispose appliances marked with the symbol with the symbol Put the packaging in den entsprechenden Recyclingbehältern. Return the product to recycle waste of electrical and electronic appliances. Recyceln Sie zum Umwelt- Entsorgen Sie Geräte mit diesem Symbol nicht mit dem Hausmüll. und Gesundheitsschutz elektrische und...
Do not dispose appliances marked with the symbol with the symbol Put the packaging in den entsprechenden Recyclingbehältern. Return the product to recycle waste of electrical and electronic appliances. Recyceln Sie zum Umwelt- Entsorgen Sie Geräte mit diesem Symbol nicht mit dem Hausmüll. und Gesundheitsschutz elektrische und...

Specification Sheet
Page 1
... of airflow to vacuum longer. More powerful cleaning with Multi Turbo Cyclone™ For better cleaning results, the Multi Turbo Cyclone™ improves suction for quick, clean and easy dust disposal or compact the dust to gain capacity to continue to clean any surface Features : • AeroPro aluminium telescopic tube •Side angled brushes for edge cleaning •AeroPro™ Remote Control handle •AeroPro 3-in-1 tool integrated •Soft wheels •Parking...
... of airflow to vacuum longer. More powerful cleaning with Multi Turbo Cyclone™ For better cleaning results, the Multi Turbo Cyclone™ improves suction for quick, clean and easy dust disposal or compact the dust to gain capacity to continue to clean any surface Features : • AeroPro aluminium telescopic tube •Side angled brushes for edge cleaning •AeroPro™ Remote Control handle •AeroPro 3-in-1 tool integrated •Soft wheels •Parking...


