Product Manual
Page 2
...find everything you need to keep all your AEG appliances looking spotless and working perfectly. FOR PERFECT RESULTS Thank you for many years, with a wide range of accessories designed and built to the high quality standards you... would expect, from specialist cookware to cutlery baskets, from it to delicate laundry bags... Please spend a few minutes reading to get the very best from bottle holders to give you impeccable performance for choosing this AEG product. Along with innovative technologies that help make...
...find everything you need to keep all your AEG appliances looking spotless and working perfectly. FOR PERFECT RESULTS Thank you for many years, with a wide range of accessories designed and built to the high quality standards you... would expect, from specialist cookware to cutlery baskets, from it to delicate laundry bags... Please spend a few minutes reading to get the very best from bottle holders to give you impeccable performance for choosing this AEG product. Along with innovative technologies that help make...

Product Manual
Page 3
electrical connections CONTENTS Contents 3 5 Important safety information 6 Your appliance 7 Operating instructions 9 Maintenance and cleaning 15 Installation instructions -
electrical connections CONTENTS Contents 3 5 Important safety information 6 Your appliance 7 Operating instructions 9 Maintenance and cleaning 15 Installation instructions -
Product Manual
Page 4
... Cooker Hood Controls To Operate Recirculation Extraction Maintenance and Cleaning External Cleaning Metal Grease Filter To Remove the Grease Filter Cassette Charcoal Filter To Remove/Replace the Charcoal Filter Worktop Lighting Replacing the Light Bulb Something Not Working Service and Spare Parts Guarantee Conditions For the Installer Installation Instructions Technical Information Electrical Connections Electrical Requirements Electrical Connection Installing the Cooker Hood Installation Requirements Unpacking Clearance Height Wall drilling and bracket fi xing Hood body mounting Drilling...
... Cooker Hood Controls To Operate Recirculation Extraction Maintenance and Cleaning External Cleaning Metal Grease Filter To Remove the Grease Filter Cassette Charcoal Filter To Remove/Replace the Charcoal Filter Worktop Lighting Replacing the Light Bulb Something Not Working Service and Spare Parts Guarantee Conditions For the Installer Installation Instructions Technical Information Electrical Connections Electrical Requirements Electrical Connection Installing the Cooker Hood Installation Requirements Unpacking Clearance Height Wall drilling and bracket fi xing Hood body mounting Drilling...
Product Manual
Page 5
.... • When the hood is used in conjunction with appliances supplied with the appliance. Maintenance and Service • This appliance can be a fire hazard if the grease and charcoal filters are not cleaned or replaced as recommended. • Under no circumstances should not be allowed to tamper with the controls or play with energy other than electricity, the negative pressure...
.... • When the hood is used in conjunction with appliances supplied with the appliance. Maintenance and Service • This appliance can be a fire hazard if the grease and charcoal filters are not cleaned or replaced as recommended. • Under no circumstances should not be allowed to tamper with the controls or play with energy other than electricity, the negative pressure...
Product Manual
Page 7
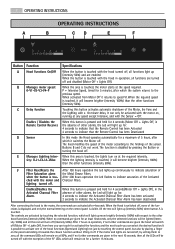
... Activated Charcoal Filter Alarm. 7 OPERATING INSTRUCTIONS OPERATING INSTRUCTIONS A B CD E F Button Function A Hood Functions On/Off B Manages motor speed: 0-V1-V2-V3-V4-P C Delay function Enables / Disables the Remote Control Receiver. All the rest will become brighter (intensity 100%) than the other alarms, the Led will turn on the panel and sliding it towards the chosen function without lifting it switches the Motor off . When the lighting intensity...
... Activated Charcoal Filter Alarm. 7 OPERATING INSTRUCTIONS OPERATING INSTRUCTIONS A B CD E F Button Function A Hood Functions On/Off B Manages motor speed: 0-V1-V2-V3-V4-P C Delay function Enables / Disables the Remote Control Receiver. All the rest will become brighter (intensity 100%) than the other alarms, the Led will turn on the panel and sliding it towards the chosen function without lifting it switches the Motor off . When the lighting intensity...
Product Manual
Page 8
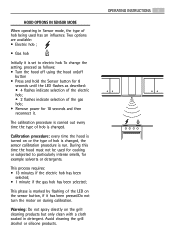
...; Remove power for example solvents or detergents. Avoid cleaning the grill alcohol or silicone products. Two options are available: • Electric hob ; • Gas hob Initially it . The calibration procedure is carried out every time the type of hob being used for cooking or subjected to electric hob. During this time the hood must not be used has an influence. OPERATING INSTRUCTIONS 8 Calibration...
...; Remove power for example solvents or detergents. Avoid cleaning the grill alcohol or silicone products. Two options are available: • Electric hob ; • Gas hob Initially it . The calibration procedure is carried out every time the type of hob being used for cooking or subjected to electric hob. During this time the hood must not be used has an influence. OPERATING INSTRUCTIONS 8 Calibration...
Product Manual
Page 9
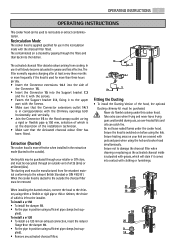
... ducted to the upper part with the charcoal filter fitted. Ensure heating areas on before using the hob and cooker hood simultaneously. In use it to the outside the charcoal filter must be manufactured from cooking. To install a ø 120 • To install a ø 120 mm air exhaust connection, insert the reducer flange 9 on the dumper 10. • Fix the pipe in the recirculation mode with the Screws. • Make...
... ducted to the upper part with the charcoal filter fitted. Ensure heating areas on before using the hob and cooker hood simultaneously. In use it to the outside the charcoal filter must be manufactured from cooking. To install a ø 120 • To install a ø 120 mm air exhaust connection, insert the reducer flange 9 on the dumper 10. • Fix the pipe in the recirculation mode with the Screws. • Make...
Product Manual
Page 10
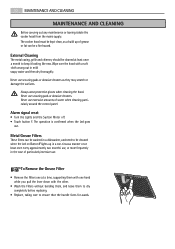
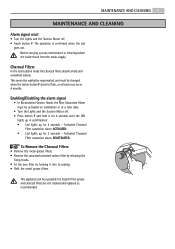
.... Alarm signal reset • Turn the Lights and the Suction Motor off. • Touch button F. The cooker hood must be kept clean, as they may scratch or damage the surfaces. External Cleaning The metal casing, grille and chimney should be a fire hazard. Always wear protective gloves when cleaning the hood. Metal Grease Filters These filters can be cleaned at least once every approximately two months' use, or more...
.... Alarm signal reset • Turn the Lights and the Suction Motor off. • Touch button F. The cooker hood must be kept clean, as they may scratch or damage the surfaces. External Cleaning The metal casing, grille and chimney should be a fire hazard. Always wear protective gloves when cleaning the hood. Metal Grease Filters These filters can be cleaned at least once every approximately two months' use, or more...
Product Manual
Page 11
... CLEANING 11 MAINTENANCE AND CLEANING Alarm signal reset • Turn the Lights and the Suction Motor off . • Press button F and hold it into its seating. • Refit the metal grease filters. Activated Charcoal Filter saturation alarm DEACTIVATED. This appliance can be changed when the led on installation or at least once every 4 months. Enabling/Disabling the alarm signal • In Recirculation Version Hoods, the Filter...
... CLEANING 11 MAINTENANCE AND CLEANING Alarm signal reset • Turn the Lights and the Suction Motor off . • Press button F and hold it into its seating. • Refit the metal grease filters. Activated Charcoal Filter saturation alarm DEACTIVATED. This appliance can be changed when the led on installation or at least once every 4 months. Enabling/Disabling the alarm signal • In Recirculation Version Hoods, the Filter...
Product Manual
Page 12
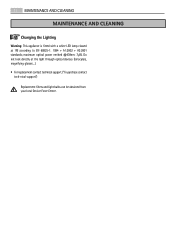
12 MAINTENANCE AND CLEANING MAINTENANCE AND CLEANING Changing the Lighting Warning: This appliance is fitted with a white LED lamp classed as 1M according to EN 60825-1: 1994 + A1:2002 + A2:2001 standards; Do not look directly at the light through optical devices (binoculars, magnifying glasses...). • For replacement contact technical support. ("To purchase contact tech-nical support") Replacement filters and light bulbs can be obtained from your local Service Force Centre. maximum optical power emitted @439nm: 7µW.
12 MAINTENANCE AND CLEANING MAINTENANCE AND CLEANING Changing the Lighting Warning: This appliance is fitted with a white LED lamp classed as 1M according to EN 60825-1: 1994 + A1:2002 + A2:2001 standards; Do not look directly at the light through optical devices (binoculars, magnifying glasses...). • For replacement contact technical support. ("To purchase contact tech-nical support") Replacement filters and light bulbs can be obtained from your local Service Force Centre. maximum optical power emitted @439nm: 7µW.
Product Manual
Page 13
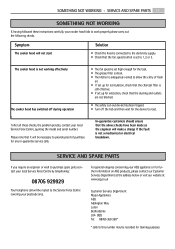
... during operation I f after all these instructions carefully, your local Service Force Centre, quoting the model and serial number. SOMETHING NOT WORKING - Please note that it will make a charge if the fault is still effective. • If set up for recirculation, check that the fan speed control is not working effectively The cooker hood has switched off the hob and then wait for the task. • The grease filter is clean...
... during operation I f after all these instructions carefully, your local Service Force Centre, quoting the model and serial number. SOMETHING NOT WORKING - Please note that it will make a charge if the fault is still effective. • If set up for recirculation, check that the fan speed control is not working effectively The cooker hood has switched off the hob and then wait for the task. • The grease filter is clean...
Product Manual
Page 14
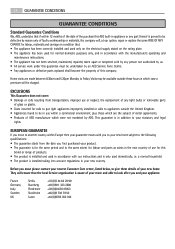
... Customer Care centre, listed below, to give them details of AEG manufacture which case a premium will be charged. They will ensure that : • The appliance has been correctly installed and used only on the electrical supply stated on condition that the local Service ...repair or replace the same FREE OF ANY CHARGE for labour, materials and carriage on the rating plate. • The appliance has been used for normal domestic purposes only, and in accordance with the manufacturer's operating and maintenance instructions. • The appliance has not been serviced, maintained, repaired...
... Customer Care centre, listed below, to give them details of AEG manufacture which case a premium will be charged. They will ensure that : • The appliance has been correctly installed and used only on the electrical supply stated on condition that the local Service ...repair or replace the same FREE OF ANY CHARGE for labour, materials and carriage on the rating plate. • The appliance has been used for normal domestic purposes only, and in accordance with the manufacturer's operating and maintenance instructions. • The appliance has not been serviced, maintained, repaired...
Product Manual
Page 15
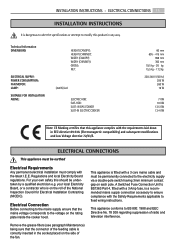
... (NICEIC). For your local Electricity Board, or a contractor who is a recommended mains supply connection accessory to ensure compliance with a 3 Amp fuse, is on the rating plate inside the cooker hood. INSTALLATION INSTRUCTIONS - Technical Information DIMENSIONS HEIGHT (CANOPY): HEIGHT (CHIMNEY): WIDTH (CANOPY): WIDTH (CHIMNEY): GROSS: NET: ELECTRICAL SUPPLY: POWER CONSUMPTION: FAN MOTOR LAMP: (4x4W) Led SUITABLE FOR INSTALLATION ABOVE ELECTRIC HOB: GAS HOB: SLOT-IN GAS COOKER SLOT-IN ELECTRIC COOKER 60 mm 695...
... (NICEIC). For your local Electricity Board, or a contractor who is a recommended mains supply connection accessory to ensure compliance with a 3 Amp fuse, is on the rating plate inside the cooker hood. INSTALLATION INSTRUCTIONS - Technical Information DIMENSIONS HEIGHT (CANOPY): HEIGHT (CHIMNEY): WIDTH (CANOPY): WIDTH (CHIMNEY): GROSS: NET: ELECTRICAL SUPPLY: POWER CONSUMPTION: FAN MOTOR LAMP: (4x4W) Led SUITABLE FOR INSTALLATION ABOVE ELECTRIC HOB: GAS HOB: SLOT-IN GAS COOKER SLOT-IN ELECTRIC COOKER 60 mm 695...
Product Manual
Page 16
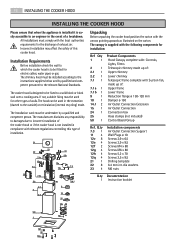
...-120 mm Damper ø 150 Air Outlet Connection Extension Air Outlet Connection Connection box Hose clamps (not included) Control Board Group Ref. The cooker hood is to be installed according to the instructions suppliers below and by a qualified and competent person. Installation Requirements Before installation check the wall to which the cooker hood is designed to be used for electric cables, water pipes or gas. The hood can be fixed to the outside) or recirculation (internal...
...-120 mm Damper ø 150 Air Outlet Connection Extension Air Outlet Connection Connection box Hose clamps (not included) Control Board Group Ref. The cooker hood is to be installed according to the instructions suppliers below and by a qualified and competent person. Installation Requirements Before installation check the wall to which the cooker hood is designed to be used for electric cables, water pipes or gas. The hood can be fixed to the outside) or recirculation (internal...

Product Manual
Page 17
... the power supply cable feed, drill ø 10 mm. • For the air outlet (Ducted Version), drill according to the screw size. • For hollow brick ceilings with washers 22 and nuts 23, provided. meter of the external air exhaust duct connection. • Insert two screws of the following type, crossing them and leaving 4-5 mm from the ceiling: • For concrete ceilings, use 4 screws 12g with wall thickness of...
... the power supply cable feed, drill ø 10 mm. • For the air outlet (Ducted Version), drill according to the screw size. • For hollow brick ceilings with washers 22 and nuts 23, provided. meter of the external air exhaust duct connection. • Insert two screws of the following type, crossing them and leaving 4-5 mm from the ceiling: • For concrete ceilings, use 4 screws 12g with wall thickness of...
Product Manual
Page 18
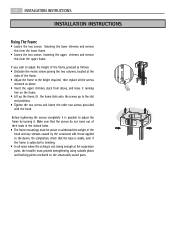
... frame mountings must provide strengthening using suitable plates and backing pieces anchored to the structurally sound parts. � � � � 18 INSTALLATION INSTRUCTIONS INSTALLATION INSTRUCTIONS Fixing The Frame • Loosen the two screws fastening the lower chimney and remove this from the lower frame. • Loosen the two screws fastening the upper chimney and remove this from above, and leave it running free on the...
... frame mountings must provide strengthening using suitable plates and backing pieces anchored to the structurally sound parts. � � � � 18 INSTALLATION INSTRUCTIONS INSTALLATION INSTRUCTIONS Fixing The Frame • Loosen the two screws fastening the lower chimney and remove this from the lower frame. • Loosen the two screws fastening the upper chimney and remove this from above, and leave it running free on the...
Product Manual
Page 19
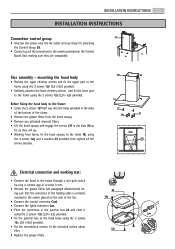
... the Control Board Unit, making sure they will go. • Working from below, fix the hood canopy to the frame (B), using the 4 screws 12q and 4 washers 22 provided, then tighten all the screws securely. ��� � � Electrical connection and working test: • Connect the hood to the mains through a two-pole switch ha-ving a contact gap of at least 3 mm. • Remove the grease filters (see...
... the Control Board Unit, making sure they will go. • Working from below, fix the hood canopy to the frame (B), using the 4 screws 12q and 4 washers 22 provided, then tighten all the screws securely. ��� � � Electrical connection and working test: • Connect the hood to the mains through a two-pole switch ha-ving a contact gap of at least 3 mm. • Remove the grease filters (see...

Product Manual
Page 20
www.aeg-electrolux.com/shop 436005218_01 - 101125
www.aeg-electrolux.com/shop 436005218_01 - 101125


