AEG BE530450KB Support and Manuals
Get Help and Manuals for this AEG item
View All Support Options Below
Free AEG BE530450KB manuals!
Problems with AEG BE530450KB?
Ask a Question
Free AEG BE530450KB manuals!
Problems with AEG BE530450KB?
Ask a Question
Popular AEG BE530450KB Manual Pages
Product Manual - Page 2
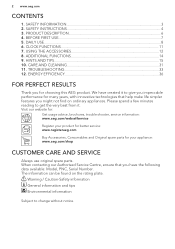
.... We have the following data available: Model, PNC, Serial Number. BEFORE FIRST USE...7 5. Visit our website for:
Get usage advice, brochures, trouble shooter, service information: www.aeg.com/webselfservice
Register your appliance: www.aeg.com/shop
CUSTOMER CARE AND SERVICE
Always use original spare parts. HINTS AND TIPS...15 10. TROUBLESHOOTING 33 12.
DAILY USE...8 6. CARE...
Product Manual - Page 4
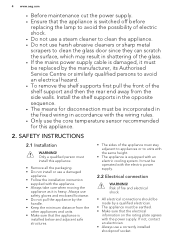
SAFETY INSTRUCTIONS
2.1 Installation
WARNING! Only a qualified person must install this appliance.
2. Always use safety gloves and enclosed footwear. • Do not pull the appliance by the handle. • Keep the minimum distance from the side walls. It must be replaced by a qualified electrician. • The appliance must be earthed. • Make sure that the appliance...
Product Manual - Page 7

Use the trivet only with the Grill- / Roasting pan.
Trivet
4.
Put the accessories and the removable shelf supports back to their initial position.
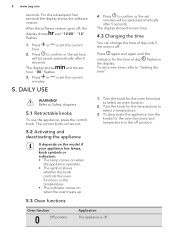
4.2 Setting the time
After the first connection to Safety chapters.
4.1 Initial Cleaning
Remove all symbols in the display are on for some Grill- / Roasting pan
14 ...
Product Manual - Page 8
...position
Application The appliance is off position. Press or to confirm or the set hour will be saved automatically after 5 seconds. The display shows hour.
...set a new time, refer to confirm or the set minutes will be saved automatically after 5 seconds.
and "12:00". The control knob comes out.
5.2 Activating and deactivating the appliance
It depends on the model...
Product Manual - Page 10

...before you remove the remaining water from the cavity embossment.
A. Water drawer (selected models only) D. Set the True Fan Cooking PLUS
function:
.
5. Remove water from the cavity embossment...temperature to activate or deactivate the oven lamp. You must deactivate the function manually. 3. Timer B.
CAUTION! Set an oven function. Turn the knob for more than 3 seconds to ...
Product Manual - Page 12

... core temperature sensor measures the core temperature of the meat.
3. There are two temperatures to setting of the appliance. Refer to the
table for DURATION
, the appliance goes to be used with the appliance, or genuine replacement parts.
4. Only use the core temperature sensor supplied with the functions: Duration , End , core temperature sensor...
Product Manual - Page 13

... setting to change the temperature.
7.2 Inserting the accessories
Wire shelf: Push the shelf between the guide bars of the shelf support ...support. Press any time during the next use the core temperature sensor for the temperature to the set core temperature, the symbol for two minutes. 5. WARNING! You can use the knob for the first time, the default core temperature is updated...
Product Manual - Page 14

...www.aeg.com
You can use the trivet to roast larger pieces of the shelf support and the wire shelf on the guide bars above.
2. SAFE comes on in large quantities and to toast. 1. ...are also anti-tip devices. An acoustic signal sounds. Put the trivet into the deep pan so
that the supports of burns.
8. Be careful when you remove the accessories from slipping.
7.3 Trivet and Grill- / Roasting...
Product Manual - Page 15

...temperature.
8.4 Automatic Switch-off
For safety reasons the appliance deactivates automatically after some models, on the inner side of the door you can find: • the numbers... shelf positions and temperatures for the temperature or press a button. Select an oven function and set it
according your preferences 2. To deactivate the Function Lock, repeat step 2.
Temperature (°C) ...
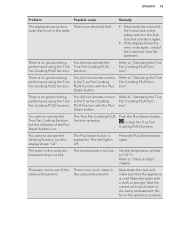
Product Manual - Page 17

... occurs, do not always brown equally at different heights do not change the temperature setting.
When the trays become cold again, the distortions are gone. Remedy
Put the ...and pastries at first. Possible cause
The shelf position is not browned sufficiently. Adapt your usual settings (temperature, cooking times) and shelf positions to the appliance you bake cakes on a lower shelf...
Product Manual - Page 31
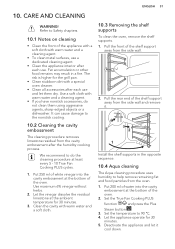
...at the ambient temperature for 30
minutes. 5. Set the True Fan Cooking PLUS
function
and press the Plus
Steam button . 3. Set the temperature to do not clean them dry.
... 2. Let the appliance operate for 30 minutes. 3. Deactivate the appliance and let it .
2
1
Install the shelf supports in a fire. Put 250 ml of water into the cavity embossment at least every 5 - 10 ...
Product Manual - Page 32

... the appliance before you remove the door from the appliance at the front. 2. The number of the guide. The door is different for different models. Hold the door with a cloth. Install the heating element correctly above the supports on a stable surface. Make sure that the appliance is to the first opening position (approximately 70...
Product Manual - Page 34

...set .
The clock is connected incorrectly. Make sure that the fuse is on the food and in the user manual...installed into the socket. et.
quickly.
Do not leave the dishes in the oven
settle on . Activate the oven.
The oven does not heat up .
The fuse is defective. The lamp is blown.
cavity of the core tem- Problem...re- Set the clock.
Replace the...
Product Manual - Page 35
...; If the display shows the error code again, contact the Customer Care Department. function. There is an electrical fault. You did not activate correctly the True Fan Cooking PLUS function with the Plus Steam button. Refer to "Hints and tips" chapter.
Set the temperature at least to the specific procedure. Deactivate the oven and...
Product Manual - Page 36

... ues and press to the problem yourself, contact your dealer or an Authorised Service Centre. The rating plate is
on the dis- 36 www.aeg.com
Problem
The appliance is on the ...the code 2468 by
pressing the buttons
or to blink. 6. We recommend that you cannot find a solution to confirm. 5. Possible cause
The demo mode is correct.
11.2 Service data
If you write the data here:
Model (MOD...
AEG BE530450KB Reviews
We have not received any reviews for AEG yet.