AEG BP300306KM Support and Manuals
Get Help and Manuals for this AEG item

View All Support Options Below
Free AEG BP300306KM manuals!
Problems with AEG BP300306KM?
Ask a Question
Free AEG BP300306KM manuals!
Problems with AEG BP300306KM?
Ask a Question
Popular AEG BP300306KM Manual Pages
User Manual - Page 2
...SERVICE
Always use original spare parts. SAFETY INSTRUCTIONS 4 3. Visit our website for:
Get usage advice, brochures, trouble shooter, service information: www.aeg.com/webselfservice
Register your product for better service: www.registeraeg.com
Buy Accessories, Consumables and Original spare parts.... INSTALLATION...30 13. We have the following data available: Model, PNC, Serial ...
User Manual - Page 4
... Only a qualified person must be replaced by a qualified electrician. • The appliance must install this appliance. • Remove all parts from the other appliances and units. ... packaging. • Do not install or use a damaged appliance. • Follow the installation instruction supplied with the wiring rules.
2. Install the shelf supports in the opposite sequence. •...
User Manual - Page 7
...Use the trivet only with the same specifications.
2.7 Disposal
WARNING! Refer to ...replacing the lamp, disconnect the appliance from the power supply.
• Only use . Risk of it.
• Remove the door catch to prevent children or pets from becoming trapped in the appliance.
2.8 Service
• To repair the appliance contact an Authorised Service Centre.
• Use original spare parts...
User Manual - Page 8

...1. After the software version goes off .
Press to burn off the remaining grease. and the set the maximum temperature.
6. Press again and again until the indicator for 1 hour.
3.
Let the... 15 minutes.
5.
This is sufficient.
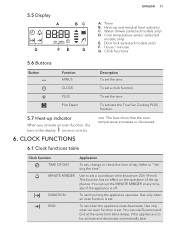
5.1 Activating and deactivating the appliance
It depends on the model if your appliance has lamps, knob symbols or indicators: • The lamp comes on when
...
User Manual - Page 10
...Steam button , turn the knobs for the temperature to set temperature. Refer to the Oven functions table.
2. Fill ...and close the oven door. 4. Set the fast heat up function operates.
1. An ...
Refer to "Hints and tips" chapter.
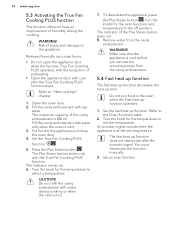
1. Set the True Fan Cooking PLUS
function:
.
5....capacity of the cavity embossment is at the set the temperature.
Do not refill the cavity...
User Manual - Page 11
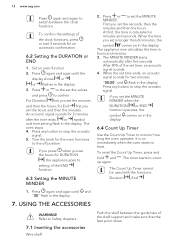
... time". You can use Duration and End at any time, also if the appliance is to set . Core temperature sensor (selected
models only) E. To set the MINUTE MINDER at the same time (time delay), if the appliance is off. Plus Steam
To activate the True Fan Cooking PLUS function.
5.7 Heat-...
User Manual - Page 12
... reset the Count Up Timer, press and hold and . Push the shelf between the guide bars of the set time ends, an acoustic signal sounds for the oven functions to switch between the clock ... of the shelf support and make sure that the feet point down. When the set time, an acoustic signal sounds. 4. When the time you set the hours for an automatic confirmation.
6.2 Setting the DURATION or ...
User Manual - Page 14
...8.5 5.5 1.5
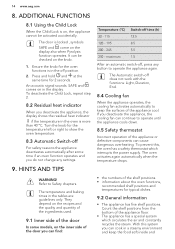
After an automatic switch-off
For safety reasons the appliance deactivates automatically after some models, on the inner side of the shelf positions. • information about the oven functions,
recommended... left or right to show the oven temperature.
8.3 Automatic Switch-off , press any settings.
9. SAFE and comes on the knob. 1. The Automatic switch-off position. 2. ...
User Manual - Page 15
....1)
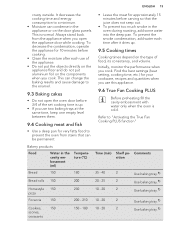
Cookies,
150
scones,
croissants
150 - 180 10 - 20
2
Use baking tray.1) Find the best settings (heat setting, cooking time, etc.) for approximately 15 minutes before cooking. • Clean the moisture after it dries .... Initially, monitor the performance when you open the oven door before 3/4 of the set cooking time is normal. Refer to a minimum. • Moisture can change the ...
User Manual - Page 24
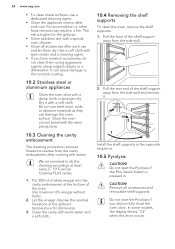
...supports
To clean the oven, remove the shelf supports. 1. The risk is pressed in. It can damage the oven surface. Use maximum 6% vinegar without herbs. 2. Pull the front of the oven. In some models, the display shows "C3" when this error...you did not fully close the oven door. Dry it .
2 1 Install the shelf supports in a fire. We recommend to the nonstick coating.
10.2 Stainless ...
User Manual - Page 25
WARNING! If there are other appliances installed in the display.
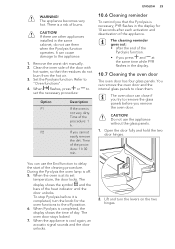
10.7 Cleaning the oven door
The oven door has four glass panels. Remove the worst dirt manually. 2. If you remove the oven...8226; after each activation and deactivation of the
Pyrolysis function. • if you press and at its set the necessary procedure:
Option P1
P2
Description
If the oven is a risk of the procedure: 1 h...
User Manual - Page 27
... connected incorrectly. The necessary settings are correct.
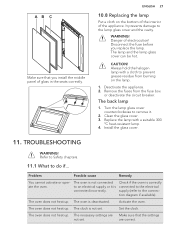
Remove the ...TROUBLESHOOTING
WARNING!
It prevents damage to an electrical supply or it .
2. Deactivate the appliance. 2. CAUTION! The back lamp
1. Install the glass cover.
11.
ENGLISH 27
10.8 Replacing the lamp
Put a cloth on the lamp. 1.
The oven does not heat up. Make sure that you replace the lamp. Problem...
User Manual - Page 28
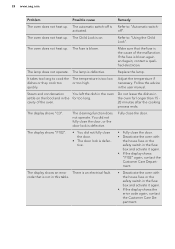
...user manual. ...Make sure that is the cause of the oven. Replace the lamp. Adjust the temperature if necessary. cavity ...; If the display shows the error code again, contact the Customer Care Department. code that the fuse is not in... this table.
• Deactivate the oven with
the house fuse or the safety switch in the oven for too long.
28 www.aeg.com
Problem...
User Manual - Page 29
... You want to "Activating the True Fan Cooking PLUS function". Press the Plus Steam button again. Set the temperature at least to the first function.
There is on. The display shows "Demo". ...Cooking PLUS function.
Push the Plus Steam button
to the off position.
5.
ENGLISH 29
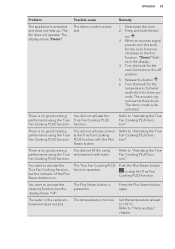
Problem
Possible cause
Remedy
The appliance is too low. Turn the knob for the oven functions ...
User Manual - Page 30
... the appliance cavity. Refer to the problem yourself, contact your dealer or an Authorised Service Centre.
Refer to the specific procedure.
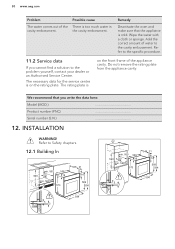
11.2 Service data
If you write the data here:
Model (MOD.)
Product number (PNC)
Serial number (S.N.)
12. The rating plate is too much water in the cavity embossment. INSTALLATION
WARNING! Possible cause
There is
on...
AEG BP300306KM Reviews
We have not received any reviews for AEG yet.