AEG BP730410KM Support and Manuals
Get Help and Manuals for this AEG item
View All Support Options Below
Free AEG BP730410KM manuals!
Problems with AEG BP730410KM?
Ask a Question
Free AEG BP730410KM manuals!
Problems with AEG BP730410KM?
Ask a Question
Popular AEG BP730410KM Manual Pages
Product Manual - Page 2
......12 8. TROUBLESHOOTING 37 14. DAILY USE...10 7. AUTOMATIC PROGRAMMES 14 9. ADDITIONAL FUNCTIONS 18 11. SAFETY INFORMATION 3 2. CONTROL PANEL...8 5. ENERGY EFFICIENCY 39
FOR PERFECT RESULTS
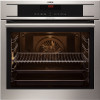
Thank you for your appliance: www.aeg.com/shop
CUSTOMER CARE AND SERVICE
Always use original spare parts. The information can be found on ordinary appliances. SAFETY INSTRUCTIONS...
Product Manual - Page 4
... Do not install or use a damaged appliance. • Obey the installation instruction supplied with the... person must be replaced by the manufacturer, its Authorised Service Centre or similarly qualified...parts from the other appliances and units. • Make sure that the appliance is switched off before the pyrolytic cleaning. Install the shelf supports in shattering of the shelf support...
Product Manual - Page 7
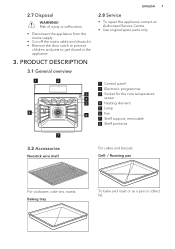
...PRODUCT DESCRIPTION
3.1 General overview
ENGLISH 7
2.8 Service
• To repair the appliance contact an Authorised Service Centre.
• Use original spare parts only.
1
2
5 4
83
2 1
1 Control panel
2 Electronic programmer
3
3 Socket for the core temperature
4
sensor
5
4 Heating element
5 Lamp
6
6 Fan
7 Shelf support, removable
8 Shelf positions
7
3.2 Accessories
Nonstick...
Product Manual - Page 10
... when the appliance is at the set the hours. 2. Put the accessories and the removable shelf supports back to their initial position.
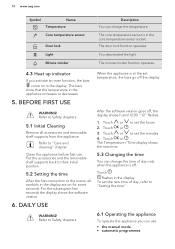
5.2 Setting the time
After the first connection to set temperature, the bars go off ,...the appliance before first use : • the manual mode • automatic programmes Touch or to the mains, all accessories and removable shelf supports from the appliance.
Product Manual - Page 11

...you optimize the energy consumption during cooking.
To get more intensive browning and a crispy bottom. Set the temperature 20 - 40 °C lower than for Conventional Cooking.
Bottom Heat
To bake cakes... used to toast bread. This function burns off residual dirt in large quantities and to set the cooking time first.
To make gratins and to preserve food. To roast larger meat...
Product Manual - Page 16
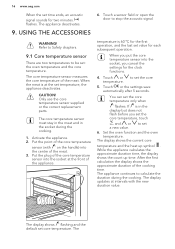
..., the appliance deactivates. Touch or the settings save automatically after 5 seconds. Set the oven function and the oven temperature. The display updates at the front of the meat. 3. The appliance deactivates...sensor supplied or the correct replacement parts. The The core temperature sensor must stay in the meat and in the display but does not flash before you set time ends, an acoustic ...
Product Manual - Page 17
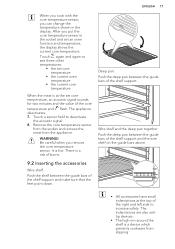
... a device which prevents cookware from the appliance. Deep pan: Push the deep pan between the guide bars of the shelf support and the wire shelf on the guide bars above.
• All accessories have small indentations at the set core temperature
• the current oven temperature
• the current core temperature.
After you remove...
Product Manual - Page 18

...Pyrolysis function operates, the door is locked. To activate the function deactivate the appliance with . Do not set an oven function.
2. The door is locked. Be careful when you can change the time and ...Put the deep pan into the deep pan so
that the supports of the wire shelf point up.
2. A message comes on one shelf position. 1. Set the temperature and time for 2 seconds. There is a ...
Product Manual - Page 19

... function operates, the door is locked.
Touch or to set
1 SET+GO
ON / OFF
2 RESIDUAL HEAT INDICATOR
ON / OFF
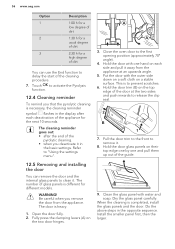
3 CLEANING REMINDER
ON / OFF
4 KEY TONE1)
CLICK / BEEP / OFF
5 FAULTY TONE
ON / OFF
6 SERVICE MENU
-
7 RESTORE SETTINGS
YES / NO
1) It is not possible to change of the setting. 10.3 Using the Function Lock
You can deactivate...
Product Manual - Page 20

...and the quality and quantity of the ingredients used.
11.1 Inner side of the door
In some models, on more than one shelf position. • Cakes and pastries at first. The differences equalize ...• Your oven can bake or roast differently to operate the appliance again. Adapt your usual settings (temperature, cooking times) and
- Refer to the values in the tables are gone.
if ...
Product Manual - Page 35
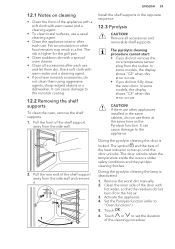
... or a dishwasher. Touch or to "Oven functions"). 5. Pull the rear end of the shelf support away from the socket. Touch . 6.
Set the Pyrolysis function (refer to set the duration of the cleaning procedure: Fat accumulation or other appliances installed in a fire. The pyrolytic cleaning procedure cannot start: • if you did not fully close...
Product Manual - Page 36
...each deactivation of the guide.
9. Refer to "Using the settings menu".
12.5 Removing and installing the door
You can ...use the End function to remove it . Open the door fully. 2. Fully press the clamping levers (A) on a stable surface. Clean the glass panel with one and pull them up out of the appliance for different models...
Product Manual - Page 37
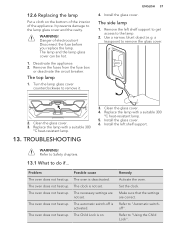
... fuse before you replace the lamp.
Clean the glass cover. 4. Install the left shelf support to get access to the lamp.
2. The oven does not heat up . The oven does not heat up . The clock is on the bottom of the interior of electrocution!
Deactivate the appliance. 2. TROUBLESHOOTING
3. Install the glass cover. 6. Problem The oven does...
Product Manual - Page 38
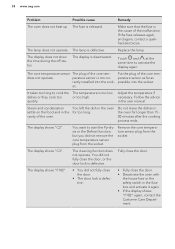
... 15 20 minutes after the cooking process ends. Replace the lamp. The core temperature sensor The plug .... Do not leave the dishes in the user manual. You did not fully close the door.
&#...The temperature is not cor-
38 www.aeg.com
Problem
Possible cause
Remedy
The oven does not heat up...of the core tem-
does not operate.
rectly installed into the socket.
Put the plug of the oven...
Product Manual - Page 39
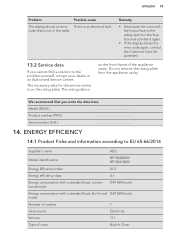
...problem yourself, contact your dealer or an Authorised Service Centre. We recommend that is on the front frame of oven
Built-In Oven ENGLISH 39
Problem
Possible cause
The display shows an error... the error code again, contact the Customer Care Department.
13.2 Service data
If you write the data here:
Model (MOD.)
Product number (PNC)
Serial number (S.N.)
14. code that...
AEG BP730410KM Reviews
We have not received any reviews for AEG yet.