
Specification Sheet
Page 1
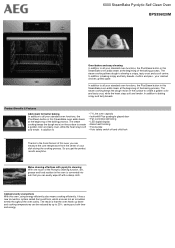
... glazed door • Fan controlled defrosting • LED digital display • Base heat finishing • Food probe • Auto safety switch off with pyrolytic cleaning With one touch of the Pyrolytic cleaning function, dirt, grease and food residue in this SteamBake oven adds steam at the beginning of the baking process. The result is converted into ash that the oven heats up faster and cooking temperatures can...
... glazed door • Fan controlled defrosting • LED digital display • Base heat finishing • Food probe • Auto safety switch off with pyrolytic cleaning With one touch of the Pyrolytic cleaning function, dirt, grease and food residue in this SteamBake oven adds steam at the beginning of the baking process. The result is converted into ash that the oven heats up faster and cooking temperatures can...
Specification Sheet
Page 2
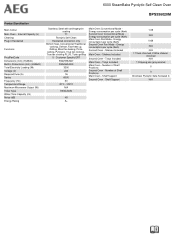
... Dimensions (mm) (HxWxD) Total Electricity Loading (W) Voltage (V) Required Fuse (A) Series Frequency (Hz) Temperature Range Maximum Microwave Output (W) Timer Type Water Tank Capacity (ml) Noise (dB) Energy Rating Stainless Steel with antifingerprint coating 71 Pyrolytic Self Clean Hardwired connection only Bottom heat, Conventional/Traditional cooking, Defrost, Fast heat up, Grilling, Moist fan baking, Pizza setting, Pyrolysis, True fan cooking, True fan cooking PLUS, Turbo grilling S - Shelves Included Main Oven - Shelves Included Second Oven - Trays Included Main Oven - Shelf Support...
... Dimensions (mm) (HxWxD) Total Electricity Loading (W) Voltage (V) Required Fuse (A) Series Frequency (Hz) Temperature Range Maximum Microwave Output (W) Timer Type Water Tank Capacity (ml) Noise (dB) Energy Rating Stainless Steel with antifingerprint coating 71 Pyrolytic Self Clean Hardwired connection only Bottom heat, Conventional/Traditional cooking, Defrost, Fast heat up, Grilling, Moist fan baking, Pizza setting, Pyrolysis, True fan cooking, True fan cooking PLUS, Turbo grilling S - Shelves Included Main Oven - Shelves Included Second Oven - Trays Included Main Oven - Shelf Support...

User Manual
Page 4
... switched off before replacing the lamp to avoid the possibility of electric shock. • Do not use the appliance before the pyrolytic cleaning. SAFETY INSTRUCTIONS 2.1 Installation WARNING! Cabinet minimum height (Cabinet under the worktop minimum height) Cabinet width 600 (600) mm 550 mm 4 www.aeg.com • Before carrying out any maintenance, disconnect the appliance from the power supply. • WARNING: Ensure that meets installation requirements...
... switched off before replacing the lamp to avoid the possibility of electric shock. • Do not use the appliance before the pyrolytic cleaning. SAFETY INSTRUCTIONS 2.1 Installation WARNING! Cabinet minimum height (Cabinet under the worktop minimum height) Cabinet width 600 (600) mm 550 mm 4 www.aeg.com • Before carrying out any maintenance, disconnect the appliance from the power supply. • WARNING: Ensure that meets installation requirements...
User Manual
Page 6
... finish the cooking. - Heat and moisture can cause a mixture of ingredients with alcohol can build up behind a furniture panel (e.g. It must not be careful when you use of alcohol and air. • Do not let sparks or open the door. • Do not put aluminium foil directly on the performance of detergent. 2.5 Pyrolytic cleaning WARNING! Only use the appliance as a work surface...
... finish the cooking. - Heat and moisture can cause a mixture of ingredients with alcohol can build up behind a furniture panel (e.g. It must not be careful when you use of alcohol and air. • Do not let sparks or open the door. • Do not put aluminium foil directly on the performance of detergent. 2.5 Pyrolytic cleaning WARNING! Only use the appliance as a work surface...
User Manual
Page 7
... not use it . • Remove the door catch to the localized temperature changes in operation. • Non-stick surfaces on pots, pans, trays, utensils etc., can be also a source for household appliances only. Risk of electric shock. • The type of light bulb or halogen lamp used for this appliance is in the vicinity of all Pyrolytic Ovens and can release fumes from cooking...
... not use it . • Remove the door catch to the localized temperature changes in operation. • Non-stick surfaces on pots, pans, trays, utensils etc., can be also a source for household appliances only. Risk of electric shock. • The type of light bulb or halogen lamp used for this appliance is in the vicinity of all Pyrolytic Ovens and can release fumes from cooking...
User Manual
Page 9
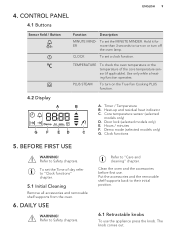
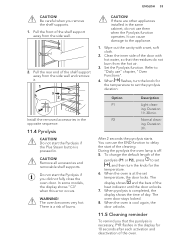
... True Fan Cooking PLUS function. 4.2 Display A B G F ED C A. DAILY USE WARNING! Clean the oven and the accessories before first use the appliance press the knob. Door lock (selected models only) E. Hours / minutes F. Demo mode (selected models only) G. BEFORE FIRST USE WARNING! CLOCK To set the MINUTE MINDER. Timer / Temperature B. 4. Use only while a heating function operates. Core temperature sensor (selected models only) D. Clock functions 5. Refer to "Clock functions" chapter. 5.1 Initial Cleaning Remove all accessories and removable shelf supports from...
... True Fan Cooking PLUS function. 4.2 Display A B G F ED C A. DAILY USE WARNING! Clean the oven and the accessories before first use the appliance press the knob. Door lock (selected models only) E. Hours / minutes F. Demo mode (selected models only) G. BEFORE FIRST USE WARNING! CLOCK To set the MINUTE MINDER. Timer / Temperature B. 4. Use only while a heating function operates. Core temperature sensor (selected models only) D. Clock functions 5. Refer to "Clock functions" chapter. 5.1 Initial Cleaning Remove all accessories and removable shelf supports from...
User Manual
Page 10
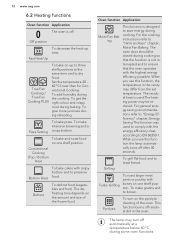
... and tips" chapter, Moist Fan Baking. The lamp may turn on the pyrolytic cleaning of the frozen food. Pizza Setting To bake pizza. To bake on one shelf position. To bake and roast food on the amount and size of the oven. For the cooking instructions refer to toast bread. ing power may differ from the set temperature. Turbo Grilling To roast larger meat joints or poultry with...
... and tips" chapter, Moist Fan Baking. The lamp may turn on the pyrolytic cleaning of the frozen food. Pizza Setting To bake pizza. To bake on one shelf position. To bake and roast food on the amount and size of the oven. For the cooking instructions refer to toast bread. ing power may differ from the set temperature. Turbo Grilling To roast larger meat joints or poultry with...

User Manual
Page 11
... oven when the Fast heat up indicator When the oven function operates, the bars in the display appear one by one when the temperature in the oven and close the oven door. 3. To turn off the oven, turn the knobs to the off position. Risk of the Plus Steam button turns off the oven, press the Plus Steam button , turn off . 7. Fill the cavity embossment with care after the function stops...
... oven when the Fast heat up indicator When the oven function operates, the bars in the display appear one by one when the temperature in the oven and close the oven door. 3. To turn off the oven, turn the knobs to the off position. Risk of the Plus Steam button turns off the oven, press the Plus Steam button , turn off . 7. Fill the cavity embossment with care after the function stops...

User Manual
Page 12
... until starts to stop the signal. 5. The oven turns off automatically. 4. "00" flashes. 3. Set a heating function. 2. Turn the knob for the temperature to set the minutes for 2 minutes. This function has no effect on the operation of DURATIME DELAY TION and END function. Press to confirm. Turn the knob for the temperature to the off position. 7.5 Setting the TIME DELAY function 1. MINUTE MINDER Use to confirm. Turn the...
... until starts to stop the signal. 5. The oven turns off automatically. 4. "00" flashes. 3. Set a heating function. 2. Turn the knob for the temperature to set the minutes for 2 minutes. This function has no effect on the operation of DURATIME DELAY TION and END function. Press to confirm. Turn the knob for the temperature to the off position. 7.5 Setting the TIME DELAY function 1. MINUTE MINDER Use to confirm. Turn the...
User Manual
Page 13
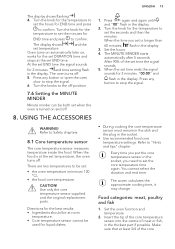
... in the display. 3. USING THE ACCESSORIES WARNING! Use only the core temperature sensor supplied and the original replacement parts. When the set END time the signal sounds for 2 minutes. At the set time ends the signal sounds for 2 minutes. Turn the knob for liquid dishes. 1. Press any button or open the oven door to be used for the temperature to stop the signal. 6. Press any button to set : • the oven temperature (minimum...
... in the display. 3. USING THE ACCESSORIES WARNING! Use only the core temperature sensor supplied and the original replacement parts. When the set END time the signal sounds for 2 minutes. At the set time ends the signal sounds for 2 minutes. Turn the knob for liquid dishes. 1. Press any button or open the oven door to be used for the temperature to stop the signal. 6. Press any button to set : • the oven temperature (minimum...
User Manual
Page 14
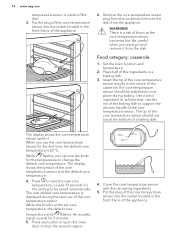
... and remove the dish from the dish. Set the oven function and temperature. 2. The display shows the symbol of the core temperature sensor. The new default core temperature is a risk of the core temperature sensor. Press any button or open the oven door to achieve that. There is displayed during baking. 14 www.aeg.com temperature sensor is inside of the core temperature sensor into the socket located in a baking dish. 3. Food category: casserole 1. Cover...
... and remove the dish from the dish. Set the oven function and temperature. 2. The display shows the symbol of the core temperature sensor. The new default core temperature is a risk of the core temperature sensor. Press any button or open the oven door to achieve that. There is displayed during baking. 14 www.aeg.com temperature sensor is inside of the core temperature sensor into the socket located in a baking dish. 3. Food category: casserole 1. Cover...

User Manual
Page 15
There is displayed during the next use of the core temperature sensor. Be careful when you unplug it and remove it from the appliance. An acoustic signal sounds for the setting to stop the acoustic signal. 8. Deep pan: Push the deep pan between the guide bars of the shelf support and the wire shelf on the guide bars above. WARNING! the display shows the set core temperature, the...
There is displayed during the next use of the core temperature sensor. Be careful when you unplug it and remove it from the appliance. An acoustic signal sounds for the setting to stop the acoustic signal. 8. Deep pan: Push the deep pan between the guide bars of the shelf support and the wire shelf on the guide bars above. WARNING! the display shows the set core temperature, the...

User Manual
Page 17
...; the numbers of the ingredients used. 10.1 Cooking recommendations Your oven may bake or roast differently to the oven you with the functions: core temperature sensor, Light, Duration, End. 9.5 Cooling fan When the oven operates, the cooling fan turns on , the Function Lock switches automatically to keep the surfaces of the oven cool. Refer to "Using the Child Lock". If you turn off the oven, the cooling fan can find the settings for a special...
...; the numbers of the ingredients used. 10.1 Cooking recommendations Your oven may bake or roast differently to the oven you with the functions: core temperature sensor, Light, Duration, End. 9.5 Cooling fan When the oven operates, the cooling fan turns on , the Function Lock switches automatically to keep the surfaces of the oven cool. Refer to "Using the Child Lock". If you turn off the oven, the cooling fan can find the settings for a special...
User Manual
Page 28
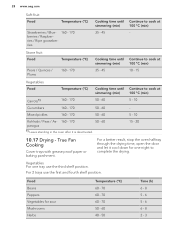
... - 60 1) Leave standing in the oven after it cool down for sour Mushrooms Herbs Temperature (°C) 60 - 70 60 - 70 60 - 70 50 - 60 40 - 50 Time (h) 6 - 8 5 - 6 5 - 6 6 - 8 2 - 3 True Fan Cooking Cover trays with grease proof paper or baking parchment. Food Beans Peppers Vegetables for one tray use the first and fourth shelf position. For 2 trays use the third shelf position. Stone fruit...
... - 60 1) Leave standing in the oven after it cool down for sour Mushrooms Herbs Temperature (°C) 60 - 70 60 - 70 60 - 70 50 - 60 40 - 50 Time (h) 6 - 8 5 - 6 5 - 6 6 - 8 2 - 3 True Fan Cooking Cover trays with grease proof paper or baking parchment. Food Beans Peppers Vegetables for one tray use the first and fourth shelf position. For 2 trays use the third shelf position. Stone fruit...
User Manual
Page 33
... oven is a risk of the heat indicator until the door unlocks. 7. If there are other appliances installed in the same cabinet, do not burn from the side wall and remove it. 1 2 Install the removed accessories in the display for 10 seconds after each activation and deactivation of the cleaning. ENGLISH 33 CAUTION! Pull the front of the shelf support away from the hot air. 3. Remove...
... oven is a risk of the heat indicator until the door unlocks. 7. If there are other appliances installed in the same cabinet, do not burn from the side wall and remove it. 1 2 Install the removed accessories in the display for 10 seconds after each activation and deactivation of the cleaning. ENGLISH 33 CAUTION! Pull the front of the shelf support away from the hot air. 3. Remove...
User Manual
Page 34
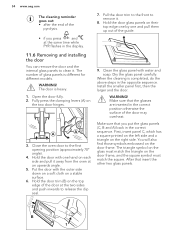
...). 4. The number of the door may overheat. Open the door fully. 2. Hold the door with water and soap. The triangle symbol on the glass must match the square. Close the oven door to remove it . Hold the door trim (B) on the two door hinges. WARNING! Fully press the clamping levers (A) on the top edge of the door at an upwards angle. 5. A A 3. Clean the glass panel with one...
...). 4. The number of the door may overheat. Open the door fully. 2. Hold the door with water and soap. The triangle symbol on the glass must match the square. Close the oven door to remove it . Hold the door trim (B) on the two door hinges. WARNING! Fully press the clamping levers (A) on the top edge of the door at an upwards angle. 5. A A 3. Clean the glass panel with one...
User Manual
Page 35
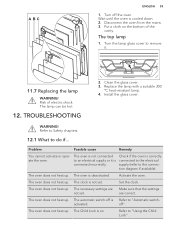
... settings are not set . Turn off ". Clean the glass cover. 3. The oven is not connected to remove it is not set . Activate the oven. The clock is connected incorrectly. activated. Refer to the connection diagram if available). ABC ENGLISH 35 1. Wait until the oven is deactivated. Disconnect the oven from the mains. 3. Put a cloth on . Turn the lamp glass cover to an electrical supply or it . 11.7 Replacing the lamp WARNING! TROUBLESHOOTING 2. Install the glass cover...
... settings are not set . Turn off ". Clean the glass cover. 3. The oven is not connected to remove it is not set . Activate the oven. The clock is connected incorrectly. activated. Refer to the connection diagram if available). ABC ENGLISH 35 1. Wait until the oven is deactivated. Disconnect the oven from the mains. 3. Put a cloth on . Turn the lamp glass cover to an electrical supply or it . 11.7 Replacing the lamp WARNING! TROUBLESHOOTING 2. Install the glass cover...

User Manual
Page 36
... the cooking process ends. code that the fuse is defective. The display shows "C2". The lamp does not operate. Adjust the temperature if necessary. If the fuse is blown. Replace the lamp. perature sensor is an electrical fault. The cleaning function does not operate. Fully close the door, or the door lock is the cause of the core temperature sensor as far as possible into the sock- Remove the core temperature sensor plug...
... the cooking process ends. code that the fuse is defective. The display shows "C2". The lamp does not operate. Adjust the temperature if necessary. If the fuse is blown. Replace the lamp. perature sensor is an electrical fault. The cleaning function does not operate. Fully close the door, or the door lock is the cause of the core temperature sensor as far as possible into the sock- Remove the core temperature sensor plug...

User Manual
Page 37
... the display shows "C4". You want to stop the True Fan Cooking PLUS function. Press the Plus Steam button again. ENGLISH 37 Problem Possible cause Remedy There is no good cooking performance using the function: True Fan Cooking PLUS. You did not turn on the func- There is no good cooking performance using the function: True Fan Cooking PLUS. Push the Plus Steam button to activate the cleaning function...
... the display shows "C4". You want to stop the True Fan Cooking PLUS function. Press the Plus Steam button again. ENGLISH 37 Problem Possible cause Remedy There is no good cooking performance using the function: True Fan Cooking PLUS. You did not turn on the func- There is no good cooking performance using the function: True Fan Cooking PLUS. Push the Plus Steam button to activate the cleaning function...
User Manual
Page 39
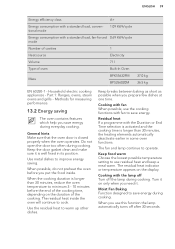
... measuring performance. 13.2 Energy saving The oven contains features which help you use residual heat and keep a meal warm. Moist Fan Baking Function designed to save energy during cooking. The residual heat inside . When you save energy during everyday cooking. Residual heat If a programme with a standard load, fan-forced 0.69 kWh/cycle mode Number of cavities 1 Heat source Electricity Volume 71 l Type of the cooking time, depending on the display. Use...
... measuring performance. 13.2 Energy saving The oven contains features which help you use residual heat and keep a meal warm. Moist Fan Baking Function designed to save energy during cooking. The residual heat inside . When you save energy during everyday cooking. Residual heat If a programme with a standard load, fan-forced 0.69 kWh/cycle mode Number of cavities 1 Heat source Electricity Volume 71 l Type of the cooking time, depending on the display. Use...


