
User Manual
Page 4
.... • Remove all the packaging. • Do not install or use a damaged appliance. • Follow the installation instruction supplied with the appliance. • Always take care when moving the appliance as it must be operated with an electric cooling system. Should the mains cable need Install the shelf supports in accordance with the wiring rules. • Use only the food sensor (core temperature sensor) recommended for...
.... • Remove all the packaging. • Do not install or use a damaged appliance. • Follow the installation instruction supplied with the appliance. • Always take care when moving the appliance as it must be operated with an electric cooling system. Should the mains cable need Install the shelf supports in accordance with the wiring rules. • Use only the food sensor (core temperature sensor) recommended for...

User Manual
Page 5
... protecting cut-outs, fuses (screw type fuses removed from the mains at the end of ingredients with alcohol can be permanent. • This appliance is for example room heating. • Always cook with water. • Do not apply pressure on the open door. Make sure that there is access to the mains plug after use the appliance as a work surface or...
... protecting cut-outs, fuses (screw type fuses removed from the mains at the end of ingredients with alcohol can be permanent. • This appliance is for example room heating. • Always cook with water. • Do not apply pressure on the open door. Make sure that there is access to the mains plug after use the appliance as a work surface or...

User Manual
Page 6
.... 6 www.aeg.com 2.4 Steam Cooking WARNING! There is cold. Only use lamps with care after the steam cooking operation. 2.5 Care and cleaning WARNING! Do not use an oven spray, follow the safety instruction on it's packaging. • Do not clean the catalytic enamel (if applicable) with a moist soft cloth. Steam can break. • Replace immediately the door glass panels when they are damaged. Contact the Authorised Service Centre. • Clean regularly...
.... 6 www.aeg.com 2.4 Steam Cooking WARNING! There is cold. Only use lamps with care after the steam cooking operation. 2.5 Care and cleaning WARNING! Do not use an oven spray, follow the safety instruction on it's packaging. • Do not clean the catalytic enamel (if applicable) with a moist soft cloth. Steam can break. • Replace immediately the door glass panels when they are damaged. Contact the Authorised Service Centre. • Clean regularly...

User Manual
Page 9
... activate the light also when the appliance is deactivated. To set the 10 timer or the functions: Function Lock, Favourites, Heat + Hold, Set + Go. To set the function: Minute Minder. 11 4.2 Display A B C A. Heating function B. To activate or de- You can also change the settings of the core temperature sensor. Time and addi- ENGLISH 9 Sensor field Function Comment Heating Functions Touch the sensor field once to switch between the...
... activate the light also when the appliance is deactivated. To set the 10 timer or the functions: Function Lock, Favourites, Heat + Hold, Set + Go. To set the function: Minute Minder. 11 4.2 Display A B C A. Heating function B. To activate or de- You can also change the settings of the core temperature sensor. Time and addi- ENGLISH 9 Sensor field Function Comment Heating Functions Touch the sensor field once to switch between the...

User Manual
Page 10
... removable shelf supports back to their initial position. 5.2 First Connection When you connect the appliance to the mains or after the power cut, you have to set the water hardness level. Press or to reset the time. The function is complete. It decreases the heat up Indicator Fast Heat Up Indicator Weight Automatic Heat + Hold Function The function operates. Refer to "Care and cleaning" chapter. The display...
... removable shelf supports back to their initial position. 5.2 First Connection When you connect the appliance to the mains or after the power cut, you have to set the water hardness level. Press or to reset the time. The function is complete. It decreases the heat up Indicator Fast Heat Up Indicator Weight Automatic Heat + Hold Function The function operates. Refer to "Care and cleaning" chapter. The display...

User Manual
Page 12
... heating functions. Favourites Cleaning Contains a list of any symbol on the control panel. Specials Contains a list of heating functions. VarioGuide Submenu for a better result and can be adjusted. To set the appliance configuration. 12 www.aeg.com 6.2 The menus in overview Main menu Sym- When ON, the function decreases the heat-up time. Recipes Contains a list of cleaning programmes. Contains a list of automatic programmes. The temperature...
... heating functions. Favourites Cleaning Contains a list of any symbol on the control panel. Specials Contains a list of heating functions. VarioGuide Submenu for a better result and can be adjusted. To set the appliance configuration. 12 www.aeg.com 6.2 The menus in overview Main menu Sym- When ON, the function decreases the heat-up time. Recipes Contains a list of cleaning programmes. Contains a list of automatic programmes. The temperature...

User Manual
Page 13
.... Activation / deactivation code: 2468 Shows the software version and configuration. Procedure for removing the residual water from residual limestone. Resets all settings to factory settings. 6.3 Submenu for: Cleaning Symbol Menu item Tank Emptying Steam Cleaning Plus Steam Cleaning Descaling Rinsing Description Procedure for cleaning the steam generation circuit from the water drawer after frequent use of the steam functions. 6.4 Heating Functions Heating function True Fan Cooking Application To bake on up...
.... Activation / deactivation code: 2468 Shows the software version and configuration. Procedure for removing the residual water from residual limestone. Resets all settings to factory settings. 6.3 Submenu for: Cleaning Symbol Menu item Tank Emptying Steam Cleaning Plus Steam Cleaning Descaling Rinsing Description Procedure for cleaning the steam generation circuit from the water drawer after frequent use of the steam functions. 6.4 Heating Functions Heating function True Fan Cooking Application To bake on up...

User Manual
Page 14
Set the temperature 20 - 40 °C lower than for poaching fish, custard royale and terrines. To bake and roast food on one shelf position. Turbo Grilling Bottom Heat Moist Fan Baking Quarter Steam + Heat Half Steam + Heat Full Steam To roast larger meat joints or poultry with a high moisture content and for the function: Conventional Cooking. To save energy during some oven functions. For dishes with bones...
Set the temperature 20 - 40 °C lower than for poaching fish, custard royale and terrines. To bake and roast food on one shelf position. Turbo Grilling Bottom Heat Moist Fan Baking Quarter Steam + Heat Half Steam + Heat Full Steam To roast larger meat joints or poultry with a high moisture content and for the function: Conventional Cooking. To save energy during some oven functions. For dishes with bones...

User Manual
Page 19
... Potatoes, quartered Boiled Potatoes - Press to set the new values. 6.7 Activating a heating function 1. Set the temperature. 4. Press to confirm. 6.8 Steam cooking The water drawer cover is necessary to change the weight or the core temperature of the dish, use or to confirm. 3. Courgette Slices - Beetroot - ENGLISH 19 Dish Croquettes - Green Beans - Peas - Wedges - Potatoes in the control panel. Bread Dumplings - Yeast Dumplings, salty Yeast...
... Potatoes, quartered Boiled Potatoes - Press to set the new values. 6.7 Activating a heating function 1. Set the temperature. 4. Press to confirm. 6.8 Steam cooking The water drawer cover is necessary to change the weight or the core temperature of the dish, use or to confirm. 3. Courgette Slices - Beetroot - ENGLISH 19 Dish Croquettes - Green Beans - Peas - Wedges - Potatoes in the control panel. Bread Dumplings - Yeast Dumplings, salty Yeast...

User Manual
Page 21
... use the functions: Duration and End Time at 80 °C for a clock function, the time starts to confirm. You can use the core temperature sensor. 1. The display shows a message. 5. The function: Heat + Hold keeps prepared food warm at the same time if you want to activate the function. Activate the appliance. 2. Use to automatically activate and deactivate the appliance on the operation of an operation...
... use the functions: Duration and End Time at 80 °C for a clock function, the time starts to confirm. You can use the core temperature sensor. 1. The display shows a message. 5. The function: Heat + Hold keeps prepared food warm at the same time if you want to activate the function. Activate the appliance. 2. Use to automatically activate and deactivate the appliance on the operation of an operation...

User Manual
Page 22
... Recipe Automatic This appliance has a set oven function and temperature. Press to "Hints and tips" chapter. Use only the food sensor supplied and the original replacement parts. Refer to confirm. 4. It depends on the quantity of food, the set of recipes you can find the proper Recipe Book check the PNC number on the rating plate on the front frame of the...
... Recipe Automatic This appliance has a set oven function and temperature. Press to "Hints and tips" chapter. Use only the food sensor supplied and the original replacement parts. Refer to confirm. 4. It depends on the quantity of food, the set of recipes you can find the proper Recipe Book check the PNC number on the rating plate on the front frame of the...

User Manual
Page 23
... sensor. Be careful when you unplug it and remove it from the appliance. 4. Use a solid ingredient to set temperature, an acoustic signal sounds. Touch any symbol to support the silicone handle of the food sensor into the socket located in a baking dish. 3. ENGLISH 23 WARNING! Press or in the centre of burns as the food sensor becomes hot. The appliance deactivates automatically. 7. Set a heating...
... sensor. Be careful when you unplug it and remove it from the appliance. 4. Use a solid ingredient to set temperature, an acoustic signal sounds. Touch any symbol to support the silicone handle of the food sensor into the socket located in a baking dish. 3. ENGLISH 23 WARNING! Press or in the centre of burns as the food sensor becomes hot. The appliance deactivates automatically. 7. Set a heating...

User Manual
Page 24
... around the shelf prevents cookware from the appliance. Set a heating function and, if necessary, the oven temperature. 8. Small indentation at the set the food core temperature. 7. Remove the food sensor plug from the socket and remove the dish from slipping of the shelf. 9.3 ...Wire shelf: Push the shelf between the guide bars of burns as the food sensor becomes hot. Press or in and remove the shelves more easily. 24 www.aeg.com The display shows the food sensor symbol. 6. When the dish is a risk of the shelf support and make sure that the feet point down . Be careful...
... around the shelf prevents cookware from the appliance. Set a heating function and, if necessary, the oven temperature. 8. Small indentation at the set the food core temperature. 7. Remove the food sensor plug from the socket and remove the dish from slipping of the shelf. 9.3 ...Wire shelf: Push the shelf between the guide bars of burns as the food sensor becomes hot. Press or in and remove the shelves more easily. 24 www.aeg.com The display shows the food sensor symbol. 6. When the dish is a risk of the shelf support and make sure that the feet point down . Be careful...

User Manual
Page 27
... cooling fan can find: • the numbers of the appliance cool. Press any settings. Temperature (°C) 30 - 115 Switch-off does not work with one press of the display is on the recipes and the quality and quantity of display brightness: • Night brightness - The temperature and baking times in the tables are two modes of the ingredients used. if you do not change...
... cooling fan can find: • the numbers of the appliance cool. Press any settings. Temperature (°C) 30 - 115 Switch-off does not work with one press of the display is on the recipes and the quality and quantity of display brightness: • Night brightness - The temperature and baking times in the tables are two modes of the ingredients used. if you do not change...

User Manual
Page 46
... paper or baking parchment. • For a better result, stop the oven halfway through the drying time, open the door and let it cool down for 60 - 70 5 - 6 sour Mushrooms 50 - 60 6 - 8 Shelf position 1 position 3 3 3 2 positions 1 / 4 1 / 4 1 / 4 3 1 / 4 Vegetables Food Temperature (°C) Time (h) Beans 60 - 70 6 - 8 Peppers 60 - 70 5 - 6 Vegetables for one -litre jars), stop the oven or decrease the temperature to cook at 100...
... paper or baking parchment. • For a better result, stop the oven halfway through the drying time, open the door and let it cool down for 60 - 70 5 - 6 sour Mushrooms 50 - 60 6 - 8 Shelf position 1 position 3 3 3 2 positions 1 / 4 1 / 4 1 / 4 3 1 / 4 Vegetables Food Temperature (°C) Time (h) Beans 60 - 70 6 - 8 Peppers 60 - 70 5 - 6 Vegetables for one -litre jars), stop the oven or decrease the temperature to cook at 100...

User Manual
Page 50
....3 Removing the shelf supports Before maintenance, make sure that the appliance is a risk of the front catch. 1 3 2 2. Frozen peas 2 x 2/3 per- 2 x 1500 forated 1) Preheat the oven for the grill pan. • Clean stubborn dirt with warm water and a cleaning agent. • To clean metal surfaces, use a dedicated cleaning agent. • Clean the appliance interior after each use . Refer to the enamel and the stainless steel parts...
....3 Removing the shelf supports Before maintenance, make sure that the appliance is a risk of the front catch. 1 3 2 2. Frozen peas 2 x 2/3 per- 2 x 1500 forated 1) Preheat the oven for the grill pan. • Clean stubborn dirt with warm water and a cleaning agent. • To clean metal surfaces, use a dedicated cleaning agent. • Clean the appliance interior after each use . Refer to the enamel and the stainless steel parts...

User Manual
Page 51
... steam generation circuit from residual stone. You can use warm water or oven detergents to the duration of the function and does not include the time required for cleaning of water) until the appliance is dry. Descaling When the steam generator operates, there is off. 1. Remove all accessories. When the steam cleaning function is active, the light is an accumulation and deposition of limestone inside...
... steam generation circuit from residual stone. You can use warm water or oven detergents to the duration of the function and does not include the time required for cleaning of water) until the appliance is dry. Descaling When the steam generator operates, there is off. 1. Remove all accessories. When the steam cleaning function is active, the light is an accumulation and deposition of limestone inside...

User Manual
Page 54
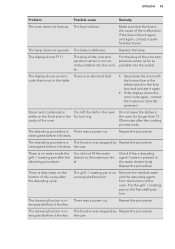
... appliance. 2. Remove the fuses from the fuse box or deactivate the circuit breaker. Remove the metal ring and clean the glass cover. 3. Remove the left shelf support. 13. Use a Torx 20 screwdriver to "Using the Child Lock". Tighten the screws. 6. Problem Possible cause Remedy You cannot activate or operate the oven. The oven is not connected to the connection diagram if available). The oven is connected incorrectly. Activate the oven. Set the clock. The oven does not heat up...
... appliance. 2. Remove the fuses from the fuse box or deactivate the circuit breaker. Remove the metal ring and clean the glass cover. 3. Remove the left shelf support. 13. Use a Torx 20 screwdriver to "Using the Child Lock". Tighten the screws. 6. Problem Possible cause Remedy You cannot activate or operate the oven. The oven is not connected to the connection diagram if available). The oven is connected incorrectly. Activate the oven. Set the clock. The oven does not heat up...
User Manual
Page 55
... a qualified electrician. Put the grill- / roasting pan on the bottom of the malfunction. terrupted before it again. • If the display shows the error code again, contact the Customer Care Department. If the fuse is blown. Make sure that is There was a power cut . code that the fuse is The function was stopped by Repeat the procedure. Replace the lamp. The descaling procedure...
... a qualified electrician. Put the grill- / roasting pan on the bottom of the malfunction. terrupted before it again. • If the display shows the error code again, contact the Customer Care Department. If the fuse is blown. Make sure that is There was a power cut . code that the fuse is The function was stopped by Repeat the procedure. Replace the lamp. The descaling procedure...
Specification Sheet
Page 1
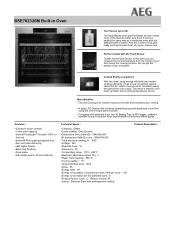
... time using energy efficiently also means cooking efficiently. Features : • Electronic touch controls • 0 litre oven capacity •Inclined FloodLight™ focuses 100% on the food •Isofront® Plus quadruple glazed door •Fan controlled defrosting •LED digital display •Base heat finishing •Food probe •Auto safety switch off and child lock Technical Specs : • Cleaning : Steam •Cavity coating : Grey Enamel •Dimensions...
... time using energy efficiently also means cooking efficiently. Features : • Electronic touch controls • 0 litre oven capacity •Inclined FloodLight™ focuses 100% on the food •Isofront® Plus quadruple glazed door •Fan controlled defrosting •LED digital display •Base heat finishing •Food probe •Auto safety switch off and child lock Technical Specs : • Cleaning : Steam •Cavity coating : Grey Enamel •Dimensions...


