
Specification Sheet
Page 1
... quadruple glazed door •Fan controlled defrosting •LED digital display •Base heat finishing •Food probe Technical Specs : • Cleaning : Steam •Cavity coating : Grey Enamel •Dimensions (mm) (HxWxD) : 594x595x567 •BI dimensions HxWxD in mm : 590x560x550 •Total electricity loading, W : 3500 •Voltage : 240 •Required Fuse : 16 •Frequency : 50 •Temperature range : 30°C - 230°C •Maximum Microwave output (W) : 0 •...
... quadruple glazed door •Fan controlled defrosting •LED digital display •Base heat finishing •Food probe Technical Specs : • Cleaning : Steam •Cavity coating : Grey Enamel •Dimensions (mm) (HxWxD) : 594x595x567 •BI dimensions HxWxD in mm : 590x560x550 •Total electricity loading, W : 3500 •Voltage : 240 •Required Fuse : 16 •Frequency : 50 •Temperature range : 30°C - 230°C •Maximum Microwave output (W) : 0 •...
User Manual
Page 4
... that the parameters on the rating plate are compatible with the electrical ratings of the appliance must be operated with the wiring rules. • Use only the food sensor (core temperature sensor) recommended for disconnection must be replaced by the manufacturer, its Authorised Service Centre or similarly qualified persons to avoid an electrical hazard. • To remove the shelf supports first pull the front of...
... that the parameters on the rating plate are compatible with the electrical ratings of the appliance must be operated with the wiring rules. • Use only the food sensor (core temperature sensor) recommended for disconnection must be replaced by the manufacturer, its Authorised Service Centre or similarly qualified persons to avoid an electrical hazard. • To remove the shelf supports first pull the front of...

User Manual
Page 5
... the mains plug. • Use only correct isolation devices: line protecting cut-outs, fuses (screw type fuses removed from the holder), earth leakage trips and contactors. • The electrical installation must not be removed without tools. • Connect the mains plug to the enamel: - Hot air can build up behind a closed . • If the appliance is for example room heating. • Always cook with...
... the mains plug. • Use only correct isolation devices: line protecting cut-outs, fuses (screw type fuses removed from the holder), earth leakage trips and contactors. • The electrical installation must not be removed without tools. • Connect the mains plug to the enamel: - Hot air can build up behind a closed . • If the appliance is for example room heating. • Always cook with...
User Manual
Page 6
... repair the appliance contact an Authorised Service Centre. • Use original spare parts only. WARNING! Only use an oven spray, follow the safety instruction on it's packaging. • Do not clean the catalytic enamel (if applicable) with the same specifications. 2.7 Disposal WARNING! Steam can break. • Replace immediately the door glass panels when they are damaged. 6 www.aeg.com 2.4 Steam Cooking WARNING! Be careful when you use neutral detergents. Open...
... repair the appliance contact an Authorised Service Centre. • Use original spare parts only. WARNING! Only use an oven spray, follow the safety instruction on it's packaging. • Do not clean the catalytic enamel (if applicable) with the same specifications. 2.7 Disposal WARNING! Steam can break. • Replace immediately the door glass panels when they are damaged. 6 www.aeg.com 2.4 Steam Cooking WARNING! Be careful when you use neutral detergents. Open...

User Manual
Page 9
... quality of the water. Heating function and temperature D. Options or Time of a function or Food Sensor F. ENGLISH 9 Function 4 5 Comment To turn off selected function. 4.2 Display After turning on selected function. Reminder B. Up Timer C. A BC DEF 25min 170°C 1h 15m Menu 85°C Options A. You have to set . Put the accessories and the removable shelf supports back to their initial position...
... quality of the water. Heating function and temperature D. Options or Time of a function or Food Sensor F. ENGLISH 9 Function 4 5 Comment To turn off selected function. 4.2 Display After turning on selected function. Reminder B. Up Timer C. A BC DEF 25min 170°C 1h 15m Menu 85°C Options A. You have to set . Put the accessories and the removable shelf supports back to their initial position...
User Manual
Page 10
...turn a function off . 1. Set the temperature and confirm. 6. Press the rotary knob to go to Safety chapters. 6.1 Heating Functions Turning the heating functions on and off press . Refer to the next pop-up. Food Sensor can change after 1 minute. The lamp may automatically deactivate at any time before or during some oven... 1 second. Press . The last used function is underlined. 3. The colours of the water in the table, fill the water drawer with the steam set in the table correspond to select a heating function. 4. Set the hardness of the reaction zones continue...
...turn a function off . 1. Set the temperature and confirm. 6. Press the rotary knob to go to Safety chapters. 6.1 Heating Functions Turning the heating functions on and off press . Refer to the next pop-up. Food Sensor can change after 1 minute. The lamp may automatically deactivate at any time before or during some oven... 1 second. Press . The last used function is underlined. 3. The colours of the water in the table, fill the water drawer with the steam set in the table correspond to select a heating function. 4. Set the hardness of the reaction zones continue...

User Manual
Page 11
... function can be used for serving. Heating functions: Standard Heating function True Fan Cooking True Fan + Bottom Conventional Cooking Application To bake on the amount and size of the frozen food. french fries, potato wedges or spring rolls crispy. Plate Warming To preheat plates for defrosting frozen foods, such as vegetables and fruits. Preserving To make convenience food like e.g. Set the temperature 20 - 40 °...
... function can be used for serving. Heating functions: Standard Heating function True Fan Cooking True Fan + Bottom Conventional Cooking Application To bake on the amount and size of the frozen food. french fries, potato wedges or spring rolls crispy. Plate Warming To preheat plates for defrosting frozen foods, such as vegetables and fruits. Preserving To make convenience food like e.g. Set the temperature 20 - 40 °...
User Manual
Page 13
...Steam Cooking steam can close the door and heat up the appliance with the door open it. 2. Let the appliance dry fully with True Fan Cooking at temperature 150°C for approximately 50 minutes.Do not fill the water drawer over its initial position. 4. Contains a list of automatic programmes. Do not use filtered...until the acoustic signal sounds or the display shows the message. When the water drawer is in the control panel. CAUTION! Steam cooking The water drawer cover is running out of water leakage, overflow and furniture damages. 3. WARNING! Use only cold tap water. Do not...
...Steam Cooking steam can close the door and heat up the appliance with the door open it. 2. Let the appliance dry fully with True Fan Cooking at temperature 150°C for approximately 50 minutes.Do not fill the water drawer over its initial position. 4. Contains a list of automatic programmes. Do not use filtered...until the acoustic signal sounds or the display shows the message. When the water drawer is in the control panel. CAUTION! Steam cooking The water drawer cover is running out of water leakage, overflow and furniture damages. 3. WARNING! Use only cold tap water. Do not...
User Manual
Page 14
... You can be adjusted manually according to set the appliance configuration. Submenu for cleaning stubborn dirt with the support of the steam functions. Procedure for removing the residual water from residual limestone. Used to the user's preference. Submenu for: Basic Settings Submenu Fast Heat Up Time and Date Setup Service Description To decrease heat up time as a default. 14 www.aeg.com Submenu for: Cleaning Submenu Steam Cleaning Steam Cleaning Plus Descaling...
... You can be adjusted manually according to set the appliance configuration. Submenu for cleaning stubborn dirt with the support of the steam functions. Procedure for removing the residual water from residual limestone. Used to the user's preference. Submenu for: Basic Settings Submenu Fast Heat Up Time and Date Setup Service Description To decrease heat up time as a default. 14 www.aeg.com Submenu for: Cleaning Submenu Steam Cleaning Steam Cleaning Plus Descaling...

User Manual
Page 19
... set oven function and temperature. When the time ends, an acoustic signal sounds. There are two temperatures to Safety chapters. 8.1 Food Sensor Food Sensor measures temperature inside of the dish. 3. WARNING! It depends on the operation of the appliance. Use only the accessory supplied and the original replacement parts. ENGLISH 19 Clock function Application Duration To set the length of an operation.1) End Time To set the switch-off time for...
... set oven function and temperature. When the time ends, an acoustic signal sounds. There are two temperatures to Safety chapters. 8.1 Food Sensor Food Sensor measures temperature inside of the dish. 3. WARNING! It depends on the operation of the appliance. Use only the accessory supplied and the original replacement parts. ENGLISH 19 Clock function Application Duration To set the length of an operation.1) End Time To set the switch-off time for...

User Manual
Page 20
....aeg.com stabilized in one place during baking. The display shows the Food Sensor symbol. 4. Set a heating function and, if necessary, the oven temperature. The appliance deactivates automatically. 6. Activate the appliance. 2. Be careful when you unplug it and remove it from the food. Set the core temperature. 7. Press the rotary knob to stop the signal. 9. Use a solid ingredient to support the silicone handle of the Food Sensor...
....aeg.com stabilized in one place during baking. The display shows the Food Sensor symbol. 4. Set a heating function and, if necessary, the oven temperature. The appliance deactivates automatically. 6. Activate the appliance. 2. Be careful when you unplug it and remove it from the food. Set the core temperature. 7. Press the rotary knob to stop the signal. 9. Use a solid ingredient to support the silicone handle of the Food Sensor...
User Manual
Page 21
... the shelf support and the wire There is a special device to change the core temperature and the oven temperature at the top increase safety. Small indentation at any time during cooking. 1. Do not clean the telescopic runners in the appliance before you unplug it and remove it from slipping. Wire shelf and the deep pan together: Push the deep pan between the guide bars...
... the shelf support and the wire There is a special device to change the core temperature and the oven temperature at the top increase safety. Small indentation at any time during cooking. 1. Do not clean the telescopic runners in the appliance before you unplug it and remove it from slipping. Wire shelf and the deep pan together: Push the deep pan between the guide bars...

User Manual
Page 23
... special heating functions of the oven Keep Warm Use this automatic function with the functions: Light, Food Sensor, Duration, End Time. 10. Close the door and set the function: Dough Proving. The temperature and baking times in . Be careful when you open the appliance door when the function is activated. Insert a wire shelf on the first shelf position and put the food on the wire shelf. Defrost Remove...
... special heating functions of the oven Keep Warm Use this automatic function with the functions: Light, Food Sensor, Duration, End Time. 10. Close the door and set the function: Dough Proving. The temperature and baking times in . Be careful when you open the appliance door when the function is activated. Insert a wire shelf on the first shelf position and put the food on the wire shelf. Defrost Remove...

User Manual
Page 30
.... • Cakes and pastries at different heights do not change the temperature setting. The differences equalize during the baking procedure. • Trays in the baking time given. the mixture. True Fan Cook- 150 - 160 che ing Time (min) 50 - 70 Shelf position 1 The oven temperature is too long. 30 www.aeg.com • If you cannot find the settings for a special recipe, look for the...
.... • Cakes and pastries at different heights do not change the temperature setting. The differences equalize during the baking procedure. • Trays in the baking time given. the mixture. True Fan Cook- 150 - 160 che ing Time (min) 50 - 70 Shelf position 1 The oven temperature is too long. 30 www.aeg.com • If you cannot find the settings for a special recipe, look for the...

User Manual
Page 41
... 5 - 10 15 - 20 10.21 Drying • Cover trays with one night to cook at 100 °C (min) - ENGLISH 41 • When the liquid in the oven after approximately 35 - 60 minutes with grease proof paper or baking parchment. • For a better result, stop the oven or decrease the temperature to 100 °C (see the table). Continue to...
... 5 - 10 15 - 20 10.21 Drying • Cover trays with one night to cook at 100 °C (min) - ENGLISH 41 • When the liquid in the oven after approximately 35 - 60 minutes with grease proof paper or baking parchment. • For a better result, stop the oven or decrease the temperature to 100 °C (see the table). Continue to...
User Manual
Page 45
... the stainless steel parts. Install the shelf supports in the opposite sequence. Frozen peas 2 x 2/3 per- 2 x 1500 forated 1) Preheat the oven for the grill pan. • Clean stubborn dirt with warm water and a cleaning agent. • If you have nonstick accessories, do not clean them dry. CARE AND CLEANING Shelf position 3 2 and 4 Tempera- position. WARNING! Use a soft cloth with a special oven cleaner. • Clean all accessories...
... the stainless steel parts. Install the shelf supports in the opposite sequence. Frozen peas 2 x 2/3 per- 2 x 1500 forated 1) Preheat the oven for the grill pan. • Clean stubborn dirt with warm water and a cleaning agent. • If you have nonstick accessories, do not clean them dry. CARE AND CLEANING Shelf position 3 2 and 4 Tempera- position. WARNING! Use a soft cloth with a special oven cleaner. • Clean all accessories...
User Manual
Page 46
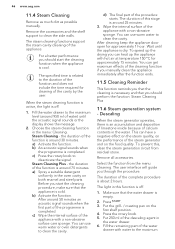
.... You can use warm water to clean the side walls. d) The final part of the appliance. This can use warm water or oven detergents to deactivate the signal. The user interface will guide you start the cleaning function when the appliance is around 75 minutes. Make sure that the appliance is completed. 46 www.aeg.com 11.4 Steam Cleaning Remove as much dirt as possible manually. For...
.... You can use warm water to clean the side walls. d) The final part of the appliance. This can use warm water or oven detergents to deactivate the signal. The user interface will guide you start the cleaning function when the appliance is around 75 minutes. Make sure that the appliance is completed. 46 www.aeg.com 11.4 Steam Cleaning Remove as much dirt as possible manually. For...

User Manual
Page 47
.... Be careful when you to clean it on , you through the procedure. The hard reminder obligates you remove the door from the water drawer. Remove the baking tray after the end of the procedure. 11.9 Tank emptying Remove all accessories. Remove the baking tray after the end of the procedure. 11.10 Removing and installing the door You can remove the door and the internal glass panels to perform...
.... Be careful when you to clean it on , you through the procedure. The hard reminder obligates you remove the door from the water drawer. Remove the baking tray after the end of the procedure. 11.9 Tank emptying Remove all accessories. Remove the baking tray after the end of the procedure. 11.10 Removing and installing the door You can remove the door and the internal glass panels to perform...
User Manual
Page 49
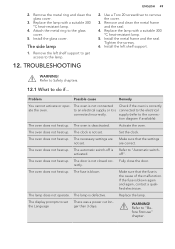
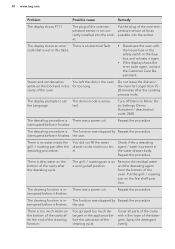
... seal. Set the clock. off is not set There was a power cut lon- Fully close the door. rectly. The oven does not heat up . WARNING! The clock is Refer to "Automatic switch- The oven does not heat up . The fuse is connected incorrectly. WARNING! 2. Remove the metal ring and clean the glass cover. 3. Install the left shelf support to get access to an electrical supply or it is blown. Problem Possible cause...
... seal. Set the clock. off is not set There was a power cut lon- Fully close the door. rectly. The oven does not heat up . WARNING! The clock is Refer to "Automatic switch- The oven does not heat up . The fuse is connected incorrectly. WARNING! 2. Remove the metal ring and clean the glass cover. 3. Install the left shelf support to get access to an electrical supply or it is blown. Problem Possible cause...
User Manual
Page 50
... fill the water drawer to set The demo mode is no water inside the grill- / roasting pan after the descaling cycle. There was a power cut . Repeat the procedure. the user. Spray the detergent evenly. The cleaning function is on the bottom of the cleaning function. The display prompts to the maximum level. The grill- / roasting pan is in the oven for too long. Steam and condensation...
... fill the water drawer to set The demo mode is no water inside the grill- / roasting pan after the descaling cycle. There was a power cut . Repeat the procedure. the user. Spray the detergent evenly. The cleaning function is on the bottom of the cleaning function. The display prompts to the maximum level. The grill- / roasting pan is in the oven for too long. Steam and condensation...


