Specification Sheet
Page 1
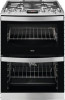
...; Conventional cooking • Gas safety thermocouples • Cooling fan • Isofront® plus triple glazed door • Main oven energy class: A • Top oven energy class: A Pan supports in larger volumes, or easily cook completely different dishes simultaneously. The catalytic cleaning activates at 200°C. Precise cooking. An acoustic signal sounds when everything's ready. Serve. It provides powerful, highly responsive heating. Start the countdown...
...; Conventional cooking • Gas safety thermocouples • Cooling fan • Isofront® plus triple glazed door • Main oven energy class: A • Top oven energy class: A Pan supports in larger volumes, or easily cook completely different dishes simultaneously. The catalytic cleaning activates at 200°C. Precise cooking. An acoustic signal sounds when everything's ready. Serve. It provides powerful, highly responsive heating. Start the countdown...
Specification Sheet
Page 2
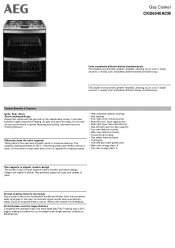
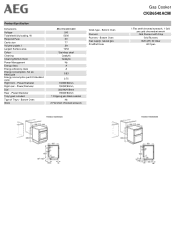
... type - Bottom Oven Gas supply: natural gas ProdPartCode Gas Cooker CKB6540ACM 1 Flat shelf chromed wirework, 1 Grill pan grid chromed wirework Grid Runners with Stop Grid Runners G20 (2H) 20 mbar All Open Power/Diameter Dial Rear - Product Specification Dimensions Voltage Total electricity loading, W Required Fuse Cavity size Volume usable, l Largest Surface area Colour Cleaning Cleaning Bottom Oven Power Management Energy class Energy efficiency class Energy consumption, hot air, kWh/cycle Energy...
... type - Bottom Oven Gas supply: natural gas ProdPartCode Gas Cooker CKB6540ACM 1 Flat shelf chromed wirework, 1 Grill pan grid chromed wirework Grid Runners with Stop Grid Runners G20 (2H) 20 mbar All Open Power/Diameter Dial Rear - Product Specification Dimensions Voltage Total electricity loading, W Required Fuse Cavity size Volume usable, l Largest Surface area Colour Cleaning Cleaning Bottom Oven Power Management Energy class Energy efficiency class Energy consumption, hot air, kWh/cycle Energy...
User Manual
Page 2
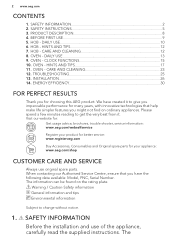
...: Get usage advice, brochures, trouble shooter, service information: www.aeg.com/webselfservice Register your product for better service: www.registeraeg.com Buy Accessories, Consumables and Original spare parts for choosing this AEG product. HOB - TROUBLESHOOTING 25 13. INSTALLATION...26 14. The DAILY USE...10 6. OVEN - HOB - CARE AND CLEANING 23 12. DAILY USE 13 9. OVEN - We have the following data available: Model, PNC, Serial Number. HINTS AND TIPS 17...
...: Get usage advice, brochures, trouble shooter, service information: www.aeg.com/webselfservice Register your product for better service: www.registeraeg.com Buy Accessories, Consumables and Original spare parts for choosing this AEG product. HOB - TROUBLESHOOTING 25 13. INSTALLATION...26 14. The DAILY USE...10 6. OVEN - HOB - CARE AND CLEANING 23 12. DAILY USE 13 9. OVEN - We have the following data available: Model, PNC, Serial Number. HINTS AND TIPS 17...
User Manual
Page 4
... appliance and its accessible parts become hot during use oven gloves to remove or put in order to avoid the possibility of an external timer or separate remote-control system. • WARNING: Unattended cooking on ships, boats or vessels. • Do not install the appliance behind a decorative door in accessories or ovenware. • Before maintenance, cut the power supply. • Ensure...
... appliance and its accessible parts become hot during use oven gloves to remove or put in order to avoid the possibility of an external timer or separate remote-control system. • WARNING: Unattended cooking on ships, boats or vessels. • Do not install the appliance behind a decorative door in accessories or ovenware. • Before maintenance, cut the power supply. • Ensure...
User Manual
Page 5
... to fall from the side walls. Always use safety gloves and enclosed footwear. • Do not pull the appliance by the handle. • The kitchen cabinet and the recess must be earthed. • Make sure that meets installation requirements. • Parts of the appliance carry current. Risk of fire and electric shock. • All electrical connections should be made by a qualified...
... to fall from the side walls. Always use safety gloves and enclosed footwear. • Do not pull the appliance by the handle. • The kitchen cabinet and the recess must be earthed. • Make sure that meets installation requirements. • Parts of the appliance carry current. Risk of fire and electric shock. • All electrical connections should be made by a qualified...
User Manual
Page 6
... sparks or open the door. • Open the appliance door carefully. The use of the installation. The isolation device must have an isolation device which evacuates the products of combustion. Risk of electrical shock. • This appliance is for the first time. • Do not put flammable products or items that are compatible. • Make sure that there is air circulation around...
... sparks or open the door. • Open the appliance door carefully. The use of the installation. The isolation device must have an isolation device which evacuates the products of combustion. Risk of electrical shock. • This appliance is for the first time. • Do not put flammable products or items that are compatible. • Make sure that there is air circulation around...
User Manual
Page 7
.... • Replace immediately the door glass panels when they are wiped dry after you remove the door from the mains socket. • Make sure the appliance is heavy! • Fat and food remaining in the room where the appliance is installed. • Use only stable cookware with a damaged bottom can be used for other purposes, for cooking purposes only. Steam produced...
.... • Replace immediately the door glass panels when they are wiped dry after you remove the door from the mains socket. • Make sure the appliance is heavy! • Fat and food remaining in the room where the appliance is installed. • Use only stable cookware with a damaged bottom can be used for other purposes, for cooking purposes only. Steam produced...
User Manual
Page 8
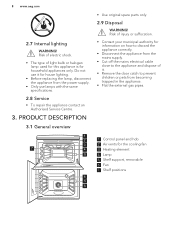
... from the power supply. • Only use lamps with the same specifications. 2.8 Service • To repair the appliance contact an Authorised Service Centre. 3. 8 www.aeg.com 2.7 Internal lighting WARNING! Do not use it . • Remove the door catch to the appliance and dispose of light bulb or halogen lamp used for this appliance is for the cooling fan 4 3 Heating element 5 4 Lamp 5 Shelf support, removable 6 Fan 7 Shelf positions 4 5 6 Risk of electric shock...
... from the power supply. • Only use lamps with the same specifications. 2.8 Service • To repair the appliance contact an Authorised Service Centre. 3. 8 www.aeg.com 2.7 Internal lighting WARNING! Do not use it . • Remove the door catch to the appliance and dispose of light bulb or halogen lamp used for this appliance is for the cooling fan 4 3 Heating element 5 4 Lamp 5 Shelf support, removable 6 Fan 7 Shelf positions 4 5 6 Risk of electric shock...
User Manual
Page 9
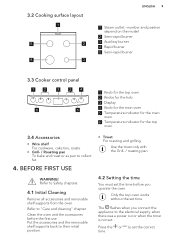
... was a power cut or when the timer is not set the time before the first use. Use the trivet only with the Grill- / roasting pan. 4.2 Setting the time You must set . Put the accessories and the removable shelf supports back to collect fat. 4. number and position depend on the model 2 Semi-rapid burner 3 Auxiliary burner 4 Rapid burner 5 Semi-rapid burner 3.3 Cooker control panel 1 2 3 2 4 6 5 1 Knob for the top oven 2 Knobs...
... was a power cut or when the timer is not set the time before the first use. Use the trivet only with the Grill- / roasting pan. 4.2 Setting the time You must set . Put the accessories and the removable shelf supports back to collect fat. 4. number and position depend on the model 2 Semi-rapid burner 3 Auxiliary burner 4 Rapid burner 5 Semi-rapid burner 3.3 Cooker control panel 1 2 3 2 4 6 5 1 Knob for the top oven 2 Knobs...
User Manual
Page 10
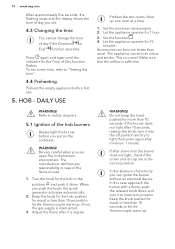
... light the burner before first use open fire in the correct position. When you put on the cookware. To set . 4.3 Changing the time You cannot change the time of day if the Duration or End function operates. Make sure that the airflow is normal. If after minimum 1 minute. 10 www.aeg.com After approximately five seconds, the flashing stops and the display...
... light the burner before first use open fire in the correct position. When you put on the cookware. To set . 4.3 Changing the time You cannot change the time of day if the Duration or End function operates. Make sure that the airflow is normal. If after minimum 1 minute. 10 www.aeg.com After approximately five seconds, the flashing stops and the display...
User Manual
Page 12
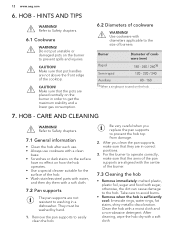
... operates. • Use a special cleaner suitable for the surface of the hob. • Wash stainless steel parts with water, and then dry them with a soft cloth. 7.2 Pan supports The pan supports are not above the front edge of burners. Remove the pan supports to Safety chapters. 6.1 Cookware WARNING! Refer to Safety chapters. 7.1 General information • Clean the hob after each use. • Always use...
... operates. • Use a special cleaner suitable for the surface of the hob. • Wash stainless steel parts with water, and then dry them with a soft cloth. 7.2 Pan supports The pan supports are not above the front edge of burners. Remove the pan supports to Safety chapters. 6.1 Cookware WARNING! Refer to Safety chapters. 7.1 General information • Clean the hob after each use. • Always use...
User Manual
Page 14
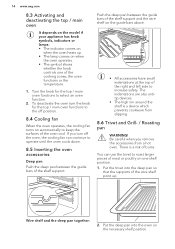
... the oven heats up . Be careful when you turn the knob for the top / main oven functions to increase safety. Wire shelf and the deep pan together: 2. To deactivate the oven turn off position. 8.4 Cooling fan When the oven operates, the cooling fan turns on one of the oven cool. Push the deep pan between the guide bars of the shelf support and the wire shelf on the guide bars...
... the oven heats up . Be careful when you turn the knob for the top / main oven functions to increase safety. Wire shelf and the deep pan together: 2. To deactivate the oven turn off position. 8.4 Cooling fan When the oven operates, the cooling fan turns on one of the oven cool. Push the deep pan between the guide bars of the shelf support and the wire shelf on the guide bars...
User Manual
Page 18
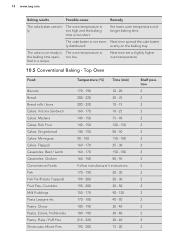
The cake batter is the baking time speci- The cake is not ready in a recipe. Set lower oven temperature and longer baking time. Next time set a slightly higher oven temperature. 10.5 Conventional Baking - evenly on the baking tray. too low. The oven temperature is too short. fied in The oven temperature is not even- Top Oven Food Biscuits Bread Bread rolls / buns Cakes: Victoria Sandwich Cakes: Madeira Cakes: Rich Fruit...
The cake batter is the baking time speci- The cake is not ready in a recipe. Set lower oven temperature and longer baking time. Next time set a slightly higher oven temperature. 10.5 Conventional Baking - evenly on the baking tray. too low. The oven temperature is too short. fied in The oven temperature is not even- Top Oven Food Biscuits Bread Bread rolls / buns Cakes: Victoria Sandwich Cakes: Madeira Cakes: Rich Fruit...
User Manual
Page 20
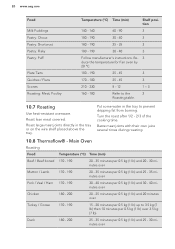
... 20 www.aeg.com Food Milk Puddings Pastry: Choux Pastry: Shortcrust Pastry: Flaky Pastry: Puff Plate Tarts Quiches / Flans Scones Roasting: Meat, Poultry Temperature (°C) Time (min) Shelf position 140 - 160 60 - 90 3 180 - 190 30 - 40 3 180 - 190 25 - 35 3 180 - 190 30 - 40 3 Follow manufacturer`s instructions. Turn the roast after 1/2 - 2/3 of the cooking time. Main Oven Roasting Food Temperature (°C) Time (min) Beef...
... 20 www.aeg.com Food Milk Puddings Pastry: Choux Pastry: Shortcrust Pastry: Flaky Pastry: Puff Plate Tarts Quiches / Flans Scones Roasting: Meat, Poultry Temperature (°C) Time (min) Shelf position 140 - 160 60 - 90 3 180 - 190 30 - 40 3 180 - 190 25 - 35 3 180 - 190 30 - 40 3 Follow manufacturer`s instructions. Turn the roast after 1/2 - 2/3 of the cooking time. Main Oven Roasting Food Temperature (°C) Time (min) Beef...
User Manual
Page 24
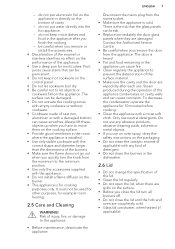
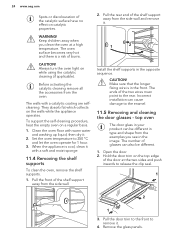
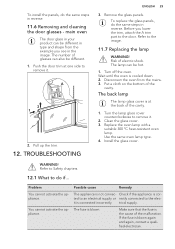
... shape from the oven. Open the door. 2. Set the oven temperature to the enamel. 11.5 Removing and cleaning the door glasses - Pull the rear end of the shelf support away from the side wall. 2. CAUTION! Incorrect installation can be different. 1. They absorb fat which collects on while using the catalytic cleaning (if applicable). Pull the door trim to the front to remove it . 1 2 Install the shelf supports in the front...
... shape from the oven. Open the door. 2. Set the oven temperature to the enamel. 11.5 Removing and cleaning the door glasses - Pull the rear end of the shelf support away from the side wall. 2. CAUTION! Incorrect installation can be different. 1. They absorb fat which collects on while using the catalytic cleaning (if applicable). Pull the door trim to the front to remove it . 1 2 Install the shelf supports in the front...
User Manual
Page 25
... trim. 12. Replace the oven lamp with a suitable 300 °C heat-resistant oven lamp. Use the same oven lamp type. 4. Install the glass cover. trical supply. main oven The door glass in your product can be different in the image. A 2 1 2. Remove the glass panels. Before you see in type and shape from the mains. 3. The lamp can also be hot. 1. Put a cloth on the bottom of electric shock. Clean...
... trim. 12. Replace the oven lamp with a suitable 300 °C heat-resistant oven lamp. Use the same oven lamp type. 4. Install the glass cover. trical supply. main oven The door glass in your product can be different in the image. A 2 1 2. Remove the glass panels. Before you see in type and shape from the mains. 3. The lamp can also be hot. 1. Put a cloth on the bottom of electric shock. Clean...
User Manual
Page 26
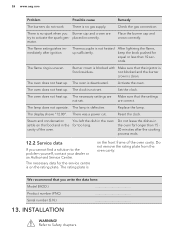
... for the service centre is no spark when you cannot find a solution to Safety chapters. The oven does not heat up . The oven does not heat up sufficiently. The lamp is deactivated. There was a power cut. Reset the clock. The necessary data for equal or less than 15 20 minutes after ignition. INSTALLATION WARNING! There is on the rating plate. Set the clock. The...
... for the service centre is no spark when you cannot find a solution to Safety chapters. The oven does not heat up . The oven does not heat up sufficiently. The lamp is deactivated. There was a power cut. Reset the clock. The necessary data for equal or less than 15 20 minutes after ignition. INSTALLATION WARNING! There is on the rating plate. Set the clock. The...
User Manual
Page 29
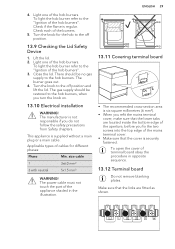
...²). • When you refit the mains terminal cover, make sure that the links are located inside the bottom edge of the aperture, before you turn the knob on. 13.10 Electrical installation WARNING! Turn the knob for different phases: Phase Min. Light one of the appliance shaded in opposite sequence. 13.12 Terminal board Do not remove blanking plates.
...²). • When you refit the mains terminal cover, make sure that the links are located inside the bottom edge of the aperture, before you turn the knob on. 13.10 Electrical installation WARNING! Turn the knob for different phases: Phase Min. Light one of the appliance shaded in opposite sequence. 13.12 Terminal board Do not remove blanking plates.
User Manual
Page 30
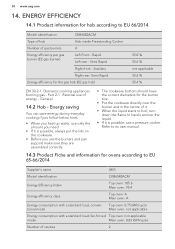
....6 % not applicable 55.6 % 55.4 % EN 30-2-1: Domestic cooking appliances burning gas - Refer to its user manual. 14.3 Product Fiche and information for hob according to EU 66/2014 Model identification CKB6540ACM Type of hob Hob inside Freestanding Cooker Number of cavities 2 Semi Rapid Right front - General 14.2 Hob - ENERGY EFFICIENCY 14.1 Product information for ovens according to barely simmer the liquid. •...
....6 % not applicable 55.6 % 55.4 % EN 30-2-1: Domestic cooking appliances burning gas - Refer to its user manual. 14.3 Product Fiche and information for hob according to EU 66/2014 Model identification CKB6540ACM Type of hob Hob inside Freestanding Cooker Number of cavities 2 Semi Rapid Right front - General 14.2 Hob - ENERGY EFFICIENCY 14.1 Product information for ovens according to barely simmer the liquid. •...
User Manual
Page 31
.... ENGLISH 31 Heat source Volume Type of electrical and electronic appliances. Part 1: Ranges, ovens, steam ovens and grills - When the cooking duration is closed properly when the oven operates. Use the residual heat to improve energy saving. Keep the door gasket clean and make sure it . Methods for measuring performance. 14.4 Oven - General hints Make sure that the oven door is longer than 30 minutes, reduce the oven temperature to your...
.... ENGLISH 31 Heat source Volume Type of electrical and electronic appliances. Part 1: Ranges, ovens, steam ovens and grills - When the cooking duration is closed properly when the oven operates. Use the residual heat to improve energy saving. Keep the door gasket clean and make sure it . Methods for measuring performance. 14.4 Oven - General hints Make sure that the oven door is longer than 30 minutes, reduce the oven temperature to your...


