
Product Manual
Page 2
... ordinary appliances. PRODUCT DESCRIPTION 7 4. HOB - OVEN - We have the following data available: Model, PNC, Serial Number. SAFETY INFORMATION 3 2. HOB - DAILY USE...9 6. CLOCK FUNCTIONS 13 10. HINTS AND TIPS 9 7. OVEN - CARE AND CLEANING 10 8. TROUBLESHOOTING 23 13. HOB - HINTS AND TIPS 15 11. When contacting our Authorised Service Centre, ensure that help make life simpler features you have created it . SAFETY INSTRUCTIONS 4 3. Please spend...
... ordinary appliances. PRODUCT DESCRIPTION 7 4. HOB - OVEN - We have the following data available: Model, PNC, Serial Number. SAFETY INFORMATION 3 2. HOB - DAILY USE...9 6. CLOCK FUNCTIONS 13 10. HINTS AND TIPS 9 7. OVEN - CARE AND CLEANING 10 8. TROUBLESHOOTING 23 13. HOB - HINTS AND TIPS 15 11. When contacting our Authorised Service Centre, ensure that help make life simpler features you have created it . SAFETY INSTRUCTIONS 4 3. Please spend...

Product Manual
Page 4
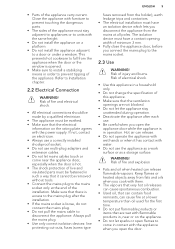
.... Do not touch the heating elements that the appliance is heavy. Install the shelf supports in the opposite sequence. • The means for disconnection must install this appliance. • Remove all the packaging. • Do not install or use a damaged appliance. • Obey the installation instruction supplied with the wiring rules. 2. 4 www.aeg.com • Do not use a steam cleaner to clean the appliance. •...
.... Do not touch the heating elements that the appliance is heavy. Install the shelf supports in the opposite sequence. • The means for disconnection must install this appliance. • Remove all the packaging. • Do not install or use a damaged appliance. • Obey the installation instruction supplied with the wiring rules. 2. 4 www.aeg.com • Do not use a steam cleaner to clean the appliance. •...
Product Manual
Page 5
... mains socket. 2.3 Use WARNING! Always pull the mains plug. • Use only correct isolation devices: line protecting cut-outs, fuses (screw type ENGLISH 5 fuses removed from the mains at all poles. • Parts of injury and burns. The isolation device must be earthed. • Make sure that the ventilation openings are wet with flammable products in operation. Hot air can release flammable...
... mains socket. 2.3 Use WARNING! Always pull the mains plug. • Use only correct isolation devices: line protecting cut-outs, fuses (screw type ENGLISH 5 fuses removed from the mains at all poles. • Parts of injury and burns. The isolation device must be earthed. • Make sure that the ventilation openings are wet with flammable products in operation. Hot air can release flammable...
Product Manual
Page 6
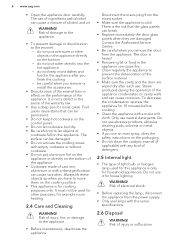
... detergents. 6 www.aeg.com • Open the appliance door carefully. be permanent. • Do not keep moist dishes and food in the appliance directly on the performance of light bulb or halogen lamp used for other purposes, for example room heating. 2.4 Care and Cleaning WARNING! Fruit juices cause stains that the glass panels can cause a mixture of ingredients with the same specifications. 2.6 Disposal WARNING...
... detergents. 6 www.aeg.com • Open the appliance door carefully. be permanent. • Do not keep moist dishes and food in the appliance directly on the performance of light bulb or halogen lamp used for other purposes, for example room heating. 2.4 Care and Cleaning WARNING! Fruit juices cause stains that the glass panels can cause a mixture of ingredients with the same specifications. 2.6 Disposal WARNING...
Product Manual
Page 7
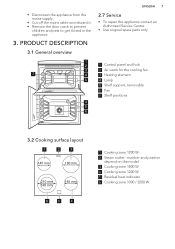
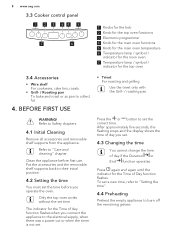
PRODUCT DESCRIPTION 3.1 General overview ENGLISH 7 2.7 Service • To repair the appliance contact an Authorised Service Centre. • Use original spare parts only. 73 2 1 5 4 3 2 1 1 2 1 Control panel and hob 3 2 Air vents for the cooling fan 4 3 Heating element 5 4 Lamp 5 Shelf support, removable 6 Fan 7 Shelf positions 4 5 6 3.2 Cooking surface layout 1 2 3 145 mm 180 mm 210 mm 140 mm 145 mm 6 5 4 1 Cooking zone 1200 W 2 Steam outlet - number and position depend on the model 3 Cooking zone 1800 W 4 Cooking zone 1200 W 5 Residual heat indicator...
PRODUCT DESCRIPTION 3.1 General overview ENGLISH 7 2.7 Service • To repair the appliance contact an Authorised Service Centre. • Use original spare parts only. 73 2 1 5 4 3 2 1 1 2 1 Control panel and hob 3 2 Air vents for the cooling fan 4 3 Heating element 5 4 Lamp 5 Shelf support, removable 6 Fan 7 Shelf positions 4 5 6 3.2 Cooking surface layout 1 2 3 145 mm 180 mm 210 mm 140 mm 145 mm 6 5 4 1 Cooking zone 1200 W 2 Steam outlet - number and position depend on the model 3 Cooking zone 1800 W 4 Cooking zone 1200 W 5 Residual heat indicator...
Product Manual
Page 8
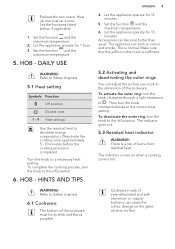
.... 4.2 Setting the time You must set . Use the trivet only with the Grill- / roasting pan. Clean the appliance before you operate the oven. Press again and again until the indicator for the Time of day you connect the appliance to the electrical supply, when there was a power cut or when the timer is not set the time before first use. Put the accessories and the removable shelf supports back to set time.
.... 4.2 Setting the time You must set . Use the trivet only with the Grill- / roasting pan. Clean the appliance before you operate the oven. Press again and again until the indicator for the Time of day you connect the appliance to the electrical supply, when there was a power cut or when the timer is not set the time before first use. Put the accessories and the removable shelf supports back to set time.
Product Manual
Page 9
... position Double zone 1 - 9 Heat settings Use the residual heat to a necessary heat setting. Turn the knob to decrease energy consumption. Set the function and the maximum temperature. 6. This is a risk of burns from residual heat. HINTS AND TIPS ENGLISH 9 4. To activate the outer ring: turn the knob counterclockwise to . Then turn the knob clockwise through a light resistance to the correct heat setting. Let the appliance operate for...
... position Double zone 1 - 9 Heat settings Use the residual heat to a necessary heat setting. Turn the knob to decrease energy consumption. Set the function and the maximum temperature. 6. This is a risk of burns from residual heat. HINTS AND TIPS ENGLISH 9 4. To activate the outer ring: turn the knob counterclockwise to . Then turn the knob clockwise through a light resistance to the correct heat setting. Let the appliance operate for...
Product Manual
Page 10
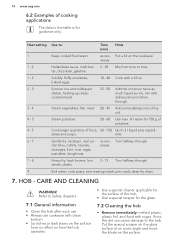
.... 7.1 General information • Clean the hob after each use. • Always use cookware with clean bottom. • Scratches or dark stains on the surface have no effect on . Boil water, cook pasta, sear meat (goulash, pot roast), deep-fry chips. 7. as nec- Heat setting 1 1 - 2 1 - 2 2 - 3 3 - 4 4 - 5 4 - 5 6 - 7 7 - 8 9 Use to: Time (min) Hints Keep cooked food warm. Steam potatoes. 20 - 60 Use max. ¼ l water for guidance only. ents. CARE AND CLEANING...
.... 7.1 General information • Clean the hob after each use. • Always use cookware with clean bottom. • Scratches or dark stains on the surface have no effect on . Boil water, cook pasta, sear meat (goulash, pot roast), deep-fry chips. 7. as nec- Heat setting 1 1 - 2 1 - 2 2 - 3 3 - 4 4 - 5 4 - 5 6 - 7 7 - 8 9 Use to: Time (min) Hints Keep cooked food warm. Steam potatoes. 20 - 60 Use max. ¼ l water for guidance only. ents. CARE AND CLEANING...
Product Manual
Page 11
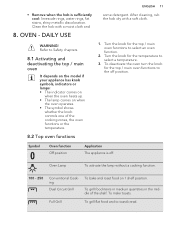
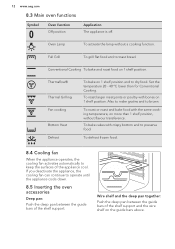
... depends on the model if your appliance has knob symbols, indicators or lamps: • The indicator comes on when the oven heats up. • The lamp comes on 1 shelf position. OVEN - Refer to select a temperature. 3. Oven Lamp To activate the lamp without a cooking function. 100 - 250 Conventional Cooking Dual Circuit Grill To bake and roast food on when the oven operates. • The...
... depends on the model if your appliance has knob symbols, indicators or lamps: • The indicator comes on when the oven heats up. • The lamp comes on 1 shelf position. OVEN - Refer to select a temperature. 3. Oven Lamp To activate the lamp without a cooking function. 100 - 250 Conventional Cooking Dual Circuit Grill To bake and roast food on when the oven operates. • The...
Product Manual
Page 12
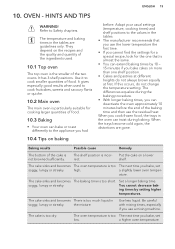
Thermaflow® Thermal Grilling Fan cooking Bottom Heat Defrost To bake on more than for Conventional Cooking. To roast or roast and bake food with the same cooking temperature, on 1 shelf position and to operate until the appliance cools down. 8.5 Inserting the oven accessories Deep pan: Push the deep pan between the guide bars of the appliance cool. Wire shelf and the deep pan together: Push the deep...
Thermaflow® Thermal Grilling Fan cooking Bottom Heat Defrost To bake on more than for Conventional Cooking. To roast or roast and bake food with the same cooking temperature, on 1 shelf position and to operate until the appliance cools down. 8.5 Inserting the oven accessories Deep pan: Push the deep pan between the guide bars of the appliance cool. Wire shelf and the deep pan together: Push the deep...

Product Manual
Page 14
... End , set , change or check the time of cooking. The display shows the indicator for the temperature to flash. 2. 14 www.aeg.com 9.2 Buttons Button Function MINUS CLOCK PLUS Description To set countdown time. Minute Minder Duration To set the time. To set . You can use the functions Duration and End at the same time to stop the signal. 4. This lets you set the cooking time of day when the oven should...
... End , set , change or check the time of cooking. The display shows the indicator for the temperature to flash. 2. 14 www.aeg.com 9.2 Buttons Button Function MINUS CLOCK PLUS Description To set countdown time. Minute Minder Duration To set the time. To set . You can use the functions Duration and End at the same time to stop the signal. 4. This lets you set the cooking time of day when the oven should...
Product Manual
Page 15
... the baking time and then use a mixing machine. the mixture. Use less liquid. OVEN - HINTS AND TIPS WARNING! If this occurs, do not always brown equally at different heights do not change the temperature setting. When you cook frozen food, the trays in the tables. • The manufacturer recommends that you use the lower temperature the first time. • If you bake cakes on baking ENGLISH...
... the baking time and then use a mixing machine. the mixture. Use less liquid. OVEN - HINTS AND TIPS WARNING! If this occurs, do not always brown equally at different heights do not change the temperature setting. When you cook frozen food, the trays in the tables. • The manufacturer recommends that you use the lower temperature the first time. • If you bake cakes on baking ENGLISH...
Product Manual
Page 19
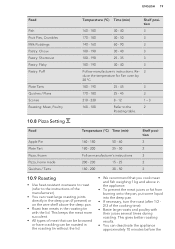
... Shelf position 2 2 3 2 2 10.9 Roasting • Use heat-resistant ovenware to roast (refer to the instructions of the cooking time). • Baste large roasts and poultry with the lid. This gives better roasting results. • You can roast large roasting joints directly in the deep pan (if present) or on the wire shelf above in the roasting tin with their juices several times during roasting. ENGLISH 19 Food...
... Shelf position 2 2 3 2 2 10.9 Roasting • Use heat-resistant ovenware to roast (refer to the instructions of the cooking time). • Baste large roasts and poultry with the lid. This gives better roasting results. • You can roast large roasting joints directly in the deep pan (if present) or on the wire shelf above in the roasting tin with their juices several times during roasting. ENGLISH 19 Food...
Product Manual
Page 21
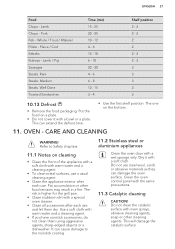
... / Cod Kebabs Kidneys - Refer to the nonstick coating. 11.2 Stainless steel or aluminium appliances Clean the oven door with a bowl or a plate. The risk is higher for the grill pan. • Clean stubborn dirt with warm water and a cleaning agent. • To clean metal surfaces, use a usual cleaning agent. • Clean the appliance interior after each use steel wool, acids or abrasive materials as they can damage...
... / Cod Kebabs Kidneys - Refer to the nonstick coating. 11.2 Stainless steel or aluminium appliances Clean the oven door with a bowl or a plate. The risk is higher for the grill pan. • Clean stubborn dirt with warm water and a cleaning agent. • To clean metal surfaces, use a usual cleaning agent. • Clean the appliance interior after each use steel wool, acids or abrasive materials as they can damage...
Product Manual
Page 22
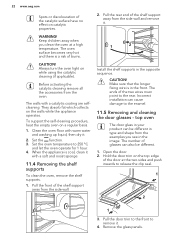
... supports in type and shape from the side wall. 2. Clean the oven floor with a catalytic coating are selfcleaning. Make sure that the longer fixing wire is in your product can be different. 1. The number of glasses can cause damage to the enamel. 11.5 Removing and cleaning the door glasses - The walls with warm water and washing up liquid, then dry it . 4. CAUTION! Hold the door trim...
... supports in type and shape from the side wall. 2. Clean the oven floor with a catalytic coating are selfcleaning. Make sure that the longer fixing wire is in your product can be different. 1. The number of glasses can cause damage to the enamel. 11.5 Removing and cleaning the door glasses - The walls with warm water and washing up liquid, then dry it . 4. CAUTION! Hold the door trim...
Product Manual
Page 23
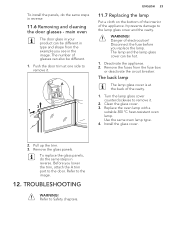
... A trim part to remove it . 2. TROUBLESHOOTING WARNING! main oven The door glass in your product can be different. 1. WARNING! It prevents damage to remove it . Danger of the appliance. Turn the lamp glass cover counterclockwise to the lamp glass cover and the cavity. Remove the glass panels. The back lamp The lamp glass cover is at one side to the door. Replace the oven lamp with a suitable 300 °C heat-resistant oven lamp. The number...
... A trim part to remove it . 2. TROUBLESHOOTING WARNING! main oven The door glass in your product can be different. 1. WARNING! It prevents damage to remove it . Danger of the appliance. Turn the lamp glass cover counterclockwise to the lamp glass cover and the cavity. Remove the glass panels. The back lamp The lamp glass cover is at one side to the door. Replace the oven lamp with a suitable 300 °C heat-resistant oven lamp. The number...
Product Manual
Page 24
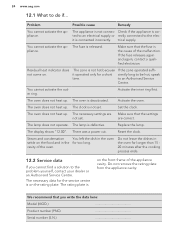
.... 12.2 Service data If you write the data here: Model (MOD.) Product number (PNC) Serial number (S.N.) Set the clock. The oven does not heat up . Make sure that you cannot find a solution to do if... The display shows "12.00". Reset the clock. The necessary data for a short time. If the fuse releases again and again, contact a qualified electrician. The oven does not heat up . The clock is...
.... 12.2 Service data If you write the data here: Model (MOD.) Product number (PNC) Serial number (S.N.) Set the clock. The oven does not heat up . Make sure that you cannot find a solution to do if... The display shows "12.00". Reset the clock. The necessary data for a short time. If the fuse releases again and again, contact a qualified electrician. The oven does not heat up . The clock is...
Product Manual
Page 26
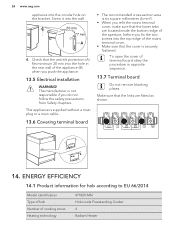
... into the hole in opposite sequence. 13.7 Terminal board Do not remove blanking plates. L L N N N 14. To open the cover of cooking zones Heating technology 47102V-MN Hob inside the bottom edge of the aperture, before you refit the mains terminal cover, make sure that the links are located inside Freestanding Cooker 4 Radiant Heater ENERGY EFFICIENCY 14.1 Product information for hob according to EU 66/2014...
... into the hole in opposite sequence. 13.7 Terminal board Do not remove blanking plates. L L N N N 14. To open the cover of cooking zones Heating technology 47102V-MN Hob inside the bottom edge of the aperture, before you refit the mains terminal cover, make sure that the links are located inside Freestanding Cooker 4 Radiant Heater ENERGY EFFICIENCY 14.1 Product information for hob according to EU 66/2014...

Product Manual
Page 27
... kWh/cycle Energy consumption with a standard load, fan-forced Top oven: not applicable mode Main oven: 0.90 kWh/cycle Number of cavities 2 Heat source Electricity Volume Top oven: 39 l Main oven: 72 l Type of the cooking zone. • Use the residual heat to keep the food warm or to melt it. 14.3 Product Fiche and information for measuring performance. 14.2 Hob - Left front ing zone...
... kWh/cycle Energy consumption with a standard load, fan-forced Top oven: not applicable mode Main oven: 0.90 kWh/cycle Number of cavities 2 Heat source Electricity Volume Top oven: 39 l Main oven: 72 l Type of the cooking zone. • Use the residual heat to keep the food warm or to melt it. 14.3 Product Fiche and information for measuring performance. 14.2 Hob - Left front ing zone...
Product Manual
Page 28
... during everyday cooking. • General hints - Use the residual heat to recycle it up other foods. • Cooking with the household waste. Return the product to improve the energy saving. - Put the packaging in applicable containers to warm up . - Do not dispose appliances marked with the symbol with fan - Household electric cooking appliances - Part 1: Ranges, ovens, steam ovens and grills - Make sure that the oven door is...
... during everyday cooking. • General hints - Use the residual heat to recycle it up other foods. • Cooking with the household waste. Return the product to improve the energy saving. - Put the packaging in applicable containers to warm up . - Do not dispose appliances marked with the symbol with fan - Household electric cooking appliances - Part 1: Ranges, ovens, steam ovens and grills - Make sure that the oven door is...


