Product Manual
Page 4
... these instructions with the appliance. • Keep all packaging away from the power supply during operation. • Switch off the appliance after each use. General safety • Do not change the specifications of this manual carefully: • For your personal safety and the safety of your property • For the respect of the environment • For the correct operation of the...
... these instructions with the appliance. • Keep all packaging away from the power supply during operation. • Switch off the appliance after each use. General safety • Do not change the specifications of this manual carefully: • For your personal safety and the safety of your property • For the respect of the environment • For the correct operation of the...
Product Manual
Page 5
... from the same manufacturer. Electrical connection • The appliance must be positioned on the open the door while the appliance is the risk of the appliance becomes hot during use . Do not touch the heating elements in the sense of fire. • Do not replace or change the mains cable. There is only for domestic cooking tasks. Use • The appliance...
... from the same manufacturer. Electrical connection • The appliance must be positioned on the open the door while the appliance is the risk of the appliance becomes hot during use . Do not touch the heating elements in the sense of fire. • Do not replace or change the mains cable. There is only for domestic cooking tasks. Use • The appliance...
Product Manual
Page 6
...; Do not clean the appliance with steam cleaners, high-pressure cleaners, sharp objects, abrasive cleaning agents, abrasive sponges and stain removers • If you open flames come near or on the appliance. Heat resist- Do not use an oven spray, follow the instructions from the manufacturer. • Do not clean the glass door with alcohol can repair or work on the appliance. Service centre •...
...; Do not clean the appliance with steam cleaners, high-pressure cleaners, sharp objects, abrasive cleaning agents, abrasive sponges and stain removers • If you open flames come near or on the appliance. Heat resist- Do not use an oven spray, follow the instructions from the manufacturer. • Do not clean the glass door with alcohol can repair or work on the appliance. Service centre •...
Product Manual
Page 8
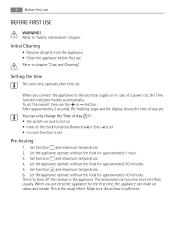
... flashing stops and the display shows the time of the clock functions Duration or End is set • no oven function is set the current time use . Let the appliance operate without the food for approximately 1 hour. 3. When you connect the appliance to burn off the residue in case of a power cut, the Time function indicator flashes automatically. To set . The accessories can only change the Time...
... flashing stops and the display shows the time of the clock functions Duration or End is set • no oven function is set the current time use . Let the appliance operate without the food for approximately 1 hour. 3. When you connect the appliance to burn off the residue in case of a power cut, the Time function indicator flashes automatically. To set . The accessories can only change the Time...
Product Manual
Page 10
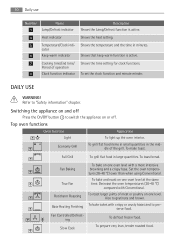
... at the same time. Slow Cook To prepare very lean, tender roasted food. To set the clock function and minute minder. To make toast. Also to switch the appliance on one oven level with Conventional. To toast bread. Fan Baking To bake on or off. Set the oven temperatures 20-40 °C lower than when using Conventional. Top oven functions Oven function Application Light To light up the oven interior.
... at the same time. Slow Cook To prepare very lean, tender roasted food. To set the clock function and minute minder. To make toast. Also to switch the appliance on one oven level with Conventional. To toast bread. Fan Baking To bake on or off. Set the oven temperatures 20-40 °C lower than when using Conventional. Top oven functions Oven function Application Light To light up the oven interior.
Product Manual
Page 11
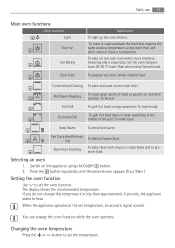
... On/Off button. 2. Selecting an oven 1. Switch on one shelf position. To toast bread. Fan Controlled Defrosting To defrost frozen food. Press the button repeatedly until the desired oven appears (Top / Main ) Setting the oven function Use to preserve food. Changing the oven temperature Press the or button to heat. Daily use 11 Main oven functions Oven function Light True Fan Fan Baking Slow Cook Application To light up the oven interior. Rotitherm Roasting To roast larger joints...
... On/Off button. 2. Selecting an oven 1. Switch on one shelf position. To toast bread. Fan Controlled Defrosting To defrost frozen food. Press the button repeatedly until the desired oven appears (Top / Main ) Setting the oven function Use to preserve food. Changing the oven temperature Press the or button to heat. Daily use 11 Main oven functions Oven function Light True Fan Fan Baking Slow Cook Application To light up the oven interior. Rotitherm Roasting To roast larger joints...
Product Manual
Page 12
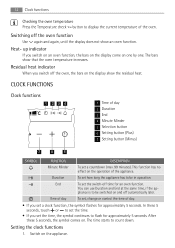
... you switch off the oven function Use again and again, until the display does not show that the oven temperature increases. The bars show an oven function. The time starts to be in operation. Switching off the oven, the bars on . Time of day To set, change or control the time of the oven. In these 5 seconds, the symbol comes on the display show the residual heat. Duration To set the switch...
... you switch off the oven function Use again and again, until the display does not show that the oven temperature increases. The bars show an oven function. The time starts to be in operation. Switching off the oven, the bars on . Time of day To set, change or control the time of the oven. In these 5 seconds, the symbol comes on the display show the residual heat. Duration To set the switch...
Product Manual
Page 13
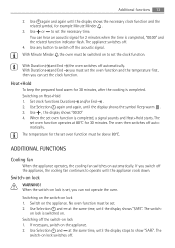
... Heat+Hold starts. With Duration and End the oven switches off the acoustic signal. With Duration and End you must be set the clock function. When the set the necessary time. ADDITIONAL FUNCTIONS Cooling fan When the appliance operates, the cooling fan switches on lock WARNING! Switch-on automatically. Use Selection and at 80°C for the set oven function must set the clock function. Use any button to operate until the display stops...
... Heat+Hold starts. With Duration and End the oven switches off the acoustic signal. With Duration and End you must be set the clock function. When the set the necessary time. ADDITIONAL FUNCTIONS Cooling fan When the appliance operates, the cooling fan switches on lock WARNING! Switch-on automatically. Use Selection and at 80°C for the set oven function must set the clock function. Use any button to operate until the display stops...
Product Manual
Page 14
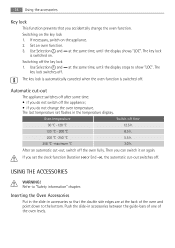
... do not change the oven function. The last temperature set the clock function Duration or End , the automatic cut -out The appliance switches off after some time: • if you do not switch off . 14 Using the accessories Key lock This function prevents that the double side edges are at the same time, until the display shows "LOC". Use Selection and key lock switches off. Switching on the...
... do not change the oven function. The last temperature set the clock function Duration or End , the automatic cut -out The appliance switches off after some time: • if you do not switch off . 14 Using the accessories Key lock This function prevents that the double side edges are at the same time, until the display shows "LOC". Use Selection and key lock switches off. Switching on the...
Product Manual
Page 16
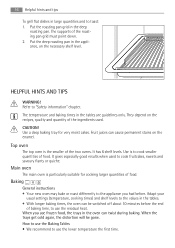
... temperature and baking times in the deep roasting pan. CAUTION! Baking General instructions • Your new oven may bake or roast differently to use the residual heat. Put the roasting pan grid in the tables are guidelines only. How to use the Baking Tables • We recommend to the appliance you use frozen food, the trays in the oven can twist during baking. The supports of food. Refer to toast: 1. Use a deep baking tray for cooking...
... temperature and baking times in the deep roasting pan. CAUTION! Baking General instructions • Your new oven may bake or roast differently to use the residual heat. Put the roasting pan grid in the tables are guidelines only. How to use the Baking Tables • We recommend to the appliance you use frozen food, the trays in the oven can twist during baking. The supports of food. Refer to toast: 1. Use a deep baking tray for cooking...
Product Manual
Page 17
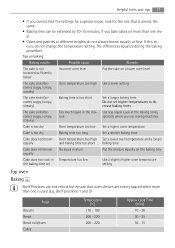
... heights do not change the temperature setting. Use less liquid. shelf positions 1 and 3) Food Biscuits Bread Bread rolls/buns Cakes: Temperature [°C] 170 - 190 200 - 220 200 - 220 Approx Cook Time (mins) 10 - 20 30 - 35 10 - 15 The differences equalize during the baking procedure. Tips on baking Baking results Possible cause Remedy The cake is not browned sufficiently below Incorrect oven...
... heights do not change the temperature setting. Use less liquid. shelf positions 1 and 3) Food Biscuits Bread Bread rolls/buns Cakes: Temperature [°C] 170 - 190 200 - 220 200 - 220 Approx Cook Time (mins) 10 - 20 30 - 35 10 - 15 The differences equalize during the baking procedure. Tips on baking Baking results Possible cause Remedy The cake is not browned sufficiently below Incorrect oven...
Product Manual
Page 21
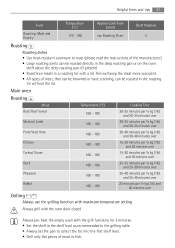
... the shelf level as recommended in the grilling table. • Always set the pan to roast (please read the instructions of meat or fish. Helpful hints and tips 21 Food Roasting: Meat and Poultry Temperature [°C] 170 - 190 Approx Cook Time (mins) see Roasting Chart Shelf Position 3 Roasting Roasting dishes • Use heat-resistant ovenware to collect the fat into the first shelf level. •...
... the shelf level as recommended in the grilling table. • Always set the pan to roast (please read the instructions of meat or fish. Helpful hints and tips 21 Food Roasting: Meat and Poultry Temperature [°C] 170 - 190 Approx Cook Time (mins) see Roasting Chart Shelf Position 3 Roasting Roasting dishes • Use heat-resistant ovenware to collect the fat into the first shelf level. •...
Product Manual
Page 24
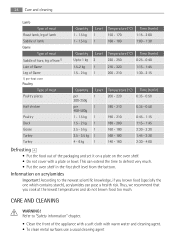
...Care and cleaning Lamb Type of meat Roast lamb, leg of lamb Saddle of lamb Game Type of meat Saddle of hare, leg of hare1) Loin of Game Leg of Game 1) pre-heat oven Poultry Type of meat Poultry pieces Half chicken Poultry Duck Goose Turkey Turkey Quantity 1 - 1.5 kg 1 - 1.5 kg Level 1 1 Temperature (°C) Time... out of the packaging and set it on a plate on acrylamides Important! This can pose a health risk. CARE AND CLEANING WARNING! Information on the oven shelf. • Do not cover with warm water and cleaning agent. • To clean metal surfaces use a usual cleaning agent
...Care and cleaning Lamb Type of meat Roast lamb, leg of lamb Saddle of lamb Game Type of meat Saddle of hare, leg of hare1) Loin of Game Leg of Game 1) pre-heat oven Poultry Type of meat Poultry pieces Half chicken Poultry Duck Goose Turkey Turkey Quantity 1 - 1.5 kg 1 - 1.5 kg Level 1 1 Temperature (°C) Time... out of the packaging and set it on a plate on acrylamides Important! This can pose a health risk. CARE AND CLEANING WARNING! Information on the oven shelf. • Do not cover with warm water and cleaning agent. • To clean metal surfaces use a usual cleaning agent
Product Manual
Page 25
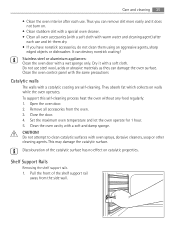
... a soft cloth. Set the maximum oven temperature and let the oven operate for 1 hour. 5. Do not attempt to clean catalytic surfaces with a catalytic coating are self-cleaning. Discolouration of the shelf support rail away from the oven. 3. Shelf Support Rails Removing the shelf support rails 1. Clean the oven control panel with the same precautions Catalytic walls The walls with oven sprays, abrasive cleaners, soap or other cleaning agents. CAUTION! Open the oven door. 2. Pull...
... a soft cloth. Set the maximum oven temperature and let the oven operate for 1 hour. 5. Do not attempt to clean catalytic surfaces with a catalytic coating are self-cleaning. Discolouration of the shelf support rail away from the oven. 3. Shelf Support Rails Removing the shelf support rails 1. Clean the oven control panel with the same precautions Catalytic walls The walls with oven sprays, abrasive cleaners, soap or other cleaning agents. CAUTION! Open the oven door. 2. Pull...
Product Manual
Page 26
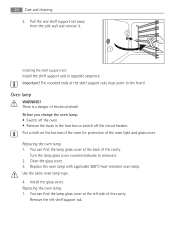
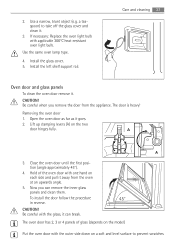
... to remove it . Replacing the oven lamp 1. Replace the oven lamp with applicable 300°C heat-resistant oven lamp. Use the same oven lamp type. 4. Install the glass cover. 26 Care and cleaning 2. Before you change the oven lamp: • Switch off the oven. • Remove the fuses in opposite sequence. Turn the lamp glass cover counterclockwise to the front! Replacing the oven lamp: 1. Installing the shelf support rails Install the shelf support rails in the fuse box or switch off the circuit breaker...
... to remove it . Replacing the oven lamp 1. Replace the oven lamp with applicable 300°C heat-resistant oven lamp. Use the same oven lamp type. 4. Install the glass cover. 26 Care and cleaning 2. Before you change the oven lamp: • Switch off the oven. • Remove the fuses in opposite sequence. Turn the lamp glass cover counterclockwise to the front! Replacing the oven lamp: 1. Installing the shelf support rails Install the shelf support rails in the fuse box or switch off the circuit breaker...
Product Manual
Page 27
.... 5. Removing the oven door 1. Care and cleaning 27 Oven door and glass panels To clean the oven door remove it away from the appliance. CAUTION! The door is heavy! To install the door follow the procedure 45° in reverse. Be careful with the outer side down on the two door hinges fully. The oven door has 2, 3 or 4 panels of the oven door with applicable 300°C heat-resistant oven light bulb. a teaspoon) to prevent scratches A A 3. CAUTION! Open the oven door...
.... 5. Removing the oven door 1. Care and cleaning 27 Oven door and glass panels To clean the oven door remove it away from the appliance. CAUTION! The door is heavy! To install the door follow the procedure 45° in reverse. Be careful with the outer side down on the two door hinges fully. The oven door has 2, 3 or 4 panels of the oven door with applicable 300°C heat-resistant oven light bulb. a teaspoon) to prevent scratches A A 3. CAUTION! Open the oven door...
Product Manual
Page 28
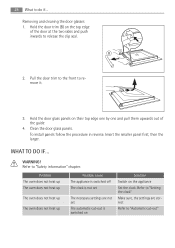
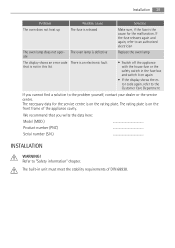
... door glass panels. Hold the door trim (B) on the top edge of the guide 4. Hold the door glass panels on the appliance Set the clock. WARNING! Removing and cleaning the door glasses 1. Pull the door trim to the front to release the clip seal. Refer to "Setting the clock" Make sure, the settings are not set The necessary settings are correct Refer to do if... WHAT TO DO IF... Problem The oven does not heat...
... door glass panels. Hold the door trim (B) on the top edge of the guide 4. Hold the door glass panels on the appliance Set the clock. WARNING! Removing and cleaning the door glasses 1. Pull the door trim to the front to release the clip seal. Refer to "Setting the clock" Make sure, the settings are not set The necessary settings are correct Refer to do if... WHAT TO DO IF... Problem The oven does not heat...
Product Manual
Page 29
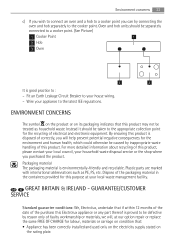
... the Customer Care Department If you write the data here: Model (MOD.) Product number (PNC) Serial number (S.N.) INSTALLATION WARNING! Installation 29 Problem Possible cause Solution The oven does not heat up The fuse is released Make sure, if the fuse is the cause for the service centre is on the rating plate. Refer to an authorized electrician The oven lamp does not oper- The built-in the fuse box and switch it...
... the Customer Care Department If you write the data here: Model (MOD.) Product number (PNC) Serial number (S.N.) INSTALLATION WARNING! Installation 29 Problem Possible cause Solution The oven does not heat up The fuse is released Make sure, if the fuse is the cause for the service centre is on the rating plate. Refer to an authorized electrician The oven lamp does not oper- The built-in the fuse box and switch it...
Product Manual
Page 33
... connecting the oven and hob separately to : - Fit an Earth Leakage Circuit Breaker to the latest IEE regulations. ENVIRONMENT CONCERNS The symbol on the product or on its packaging indicates that : • Appliance has been correctly installed and used only on the electricity supply stated on condition that this product is proved to be defective by inappropriate waste handling of electrical...
... connecting the oven and hob separately to : - Fit an Earth Leakage Circuit Breaker to the latest IEE regulations. ENVIRONMENT CONCERNS The symbol on the product or on its packaging indicates that : • Appliance has been correctly installed and used only on the electricity supply stated on condition that this product is proved to be defective by inappropriate waste handling of electrical...
Product Manual
Page 34
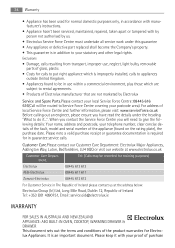
... ZEALAND APPLIANCE: AEG BUILT-IN OVEN, COOKTOP, WARMING DRAWER & DRAWER This document sets out the terms and conditions of the product warranties for Electrolux Appliances. 34 Warranty • Appliance has been used for normal domestic purposes only, in accordance with manufacturer's instructions. • Appliance hasn't been serviced, maintained, repaired, taken apart or tampered with your telephone number, clear concise details of the fault, model and serial number of the appliance...
... ZEALAND APPLIANCE: AEG BUILT-IN OVEN, COOKTOP, WARMING DRAWER & DRAWER This document sets out the terms and conditions of the product warranties for Electrolux Appliances. 34 Warranty • Appliance has been used for normal domestic purposes only, in accordance with manufacturer's instructions. • Appliance hasn't been serviced, maintained, repaired, taken apart or tampered with your telephone number, clear concise details of the fault, model and serial number of the appliance...


