Product Manual
Page 5
... on the rating plate agree with alumi- There is the risk of the warranty law. • Do not apply pressure on a base. • Built in ovens and built in the appliance. if applicable. There is the risk of skin burns. • To prevent damage or discoloration to the other appliances and...; The appliance must be positioned on the open the door while the appliance is to prevent physical injury to persons or prevent damage to the oven enamel. • Always stay away from the same manufacturer. To prevent damage to disconnect the appliance.
... on the rating plate agree with alumi- There is the risk of the warranty law. • Do not apply pressure on a base. • Built in ovens and built in the appliance. if applicable. There is the risk of skin burns. • To prevent damage or discoloration to the other appliances and...; The appliance must be positioned on the open the door while the appliance is to prevent physical injury to persons or prevent damage to the oven enamel. • Always stay away from the same manufacturer. To prevent damage to disconnect the appliance.
Product Manual
Page 6
...safety and the safety of ingredients with abrasive cleaning agents or metal scraper. 6 Safety information • Always close the appliance door when you use an oven spray, follow the instructions from deteriorating • Use a deep baking tray for very moist cakes to replace the lamp, use one of the same ...become weak and can cause a mixture of alcohol and air. Do not use flammable products or products that can repair or work on the appliance. Oven lamp • The type of light bulb or halogen lamp used for this appliance is cold. There is heavy! • Do not clean catalytic...
...safety and the safety of ingredients with abrasive cleaning agents or metal scraper. 6 Safety information • Always close the appliance door when you use an oven spray, follow the instructions from deteriorating • Use a deep baking tray for very moist cakes to replace the lamp, use one of the same ...become weak and can cause a mixture of alcohol and air. Do not use flammable products or products that can repair or work on the appliance. Oven lamp • The type of light bulb or halogen lamp used for this appliance is cold. There is heavy! • Do not clean catalytic...
Product Manual
Page 7
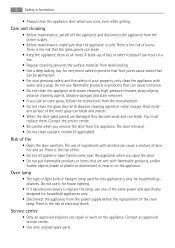
... small animals from the power supply. - Discard the door catch. PRODUCT DESCRIPTION General overview 1 2 6 5 3 6 4 3 4 2 1 5 2 6 5 6 4 3 2 3 4 1 5 1 Electronic programmer 2 Heating element 3 Oven lamp 4 Fan and rear wall heating element 5 Heating element 6 Shelf positions Oven accessories • Oven shelf For cookware, cake tins, roasts. • Deep roasting pan To bake and roast or as pan to collect...
... small animals from the power supply. - Discard the door catch. PRODUCT DESCRIPTION General overview 1 2 6 5 3 6 4 3 4 2 1 5 2 6 5 6 4 3 2 3 4 1 5 1 Electronic programmer 2 Heating element 3 Oven lamp 4 Fan and rear wall heating element 5 Heating element 6 Shelf positions Oven accessories • Oven shelf For cookware, cake tins, roasts. • Deep roasting pan To bake and roast or as pan to collect...
Product Manual
Page 8
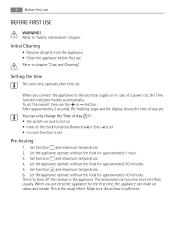
Setting the time The oven only operates after time set . After approximately 5 seconds, the flashing stops and the display shows the time of day set . Let the appliance operate without ... maximum temperature. 6. When you connect the appliance to burn off the residue in case of the clock functions Duration or End is set • no oven function is sufficient. Refer to chapter "Care and Cleaning". Initial Cleaning • Remove all parts from the appliance. • Clean the appliance before first use...
Setting the time The oven only operates after time set . After approximately 5 seconds, the flashing stops and the display shows the time of day set . Let the appliance operate without ... maximum temperature. 6. When you connect the appliance to burn off the residue in case of the clock functions Duration or End is set • no oven function is sufficient. Refer to chapter "Care and Cleaning". Initial Cleaning • Remove all parts from the appliance. • Clean the appliance before first use...
Product Manual
Page 9
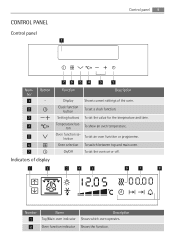
... function. On/Off To set a clock function. Indicators of the oven. Display Shows current settings of display 1 2 3 4 5 6 7 8 Number 1 2 Name Top/Main oven indicator Oven function indicator Description Shows which oven operates. Oven selection To switch between top and main oven. Clock function button To set the oven on or off. CONTROL PANEL Control panel 1 Control panel 9 765...
... function. On/Off To set a clock function. Indicators of the oven. Display Shows current settings of display 1 2 3 4 5 6 7 8 Number 1 2 Name Top/Main oven indicator Oven function indicator Description Shows which oven operates. Oven selection To switch between top and main oven. Clock function button To set the oven on or off. CONTROL PANEL Control panel 1 Control panel 9 765...
Product Manual
Page 10
... food in minutes. Shows the heat setting. To set the clock function and minute minder. Refer to gratinate and brown. To make toast. Set the oven temperatures 20-40 °C lower than when using Conventional. Shows that keep warm function is active. To toast bread. Top... with a more intensive browning and a crispy base. Shows the time setting for clock functions. True Fan To bake and roast on one oven level at the same time. Economy Grill To grill flat food items in small quantities in the middle of operation Clock function indicator Description Shows ...
... food in minutes. Shows the heat setting. To set the clock function and minute minder. Refer to gratinate and brown. To make toast. Set the oven temperatures 20-40 °C lower than when using Conventional. Shows that keep warm function is active. To toast bread. Top... with a more intensive browning and a crispy base. Shows the time setting for clock functions. True Fan To bake and roast on one oven level at the same time. Economy Grill To grill flat food items in small quantities in the middle of operation Clock function indicator Description Shows ...
Product Manual
Page 11
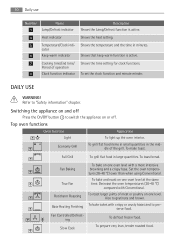
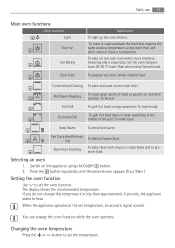
...in less than approximately 5 seconds, the appliance starts to set the temperature. Press the button repeatedly until the desired oven appears (Top / Main ) Setting the oven function Use to preserve food. To roast or roast and bake the food that requires the same cooking temperature, using... toast. Switch on one shelf, without flavour transference. If you do not change the oven function while the oven operates. When the appliance operates at the set the oven function. Changing the oven temperature Press the or button to heat. To prepare very lean, tender roasted food. ...
...in less than approximately 5 seconds, the appliance starts to set the temperature. Press the button repeatedly until the desired oven appears (Top / Main ) Setting the oven function Use to preserve food. To roast or roast and bake the food that requires the same cooking temperature, using... toast. Switch on one shelf, without flavour transference. If you do not change the oven function while the oven operates. When the appliance operates at the set the oven function. Changing the oven temperature Press the or button to heat. To prepare very lean, tender roasted food. ...
Product Manual
Page 12
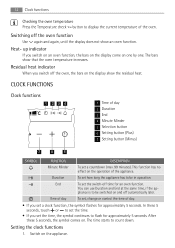
.... End To set the time, the symbol continues to be in operation. The time starts to be switched on . pliance is to flash for an oven function. CLOCK FUNCTIONS Clock functions 1 234 1 Time of the appliance. You can use Duration and End at the same time, if the ap- After ...these 5 seconds, touch or to set the time. • If you set the switch-off automatically later. Residual heat indicator When you switch on an oven function, the bars on the display come on the display show the residual heat. Duration To set a countdown (max. 99 minutes). Switch on the operation...
.... End To set the time, the symbol continues to be in operation. The time starts to be switched on . pliance is to flash for an oven function. CLOCK FUNCTIONS Clock functions 1 234 1 Time of the appliance. You can use Duration and End at the same time, if the ap- After ...these 5 seconds, touch or to set the time. • If you set the switch-off automatically later. Residual heat indicator When you switch on an oven function, the bars on the display come on the display show the residual heat. Duration To set a countdown (max. 99 minutes). Switch on the operation...
Product Manual
Page 13
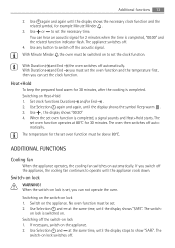
...and the related symbol, for 2 minutes when the time is set the clock function. Switching off the acoustic signal. With Minute Minder the oven must be above 80°C. Set clock functions Duration and/or End . 2. Switching on the switch-on to switch off the switch-...Use Selection and at the same time, until the display shows the symbol Keep warm . 3. Switch on Heat+Hold 1. Additional functions 13 2. No oven function must be switched on lock 1. Switching on the appliance. Switch-on lock is completed, "00.00" and the related function indicator flash. When ...
...and the related symbol, for 2 minutes when the time is set the clock function. Switching off the acoustic signal. With Minute Minder the oven must be above 80°C. Set clock functions Duration and/or End . 2. Switching on the switch-on to switch off the switch-...Use Selection and at the same time, until the display shows the symbol Keep warm . 3. Switch on Heat+Hold 1. Additional functions 13 2. No oven function must be switched on lock 1. Switching on the appliance. Switch-on lock is completed, "00.00" and the related function indicator flash. When ...
Product Manual
Page 14
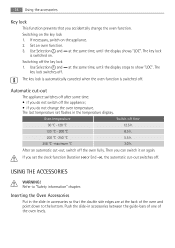
...to "Safety information" chapter. Refer to show "LOC". Switching on the appliance. 2. After an automatic cut -out switches off the oven fully. Set an oven function. 3. Use Selection and at the same time, until the display shows "LOC". The The key lock is automatically canceled when ...the oven function is switched on. If you do not change the oven function. Inserting the Oven Accessories Put in the slide-in the temperature display. 14 Using the accessories Key lock This...
...to "Safety information" chapter. Refer to show "LOC". Switching on the appliance. 2. After an automatic cut -out switches off the oven fully. Set an oven function. 3. Use Selection and at the same time, until the display shows "LOC". The The key lock is automatically canceled when ...the oven function is switched on. If you do not change the oven function. Inserting the Oven Accessories Put in the slide-in the temperature display. 14 Using the accessories Key lock This...
Product Manual
Page 15
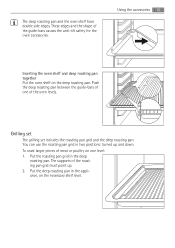
Put the deep roasting pan in the appliance, on the deep roasting pan. These edges and the shape of the oven levels. Put the roasting pan grid in two positions: turned up . 2. Push the deep roasting pan between the guide-bars of the roasting pan grid ... up and down. You can use the roasting pan grid in the deep roasting pan. Using the accessories 15 Inserting the oven shelf and deep roasting pan together Put the oven shelf on the necessary shelf level. Grilling set The grilling set includes the roasting pan grid and the deep roasting pan...
Put the deep roasting pan in the appliance, on the deep roasting pan. These edges and the shape of the oven levels. Put the roasting pan grid in two positions: turned up . 2. Push the deep roasting pan between the guide-bars of the roasting pan grid ... up and down. You can use the roasting pan grid in the deep roasting pan. Using the accessories 15 Inserting the oven shelf and deep roasting pan together Put the oven shelf on the necessary shelf level. Grilling set The grilling set includes the roasting pan grid and the deep roasting pan...
Product Manual
Page 16
...supports of food. The temperature and baking times in the deep roasting pan. Use is to use the lower temperature the first time. Main oven The main oven is the smaller of baking time, to cook smaller quantities of the roasting pan grid must point down. 2. How to use the Baking Tables... shelf levels to use the residual heat. Put the roasting pan grid in the tables are guidelines only. Put the deep roasting pan in the oven can cause permanent stains on the enamel. Fruit juices can twist during baking. It has 6 shelf levels. Use a deep baking tray for cooking ...
...supports of food. The temperature and baking times in the deep roasting pan. Use is to use the lower temperature the first time. Main oven The main oven is the smaller of baking time, to cook smaller quantities of the roasting pan grid must point down. 2. How to use the Baking Tables... shelf levels to use the residual heat. Put the roasting pan grid in the tables are guidelines only. Put the deep roasting pan in the oven can cause permanent stains on the enamel. Fruit juices can twist during baking. It has 6 shelf levels. Use a deep baking tray for cooking ...
Product Manual
Page 17
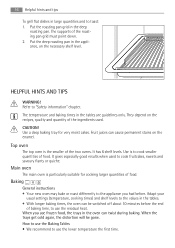
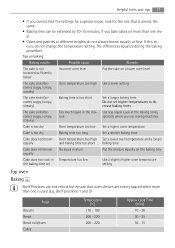
...times The cake sinks (becomes soggy, lumpy, streaky) Too much liquid in Temperature too low the baking time set Use a slightly higher oven temperature setting Top oven Baking Shelf Positions are evenly spaced when more than one level. • Cakes and pastries at different heights do not change the temperature ... the baking procedure. Helpful hints and tips 17 • If you cannot find the settings for a special recipe, look for the one that oven shelves are not critical but ensure that is almost the same. • Baking time can be extended by 10-15 minutes, if you bake ...
...times The cake sinks (becomes soggy, lumpy, streaky) Too much liquid in Temperature too low the baking time set Use a slightly higher oven temperature setting Top oven Baking Shelf Positions are evenly spaced when more than one level. • Cakes and pastries at different heights do not change the temperature ... the baking procedure. Helpful hints and tips 17 • If you cannot find the settings for a special recipe, look for the one that oven shelves are not critical but ensure that is almost the same. • Baking time can be extended by 10-15 minutes, if you bake ...
Product Manual
Page 19
... 160 - 180 160 - 180 160 - 180 25 - 50 Follow manufacturer´s instructions. 160 - 180 25 - 50 Main oven Baking Shelf Positions are not critical but ensure that oven shelves are evenly spaced when more than one is used (e.g. Flaky - Small & Queen - Rich Fruit - Shortcrust - Reduce the ...temperature for Fan oven by 20°C Individual Roasting Meat, Poultry Temperature [°C] Approx Cook Time (mins) 180 - 190 25 - 40 200 - 210 15 - ...
... 160 - 180 160 - 180 160 - 180 25 - 50 Follow manufacturer´s instructions. 160 - 180 25 - 50 Main oven Baking Shelf Positions are not critical but ensure that oven shelves are evenly spaced when more than one is used (e.g. Flaky - Small & Queen - Rich Fruit - Shortcrust - Reduce the ...temperature for Fan oven by 20°C Individual Roasting Meat, Poultry Temperature [°C] Approx Cook Time (mins) 180 - 190 25 - 40 200 - 210 15 - ...
Product Manual
Page 21
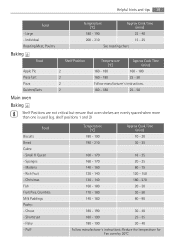
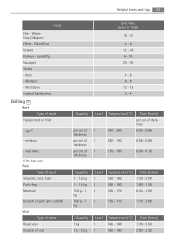
... or have crackling, can be roasted directly in the deep roasting pan or on the oven shelf above the deep roasting pan. (If present) • Roast lean meats in the roasting tin without the lid. ...Main oven Roasting Meat Beef/ Beef boned Mutton/ Lamb Pork/ Veal/ Ham Chicken Turkey/ Goose Duck Pheasant Rabbit Temperature [°C] ...minutes over Grilling Always use the grilling function with maximum temperature setting Always grill with the oven door closed Always pre-heat the empty...
... or have crackling, can be roasted directly in the deep roasting pan or on the oven shelf above the deep roasting pan. (If present) • Roast lean meats in the roasting tin without the lid. ...Main oven Roasting Meat Beef/ Beef boned Mutton/ Lamb Pork/ Veal/ Ham Chicken Turkey/ Goose Duck Pheasant Rabbit Temperature [°C] ...minutes over Grilling Always use the grilling function with maximum temperature setting Always grill with the oven door closed Always pre-heat the empty...
Product Manual
Page 22
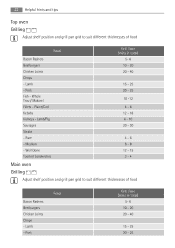
...in total) 5- 6 10 - 20 20 - 40 15 - 25 20 - 25 10 -12 4 - 6 12 - 18 6 - 10 20 - 30 4 - 6 6 - 8 12 - 15 3 - 4 Main oven Grilling Adjust shelf position and grill pan grid to suit different thicknesses of food Food Bacon Rashers Beefburgers Chicken Joints Chops - Well Done Toasted Sandwiches...Lamb - Plaice/Cod Kebabs Kidneys - Lamb/Pig Sausages Steaks - Whole Trout/ Makarel Fillets - Lamb - 22 Helpful hints and tips Top oven Grilling Adjust shelf position and grill pan grid to suit different thicknesses of food Food Bacon Rashers Beefburgers Chicken Joints Chops - Medium -
...in total) 5- 6 10 - 20 20 - 40 15 - 25 20 - 25 10 -12 4 - 6 12 - 18 6 - 10 20 - 30 4 - 6 6 - 8 12 - 15 3 - 4 Main oven Grilling Adjust shelf position and grill pan grid to suit different thicknesses of food Food Bacon Rashers Beefburgers Chicken Joints Chops - Well Done Toasted Sandwiches...Lamb - Plaice/Cod Kebabs Kidneys - Lamb/Pig Sausages Steaks - Whole Trout/ Makarel Fillets - Lamb - 22 Helpful hints and tips Top oven Grilling Adjust shelf position and grill pan grid to suit different thicknesses of food Food Bacon Rashers Beefburgers Chicken Joints Chops - Medium -
Product Manual
Page 23
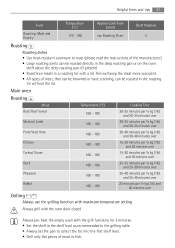
well done 1) Pre-heat oven Pork Type of meat Shoulder, neck, ham Pork chop Meatloaf Knuckle of pork (pre-cooked) Veal Type of meat Roast veal Knuckle of veal Grill ...
well done 1) Pre-heat oven Pork Type of meat Shoulder, neck, ham Pork chop Meatloaf Knuckle of pork (pre-cooked) Veal Type of meat Roast veal Knuckle of veal Grill ...
Product Manual
Page 24
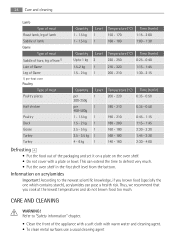
...scientific knowledge, if you cook at the lowest temperatures and do not brown food too much . • Put the oven shelf in the first shelf level from the bottom. Information on the oven shelf. • Do not cover with warm water and cleaning agent. • To clean metal surfaces use a usual... lamb, leg of lamb Saddle of lamb Game Type of meat Saddle of hare, leg of hare1) Loin of Game Leg of Game 1) pre-heat oven Poultry Type of meat Poultry pieces Half chicken Poultry Duck Goose Turkey Turkey Quantity 1 - 1.5 kg 1 - 1.5 kg Level 1 1 Temperature (°C) Time (h:min) 150 - 170 1:15 -...
...scientific knowledge, if you cook at the lowest temperatures and do not brown food too much . • Put the oven shelf in the first shelf level from the bottom. Information on the oven shelf. • Do not cover with warm water and cleaning agent. • To clean metal surfaces use a usual... lamb, leg of lamb Saddle of lamb Game Type of meat Saddle of hare, leg of hare1) Loin of Game Leg of Game 1) pre-heat oven Poultry Type of meat Poultry pieces Half chicken Poultry Duck Goose Turkey Turkey Quantity 1 - 1.5 kg 1 - 1.5 kg Level 1 1 Temperature (°C) Time (h:min) 150 - 170 1:15 -...
Product Manual
Page 25
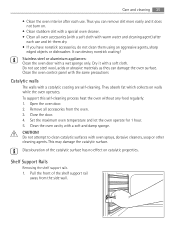
...same precautions Catalytic walls The walls with a wet sponge only. CAUTION! Stainless steel or aluminium appliances: Clean the oven door with a catalytic coating are self-cleaning. Clean the oven cavity with warm water and cleaning agent) after each use and let them dry. • If you have... 1. Close the door. 4. This may damage the catalytic surface. Care and cleaning 25 • Clean the oven interior after each use. Set the maximum oven temperature and let the oven operate for 1 hour. 5. Pull the front of the catalytic surface has no effect on catalytic properties. It can...
...same precautions Catalytic walls The walls with a wet sponge only. CAUTION! Stainless steel or aluminium appliances: Clean the oven door with a catalytic coating are self-cleaning. Clean the oven cavity with warm water and cleaning agent) after each use and let them dry. • If you have... 1. Close the door. 4. This may damage the catalytic surface. Care and cleaning 25 • Clean the oven interior after each use. Set the maximum oven temperature and let the oven operate for 1 hour. 5. Pull the front of the catalytic surface has no effect on catalytic properties. It can...
Product Manual
Page 26
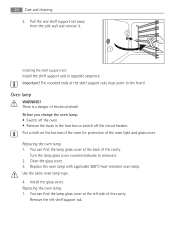
...in the fuse box or switch off the circuit breaker. Important! The rounded ends of the cavity. Replace the oven lamp with applicable 300°C heat-resistant oven lamp. You can find the lamp glass cover at the back of the cavity. Turn the lamp glass cover counterclockwise... to the front! Use the same oven lamp type. 4. Replacing the oven lamp: 1. Pull the rear shelf support rail away from the side wall and remove it . 2. Before you change the oven lamp: • Switch off the oven. • Remove the fuses in opposite sequence. 26...
...in the fuse box or switch off the circuit breaker. Important! The rounded ends of the cavity. Replace the oven lamp with applicable 300°C heat-resistant oven lamp. You can find the lamp glass cover at the back of the cavity. Turn the lamp glass cover counterclockwise... to the front! Use the same oven lamp type. 4. Replacing the oven lamp: 1. Pull the rear shelf support rail away from the side wall and remove it . 2. Before you change the oven lamp: • Switch off the oven. • Remove the fuses in opposite sequence. 26...


