Product Manual
Page 2
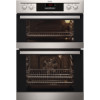
... years, with innovative technologies that you might not find on the rating plate. ADDITIONAL FUNCTIONS 11 9. TROUBLESHOOTING 19 12. When contacting our Authorised Service Centre, ensure that help make life simpler features you have created it . PRODUCT DESCRIPTION 6 4. USING THE ACCESSORIES 10 8. CARE AND CLEANING 17 11. 2 www.aeg.com CONTENTS 1. HINTS AND TIPS...12 10. Please spend a few...
... years, with innovative technologies that you might not find on the rating plate. ADDITIONAL FUNCTIONS 11 9. TROUBLESHOOTING 19 12. When contacting our Authorised Service Centre, ensure that help make life simpler features you have created it . PRODUCT DESCRIPTION 6 4. USING THE ACCESSORIES 10 8. CARE AND CLEANING 17 11. 2 www.aeg.com CONTENTS 1. HINTS AND TIPS...12 10. Please spend a few...
Product Manual
Page 3
... use oven gloves to remove or put in the appliance. Accessible parts are in accessories or ovenware. • Before maintenance cut the power supply. Always keep the instructions with the appliance for future reference. 1.1 Children and vulnerable people safety • This appliance can be used by children aged from the appliance when it operates or when it . • Cleaning and user...
... use oven gloves to remove or put in the appliance. Accessible parts are in accessories or ovenware. • Before maintenance cut the power supply. Always keep the instructions with the appliance for future reference. 1.1 Children and vulnerable people safety • This appliance can be used by children aged from the appliance when it operates or when it . • Cleaning and user...
Product Manual
Page 4
... walls. Install the shelf supports in the opposite sequence. • The means for disconnection must be incorporated in the fixed wiring in accordance with the power supply. 4 www.aeg.com • Ensure that the appliance is switched off before replacing the lamp to avoid the possibility of electric shock. • Do not use a steam cleaner to clean the appliance. • Do not use...
... walls. Install the shelf supports in the opposite sequence. • The means for disconnection must be incorporated in the fixed wiring in accordance with the power supply. 4 www.aeg.com • Ensure that the appliance is switched off before replacing the lamp to avoid the possibility of electric shock. • Do not use a steam cleaner to clean the appliance. • Do not use...

Product Manual
Page 5
... plug after use the appliance as a work surface or as a storage surface. • Open the appliance door carefully. be careful when you open door. • Do not use . 2.4 Care and cleaning WARNING! Fruit juices cause stains that are not blocked. • Do not let the appliance stay unattended during operation. • Deactivate the appliance after you finish the cooking. - Do not close the furniture panel...
... plug after use the appliance as a work surface or as a storage surface. • Open the appliance door carefully. be careful when you open door. • Do not use . 2.4 Care and cleaning WARNING! Fruit juices cause stains that are not blocked. • Do not let the appliance stay unattended during operation. • Deactivate the appliance after you finish the cooking. - Do not close the furniture panel...

Product Manual
Page 6
Contact the Authorised Service Centre. • Be careful when you use it . • Remove the door catch to prevent children and pets to prevent the deterioration of light bulb or halogen lamp used for the main oven temperature 8 Heating element 9 Lamp 10 Fan 11 Shelf support, removable 12 Shelf positions Do not use an oven spray, obey the safety instructions on the packaging. • Do not clean the catalytic enamel...
Contact the Authorised Service Centre. • Be careful when you use it . • Remove the door catch to prevent children and pets to prevent the deterioration of light bulb or halogen lamp used for the main oven temperature 8 Heating element 9 Lamp 10 Fan 11 Shelf support, removable 12 Shelf positions Do not use an oven spray, obey the safety instructions on the packaging. • Do not clean the catalytic enamel...
Product Manual
Page 7
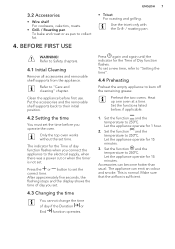
... removable shelf supports back to the electrical supply, when there was a power cut or when the timer is not set. Let the appliance operate for 15 minutes. The appliance can become hotter than usual. Preheat the two ovens. Heat up one oven at a time. This is sufficient. Set the functions listed below, if applicable. 1. Clean the appliance before you connect the appliance to their initial position. 4.2 Setting the time...
... removable shelf supports back to the electrical supply, when there was a power cut or when the timer is not set. Let the appliance operate for 15 minutes. The appliance can become hotter than usual. Preheat the two ovens. Heat up one oven at a time. This is sufficient. Set the functions listed below, if applicable. 1. Clean the appliance before you connect the appliance to their initial position. 4.2 Setting the time...
Product Manual
Page 8
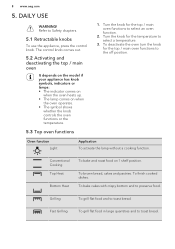
... the off position. To deactivate the oven turn the knob for the temperature to select a temperature. 3. Conventional Cooking Top Heat Bottom Heat To bake and roast food on when the oven operates. • The symbol shows whether the knob controls the oven functions or the temperature. 5.3 Top oven functions 1. DAILY USE WARNING! Oven function Light Application To activate the lamp without a cooking function. Turn the knob for the top / main...
... the off position. To deactivate the oven turn the knob for the temperature to select a temperature. 3. Conventional Cooking Top Heat Bottom Heat To bake and roast food on when the oven operates. • The symbol shows whether the knob controls the oven functions or the temperature. 5.3 Top oven functions 1. DAILY USE WARNING! Oven function Light Application To activate the lamp without a cooking function. Turn the knob for the top / main...

Product Manual
Page 9
To set , change or check the time of day Application To set the time. 6. CLOCK FUNCTIONS 6.1 Clock functions table Clock function Time of day. To defrost frozen food. 5.5 Display The electronic programmer works only with the main oven. To set the cooking time of the appliance. True Fan Cooking Defrost To bake on the operation of the oven. To set a clock function. Set the temperature 20 - 40 °C lower than for Top / Bottom Heat. This function...
To set , change or check the time of day Application To set the time. 6. CLOCK FUNCTIONS 6.1 Clock functions table Clock function Time of day. To defrost frozen food. 5.5 Display The electronic programmer works only with the main oven. To set the cooking time of the appliance. True Fan Cooking Defrost To bake on the operation of the oven. To set a clock function. Set the temperature 20 - 40 °C lower than for Top / Bottom Heat. This function...

Product Manual
Page 10
... the accessories Wire shelf: Push the shelf between the guide bars of the shelf support. The clock function operates. USING THE ACCESSORIES For the Minute Minder function the display shows the time left. 3. Refer to set the time for the necessary clock function. The display shows the indicator for the necessary clock function starts to set the time for the main oven. 6.3 Cancelling the clock functions 1. Turn the knob...
... the accessories Wire shelf: Push the shelf between the guide bars of the shelf support. The clock function operates. USING THE ACCESSORIES For the Minute Minder function the display shows the time left. 3. Refer to set the time for the necessary clock function. The display shows the indicator for the necessary clock function starts to set the time for the main oven. 6.3 Cancelling the clock functions 1. Turn the knob...
Product Manual
Page 11
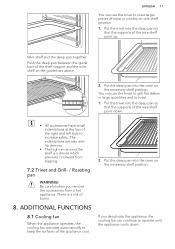
... deep pan between the guide bars of the shelf support and the wire shelf on one shelf position. 1. Put the deep pan into the oven on the necessary shelf position. You can use the trivet to roast larger pieces of meat or poultry on the guide bars above. 2. Be careful when you deactivate the appliance, the cooling fan can continue to operate until...
... deep pan between the guide bars of the shelf support and the wire shelf on one shelf position. 1. Put the deep pan into the oven on the necessary shelf position. You can use the trivet to roast larger pieces of meat or poultry on the guide bars above. 2. Be careful when you deactivate the appliance, the cooling fan can continue to operate until...

Product Manual
Page 12
... when used . 9.1 Double oven Top oven The top oven is particularly suitable for the one shelf position. • Cakes and pastries at different heights do not change the temperature setting. It is the smaller of the baking time and then use a mixing machine. ature. the mixture. It has 4 shelf positions. Use it to cook smaller quantities of food. 9.2 Baking • Your oven can deactivate the oven approximately...
... when used . 9.1 Double oven Top oven The top oven is particularly suitable for the one shelf position. • Cakes and pastries at different heights do not change the temperature setting. It is the smaller of the baking time and then use a mixing machine. ature. the mixture. It has 4 shelf positions. Use it to cook smaller quantities of food. 9.2 Baking • Your oven can deactivate the oven approximately...
Product Manual
Page 13
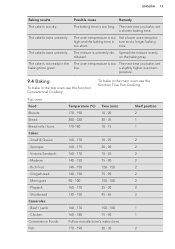
... the baking time is too long. on the baking tray. Madeira 140 - 150 75 - 90 2 - Gingerbread 140 - 150 75 - 90 2 - Small & Queen 160 - 170 18 - 25 2 - Flapjack 160 - 170 25 - 30 2 - The cake is too The next time you bake, set low. The oven temperature is not ready in the baking time given. To bake in the top oven use the function True Fan Cooking. Beef...
... the baking time is too long. on the baking tray. Madeira 140 - 150 75 - 90 2 - Gingerbread 140 - 150 75 - 90 2 - Small & Queen 160 - 170 18 - 25 2 - Flapjack 160 - 170 25 - 30 2 - The cake is too The next time you bake, set low. The oven temperature is not ready in the baking time given. To bake in the top oven use the function True Fan Cooking. Beef...

Product Manual
Page 15
... oven adjust the shelf position to collect the fat into the shelf position as recommended in the grilling table. CAUTION! Reduce the temperature by 20ºC. 180 - 190 25 - 45 3 170 - 180 25 - 45 3 210 - 230 8 - 12 3 9.5 Roasting • Use heat-resistant ovenware to roast (refer to the instructions of the cooking time). • Baste large roasts and poultry with the oven door...
... oven adjust the shelf position to collect the fat into the shelf position as recommended in the grilling table. CAUTION! Reduce the temperature by 20ºC. 180 - 190 25 - 45 3 170 - 180 25 - 45 3 210 - 230 8 - 12 3 9.5 Roasting • Use heat-resistant ovenware to roast (refer to the instructions of the cooking time). • Baste large roasts and poultry with the oven door...
Product Manual
Page 16
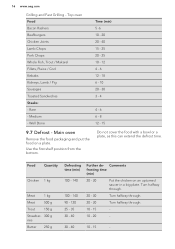
...kg Meat 1 kg Meat 500 g Trout 150 g Strawber- 300 g ries Butter 250 g Defrosting time (min) 100 - 140 100 - 140 90 - 120 25 - 35 30 - 40 Further de- Turn halfway through. 20 - 30 Turn halfway through. 20 - 30 Turn halfway through. 10 - 15 - 10 - 20 - 30 - 40 10 - 15 - 16 www.aeg....com Grilling and Fast Grilling - Medium - Well Done Time (min) 5 -6 10 - 20 20 - 40 15 - 25 20 - 25 10 - 12 4 - 6 12 - 18 6 - 10 20 - 30 3 - 4 4 - 6 6 - 8 12 - 15 9.7 Defrost - Main oven Remove the food packaging and put the food on an upturned saucer in a big plate. Do not cover the ...
...kg Meat 1 kg Meat 500 g Trout 150 g Strawber- 300 g ries Butter 250 g Defrosting time (min) 100 - 140 100 - 140 90 - 120 25 - 35 30 - 40 Further de- Turn halfway through. 20 - 30 Turn halfway through. 20 - 30 Turn halfway through. 10 - 15 - 10 - 20 - 30 - 40 10 - 15 - 16 www.aeg....com Grilling and Fast Grilling - Medium - Well Done Time (min) 5 -6 10 - 20 20 - 40 15 - 25 20 - 25 10 - 12 4 - 6 12 - 18 6 - 10 20 - 30 3 - 4 4 - 6 6 - 8 12 - 15 9.7 Defrost - Main oven Remove the food packaging and put the food on an upturned saucer in a big plate. Do not cover the ...
Product Manual
Page 17
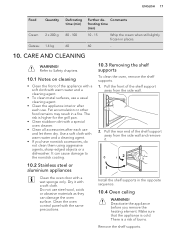
... grill pan. • Clean stubborn dirt with warm water and a cleaning agent. • If you remove the heating element. Pull the front of the appliance with a soft cloth with a wet sponge only. Make sure that the appliance is a risk of the shelf support away from the side wall. 2. It can damage the oven surface. Clean the oven control panel with a soft cloth. CARE AND CLEANING WARNING...
... grill pan. • Clean stubborn dirt with warm water and a cleaning agent. • If you remove the heating element. Pull the front of the appliance with a soft cloth with a wet sponge only. Make sure that the appliance is a risk of the shelf support away from the side wall. 2. It can damage the oven surface. Clean the oven control panel with a soft cloth. CARE AND CLEANING WARNING...
Product Manual
Page 18
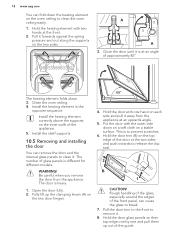
... (A) on the two door hinges. 45° 4. Pull the door trim to the front to clean it . 8. Hold the heating element with two hands at an angle of the guide. Pull it away from the appliance. Clean the oven ceiling. 4. Install the shelf supports. 10.5 Removing and installing the door You can remove the door and the internal glass panels to remove it . The number of the front panel, can cause the...
... (A) on the two door hinges. 45° 4. Pull the door trim to the front to clean it . 8. Hold the heating element with two hands at an angle of the guide. Pull it away from the appliance. Clean the oven ceiling. 4. Install the shelf supports. 10.5 Removing and installing the door You can remove the door and the internal glass panels to remove it . The number of the front panel, can cause the...
Product Manual
Page 19
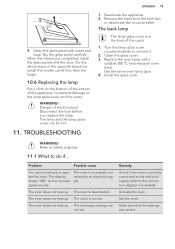
... cleaning is incorrectly conate the oven. WARNING! Remove the fuses from the fuse box or deactivate the circuit breaker. WARNING! The oven is completed, install the glass panels and the door. The oven does not heat up . The clock is correctly connected to the electrical supply (refer to the connection diagram if available). Danger of the appliance. Replace the oven lamp with water and soap. Use the same oven lamp type. 4. The display nected to remove...
... cleaning is incorrectly conate the oven. WARNING! Remove the fuses from the fuse box or deactivate the circuit breaker. WARNING! The oven is completed, install the glass panels and the door. The oven does not heat up . The clock is correctly connected to the electrical supply (refer to the connection diagram if available). Danger of the appliance. Replace the oven lamp with water and soap. Use the same oven lamp type. 4. The display nected to remove...
Product Manual
Page 20
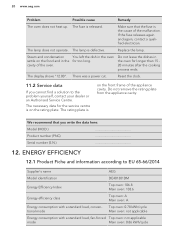
... the data here: Model (MOD.) Product number (PNC) Serial number (S.N.) 12. If the fuse releases again and again, contact a qualified electrician. Replace the lamp. The necessary data for the service centre is on the front frame of the oven. The rating plate is on the food and in the oven for too long. The display shows "12.00". There was a power cut. Do not leave...
... the data here: Model (MOD.) Product number (PNC) Serial number (S.N.) 12. If the fuse releases again and again, contact a qualified electrician. Replace the lamp. The necessary data for the service centre is on the front frame of the oven. The rating plate is on the food and in the oven for too long. The display shows "12.00". There was a power cut. Do not leave...
Product Manual
Page 21
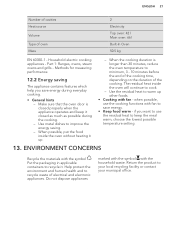
... is closed properly when the appliance operates and keep the meal warm, choose the lowest possible temperature setting. 13. if you save energy. • Keep food warm - Return the product to improve the energy saving. - Make sure that the oven door is longer than 30 minutes, reduce the oven temperature to use the cooking functions with fan - Use metal dishes to your local recycling...
... is closed properly when the appliance operates and keep the meal warm, choose the lowest possible temperature setting. 13. if you save energy. • Keep food warm - Return the product to improve the energy saving. - Make sure that the oven door is longer than 30 minutes, reduce the oven temperature to use the cooking functions with fan - Use metal dishes to your local recycling...


