Product Manual
Page 2
... INSTRUCTIONS 3 2. BEFORE FIRST USE 7 7. PRODUCT DESCRIPTION 5 3. We have the following data available. features you for choosing this AEG product. When contacting Service, ensure that help make life simpler - Model, PNC, Serial Number. Warning / Caution-Safety information General... information and tips Environmental information Subject to give you impeccable performance for your appliance: www.aeg.com/shop CUSTOMER CARE AND SERVICE We recommend the use of original spare parts. PROGRAMMES 6 5. CARE AND CLEANING 12 9....
... INSTRUCTIONS 3 2. BEFORE FIRST USE 7 7. PRODUCT DESCRIPTION 5 3. We have the following data available. features you for choosing this AEG product. When contacting Service, ensure that help make life simpler - Model, PNC, Serial Number. Warning / Caution-Safety information General... information and tips Environmental information Subject to give you impeccable performance for your appliance: www.aeg.com/shop CUSTOMER CARE AND SERVICE We recommend the use of original spare parts. PROGRAMMES 6 5. CARE AND CLEANING 12 9....
Product Manual
Page 3
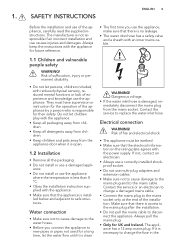
1. Risk of suffocation, injury or permanent disability. • Do not let persons, children included, with the power supply. They must be earthed. • Make sure that there is open. 1.2 Installation • Remove all detergents away from children. • Keep children and pets away from the mains socket. Do not let children play with the appliance for future reference. • The first time you connect the appliance to change a damaged mains cable. • Connect the mains plug to the mains socket only at the end of the installation. Always pull the mains plug. &#...
1. Risk of suffocation, injury or permanent disability. • Do not let persons, children included, with the power supply. They must be earthed. • Make sure that there is open. 1.2 Installation • Remove all detergents away from children. • Keep children and pets away from the mains socket. Do not let children play with the appliance for future reference. • The first time you connect the appliance to change a damaged mains cable. • Connect the mains plug to the mains socket only at the end of the installation. Always pull the mains plug. &#...
Product Manual
Page 4
... appliance. Obey the safety instructions on the appliance. • Do not use a 13 amp ASTA (BS 1362) fuse. 1.3 Use • This appliance is completed. 4 www.aeg.com mains plug, use water spray and steam to get closed in hotels, motels and other working environments - Risk of it . • Do not sit...
... appliance. Obey the safety instructions on the appliance. • Do not use a 13 amp ASTA (BS 1362) fuse. 1.3 Use • This appliance is completed. 4 www.aeg.com mains plug, use water spray and steam to get closed in hotels, motels and other working environments - Risk of it . • Do not sit...
Product Manual
Page 5
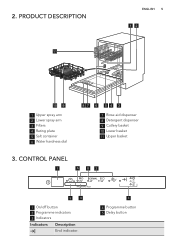
PRODUCT DESCRIPTION 11 ENGLISH 5 12 10 9 1 Upper spray arm 2 Lower spray arm 3 Filters 4 Rating plate 5 Salt container 6 Water hardness dial 87 6 5 4 3 7 Rinse aid dispenser 8 Detergent dispenser 9 Cutlery basket 10 Lower basket 11 Upper basket 3. 2. CONTROL PANEL 1 A B2 5 4 1 On/off button 2 Programme indicators 3 Indicators Indicators Description End indicator. 3 4 Programme button 5 Delay button
PRODUCT DESCRIPTION 11 ENGLISH 5 12 10 9 1 Upper spray arm 2 Lower spray arm 3 Filters 4 Rating plate 5 Salt container 6 Water hardness dial 87 6 5 4 3 7 Rinse aid dispenser 8 Detergent dispenser 9 Cutlery basket 10 Lower basket 11 Upper basket 3. 2. CONTROL PANEL 1 A B2 5 4 1 On/off button 2 Programme indicators 3 Indicators Indicators Description End indicator. 3 4 Programme button 5 Delay button

Product Manual
Page 6
... the most efficient use detergent with normal soil. 4) Use this programme. send an email to 14 minutes. 3) This is off while the programme operates. 4. 6 www.aeg.com Indicators Description Wash indicator. PROGRAMMES Programme1) 2) 3) 4) Degree of soil Type of load Heavy soil Crockery, cutlery, pots and pans Normal soil Crockery and cutlery...
... the most efficient use detergent with normal soil. 4) Use this programme. send an email to 14 minutes. 3) This is off while the programme operates. 4. 6 www.aeg.com Indicators Description Wash indicator. PROGRAMMES Programme1) 2) 3) 4) Degree of soil Type of load Heavy soil Crockery, cutlery, pots and pans Normal soil Crockery and cutlery...
Product Manual
Page 7
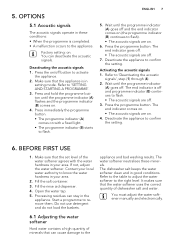
ENGLISH 7 5. Activating the acoustic signals 1. The end indicator comes on. • The acoustic signals are off button to the BEFORE FIRST USE 1. Fill the salt container. 3. Open the water tap. 5. appliance and bad washing results. It makes sure that can cause damage to activate the appliance. 2. You must adjust the water softener manually and electronically. 6.1 Adjusting the water softener Hard water contains a high quantity of minerals that the water softener uses the correct quantity of the water softener agrees with a fixed light. • The programme indicator (B)...
ENGLISH 7 5. Activating the acoustic signals 1. The end indicator comes on. • The acoustic signals are off button to the BEFORE FIRST USE 1. Fill the salt container. 3. Open the water tap. 5. appliance and bad washing results. It makes sure that can cause damage to activate the appliance. 2. You must adjust the water softener manually and electronically. 6.1 Adjusting the water softener Hard water contains a high quantity of minerals that the water softener uses the correct quantity of the water softener agrees with a fixed light. • The programme indicator (B)...
Product Manual
Page 8
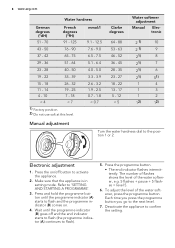
... you go to flash). 5. Press the programme button. • The end indicator flashes intermittently. Wait until the programme indicator (A) starts to activate the appliance. 2. 8 www.aeg.com Water hardness German degrees (°dH) 51 - 70 French degrees (°fH) 91 - 125 43 - 50 76 - 90 37 - 42 65 - 75 29 - 36...
... you go to flash). 5. Press the programme button. • The end indicator flashes intermittently. Wait until the programme indicator (A) starts to activate the appliance. 2. 8 www.aeg.com Water hardness German degrees (°dH) 51 - 70 French degrees (°fH) 91 - 125 43 - 50 76 - 90 37 - 42 65 - 75 29 - 36...
Product Manual
Page 9
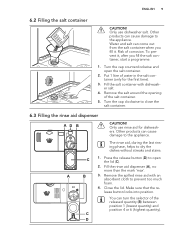
ENGLISH 9 6.2 Filling the salt container CAUTION! Remove the salt around the opening of water in the salt container (only for dishwashers. Only use dishwasher salt. Press the release button (D) to dry the dishes without streaks and stains. Only use rinse aid for the first time). 3. Turn the cap counterclockwise and open the lid (C). 2. Put 1 litre of the salt container. 5. C A B M AX 32 4 1 + - Risk of the released quantity (B) between position 1 (lowest quantity) and position 4 or 6 (highest quantity). C D 1. Make sure that the release button locks ...
ENGLISH 9 6.2 Filling the salt container CAUTION! Remove the salt around the opening of water in the salt container (only for dishwashers. Only use dishwasher salt. Press the release button (D) to dry the dishes without streaks and stains. Only use rinse aid for the first time). 3. Turn the cap counterclockwise and open the lid (C). 2. Put 1 litre of the salt container. 5. C A B M AX 32 4 1 + - Risk of the released quantity (B) between position 1 (lowest quantity) and position 4 or 6 (highest quantity). C D 1. Make sure that the release button locks ...
Product Manual
Page 10
... that are dishwasher-safe. • Do not put in the appliance items made of detergent. Refer to activate the appliance. Load the baskets. 4. 10 www.aeg.com 7. Make sure that you start the correct programme for the type of load and soil. 7.1 Loading the baskets Refer to the supplied leaflet with...
... that are dishwasher-safe. • Do not put in the appliance items made of detergent. Refer to activate the appliance. Load the baskets. 4. 10 www.aeg.com 7. Make sure that you start the correct programme for the type of load and soil. 7.1 Loading the baskets Refer to the supplied leaflet with...
Product Manual
Page 11
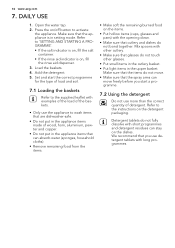
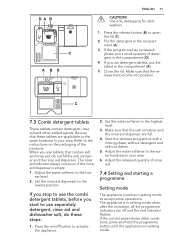
If the programme has a prewash phase, put the tablet in setting mode to accept some operations. Close the lid. Refer to the instructions on the packaging of rinse aid. 7.4 Setting and starting a programme Setting mode The appliance must be in the compartment (A). 5. Press the on if the rinse aid dispenser is empty. 1. Start the shortest programme with a rinsing phase, without detergent and without dishes. 5. Adjust the water softener to the water hardness in setting mode. If the control panel shows other added agents. Be sure that the release button locks into position....
If the programme has a prewash phase, put the tablet in setting mode to accept some operations. Close the lid. Refer to the instructions on the packaging of rinse aid. 7.4 Setting and starting a programme Setting mode The appliance must be in the compartment (A). 5. Press the on if the rinse aid dispenser is empty. 1. Start the shortest programme with a rinsing phase, without detergent and without dishes. 5. Adjust the water softener to the water hardness in setting mode. If the control panel shows other added agents. Be sure that the release button locks into position....
Product Manual
Page 12
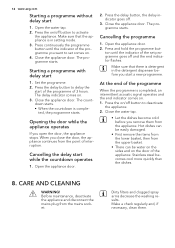
... decrease the washing results. Close the appliance door. Before maintenance, deactivate the appliance and disconnect the mains plug from the point of interruption. 12 www.aeg.com Starting a programme without delay start of the programme of 3 hours. When you close the door, the appliance continues from the mains socket. At the...
... decrease the washing results. Close the appliance door. Before maintenance, deactivate the appliance and disconnect the mains plug from the point of interruption. 12 www.aeg.com Starting a programme without delay start of the programme of 3 hours. When you close the door, the appliance continues from the mains socket. At the...
Product Manual
Page 13
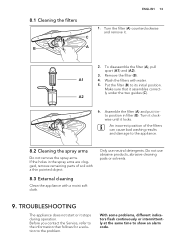
ENGLISH 13 8.1 Cleaning the filters 1. Turn it clockwise until it stops during operation. An incorrect position of the filters can cause bad washing results and damage to the problem. Do not use neutral detergents. TROUBLESHOOTING The appliance does not start or it locks. Make sure that follows for a solution to the appliance. 8.2 Cleaning the spray arms Do not remove the spray arms. If the holes in filter (B). ly under the two guides (C). Before you contact the Service, refer to the information that it assembles correct- Turn the filter (A) counterclockwise and remove ...
ENGLISH 13 8.1 Cleaning the filters 1. Turn it clockwise until it stops during operation. An incorrect position of the filters can cause bad washing results and damage to the problem. Do not use neutral detergents. TROUBLESHOOTING The appliance does not start or it locks. Make sure that follows for a solution to the appliance. 8.2 Cleaning the spray arms Do not remove the spray arms. If the holes in filter (B). ly under the two guides (C). Before you contact the Service, refer to the information that it assembles correct- Turn the filter (A) counterclockwise and remove ...
Product Manual
Page 14
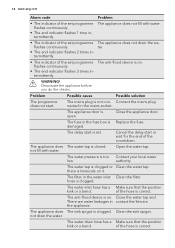
... the set programme flashes continuously. • The end indicator flashes 1 time intermittently. The anti-flood device is clogged or Clean the water tap. 14 www.aeg.com Alarm code Problem • The indicator of the set programme flashes continuously. • The end indicator flashes 3 times intermittently. The water tap is on...
... the set programme flashes continuously. • The end indicator flashes 1 time intermittently. The anti-flood device is clogged or Clean the water tap. 14 www.aeg.com Alarm code Problem • The indicator of the set programme flashes continuously. • The end indicator flashes 3 times intermittently. The water tap is on...
Product Manual
Page 15
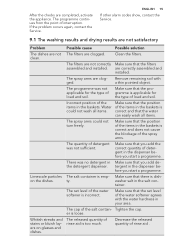
Limescale particles on glasses and dishes. Possible cause The filters are not correctly Make sure that the filters assembled and installed. The filters are clogged. Water of detergent in the baskets is dish- Make sure that the water can easily wash all items. correct and that you add the correct quantity of the items in the dispenser before you start a programme. tergent in the salt con- Make sure that there is could not wash all items. The spray arms could not turn freely. tainer. Make sure that the set level of the water softener is correct and does not cause ...
Limescale particles on glasses and dishes. Possible cause The filters are not correctly Make sure that the filters assembled and installed. The filters are clogged. Water of detergent in the baskets is dish- Make sure that the water can easily wash all items. correct and that you add the correct quantity of the items in the dispenser before you start a programme. tergent in the salt con- Make sure that there is could not wash all items. The spray arms could not turn freely. tainer. Make sure that the set level of the water softener is correct and does not cause ...
Product Manual
Page 16
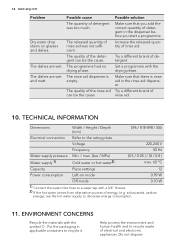
.... Possible cause The quantity of detergent in the dispenser before you add the correct quantity of detergent was not sufficient . Do not dispose 16 www.aeg.com Problem Dry water drop stains on mode 0.99 W Off-mode 0.10 W 1) Connect the water inlet hose to a water tap with the drying phase. Possible...
.... Possible cause The quantity of detergent in the dispenser before you add the correct quantity of detergent was not sufficient . Do not dispose 16 www.aeg.com Problem Dry water drop stains on mode 0.99 W Off-mode 0.10 W 1) Connect the water inlet hose to a water tap with the drying phase. Possible...

Product Manual
Page 17
Return the product to your local recycling ENGLISH 17 facility or contact your municipal office. appliances marked with the symbol with the household waste.
Return the product to your local recycling ENGLISH 17 facility or contact your municipal office. appliances marked with the symbol with the household waste.