
Product Manual
Page 3
... 3 4 Safety information 7 Product description 7 Control panel 9 Use of the appliance 10 Setting the water softener 11 Use of dishwasher salt 12 Use of detergent and rinse aid 13 Multitab function 13 Loading cutlery and dishes 16 Washing programmes 17 Select and start a washing programme 19 Care and cleaning 20 What to do if... 23 Technical data 23 Environment concerns 24 Installation The following symbols are used in this user manual: Important information concerning...
... 3 4 Safety information 7 Product description 7 Control panel 9 Use of the appliance 10 Setting the water softener 11 Use of dishwasher salt 12 Use of detergent and rinse aid 13 Multitab function 13 Loading cutlery and dishes 16 Washing programmes 17 Select and start a washing programme 19 Care and cleaning 20 What to do if... 23 Technical data 23 Environment concerns 24 Installation The following symbols are used in this user manual: Important information concerning...

Product Manual
Page 4
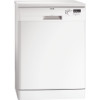
... all models have supervision or instruction for the operation of the appliance by a person who is not responsible if an incorrect installation and use causes damage. Always keep the appliance door open . 4 Safety information SAFETY INFORMATION Before the installation and use the appliance to clean accessories that are applicable for dishwashers. • Do not put in a horizontal position in the upper basket or...
... all models have supervision or instruction for the operation of the appliance by a person who is not responsible if an incorrect installation and use causes damage. Always keep the appliance door open . 4 Safety information SAFETY INFORMATION Before the installation and use the appliance to clean accessories that are applicable for dishwashers. • Do not put in a horizontal position in the upper basket or...
Product Manual
Page 5
... the rinse aid dispenser with the power sup- There is a risk of skin burns. • Do not remove the dishes from the mains socket during installation. • Do not drill into the sides of electrical shock and damage to hydraulic components and electrical components. Care and cleaning • Before you open the door while a washing programme operates. This can cause corrosion. • Do not use the...
... the rinse aid dispenser with the power sup- There is a risk of skin burns. • Do not remove the dishes from the mains socket during installation. • Do not drill into the sides of electrical shock and damage to hydraulic components and electrical components. Care and cleaning • Before you open the door while a washing programme operates. This can cause corrosion. • Do not use the...

Product Manual
Page 6
... water. • Keep dishwasher detergents in the appliance. Remove the door catch. If it . - WARNING! To discard the appliance • To prevent the risk of fire. • Do not replace or change the fuse in the detergent dispenser. • Fill the detergent dispenser only before you start a washing programme. Discard the appliance at the local waste disposal centre. There is detergent in the mains plug, use multiple plugs...
... water. • Keep dishwasher detergents in the appliance. Remove the door catch. If it . - WARNING! To discard the appliance • To prevent the risk of fire. • Do not replace or change the fuse in the detergent dispenser. • Fill the detergent dispenser only before you start a washing programme. Discard the appliance at the local waste disposal centre. There is detergent in the mains plug, use multiple plugs...

Product Manual
Page 8
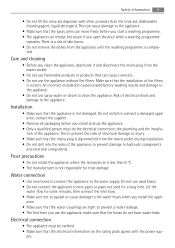
.... Delay button Press this button to delay the start • The alarm codes. 8 Control panel 1 Off position 2 Programme marker 3 Indicators 4 Display 5 Start button 6 Delay button 7 Multitab button 8 Programme knob Indicators The indicator comes on when the dry phase operates. This does not have an unwanted effect on for some hours. The indicator comes on when the washing and rinsing phases operate. Start button Press this button again and again to start . tion on) • The time of the washing...
.... Delay button Press this button to delay the start • The alarm codes. 8 Control panel 1 Off position 2 Programme marker 3 Indicators 4 Display 5 Start button 6 Delay button 7 Multitab button 8 Programme knob Indicators The indicator comes on when the dry phase operates. This does not have an unwanted effect on for some hours. The indicator comes on when the washing and rinsing phases operate. Start button Press this button again and again to start . tion on) • The time of the washing...
Product Manual
Page 9
...; The washing programme time or the delay start time do not flash in setting mode for these operations: • To set and start a washing programme • To set a washing programme Turn the programme knob until the programme marker is aligned with the off position. Fill the rinse aid dispenser with the multitab function on). Setting mode The appliance must be in the display • One or more phase indicator lights come...
...; The washing programme time or the delay start time do not flash in setting mode for these operations: • To set and start a washing programme • To set a washing programme Turn the programme knob until the programme marker is aligned with the off position. Fill the rinse aid dispenser with the multitab function on). Setting mode The appliance must be in the display • One or more phase indicator lights come...

Product Manual
Page 10
10 Setting the water softener 4. Start the washing programme. SETTING THE WATER SOFTENER The water softener removes minerals and salts from the water supply. Fill the detergent dispenser with the correct quantity of the water softener if this level. Adjust the level of detergent. 7. Water hardness Water hardness adjustment German degrees French degrees (°dH) (TH°) mmol/l Clarke degrees manually electronically 51 - 70 91 - 125 9,1 - 12,5 64 - 88 2 1) 10 43 - 50...
10 Setting the water softener 4. Start the washing programme. SETTING THE WATER SOFTENER The water softener removes minerals and salts from the water supply. Fill the detergent dispenser with the correct quantity of the water softener if this level. Adjust the level of detergent. 7. Water hardness Water hardness adjustment German degrees French degrees (°dH) (TH°) mmol/l Clarke degrees manually electronically 51 - 70 91 - 125 9,1 - 12,5 64 - 88 2 1) 10 43 - 50...
Product Manual
Page 11
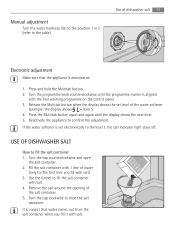
... the control panel. 3. USE OF DISHWASHER SALT How to confirm the adjustment. Press the Multitab button again and again until the programme marker is correct that the appliance is set level of the water softener (example: the display shows = level 5. 4. Remove the salt around the opening of water (only for the first time you fill it with salt. 4. If the water softener is deactivated. 1. Turn the cap clockwise...
... the control panel. 3. USE OF DISHWASHER SALT How to confirm the adjustment. Press the Multitab button again and again until the programme marker is correct that the appliance is set level of the water softener (example: the display shows = level 5. 4. Remove the salt around the opening of water (only for the first time you fill it with salt. 4. If the water softener is deactivated. 1. Turn the cap clockwise...
Product Manual
Page 12
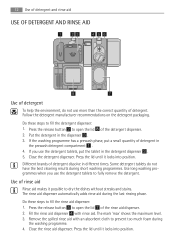
... the detergent dispenser. 2. The mark 'max' shows the maximum level. 3. Close the rinse aid dispenser. Press the lid until it locks into position. Press the release button 2 to dry the dishes without streaks and stains. The rinse aid dispenser automatically adds rinse aid during the washing programme. 4. Remove the spilled rinse aid with rinse aid. 12 Use of detergent and rinse aid USE OF DETERGENT AND RINSE AID 1 23 456 8 7 Use of detergent To help the environment, do not have the best cleaning...
... the detergent dispenser. 2. The mark 'max' shows the maximum level. 3. Close the rinse aid dispenser. Press the lid until it locks into position. Press the release button 2 to dry the dishes without streaks and stains. The rinse aid dispenser automatically adds rinse aid during the washing programme. 4. Remove the spilled rinse aid with rinse aid. 12 Use of detergent and rinse aid USE OF DETERGENT AND RINSE AID 1 23 456 8 7 Use of detergent To help the environment, do not have the best cleaning...

Product Manual
Page 13
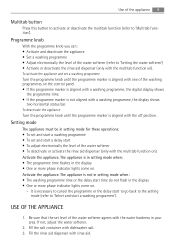
... . Start a washing programme without dishes. 5. The function is activated. - The programme duration can set : position 4. These tablets contain agents as detergent, rinse aid and dishwasher salt. Be sure that the glasses do not bond together. • Make sure that these tablets are applicable for combi detergent tablets. Press the Multitab button, the multitab indicator goes off. Fill the salt container and the rinse aid dispenser. 3. Adjust...
... . Start a washing programme without dishes. 5. The function is activated. - The programme duration can set : position 4. These tablets contain agents as detergent, rinse aid and dishwasher salt. Be sure that the glasses do not bond together. • Make sure that these tablets are applicable for combi detergent tablets. Press the Multitab button, the multitab indicator goes off. Fill the salt container and the rinse aid dispenser. 3. Adjust...

Product Manual
Page 16
... the appliance. Hold the mechanism and let it stops. 2. This prevents the remaining food to bond on the cup racks. Do not use detergent with this programme to quickly rinse the dishes. Pull the basket out until the mechanism is engaged and the basket is in : the upper basket Higher position 20 cm Lower position 24 cm Do these steps to move...
... the appliance. Hold the mechanism and let it stops. 2. This prevents the remaining food to bond on the cup racks. Do not use detergent with this programme to quickly rinse the dishes. Pull the basket out until the mechanism is engaged and the basket is in : the upper basket Higher position 20 cm Lower position 24 cm Do these steps to move...

Product Manual
Page 17
... door. 2. Close the appliance door. 2. Press the Delay button again and again until the display shows the time of the delay start. • The time of items in the baskets. Select and start a washing programme 17 Programme Type of soil Type of load Programme description Normal soil Crockery and cutlery Prewash 3) Wash 50 °C Rinses Dry 1) The appliance senses the type of soil and the quantity of the delay start flashes...
... door. 2. Close the appliance door. 2. Press the Delay button again and again until the display shows the time of the delay start. • The time of items in the baskets. Select and start a washing programme 17 Programme Type of soil Type of load Programme description Normal soil Crockery and cutlery Prewash 3) Wash 50 °C Rinses Dry 1) The appliance senses the type of soil and the quantity of the delay start flashes...

Product Manual
Page 18
... can change the selection when the washing programme operates, it is completed. 1. The washing programme stops. • Close the appliance door. - The time of the set washing programme flashes in operation comes on . Open the appliance door. 3. Cancel the delay start a new washing programme. The opening of a washing programme • Open the appliance door. - Press the Delay button again and again until: • The display shows the time of the last set washing programme • The phase indicators come on...
... can change the selection when the washing programme operates, it is completed. 1. The washing programme stops. • Close the appliance door. - The time of the set washing programme flashes in operation comes on . Open the appliance door. 3. Cancel the delay start a new washing programme. The opening of a washing programme • Open the appliance door. - Press the Delay button again and again until: • The display shows the time of the last set washing programme • The phase indicators come on...

Product Manual
Page 19
All indicators go off - Press one horizontal bar. Stainless steel be water on the sides and on again. Hot dishes can be - CARE AND CLEANING To remove and clean the filters Dirty filters decrease the washing results. Make a check at the end of the washing programme, the appliance stays on standby. • To decrease energy consumption during the standby, after three minutes from the upper basket. • There can...
All indicators go off - Press one horizontal bar. Stainless steel be water on the sides and on again. Hot dishes can be - CARE AND CLEANING To remove and clean the filters Dirty filters decrease the washing results. Make a check at the end of the washing programme, the appliance stays on standby. • To decrease energy consumption during the standby, after three minutes from the upper basket. • There can...

Product Manual
Page 20
... stops during operation. Deactivate the appliance before you do if... 1. Make sure that it from the bottom of the appliance does not occur or it locks in the spray arms become clogged, remove remaining parts of the appliance and control panel with a thin pointed object. The appliance does not drain the water • - Only use abrasive products, abrasive cleaning pads or solvents (acetone). The start...
... stops during operation. Deactivate the appliance before you do if... 1. Make sure that it from the bottom of the appliance does not occur or it locks in the spray arms become clogged, remove remaining parts of the appliance and control panel with a thin pointed object. The appliance does not drain the water • - Only use abrasive products, abrasive cleaning pads or solvents (acetone). The start...

Product Manual
Page 21
.... Serial number (S.N The water pressure is correct. Open the water tap. Make sure that the connection is completed, the washing programme starts automatically. The start of interruption. there is on the rating plate. The connection of the water inlet hose is closed. Close the water tap and contact the service centre. The appliance door is not correct. Close the appliance door. The mains plug is blocked or water. After the check, set . • Cancel the delay start...
.... Serial number (S.N The water pressure is correct. Open the water tap. Make sure that the connection is completed, the washing programme starts automatically. The start of interruption. there is on the rating plate. The connection of the water inlet hose is closed. Close the water tap and contact the service centre. The appliance door is not correct. Close the appliance door. The mains plug is blocked or water. After the check, set . • Cancel the delay start...

Product Manual
Page 22
.... Use a different brand of load and soil. Fill the rinse aid dispenser with a decreased drying phase. Dry water drop stains on glasses and dishes. not touch all surfaces. freely. Adjust the water softener with dishwasher salt. The rinse aid quantity is on the dishes. Activate the rinse aid dispenser. The washing results and drying results are not satisfactory Problem The dishes are wet. There are sembled and installed correctly. The dishes are not clean. The...
.... Use a different brand of load and soil. Fill the rinse aid dispenser with a decreased drying phase. Dry water drop stains on glasses and dishes. not touch all surfaces. freely. Adjust the water softener with dishwasher salt. The rinse aid quantity is on the dishes. Activate the rinse aid dispenser. The washing results and drying results are not satisfactory Problem The dishes are wet. There are sembled and installed correctly. The dishes are not clean. The...

Product Manual
Page 23
... environmentally friendly and can be recycled. The rating plate on the control panel. 5. The display shows the set level of this product. TECHNICAL DATA Dimensions Width 600 mm Height 850 mm Depth 610 mm Water supply pressure Minimum 0,5 bar (0,05 MPa) Maximum 8 bar (0,8 MPa) Water supply 1) cold water Capacity Place settings 12 1) Connect the water inlet hose to a water tap with the second washing programme on the inner edge of...
... environmentally friendly and can be recycled. The rating plate on the control panel. 5. The display shows the set level of this product. TECHNICAL DATA Dimensions Width 600 mm Height 850 mm Depth 610 mm Water supply pressure Minimum 0,5 bar (0,05 MPa) Maximum 8 bar (0,8 MPa) Water supply 1) cold water Capacity Place settings 12 1) Connect the water inlet hose to a water tap with the second washing programme on the inner edge of...

Product Manual
Page 24
... a water tap and a water drain. This prevents the children to remove the appliance worktop 1. How to close themselves inside the appliance and endanger their lives. Remove the rear screws (1). 2. Make sure that the dimensions of the appliance (2). Pull the worktop from the behind of the recess agree with the dimensions in the picture. INSTALLATION Installation under a sink unit or a kitchen worktop. 24 Installation...
... a water tap and a water drain. This prevents the children to remove the appliance worktop 1. How to close themselves inside the appliance and endanger their lives. Remove the rear screws (1). 2. Make sure that the dimensions of the appliance (2). Pull the worktop from the behind of the recess agree with the dimensions in the picture. INSTALLATION Installation under a sink unit or a kitchen worktop. 24 Installation...

Product Manual
Page 25
... incorrect appliance level, the door does catches on the sides of the appliance lets the door to adjust the level of the hose. This prevents that the water goes back into the appliance. 25 3. The internal diameter must not be minimum 4 cm. Install the appliance under the work surface. Use the adjustable feet to close and seal correctly. If you connect the water drain hose to make...
... incorrect appliance level, the door does catches on the sides of the appliance lets the door to adjust the level of the hose. This prevents that the water goes back into the appliance. 25 3. The internal diameter must not be minimum 4 cm. Install the appliance under the work surface. Use the adjustable feet to close and seal correctly. If you connect the water drain hose to make...


