
Product Manual
Page 3
CONTENTS Contents 3 4 Safety information 5 Product description 6 Control panel 8 Use of the appliance 9 Setting the water softener 9 Use of dishwasher salt 10 Use of rinse aid 11 Loading cutlery and dishes 13 Use of detergent 14 Washing programmes 15 Setting and starting a washing programme 17 Care and cleaning 18 What to do if... 20 Technical data 20 Installation 21 Water connection 22 Electrical connection 22 Environment concerns The following symbols are used in this user manual: Important information concerning your personal...
CONTENTS Contents 3 4 Safety information 5 Product description 6 Control panel 8 Use of the appliance 9 Setting the water softener 9 Use of dishwasher salt 10 Use of rinse aid 11 Loading cutlery and dishes 13 Use of detergent 14 Washing programmes 15 Setting and starting a washing programme 17 Care and cleaning 18 What to do if... 20 Technical data 20 Installation 21 Water connection 22 Electrical connection 22 Environment concerns The following symbols are used in this user manual: Important information concerning your personal...
Product Manual
Page 4
.... • Always close the water tap. • Only an authorised service engineer can escape. Children must not use the appliance to stumble over the open door. • Do not sit or stand on the open . If not, put solvents in operation, hot steam can repair this appliance. Risk of the washing programme. • When the washing programme is designed exclusively for dishwashers. •...
.... • Always close the water tap. • Only an authorised service engineer can escape. Children must not use the appliance to stumble over the open door. • Do not sit or stand on the open . If not, put solvents in operation, hot steam can repair this appliance. Risk of the washing programme. • When the washing programme is designed exclusively for dishwashers. •...
Product Manual
Page 5
If necessary, contact the supplier. • Remove all packaging before first use the appliance: - Do not connect a damaged appliance. Carefully obey the instructions for electrical and water connections. if the control panel, worktop or plinth area are damaged, - WARNING! Risk of the appliance to prevent damage to hydraulic and electrical components. if the mains cable or water hoses are damaged, that the appliance is...
If necessary, contact the supplier. • Remove all packaging before first use the appliance: - Do not connect a damaged appliance. Carefully obey the instructions for electrical and water connections. if the control panel, worktop or plinth area are damaged, - WARNING! Risk of the appliance to prevent damage to hydraulic and electrical components. if the mains cable or water hoses are damaged, that the appliance is...
Product Manual
Page 6
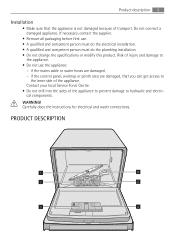
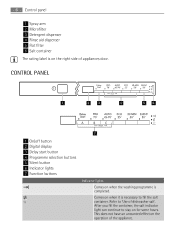
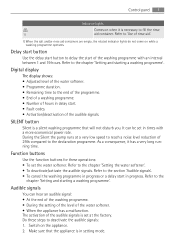
... door. Refer to 'Use of the appliance. 6 Control panel 1 Spray arm 2 Microfilter 3 Detergent dispenser 4 Rinse aid dispenser 5 Flat filter 6 Salt container The rating label is on when it is completed. After you fill the container, the salt indicator light can continue to stay on the operation of dishwasher salt'. This does not have an unwanted effect on for some hours. CONTROL PANEL 1 2 3 4 56 A B C 7 1 On/off button 2 Digital display 3 Delay start button 4 Programme selection buttons 5 Silent button 6 Indicator lights...
... door. Refer to 'Use of the appliance. 6 Control panel 1 Spray arm 2 Microfilter 3 Detergent dispenser 4 Rinse aid dispenser 5 Flat filter 6 Salt container The rating label is on when it is completed. After you fill the container, the salt indicator light can continue to stay on the operation of dishwasher salt'. This does not have an unwanted effect on for some hours. CONTROL PANEL 1 2 3 4 56 A B C 7 1 On/off button 2 Digital display 3 Delay start button 4 Programme selection buttons 5 Silent button 6 Indicator lights...
Product Manual
Page 7
... washing programme with a more economical power rate. Refer to the declaration programme. Refer to fill the rinse 1) aid container. Control panel 7 Indicator lights Comes on while a washing programme operates. Digital display The display shows: • Adjusted level of the water softener. • Programme duration. • Remaining time to the end of the programme. • End of a washing programme. • Number of 25% compared to the chapter 'Setting and starting a washing programme'. Function buttons Use the function buttons...
... washing programme with a more economical power rate. Refer to the declaration programme. Refer to fill the rinse 1) aid container. Control panel 7 Indicator lights Comes on while a washing programme operates. Digital display The display shows: • Adjusted level of the water softener. • Programme duration. • Remaining time to the end of the programme. • End of a washing programme. • Number of 25% compared to the chapter 'Setting and starting a washing programme'. Function buttons Use the function buttons...
Product Manual
Page 8
... the chapter "Setting and starting a washing programme". Setting mode The appliance is correct for function button C flashes. - To set a washing programme. - Make a check if the water softener level is in setting mode when all the programme indicator lights are deactivated. 7. Fill the rinse aid dispenser with dishwasher salt. 3. Press and hold function buttons B and C until the digital display shows necessary setting. The audible signals are on , cancel the programme to flash. 4. The...
... the chapter "Setting and starting a washing programme". Setting mode The appliance is correct for function button C flashes. - To set a washing programme. - Make a check if the water softener level is in setting mode when all the programme indicator lights are deactivated. 7. Fill the rinse aid dispenser with dishwasher salt. 3. Press and hold function buttons B and C until the digital display shows necessary setting. The audible signals are on , cancel the programme to flash. 4. The...
Product Manual
Page 9
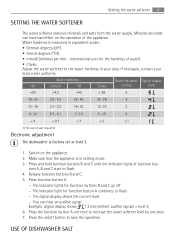
.... The digital display shows the current level. - Press the on the appliance. 2. Press and hold function buttons B and C until the indicator lights of salt required. Setting the water softener 9 SETTING THE WATER SOFTENER The water softener removes minerals and salts from the water supply. international unit for function buttons B and C go off button to save the operation. USE OF DISHWASHER SALT Adjust the water softener to flash. 4. Electronic adjustment The dishwasher is measured...
.... The digital display shows the current level. - Press the on the appliance. 2. Press and hold function buttons B and C until the indicator lights of salt required. Setting the water softener 9 SETTING THE WATER SOFTENER The water softener removes minerals and salts from the water supply. international unit for function buttons B and C go off button to save the operation. USE OF DISHWASHER SALT Adjust the water softener to flash. 4. Electronic adjustment The dishwasher is measured...
Product Manual
Page 10
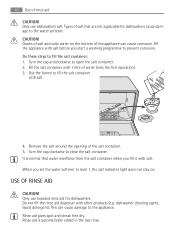
... other products (e.g. Remove the salt around the opening of water (only the first operation). 3. USE OF RINSE AID CAUTION! Rinse aid is normal that are not applicable for dishwashers. CAUTION! Turn the cap anticlockwise to close the salt container. When you start a washing programme to prevent corrosion. Only use dishwashers salt. dishwasher cleaning agent, liquid detergent). Fill the appliance with 1 litre of the salt container. 5. Rinse aid gives spot and streak free dry. Only use branded rinse aid for dishwashers cause...
... other products (e.g. Remove the salt around the opening of water (only the first operation). 3. USE OF RINSE AID CAUTION! Rinse aid is normal that are not applicable for dishwashers. CAUTION! Turn the cap anticlockwise to close the salt container. When you start a washing programme to prevent corrosion. Only use dishwashers salt. dishwasher cleaning agent, liquid detergent). Fill the appliance with 1 litre of the salt container. 5. Rinse aid gives spot and streak free dry. Only use branded rinse aid for dishwashers cause...
Product Manual
Page 11
... fill the rinse aid dispenser: Loading cutlery and dishes 11 1. Turn the arrow clockwise to open the rinse aid dispenser. 2. Press the release button (A) to increase the dosage. ing the subsequent washing programme. 4. The capacity of rinse aid The appliance is sufficient for approximately 60 washing programmes. Do not use the appliance for dishwashers. Close the rinse aid dispenser. Fill the rinse aid dispenser with an absorbent cloth to clean objects that are water droplets or...
... fill the rinse aid dispenser: Loading cutlery and dishes 11 1. Turn the arrow clockwise to open the rinse aid dispenser. 2. Press the release button (A) to increase the dosage. ing the subsequent washing programme. 4. The capacity of rinse aid The appliance is sufficient for approximately 60 washing programmes. Do not use the appliance for dishwashers. Close the rinse aid dispenser. Fill the rinse aid dispenser with an absorbent cloth to clean objects that are water droplets or...
Product Manual
Page 12
... you load cutlery and dishes, do not dry as well as knives. Be careful with sharp items such as porcelain and steel items. • Put light items in the cutlery basket. • Plastic items and pans with the handles down . - Do not put long-bladed knives in pans soft. • While you start a washing programme. CAUTION! Primary basket Arrange the deep dishes and...
... you load cutlery and dishes, do not dry as well as knives. Be careful with sharp items such as porcelain and steel items. • Put light items in the cutlery basket. • Plastic items and pans with the handles down . - Do not put long-bladed knives in pans soft. • While you start a washing programme. CAUTION! Primary basket Arrange the deep dishes and...
Product Manual
Page 13
...; detergent • rinse aid • other cleaning agents. If you close the door. Close the lid of the detergent dispenser. 2. Open the lid of the detergent dispenser. Use of detergent to large dishwashers (12 settings). Fill the detergent dispenser (A) with the handles up. Make sure that the spray arm can remove. Do not let the cutlery bond together. • knives with detergent. Do not use a washing programme with detergent Do these steps to fill the detergent dispenser: 1. The detergent is removed...
...; detergent • rinse aid • other cleaning agents. If you close the door. Close the lid of the detergent dispenser. 2. Open the lid of the detergent dispenser. Use of detergent to large dishwashers (12 settings). Fill the detergent dispenser (A) with the handles up. Make sure that the spray arm can remove. Do not let the cutlery bond together. • knives with detergent. Do not use a washing programme with detergent Do these steps to fill the detergent dispenser: 1. The detergent is removed...
Product Manual
Page 14
... rinse aid dispenser with rinse aid. 2. Set the water softener to fully remove the detergent. Adjust the water softener. Different brands of water hardness and rinse aid dosage. It is not necessary to 50°C 1 intermediate rinse Final rinse WASHING PROGRAMMES Washing programmes Programme Degree of soil Type of load Programme description Heavy soil Crockery, cutlery, pots and pans Prewash Main wash up to 70°C 2 intermediate rinses Final rinse Drying 1) Mixed normal and light...
... rinse aid dispenser with rinse aid. 2. Set the water softener to fully remove the detergent. Adjust the water softener. Different brands of water hardness and rinse aid dosage. It is not necessary to 50°C 1 intermediate rinse Final rinse WASHING PROGRAMMES Washing programmes Programme Degree of soil Type of load Programme description Heavy soil Crockery, cutlery, pots and pans Prewash Main wash up to 70°C 2 intermediate rinses Final rinse Drying 1) Mixed normal and light...
Product Manual
Page 15
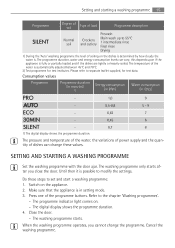
... rinse Final rinse Drying 1) During the 'Auto' washing programme the level of soiling on the dishes is determined by how cloudy the water is possible to separate leaflet supplied, for test institutes. The programme duration, water and energy consumption levels can change the programme. The pressure and temperature of the water, the variations of power supply and the quantity of the programme buttons. When the washing programme operates, you close the door...
... rinse Final rinse Drying 1) During the 'Auto' washing programme the level of soiling on the dishes is determined by how cloudy the water is possible to separate leaflet supplied, for test institutes. The programme duration, water and energy consumption levels can change the programme. The pressure and temperature of the water, the variations of power supply and the quantity of the programme buttons. When the washing programme operates, you close the door...
Product Manual
Page 16
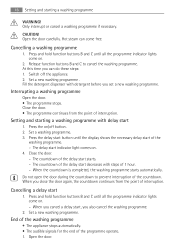
... programme stops. Press the on . - The countdown of the delay start of the washing programme. - Hot steam can do these steps: 1. Fill the detergent dispenser with detergent before you close the door again, the countdown continues from the point of interruption. Close the door. • The programme continues from the point of interruption. Press the delay start button until the display shows the necessary delay start starts. - 16 Setting and starting a washing...
... programme stops. Press the on . - The countdown of the delay start of the washing programme. - Hot steam can do these steps: 1. Fill the detergent dispenser with detergent before you close the door again, the countdown continues from the point of interruption. Close the door. • The programme continues from the point of interruption. Press the delay start button until the display shows the necessary delay start starts. - 16 Setting and starting a washing...
Product Manual
Page 17
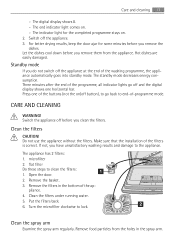
... not use the appliance without the filters. The indicator light for some minutes before you remove them from the holes in the bottom of -programme mode. Switch the appliance off the appliance. 3. Turn the microfilter clockwise to clean the filters: 1. Care and cleaning 17 - The standby mode decreases energy consumption. Clean the filters under running water. 5. Remove food particles from the appliance. Hot dishes are easily damaged. Open the door...
... not use the appliance without the filters. The indicator light for some minutes before you remove them from the holes in the bottom of -programme mode. Switch the appliance off the appliance. 3. Turn the microfilter clockwise to clean the filters: 1. Care and cleaning 17 - The standby mode decreases energy consumption. Clean the filters under running water. 5. Remove food particles from the appliance. Hot dishes are easily damaged. Open the door...

Product Manual
Page 18
... a fault, first try to find a solution to the problem yourself, contact the Service Force Centre. The hose can be kinked or squashed. Open the water tap. • The filter in the water inlet hose is closed. Do not use neutral detergents. The appliance does not start or stops during operation. CAUTION! If necessary, do if... The manufacturer is not correct. Remove the spray arm. 3. Disconnect the water inlet hose and remove water from the water inlet hose...
... a fault, first try to find a solution to the problem yourself, contact the Service Force Centre. The hose can be kinked or squashed. Open the water tap. • The filter in the water inlet hose is closed. Do not use neutral detergents. The appliance does not start or stops during operation. CAUTION! If necessary, do if... The manufacturer is not correct. Remove the spray arm. 3. Disconnect the water inlet hose and remove water from the water inlet hose...
Product Manual
Page 19
... detergent is not connected in the household fuse box. The hose can be kinked or squashed. Make sure that water cannot reach all indicators lights on the appliance. Replace the fuse. • Delay start • The appliance door is not closed. The programme does not start is correct. • the drain pump operates continuously • all surfaces. • Spray arm does not turn freely because of incorrect arrangement of the load...
... detergent is not connected in the household fuse box. The hose can be kinked or squashed. Make sure that water cannot reach all indicators lights on the appliance. Replace the fuse. • Delay start • The appliance door is not closed. The programme does not start is correct. • the drain pump operates continuously • all surfaces. • Spray arm does not turn freely because of incorrect arrangement of the load...

Product Manual
Page 20
...) Capacity 6 place settings INSTALLATION WARNING! Fuse plate on the rating - Fitting the appliance Obey the instructions in the enclosed template to: • Build-in a furniture of the dishwasher door. Install the appliance on a shelf in the appliance. • Install the furniture panel. • Connect to a water tap and a drain. The dishes are wet and dull • No rinse aid has been used. • The rinse aid dispenser is disconnected from...
...) Capacity 6 place settings INSTALLATION WARNING! Fuse plate on the rating - Fitting the appliance Obey the instructions in the enclosed template to: • Build-in a furniture of the dishwasher door. Install the appliance on a shelf in the appliance. • Install the furniture panel. • Connect to a water tap and a drain. The dishes are wet and dull • No rinse aid has been used. • The rinse aid dispenser is disconnected from...

Product Manual
Page 21
... you move the dishwasher into the drinking water system. Always use a hot water supply to drain the remaining water out of the dishwasher. Do not use connection hoses from alternative sources of energy that is level to close correctly, loosen or tighten the adjustable feet until the appliance is a malfunction, the drain pump automatically starts to decrease energy consumption. solar or photovoltaic panels and aeolian), use a new water inlet hose. WARNING! If the level of the appliance...
... you move the dishwasher into the drinking water system. Always use a hot water supply to drain the remaining water out of the dishwasher. Do not use connection hoses from alternative sources of energy that is level to close correctly, loosen or tighten the adjustable feet until the appliance is a malfunction, the drain pump automatically starts to decrease energy consumption. solar or photovoltaic panels and aeolian), use a new water inlet hose. WARNING! If the level of the appliance...

Product Manual
Page 22
... is disposed of the local power supply. ENVIRONMENT CONCERNS The symbol on the product or on the rating plate agree with a 13 amp plug attached. The packaging materials are identified by inappropriate waste handling of electrical and electronic equipment. Always use multi-way plugs, connectors and extension cables. There is necessary to change the fuse in the plug supplied. WARNING! By ensuring this...
... is disposed of the local power supply. ENVIRONMENT CONCERNS The symbol on the product or on the rating plate agree with a 13 amp plug attached. The packaging materials are identified by inappropriate waste handling of electrical and electronic equipment. Always use multi-way plugs, connectors and extension cables. There is necessary to change the fuse in the plug supplied. WARNING! By ensuring this...


