Product Manual
Page 2
...to change without notice. OPTIONS...10 8. TROUBLESHOOTING 17 13. Visit our website for: Get usage advice, brochures, trouble shooter, service information: www.aeg.com Register your appliance: www.aeg.com/shop CUSTOMER CARE AND SERVICE Always use original spare parts. SAFETY INFORMATION 3 2. CONTROL PANEL...6 5....your product for better service: www.registeraeg.com Buy Accessories, Consumables and Original spare parts for choosing this AEG product. CARE AND CLEANING 15 12. We have the following data available: Model, PNC, Serial Number. When contacting our Authorised Service ...
...to change without notice. OPTIONS...10 8. TROUBLESHOOTING 17 13. Visit our website for: Get usage advice, brochures, trouble shooter, service information: www.aeg.com Register your appliance: www.aeg.com/shop CUSTOMER CARE AND SERVICE Always use original spare parts. SAFETY INFORMATION 3 2. CONTROL PANEL...6 5....your product for better service: www.registeraeg.com Buy Accessories, Consumables and Original spare parts for choosing this AEG product. CARE AND CLEANING 15 12. We have the following data available: Model, PNC, Serial Number. When contacting our Authorised Service ...
Product Manual
Page 3
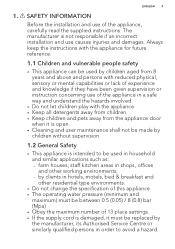
... maximum number of the appliance, carefully read the supplied instructions. staff kitchen areas in shops, offices and other residential type environments. • Do not change the specification of this appliance. • The operating water pressure (minimum and maximum) must be replaced by children without supervision. 1.2 General Safety • This appliance is not responsible if an incorrect installation and use of 13 place settings...
... maximum number of the appliance, carefully read the supplied instructions. staff kitchen areas in shops, offices and other residential type environments. • Do not change the specification of this appliance. • The operating water pressure (minimum and maximum) must be replaced by children without supervision. 1.2 General Safety • This appliance is not responsible if an incorrect installation and use of 13 place settings...
Product Manual
Page 4
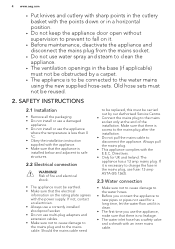
... cable need to be replaced, this must not be obstructed by our Authorised Service Centre. • Connect the mains plug to the mains socket only at the end of fire and electrical shock. • The appliance must be connected to the water mains using the new supplied hose-sets. SAFETY INSTRUCTIONS 2.1 Installation • Remove all the packaging. • Do not install or use a damaged appliance. • Do not install or use fuse...
... cable need to be replaced, this must not be obstructed by our Authorised Service Centre. • Connect the mains plug to the mains socket only at the end of fire and electrical shock. • The appliance must be connected to the water mains using the new supplied hose-sets. SAFETY INSTRUCTIONS 2.1 Installation • Remove all the packaging. • Do not install or use a damaged appliance. • Do not install or use fuse...
Product Manual
Page 5
...; Do not remove the dishes from the appliance until the programme is damaged, immediately disconnect the mains plug from the mains supply. • Cut off the mains cable and discard it. • Remove the door catch to prevent children and pets to get closed in , near or on the appliance. 2.5 Service • Contact the Authorised Service Centre to replace the water inlet hose. 2.4 Use •...
...; Do not remove the dishes from the appliance until the programme is damaged, immediately disconnect the mains plug from the mains supply. • Cut off the mains cable and discard it. • Remove the door catch to prevent children and pets to get closed in , near or on the appliance. 2.5 Service • Contact the Authorised Service Centre to replace the water inlet hose. 2.4 Use •...
Product Manual
Page 6
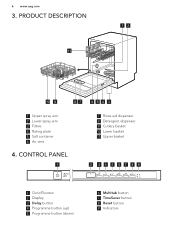
6 www.aeg.com 3. CONTROL PANEL 1 7 Rinse aid dispenser 8 Detergent dispenser 9 Cutlery basket 10 Lower basket 11 Upper basket 2 3 4 5 6 7 89 1 On/off button 2 Display 3 Delay button 4 Programme button (up) 5 Programme button (down) 6 Multitab button 7 TimeSaver button 8 Reset button 9 Indicators PRODUCT DESCRIPTION 12 11 10 9 8 7 654 3 1 Upper spray arm 2 Lower spray arm 3 Filters 4 Rating plate 5 Salt container 6 Air vent 4.
6 www.aeg.com 3. CONTROL PANEL 1 7 Rinse aid dispenser 8 Detergent dispenser 9 Cutlery basket 10 Lower basket 11 Upper basket 2 3 4 5 6 7 89 1 On/off button 2 Display 3 Delay button 4 Programme button (up) 5 Programme button (down) 6 Multitab button 7 TimeSaver button 8 Reset button 9 Indicators PRODUCT DESCRIPTION 12 11 10 9 8 7 654 3 1 Upper spray arm 2 Lower spray arm 3 Filters 4 Rating plate 5 Salt container 6 Air vent 4.
Product Manual
Page 7
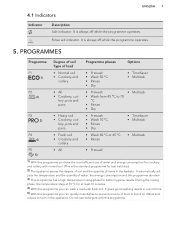
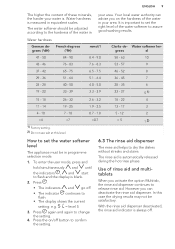
... programme you can quickly rinse dishes to prevent remains of water, the energy consumption and the programme duration. 3) This programme has a high temperature rinsing phase for at 70 °C for better hygiene results. Rinse aid indicator. It is always off while the programme operates. PROGRAMMES Programme Degree of soil Type of items in the baskets . Do not use of water and energy consumption for...
... programme you can quickly rinse dishes to prevent remains of water, the energy consumption and the programme duration. 3) This programme has a high temperature rinsing phase for at 70 °C for better hygiene results. Rinse aid indicator. It is always off while the programme operates. PROGRAMMES Programme Degree of soil Type of items in the baskets . Do not use of water and energy consumption for...
Product Manual
Page 8
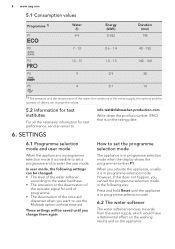
... mode. These settings will be changed: • The level of the water softener according to the water hardness. • The activation or the deactivation of the rinse aid dispenser when you want to enter the user mode. How to : info.test@dishwasher-production.com Write down the product number (PNC) that is in programme selection mode. 6.2 The water softener The water softener removes minerals from the water supply, which...
... mode. These settings will be changed: • The level of the water softener according to the water hardness. • The activation or the deactivation of the rinse aid dispenser when you want to enter the user mode. How to : info.test@dishwasher-production.com Write down the product number (PNC) that is in programme selection mode. 6.2 The water softener The water softener removes minerals from the water supply, which...
Product Manual
Page 9
... your area. French degrees grees (°dH) (°fH) mmol/l Clarke de- Water hardness is . grees el 47 - 50 84 - 90 8.4 - 9.0 58 - 63 10 43 - 46 76 - 83 7.6 - 8.3 53 - 57 9 37 - 42 65 - 75 6.5 - 7.5 46 - ... 18 - 22 4 11 - 14 19 - 25 1.9 - 2.5 13 - 17 3 4 - 10 7 - 18 0.7 - 1.8 5 - 12 2 Water softener lev- The water softener should be adjusted according to assure good washing results. It is important to set the right level of the water softener to the hardness of the water in your area. ENGLISH 9 The higher the content of these minerals, the harder...
... your area. French degrees grees (°dH) (°fH) mmol/l Clarke de- Water hardness is . grees el 47 - 50 84 - 90 8.4 - 9.0 58 - 63 10 43 - 46 76 - 83 7.6 - 8.3 53 - 57 9 37 - 42 65 - 75 6.5 - 7.5 46 - ... 18 - 22 4 11 - 14 19 - 25 1.9 - 2.5 13 - 17 3 4 - 10 7 - 18 0.7 - 1.8 5 - 12 2 Water softener lev- The water softener should be adjusted according to assure good washing results. It is important to set the right level of the water softener to the hardness of the water in your area. ENGLISH 9 The higher the content of these minerals, the harder...
Product Manual
Page 10
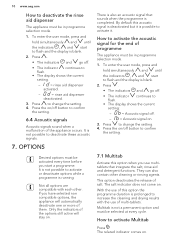
... on /off button to confirm the setting. 7.1 Multitab Activate this option when you use multitablets that sounds when the programme is blank. 2. OPTIONS Desired options must be activated every time before you have selected non compatible options, the appliance will stay on /off . • The indicator continues to flash. • The display shows the current setting. - = rinse aid dispenser activated. - = rinse aid dispenser deactivated...
... on /off button to confirm the setting. 7.1 Multitab Activate this option when you use multitablets that sounds when the programme is blank. 2. OPTIONS Desired options must be activated every time before you have selected non compatible options, the appliance will stay on /off . • The indicator continues to flash. • The display shows the current setting. - = rinse aid dispenser activated. - = rinse aid dispenser deactivated...
Product Manual
Page 11
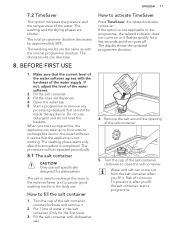
... USE 1. If not, adjust the level of the salt container. 5. If the option is used to recharge the resin in the water softener and to assure good washing results in the daily use detergent and do not load the baskets. To prevent it . 2. The total programme duration decreases by approximately 50%. Make sure that the appliance is completed. Fill the rinse aid dispenser...
... USE 1. If not, adjust the level of the salt container. 5. If the option is used to recharge the resin in the water softener and to assure good washing results in the daily use detergent and do not load the baskets. To prevent it . 2. The total programme duration decreases by approximately 50%. Make sure that the appliance is completed. Fill the rinse aid dispenser...
Product Manual
Page 12
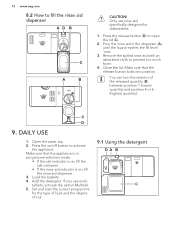
.... 5. Set and start the correct programme for dishwashers. 1. 12 www.aeg.com 8.2 How to open the lid (C). 2. Close the lid. Add the detergent. If you use rinse aid specifically designed for the type of load and the degree of the released quantity (B) between position 1 (lowest quantity) and position 4 or 6 (highest quantity). DAILY USE 1. Load the baskets. 4. Only use multi- Press the release button (D) to fill the rinse aid dispenser AD...
.... 5. Set and start the correct programme for dishwashers. 1. 12 www.aeg.com 8.2 How to open the lid (C). 2. Close the lid. Add the detergent. If you use rinse aid specifically designed for the type of load and the degree of the released quantity (B) between position 1 (lowest quantity) and position 4 or 6 (highest quantity). DAILY USE 1. Load the baskets. 4. Only use multi- Press the release button (D) to fill the rinse aid dispenser AD...

Product Manual
Page 13
... appliance stops. Make sure that there is in programme selection mode. The display will show the programme duration. 4. ENGLISH 13 Starting a programme with delay start a new programme. The delay indicator comes on /off button to start . Opening the door while the appliance operates If you start 1. Press and hold Reset until the appliance is running programme will end. Cancelling the programme Press and hold Reset until the appliance is detergent...
... appliance stops. Make sure that there is in programme selection mode. The display will show the programme duration. 4. ENGLISH 13 Starting a programme with delay start a new programme. The delay indicator comes on /off button to start . Opening the door while the appliance operates If you start 1. Press and hold Reset until the appliance is running programme will end. Cancelling the programme Press and hold Reset until the appliance is detergent...

Product Manual
Page 14
... not load the baskets. 4. Start the shortest programme with a water hardness up to the water hardness in the appliance items that the dishes can absorb water (sponges, household cloths). • Remove remaining food from the spray arm nozzles. Close the water tap. • If you use salt, rinse aid and detergent for dishwasher. Set the highest level of soil. 14 www.aeg.com automatically deactivate the appliance. 10. Other products can use dishwasher detergent, rinse aid...
... not load the baskets. 4. Start the shortest programme with a water hardness up to the water hardness in the appliance items that the dishes can absorb water (sponges, household cloths). • Remove remaining food from the spray arm nozzles. Close the water tap. • If you use salt, rinse aid and detergent for dishwasher. Set the highest level of soil. 14 www.aeg.com automatically deactivate the appliance. 10. Other products can use dishwasher detergent, rinse aid...
Product Manual
Page 15
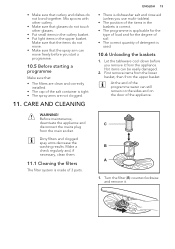
... and on the door of the salt container is dishwasher salt and rinse aid (unless you use multi- CARE AND CLEANING WARNING! Dirty filters and clogged spay arms decrease the washing results. Make a check regularly and, if necessary, clean them. 11.1 Cleaning the filters The filter system is used. 10.6 Unloading the baskets 1. • Make sure that the spray arm can move freely before you remove it . tablets). •...
... and on the door of the salt container is dishwasher salt and rinse aid (unless you use multi- CARE AND CLEANING WARNING! Dirty filters and clogged spay arms decrease the washing results. Make a check regularly and, if necessary, clean them. 11.1 Cleaning the filters The filter system is used. 10.6 Unloading the baskets 1. • Make sure that the spray arm can move freely before you remove it . tablets). •...

Product Manual
Page 16
... spray arms Do not remove the spray arms. If the holes in the spray arms are no residues of food or soil in or around the edge of the sump. 6. Follow carefully the instructions on the packaging of your appliance at its best, we recommend to run long duration programmes at least 2 times per month. • To maintain the performance of the product. Turn...
... spray arms Do not remove the spray arms. If the holes in the spray arms are no residues of food or soil in or around the edge of the sump. 6. Follow carefully the instructions on the packaging of your appliance at its best, we recommend to run long duration programmes at least 2 times per month. • To maintain the performance of the product. Turn...
Product Manual
Page 17
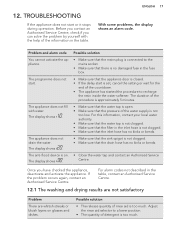
... start or it stops during operation. The display shows . Once you can solve the problem by yourself with water. The anti-flood device is too much . For alarm codes not described in the inlet hose is not clogged. • Make sure that the inlet hose has no kinks or bends. • Make sure that the sink spigot is too much . Adjust the rinse aid...
... start or it stops during operation. The display shows . Once you can solve the problem by yourself with water. The anti-flood device is too much . For alarm codes not described in the inlet hose is not clogged. • Make sure that the inlet hose has no kinks or bends. • Make sure that the sink spigot is too much . Adjust the rinse aid...

Product Manual
Page 18
... a different brand or activate the rinse aid dispenser and use the hot water supply to recycle it. bar (MPa) 0.5 (0.05) / 8 (0.8) Water supply Cold water or hot water 2) max 60 °C Capacity Place settings 13 Power consumption Left-on glasses and dishes. just the rinse aid selector to a higher position. • The quality of the multi-tablets can be the cause. TECHNICAL INFORMATION Dimensions Width / height / depth (mm) 596...
... a different brand or activate the rinse aid dispenser and use the hot water supply to recycle it. bar (MPa) 0.5 (0.05) / 8 (0.8) Water supply Cold water or hot water 2) max 60 °C Capacity Place settings 13 Power consumption Left-on glasses and dishes. just the rinse aid selector to a higher position. • The quality of the multi-tablets can be the cause. TECHNICAL INFORMATION Dimensions Width / height / depth (mm) 596...


