Product Manual
Page 1
EN User Manual Dishwasher FAVORIT 56302MO FAVORIT 56302WO
EN User Manual Dishwasher FAVORIT 56302MO FAVORIT 56302WO

Product Manual
Page 2
... years, with innovative technologies that you for your appliance: www.aeg.com/shop CUSTOMER CARE AND SERVICE Always use original spare parts. CONTROL PANEL ...6 5. CARE AND CLEANING 15 12. We have created it . Please spend a few minutes reading to change without notice. SAFETY INSTRUCTIONS 4 3. TECHNICAL INFORMATION 18 FOR PERFECT RESULTS Thank you have the following data available: Model, PNC, Serial Number. BEFORE FIRST USE...11 9. PROGRAMMES...7 6.
... years, with innovative technologies that you for your appliance: www.aeg.com/shop CUSTOMER CARE AND SERVICE Always use original spare parts. CONTROL PANEL ...6 5. CARE AND CLEANING 15 12. We have created it . Please spend a few minutes reading to change without notice. SAFETY INSTRUCTIONS 4 3. TECHNICAL INFORMATION 18 FOR PERFECT RESULTS Thank you have the following data available: Model, PNC, Serial Number. BEFORE FIRST USE...11 9. PROGRAMMES...7 6.

Product Manual
Page 3
... not change the specification of this appliance. • The operating water pressure (minimum and maximum) must be between 0.5 (0.05) / 8 (0.8) bar (Mpa) • Obey the maximum number of 13 place settings. • If the supply cord is damaged, it . • Before maintenance, deactivate the appliance and disconnect the mains plug from the mains socket. • Do not use water spray and steam to clean the...
... not change the specification of this appliance. • The operating water pressure (minimum and maximum) must be between 0.5 (0.05) / 8 (0.8) bar (Mpa) • Obey the maximum number of 13 place settings. • If the supply cord is damaged, it . • Before maintenance, deactivate the appliance and disconnect the mains plug from the mains socket. • Do not use water spray and steam to clean the...

Product Manual
Page 4
... new pipes or pipes not used by children without supervision. 2. 4 www.aeg.com 1.2 Children and vulnerable people safety • This appliance can be used for UK and Ireland. SAFETY INSTRUCTIONS 2.1 Installation • Remove all detergents away from children. • Keep children and pets away from the appliance door when it is clean. • The first time you connect the appliance to replace the water inlet hose. 2.4 Use...
... new pipes or pipes not used by children without supervision. 2. 4 www.aeg.com 1.2 Children and vulnerable people safety • This appliance can be used for UK and Ireland. SAFETY INSTRUCTIONS 2.1 Installation • Remove all detergents away from children. • Keep children and pets away from the appliance door when it is clean. • The first time you connect the appliance to replace the water inlet hose. 2.4 Use...

Product Manual
Page 5
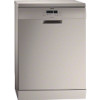
... completed. Obey the safety instructions on the appliance. 2.5 Service • Contact the Authorised Service Centre to get closed in the appliance. • Do not remove the dishes from the mains supply. • Cut off the mains cable and discard it. • Remove the door catch to prevent children and pets to repair the appliance. Model : PNC : Serial Number : 2.6 Disposal WARNING! PRODUCT DESCRIPTION ENGLISH 5 recommend only...
... completed. Obey the safety instructions on the appliance. 2.5 Service • Contact the Authorised Service Centre to get closed in the appliance. • Do not remove the dishes from the mains supply. • Cut off the mains cable and discard it. • Remove the door catch to prevent children and pets to repair the appliance. Model : PNC : Serial Number : 2.6 Disposal WARNING! PRODUCT DESCRIPTION ENGLISH 5 recommend only...

Product Manual
Page 6
6 www.aeg.com 11 Lower basket 4. Rinse aid indicator. CONTROL PANEL 1 12 Upper basket 2 3 45 8 7 6 1 On/off while the programme operates. Multitab indicator. It comes on when the washing phase operates. It is always off while the programme operates. ÖKO PLUS indicator. It is always off button 2 Program button 3 Programme indicators 4 Display 5 Delay button 6 Start button 7 Indicators 8 Option button 4.1 Indicators Indicator Description Washing phase. It comes on when the drying phase operates. Drying phase. Salt indicator.
6 www.aeg.com 11 Lower basket 4. Rinse aid indicator. CONTROL PANEL 1 12 Upper basket 2 3 45 8 7 6 1 On/off while the programme operates. Multitab indicator. It comes on when the washing phase operates. It is always off while the programme operates. ÖKO PLUS indicator. It is always off button 2 Program button 3 Programme indicators 4 Display 5 Delay button 6 Start button 7 Indicators 8 Option button 4.1 Indicators Indicator Description Washing phase. It comes on when the drying phase operates. Drying phase. Salt indicator.

Product Manual
Page 7
...; Rinses • Dry • Light soil • Wash 50 °C or 55 • Crockery and cut- °C lery • Rinses • Multitab 4) • Fresh soil • Wash 60 °C or 65 • Multitab • Crockery and cut- °C lery • Rinses 5) • All • Prewash 1) With this programme you can wash a load with this programme you have the most efficient use detergent with...
...; Rinses • Dry • Light soil • Wash 50 °C or 55 • Crockery and cut- °C lery • Rinses • Multitab 4) • Fresh soil • Wash 60 °C or 65 • Multitab • Crockery and cut- °C lery • Rinses 5) • All • Prewash 1) With this programme you can wash a load with this programme you have the most efficient use detergent with...

Product Manual
Page 8
... the deactivation of the acoustic signal for test performance, send an email to use the Multitab option without rinse aid. When you can set the programme selection mode The appliance is in your water is possible to set the right level of the water softener to enter the user mode. 8 www.aeg.com Programme 1) Water (l) 9 Energy (kWh) 0.9 Duration (min) 30 4 0.1 14 1) The pressure...
... the deactivation of the acoustic signal for test performance, send an email to use the Multitab option without rinse aid. When you can set the programme selection mode The appliance is in your water is possible to set the right level of the water softener to enter the user mode. 8 www.aeg.com Programme 1) Water (l) 9 Energy (kWh) 0.9 Duration (min) 30 4 0.1 14 1) The pressure...

Product Manual
Page 9
grees el 37 - 42 65 - 75 6.5 - 7.5 46 - 52 8 29 - 36 51 - 64 5.1 - 6.4 36 - 45 7 23 - 28 40 - 50 4.0 - 5.0 28 - 35 6 19 - 22 33 - 39 3.3 - 3.9 23 - 27 5 1) 15 - 18 26 - 32 2.6 - 3.2 18 - 22 4 11 - 14 19 - 25 1.9 - 2.5 13 - 17 3 4 - 10 7 - 18 0.7 - 1.8 5 - 12 2 Water softener lev- ENGLISH 9 German de- French degrees grees (°dH) (°fH) mmol/l Clarke de-
grees el 37 - 42 65 - 75 6.5 - 7.5 46 - 52 8 29 - 36 51 - 64 5.1 - 6.4 36 - 45 7 23 - 28 40 - 50 4.0 - 5.0 28 - 35 6 19 - 22 33 - 39 3.3 - 3.9 23 - 27 5 1) 15 - 18 26 - 32 2.6 - 3.2 18 - 22 4 11 - 14 19 - 25 1.9 - 2.5 13 - 17 3 4 - 10 7 - 18 0.7 - 1.8 5 - 12 2 Water softener lev- ENGLISH 9 German de- French degrees grees (°dH) (°fH) mmol/l Clarke de-

Product Manual
Page 10
10 www.aeg.com - = rinse aid dispenser deactivated. 3. Press the on . 7.2 ÖKO PLUS This option decreases the temperature of the appliance occurs. They can still be selected at every cycle. The salt indicator does not come on /off button to confirm the setting. Press the on . 1. How to increase the cleaning and drying results with each other cleaning or rinsing agents. It is running. To...
10 www.aeg.com - = rinse aid dispenser deactivated. 3. Press the on . 7.2 ÖKO PLUS This option decreases the temperature of the appliance occurs. They can still be selected at every cycle. The salt indicator does not come on /off button to confirm the setting. Press the on . 1. How to increase the cleaning and drying results with each other cleaning or rinsing agents. It is running. To...

Product Manual
Page 11
... counterclockwise and remove it , after this procedure is not working. The procedure will be inside the appliance. Turn the cap of the water softener. 2. To prevent it . 2. BEFORE FIRST USE 1. Fill the rinse aid dispenser. 4. Only use detergent and do not load the baskets. Water and salt can come on . Risk of the salt container. 5. Do not use salt specifically designed for the first time). 3. The washing phase starts only...
... counterclockwise and remove it , after this procedure is not working. The procedure will be inside the appliance. Turn the cap of the water softener. 2. To prevent it . 2. BEFORE FIRST USE 1. Fill the rinse aid dispenser. 4. Only use detergent and do not load the baskets. Water and salt can come on . Risk of the salt container. 5. Do not use salt specifically designed for the first time). 3. The washing phase starts only...

Product Manual
Page 12
CAUTION! Only use multi- Close the lid. C D 9. Open the water tap. 2. Pour the rinse aid in programme selection mode. • If the salt indicator is on, fill the salt container. • If the rinse aid indicator is in the dispenser (A) until the liquid reaches the fill level 'max'. 3. You can turn the selector of soil. 9.1 Using the detergent DA B 30 20 C Load the baskets. 4. If you use rinse aid specifically designed for...
CAUTION! Only use multi- Close the lid. C D 9. Open the water tap. 2. Pour the rinse aid in programme selection mode. • If the salt indicator is on, fill the salt container. • If the rinse aid indicator is in the dispenser (A) until the liquid reaches the fill level 'max'. 3. You can turn the selector of soil. 9.1 Using the detergent DA B 30 20 C Load the baskets. 4. If you use rinse aid specifically designed for...

Product Manual
Page 13
... washing phase indicator comes on . Make sure that the appliance is opened for more than 30 seconds during the drying phase, the running , the appliance stops. Put the detergent, in powder or tablets, in programme selection mode. Close the lid. Press Program again and again until the display shows the delay time you start a new programme. Set a programme. 2. Make sure that the release button locks into operation...
... washing phase indicator comes on . Make sure that the appliance is opened for more than 30 seconds during the drying phase, the running , the appliance stops. Put the detergent, in powder or tablets, in programme selection mode. Close the lid. Press Program again and again until the display shows the delay time you start a new programme. Set a programme. 2. Make sure that the release button locks into operation...

Product Manual
Page 14
... deactivated. 2. Adjust the released quantity of food from the spray arm nozzles. In areas exceeding this limit, rinse aid and salt must be completely reached and washed by the water released from the dishes into the waste bin. • Do not pre-rinse dishes by hand. Do not add detergent and do if you want to stop using multi-tablets Before you start to...
... deactivated. 2. Adjust the released quantity of food from the spray arm nozzles. In areas exceeding this limit, rinse aid and salt must be completely reached and washed by the water released from the dishes into the waste bin. • Do not pre-rinse dishes by hand. Do not add detergent and do if you want to stop using multi-tablets Before you start to...

Product Manual
Page 15
... do not move freely before you use multi- Hot items can move . • Make sure that the spray arms can be easily damaged. 2. Make a check regularly and, if necessary, clean them. 11.1 Cleaning the filters The filter system is used. 10.6 Unloading the baskets 1. CARE AND CLEANING ENGLISH 15 • The filters are not clogged. • There is dishwasher salt and rinse aid (unless you remove it .
... do not move freely before you use multi- Hot items can move . • Make sure that the spray arms can be easily damaged. 2. Make a check regularly and, if necessary, clean them. 11.1 Cleaning the filters The filter system is used. 10.6 Unloading the baskets 1. CARE AND CLEANING ENGLISH 15 • The filters are not clogged. • There is dishwasher salt and rinse aid (unless you remove it .

Product Manual
Page 16
.... 11.2 Cleaning the spray arms Do not remove the spray arms. If the holes in or around the edge of the sump. 6. Remove the filter (C) out of the door, with a soft moist cloth. Put back the filter (B) in place the flat filter (A). Reassemble the filters (B) and (C). 8. Put back in the flat filter (A). Wash the filters. 5. Make sure that it locks. 4. CAUTION! 16 www.aeg.com 2. Turn it clockwise...
.... 11.2 Cleaning the spray arms Do not remove the spray arms. If the holes in or around the edge of the sump. 6. Remove the filter (C) out of the door, with a soft moist cloth. Put back the filter (B) in place the flat filter (A). Reassemble the filters (B) and (C). 8. Put back in the flat filter (A). Wash the filters. 5. Make sure that it locks. 4. CAUTION! 16 www.aeg.com 2. Turn it clockwise...

Product Manual
Page 17
... Authorised Service Centre. TROUBLESHOOTING If the appliance does not start . The display shows . • If you regularly use short duration programmes, these can solve the problem by yourself with water. The programme does not start or it stops during operation. The anti-flood device is not clogged. • Make sure that the appliance door is closed. • Press Start. • If the delay start is...
... Authorised Service Centre. TROUBLESHOOTING If the appliance does not start . The display shows . • If you regularly use short duration programmes, these can solve the problem by yourself with water. The programme does not start or it stops during operation. The anti-flood device is not clogged. • Make sure that the appliance door is closed. • Press Start. • If the delay start is...

Product Manual
Page 18
....1 The washing and drying results are not satisfactory Problem Possible solution There are stains and dry water • The released quantity of rinse aid is not sufficient. Adjust the rinse aid selector to your local recycling facility or contact your municipal office. * just the rinse aid selector to the rating plate for other values. 2) f the hot water comes from alternative source of energy, (e.g. solar panels, aeolian energy), use rinse aid and...
....1 The washing and drying results are not satisfactory Problem Possible solution There are stains and dry water • The released quantity of rinse aid is not sufficient. Adjust the rinse aid selector to your local recycling facility or contact your municipal office. * just the rinse aid selector to the rating plate for other values. 2) f the hot water comes from alternative source of energy, (e.g. solar panels, aeolian energy), use rinse aid and...


