Specification Sheet
Page 1
... closed-door systems. The door automatically opens at the end of the drying phase and air is circulated inside the machine. Efficiently clean. The door automatically opens 10cm in the most eco-friendly way possible. • Capacity: 13 place settings • Sensorlogic • 2 temperature settings • 5 programmes including: • Multi-tab • Delay start • Height adjustable upper basket • End of programme audible alarm • Rinse aid and salt indicators • Noise level...
... closed-door systems. The door automatically opens at the end of the drying phase and air is circulated inside the machine. Efficiently clean. The door automatically opens 10cm in the most eco-friendly way possible. • Capacity: 13 place settings • Sensorlogic • 2 temperature settings • 5 programmes including: • Multi-tab • Delay start • Height adjustable upper basket • End of programme audible alarm • Rinse aid and salt indicators • Noise level...
Specification Sheet
Page 2
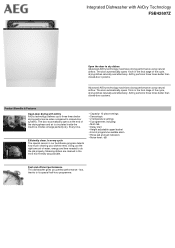
Open All Integrated Dishwasher with AirDry Technology FSB42607Z Product Specification Installation Dimensions (mm) (HxWxD) Dimensions_Dishwasher_FSBU_DK Double Hinges Water Supply Cord Length Inlet hose length (mm) Outlet hose length (mm) Connected Load Wheels/feet Voltage Required Fuse Frequency Noise level, dB(A) Settings Number of programmes Number of Temperatures Second Generation Energy Class Cleaning efficiency (2010/30/EC) Drying efficiency (2010/30/EC) Energy consumption (annual) Annual water consumption, l Water consumption, l Program Fully Integrated 818x596x550 820-880x600x550 ...
Open All Integrated Dishwasher with AirDry Technology FSB42607Z Product Specification Installation Dimensions (mm) (HxWxD) Dimensions_Dishwasher_FSBU_DK Double Hinges Water Supply Cord Length Inlet hose length (mm) Outlet hose length (mm) Connected Load Wheels/feet Voltage Required Fuse Frequency Noise level, dB(A) Settings Number of programmes Number of Temperatures Second Generation Energy Class Cleaning efficiency (2010/30/EC) Drying efficiency (2010/30/EC) Energy consumption (annual) Annual water consumption, l Water consumption, l Program Fully Integrated 818x596x550 820-880x600x550 ...
User Manual
Page 2
... created it . SAFETY INFORMATION Before the installation and use original spare parts. The SAFETY INSTRUCTIONS 4 3. CONTROL PANEL...6 5. PRODUCT INFORMATION SHEET 22 13. Visit our website for: Get usage advice, brochures, trouble shooter, service information: www.aeg.com/webselfservice Register your product for better service: www.registeraeg.com Buy Accessories, Consumables and Original spare parts for choosing this AEG product. BEFORE FIRST USE 12 8. HINTS AND TIPS...15 10...
... created it . SAFETY INFORMATION Before the installation and use original spare parts. The SAFETY INSTRUCTIONS 4 3. CONTROL PANEL...6 5. PRODUCT INFORMATION SHEET 22 13. Visit our website for: Get usage advice, brochures, trouble shooter, service information: www.aeg.com/webselfservice Register your product for better service: www.registeraeg.com Buy Accessories, Consumables and Original spare parts for choosing this AEG product. BEFORE FIRST USE 12 8. HINTS AND TIPS...15 10...
User Manual
Page 3
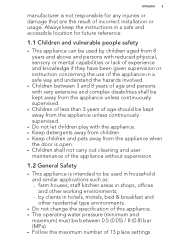
staff kitchen areas in shops, offices and other residential type environments. • Do not change the specification of this appliance. • The operating water pressure (minimum and maximum) must be between 3 and 8 years of age and persons with very extensive ...years of age should be kept away from the appliance when the door is open. • Children shall not carry out cleaning and user maintenance of incorrect installation or usage. farm houses; Always keep the instructions in a safe and accessible location for any injuries or damage that are the result of the appliance ...
staff kitchen areas in shops, offices and other residential type environments. • Do not change the specification of this appliance. • The operating water pressure (minimum and maximum) must be between 3 and 8 years of age and persons with very extensive ...years of age should be kept away from the appliance when the door is open. • Children shall not carry out cleaning and user maintenance of incorrect installation or usage. farm houses; Always keep the instructions in a safe and accessible location for any injuries or damage that are the result of the appliance ...
User Manual
Page 4
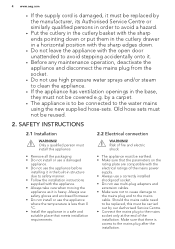
... new supplied hose-sets. Should the mains cable need to be replaced, this appliance. • Remove all the packaging. • Do not install or use a damaged appliance. • Do not use the appliance before installing it in the built-in structure due to safety manner. • Follow the installation instructions supplied with the electrical ratings of the mains power supply. • Always use a correctly installed shockproof socket. • Do not use multi-plug adapters...
... new supplied hose-sets. Should the mains cable need to be replaced, this appliance. • Remove all the packaging. • Do not install or use a damaged appliance. • Do not use the appliance before installing it in the built-in structure due to safety manner. • Follow the installation instructions supplied with the electrical ratings of the mains power supply. • Always use a correctly installed shockproof socket. • Do not use multi-plug adapters...
User Manual
Page 5
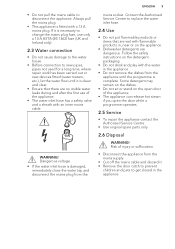
... mains supply. • Cut off the mains cable and discard it. • Remove the door catch to prevent children and pets to new pipes, pipes not used for a long time, where repair work has been carried out or new devices fitted (water meters, etc.), let the water flow until the programme is complete. WARNING! • Do not pull the mains cable to replace the water inlet hose. 2.4 Use...
... mains supply. • Cut off the mains cable and discard it. • Remove the door catch to prevent children and pets to new pipes, pipes not used for a long time, where repair work has been carried out or new devices fitted (water meters, etc.), let the water flow until the programme is complete. WARNING! • Do not pull the mains cable to replace the water inlet hose. 2.4 Use...
User Manual
Page 6
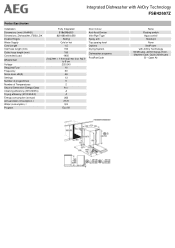
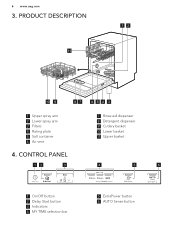
6 www.aeg.com 3. PRODUCT DESCRIPTION 12 11 10 9 8 7 654 3 1 Upper spray arm 2 Lower spray arm 3 Filters 4 Rating plate 5 Salt container 6 Air vent 4. CONTROL PANEL 12 3 7 Rinse aid dispenser 8 Detergent dispenser 9 Cutlery basket 10 Lower basket 11 Upper basket 4 5 6 1 On/Off button 2 Delay Start button 3 Indicators 4 MY TIME selection bar 5 ExtraPower button 6 AUTO Sense button
6 www.aeg.com 3. PRODUCT DESCRIPTION 12 11 10 9 8 7 654 3 1 Upper spray arm 2 Lower spray arm 3 Filters 4 Rating plate 5 Salt container 6 Air vent 4. CONTROL PANEL 12 3 7 Rinse aid dispenser 8 Detergent dispenser 9 Cutlery basket 10 Lower basket 11 Upper basket 4 5 6 1 On/Off button 2 Delay Start button 3 Indicators 4 MY TIME selection bar 5 ExtraPower button 6 AUTO Sense button
User Manual
Page 7
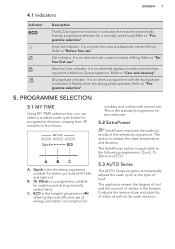
... rinse aid dispenser needs refilling. Quick is the standard programme for test institutes. 5.2 ExtraPower ExtraPower improves the washing results of dishes in the baskets. This is the shortest programme suitable for a normally soiled load. Rinse aid indicator. Drying phase indicator. It is selected. It is on when a programme with the drying phase is on when the appliance needs internal cleaning with the Machine Care programme. Refer to "Programme selection". It adjusts...
... rinse aid dispenser needs refilling. Quick is the standard programme for test institutes. 5.2 ExtraPower ExtraPower improves the washing results of dishes in the baskets. This is the shortest programme suitable for a normally soiled load. Rinse aid indicator. Drying phase indicator. It is selected. It is on when a programme with the drying phase is on when the appliance needs internal cleaning with the Machine Care programme. Refer to "Programme selection". It adjusts...
User Manual
Page 9
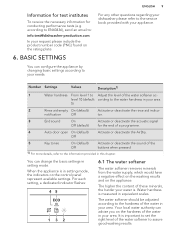
... water softener The water softener removes minerals from the water supply, which would have a negative effect on the washing results and on the control panel represent available settings. The water softener should be adjusted according to : info.test@dishwasher-production.com In your request please include the product number code (PNC) found on the hardness of these minerals, the harder your area. Your local water authority can change the...
... water softener The water softener removes minerals from the water supply, which would have a negative effect on the washing results and on the control panel represent available settings. The water softener should be adjusted according to : info.test@dishwasher-production.com In your request please include the product number code (PNC) found on the hardness of these minerals, the harder your area. Your local water authority can change the...
User Manual
Page 11
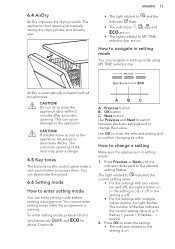
... until the indicator dedicated to confirm changing its value. The number of the door may pose a danger. 6.5 Key tones The buttons on . MYTIME Quick ECO AirDry is on the control panel make a click sound when you press them. Previous button B. How to indicates the current setting value: • For the settings with multiple values (levels), the light flashes. The appliance door opens automatically during the drying phase and...
... until the indicator dedicated to confirm changing its value. The number of the door may pose a danger. 6.5 Key tones The buttons on . MYTIME Quick ECO AirDry is on the control panel make a click sound when you press them. Previous button B. How to indicates the current setting value: • For the settings with multiple values (levels), the light flashes. The appliance door opens automatically during the drying phase and...
User Manual
Page 12
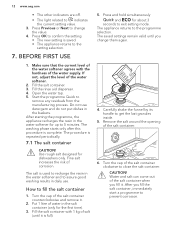
... CAUTION! How to indicates the current setting value. 3. Press OK to the setting selection. 7. If not, adjust the level of the salt container clockwise to 5 minutes. Fill the rinse aid dispenser. 4. Open the water tap. 5. Do not use . Use rough salt designed for up to close the salt container. After starting the programme, the appliance recharges the resin in the water softener for dishwashers only. The...
... CAUTION! How to indicates the current setting value. 3. Press OK to the setting selection. 7. If not, adjust the level of the salt container clockwise to 5 minutes. Fill the rinse aid dispenser. 4. Open the water tap. 5. Do not use . Use rough salt designed for up to close the salt container. After starting the programme, the appliance recharges the resin in the water softener for dishwashers only. The...
User Manual
Page 13
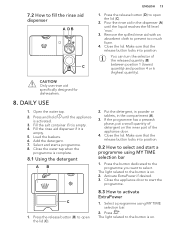
... that the release button locks into position. The light related to activate ExtraPower 1. Open the water tap. 2. Add the detergent. 7. Close the water tap when the programme is on. 2. ENGLISH 13 1. Close the appliance door to start a programme. 8. Select a programme using MY TIME selection bar 1. 7.2 How to fill the rinse aid dispenser A DB M AX 32 4 1 + - Press and hold until the liquid reaches the fill level 'max'. 3. Activate...
... that the release button locks into position. The light related to activate ExtraPower 1. Open the water tap. 2. Add the detergent. 7. Close the water tap when the programme is on. 2. ENGLISH 13 1. Close the appliance door to start a programme. 8. Select a programme using MY TIME selection bar 1. 7.2 How to fill the rinse aid dispenser A DB M AX 32 4 1 + - Press and hold until the liquid reaches the fill level 'max'. 3. Activate...
User Manual
Page 14
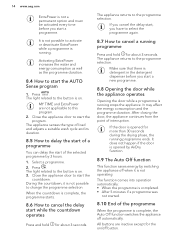
... function saves energy by 3 hours. 1. The appliance senses the type of load and adjusts a suitable wash cycle and its duration. 8.5 How to cancel the delay start , you cancel the delay start while the countdown operates Press and hold for more than 30 seconds during the drying phase, the running . Close the appliance door to change the programme selection. If the door is not possible to start the AUTO Sense program...
... function saves energy by 3 hours. 1. The appliance senses the type of load and adjusts a suitable wash cycle and its duration. 8.5 How to cancel the delay start , you cancel the delay start while the countdown operates Press and hold for more than 30 seconds during the drying phase, the running . Close the appliance door to change the programme selection. If the door is not possible to start the AUTO Sense program...
User Manual
Page 15
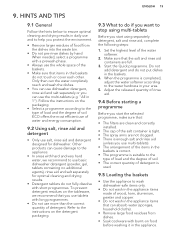
.... • Remove larger residues of the water softener. 2. When needed, select a programme with short programmes. Follow the instructions on the detergent packaging. Make sure that the salt and rinse aid containers are not clogged. • There is tight. • The spray arms are full. 3. Other products can cause damage to the type of load and the degree of the baskets. • Make...
.... • Remove larger residues of the water softener. 2. When needed, select a programme with short programmes. Follow the instructions on the detergent packaging. Make sure that the salt and rinse aid containers are not clogged. • There is tight. • The spray arms are full. 3. Other products can cause damage to the type of load and the degree of the baskets. • Make...
User Manual
Page 16
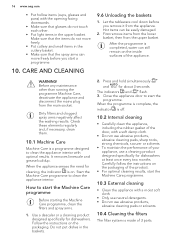
.... Follow the instructions on the inside surfaces of the appliance. It removes limescale and grease buildup. When the appliance senses the need for dishwashers at least once every two months. Carefully follow the instructions on . Close the appliance door to clean the appliance interior. Before any maintenance other . • Put light items in the upper basket. Use a descaler or a cleaning product designed specifically for about 3 seconds. The indicators and flash. 3. Make...
.... Follow the instructions on the inside surfaces of the appliance. It removes limescale and grease buildup. When the appliance senses the need for dishwashers at least once every two months. Carefully follow the instructions on . Close the appliance door to clean the appliance interior. Before any maintenance other . • Put light items in the upper basket. Use a descaler or a cleaning product designed specifically for about 3 seconds. The indicators and flash. 3. Make...
User Manual
Page 18
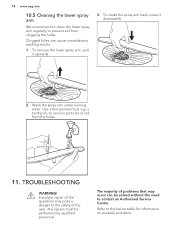
Wash the spray arm under running water. Use a thin pointed tool, e.g. Any repairs must be solved without the need to the safety of the user. To install the spray arm back, press it upwards. 3. Improper repair of the appliance may occur can cause unsatisfactory washing results. 1. The majority of problems that may pose a danger to contact an Authorised Service Centre. To remove the lower spray arm, pull it downwards. 2. a toothpick, to...
Wash the spray arm under running water. Use a thin pointed tool, e.g. Any repairs must be solved without the need to the safety of the user. To install the spray arm back, press it upwards. 3. Improper repair of the appliance may occur can cause unsatisfactory washing results. 1. The majority of problems that may pose a danger to contact an Authorised Service Centre. To remove the lower spray arm, pull it downwards. 2. a toothpick, to...
User Manual
Page 19
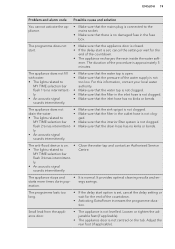
... too long. • If the delay start is approximately 5 minutes. ly. • An acoustic signal sounds intermittently. drain the water. • Make sure that the filter in the outlet hose is set , cancel the setting or wait for the end of the water supply is normal. The anti-flood device is not centred on . • Close the water tap and contact an Authorised Service • The lights related...
... too long. • If the delay start is approximately 5 minutes. ly. • An acoustic signal sounds intermittently. drain the water. • Make sure that the filter in the outlet hose is set , cancel the setting or wait for the end of the water supply is normal. The anti-flood device is not centred on . • Close the water tap and contact an Authorised Service • The lights related...

User Manual
Page 20
... for too long inside of a selected programme. • Clean spray arm jets and filter. Contact an Authorised Service Centre. Rattling or knocking sounds • The tableware is not levelled. Once you have the drying phase. Adjust the rinse aid level to a lower level. • The quantity of rinse aid is insufficient to supply simultaneously all the appliances in use rinse aid always, even in com- 20 www.aeg.com Problem and alarm code Possible...
... for too long inside of a selected programme. • Clean spray arm jets and filter. Contact an Authorised Service Centre. Rattling or knocking sounds • The tableware is not levelled. Once you have the drying phase. Adjust the rinse aid level to a lower level. • The quantity of rinse aid is insufficient to supply simultaneously all the appliances in use rinse aid always, even in com- 20 www.aeg.com Problem and alarm code Possible...
User Manual
Page 21
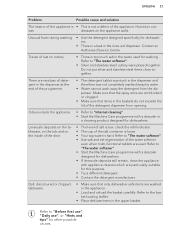
... the detergent manufacturer. Contact an Authorised Service Centre. Do not put silver and stainless steel items close together. Odours inside of the door. • The level of salt is a leak in the upper basket. Refer to "Internal cleaning". • Start the Machine Care programme with appliance cleaners which are washed in the water used . densates on cutlery. • There is too much salt in the appliance. • Load...
... the detergent manufacturer. Contact an Authorised Service Centre. Do not put silver and stainless steel items close together. Odours inside of the door. • The level of salt is a leak in the upper basket. Refer to "Internal cleaning". • Start the Machine Care programme with appliance cleaners which are washed in the water used . densates on cutlery. • There is too much salt in the appliance. • Load...
User Manual
Page 22
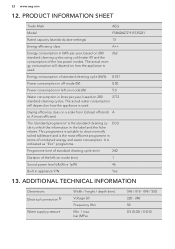
...- ECO cle to A (most efficient programme in appliance Y/N Yes 13. gy consumption will depend on how the appliance is used . ADDITIONAL TECHNICAL INFORMATION Dimensions Electrical connection 1) Water supply pressure Width / height / depth (mm) Voltage (V) Frequency (Hz) Min. / max. PRODUCT INFORMATION SHEET Trade Mark AEG Model FSB42607Z 911535221 Rated capacity (standard place settings) 13 Energy efficiency class A++ Energy consumption in the label and the fiche relates.
...- ECO cle to A (most efficient programme in appliance Y/N Yes 13. gy consumption will depend on how the appliance is used . ADDITIONAL TECHNICAL INFORMATION Dimensions Electrical connection 1) Water supply pressure Width / height / depth (mm) Voltage (V) Frequency (Hz) Min. / max. PRODUCT INFORMATION SHEET Trade Mark AEG Model FSB42607Z 911535221 Rated capacity (standard place settings) 13 Energy efficiency class A++ Energy consumption in the label and the fiche relates.


