
Product Manual
Page 2
... usage advice, brochures, trouble shooter, service information: www.aeg.com Register your product for better service: www.aeg.com/productregistration Buy Accessories, Consumables and Original spare parts for choosing this AEG product. PROGRAMMES 6 5. BEFORE FIRST USE 9 7. The information can be found on ordinary appliances. OPTIONS 8 6. HINTS AND TIPS 12 9. CARE AND CLEANING 13 10. features you for your appliance: www.aeg.com/shop CUSTOMER CARE AND SERVICE...
... usage advice, brochures, trouble shooter, service information: www.aeg.com Register your product for better service: www.aeg.com/productregistration Buy Accessories, Consumables and Original spare parts for choosing this AEG product. PROGRAMMES 6 5. BEFORE FIRST USE 9 7. The information can be found on ordinary appliances. OPTIONS 8 6. HINTS AND TIPS 12 9. CARE AND CLEANING 13 10. features you for your appliance: www.aeg.com/shop CUSTOMER CARE AND SERVICE...

Product Manual
Page 3
... of the appliance, carefully read the supplied instructions. Should the appliance power supply cable need to safe structures. • Make sure that there is clean. • The first time you use a 13 amp ASTA (BS 1362) fuse. • This appliance complies with an inner mains cable. Electrical connection WARNING! The manufacturer is not responsible if an incorrect installation and use of experience and knowledge...
... of the appliance, carefully read the supplied instructions. Should the appliance power supply cable need to safe structures. • Make sure that there is clean. • The first time you use a 13 amp ASTA (BS 1362) fuse. • This appliance complies with an inner mains cable. Electrical connection WARNING! The manufacturer is not responsible if an incorrect installation and use of experience and knowledge...
Product Manual
Page 4
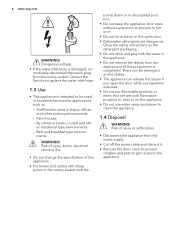
... the Service to replace the water inlet hose. 1.3 Use • This appliance is intended to get closed in household and similar applications such as: - Dangerous voltage. • If the water inlet hose is completed. WARNING! By clients in the appliance. • Do not remove the dishes from the appliance until the programme is damaged, immediately disconnect the mains plug from the mains supply. • Cut...
... the Service to replace the water inlet hose. 1.3 Use • This appliance is intended to get closed in household and similar applications such as: - Dangerous voltage. • If the water inlet hose is completed. WARNING! By clients in the appliance. • Do not remove the dishes from the appliance until the programme is damaged, immediately disconnect the mains plug from the mains supply. • Cut...
Product Manual
Page 5
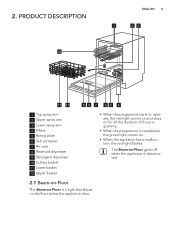
... 10 98 7 65 4 1 Top spray arm 2 Upper spray arm 3 Lower spray arm 4 Filters 5 Rating plate 6 Salt container 7 Air vent 8 Rinse aid dispenser 9 Detergent dispenser 10 Cutlery basket 11 Lower basket 12 Upper basket • When the programme starts to operate, the red light comes on and stays on for all the duration of the programme. • When the programme is a light that shows on . • When the appliance has a malfunction, the red light flashes. The Beam-on-Floor...
... 10 98 7 65 4 1 Top spray arm 2 Upper spray arm 3 Lower spray arm 4 Filters 5 Rating plate 6 Salt container 7 Air vent 8 Rinse aid dispenser 9 Detergent dispenser 10 Cutlery basket 11 Lower basket 12 Upper basket • When the programme starts to operate, the red light comes on and stays on for all the duration of the programme. • When the programme is a light that shows on . • When the appliance has a malfunction, the red light flashes. The Beam-on-Floor...

Product Manual
Page 6
... the programme operates. It is always off button 2 Display 3 Delay button 4 Programme button (down) 5 Programme button (up) 6 ExtraHygiene button 7 Multitab button 8 RESET button 9 Indicators Indicators Description Salt indicator. PROGRAMMES Programme 1 1) 2 2) 3 3) 4 4) Degree of soil Type of load Normal soil Crockery and cutlery All Crockery, cutlery, pots and pans Heavy soil Crockery, cutlery, pots and pans Fresh soil Crockery and cutlery Programme phases Prewash Wash 50 °C Rinses Dry Prewash Wash from...
... the programme operates. It is always off button 2 Display 3 Delay button 4 Programme button (down) 5 Programme button (up) 6 ExtraHygiene button 7 Multitab button 8 RESET button 9 Indicators Indicators Description Salt indicator. PROGRAMMES Programme 1 1) 2 2) 3 3) 4 4) Degree of soil Type of load Normal soil Crockery and cutlery All Crockery, cutlery, pots and pans Heavy soil Crockery, cutlery, pots and pans Fresh soil Crockery and cutlery Programme phases Prewash Wash 50 °C Rinses Dry Prewash Wash from...

Product Manual
Page 7
... for at a very low speed to : info.test@dishwasher-production.com Write down the product number (PNC) that is long. The pump works at least 10 minutes. 4) With this programme you can change the values. ENGLISH 7 Programme Degree of soil Type of load Programme phases Options 5 5) Normal soil Crockery and cutlery Prewash Wash 50 °C Rinses Dry Multitab 1) With this programme you have the...
... for at a very low speed to : info.test@dishwasher-production.com Write down the product number (PNC) that is long. The pump works at least 10 minutes. 4) With this programme you can change the values. ENGLISH 7 Programme Degree of soil Type of load Programme phases Options 5 5) Normal soil Crockery and cutlery Prewash Wash 50 °C Rinses Dry Multitab 1) With this programme you have the...

Product Manual
Page 8
... buttons , and start to the programme, the related indicator flashes quickly 3 times and then goes off . • The indicator of the water softener occurs and when the programme is completed. The related indicators stay off button to deactivate the appliance and to use separately detergent, rinse aid and dishwasher salt, do these steps: 1. How to activate the ExtraHygiene option 1. If you stop to confirm the setting. Adjust the water...
... buttons , and start to the programme, the related indicator flashes quickly 3 times and then goes off . • The indicator of the water softener occurs and when the programme is completed. The related indicators stay off button to deactivate the appliance and to use separately detergent, rinse aid and dishwasher salt, do these steps: 1. How to activate the ExtraHygiene option 1. If you stop to confirm the setting. Adjust the water...

Product Manual
Page 9
... button to confirm the setting. Make sure that the appliance is in your area. If not, adjust the water softener. Press and hold, at this level. five intermittent acoustic signals = level 5. • The display shows the current set level of the water softener agrees with the water hardness in the appliance. Fill the rinse aid dispenser. 4. Start a programme to flash. 3. Do not use detergent and do not load the baskets. 6.1 Adjusting...
... button to confirm the setting. Make sure that the appliance is in your area. If not, adjust the water softener. Press and hold, at this level. five intermittent acoustic signals = level 5. • The display shows the current set level of the water softener agrees with the water hardness in the appliance. Fill the rinse aid dispenser. 4. Start a programme to flash. 3. Do not use detergent and do not load the baskets. 6.1 Adjusting...

Product Manual
Page 10
... the rinse aid indicator is on /off button to close the salt container. DAILY USE 1. Load the baskets. 4. Risk of the salt container. 5. Make sure that the appliance is in the salt container (only for the first time). 3. Press the on , fill the rinse aid dispenser. 3. Add the detergent. • If you fill the salt container, start a programme. 6.3 Filling the rinse aid dispenser A B M AX 32 4 1 + - Remove the salt...
... the rinse aid indicator is on /off button to close the salt container. DAILY USE 1. Load the baskets. 4. Risk of the salt container. 5. Make sure that the appliance is in the salt container (only for the first time). 3. Press the on , fill the rinse aid dispenser. 3. Add the detergent. • If you fill the salt container, start a programme. 6.3 Filling the rinse aid dispenser A B M AX 32 4 1 + - Remove the salt...

Product Manual
Page 11
... (A) . 3. Cancelling the delay start while the countdown operates When you want to start. • The programme number flashes in the display. • If you cancel the delay start 1. ENGLISH 11 7.1 Using the detergent AB 30 MAX 32 4 1 20 + - Put the detergent in setting mode when the display shows 2 horizontal status bars. Set the programme. 2. play. • The Delay indicator comes on /off button to open the door, the appliance stops. Close the appliance door. Press...
... (A) . 3. Cancelling the delay start while the countdown operates When you want to start. • The programme number flashes in the display. • If you cancel the delay start 1. ENGLISH 11 7.1 Using the detergent AB 30 MAX 32 4 1 20 + - Put the detergent in setting mode when the display shows 2 horizontal status bars. Set the programme. 2. play. • The Delay indicator comes on /off button to open the door, the appliance stops. Close the appliance door. Press...

Product Manual
Page 12
... the supplied leaflet with examples of the load of the baskets. • Only use salt, rinse aid and detergent for dishwasher. 12 www.aeg.com Cancelling the programme 1. Hot dishes can be water on the sides and on the tableware, we recommend that the water softener uses the correct quantity of dishwasher salt and water. 8.2 Using salt, rinse aid and detergent • Only use the appliance to set the right level of the products. • Detergent...
... the supplied leaflet with examples of the load of the baskets. • Only use salt, rinse aid and detergent for dishwasher. 12 www.aeg.com Cancelling the programme 1. Hot dishes can be water on the sides and on the tableware, we recommend that the water softener uses the correct quantity of dishwasher salt and water. 8.2 Using salt, rinse aid and detergent • Only use the appliance to set the right level of the products. • Detergent...

Product Manual
Page 13
... items in the cutlery basket. • Put the light items in the upper basket. CARE AND CLEANING WARNING! ENGLISH 13 8.4 Before starting a programme Make sure that the spray arms can move . • Make sure that : • The filters are not clogged. • The position of the salt container is dishwasher salt and rinse aid (unless you use combi detergent tablets). • The cap of the items...
... items in the cutlery basket. • Put the light items in the upper basket. CARE AND CLEANING WARNING! ENGLISH 13 8.4 Before starting a programme Make sure that the spray arms can move . • Make sure that : • The filters are not clogged. • The position of the salt container is dishwasher salt and rinse aid (unless you use combi detergent tablets). • The cap of the items...

Product Manual
Page 14
... it stops during operation. The programme does not start is closed. TROUBLESHOOTING The appliance does not start or it back in the spray arms are clogged, remove remaining parts of grease and limescale inside the appliance. If the delay start . Make sure that the water tap is open. Turn it clockwise until it locks. Do not use abrasive products, abrasive cleaning pads or solvents. 9.4 Internal cleaning If you regularly use neutral detergents. The...
... it stops during operation. The programme does not start is closed. TROUBLESHOOTING The appliance does not start or it back in the spray arms are clogged, remove remaining parts of grease and limescale inside the appliance. If the delay start . Make sure that the water tap is open. Turn it clockwise until it locks. Do not use abrasive products, abrasive cleaning pads or solvents. 9.4 Internal cleaning If you regularly use neutral detergents. The...

Product Manual
Page 15
.... penser and use rinse aid together with a low temperature drying phase. • The rinse aid dispenser is without a drying phase or with the combi detergent tablets. The appliance does not drain the water. Try a different brand or activate the rinse aid dis- Make sure that the appliance is in the inlet hose is on /off button to "Setting and starting a programme". 2. Make sure that the filter in setting mode, refer...
.... penser and use rinse aid together with a low temperature drying phase. • The rinse aid dispenser is without a drying phase or with the combi detergent tablets. The appliance does not drain the water. Try a different brand or activate the rinse aid dis- Make sure that the appliance is in the inlet hose is on /off button to "Setting and starting a programme". 2. Make sure that the filter in setting mode, refer...

Product Manual
Page 16
... and human health and to a water tap with a 3/4'' thread. 2) If the hot water comes from alternative sources of electrical and electronic appliances. Fill the rinse aid dispenser. 11. TECHNICAL INFORMATION Dimensions Width / Height / Depth (mm) 596 / 818 - 898 / 550 Electrical connection Refer to decrease energy consumption. 12. Adjust the released quantity of rinse aid. 7. solar panels, aeolian energy), use the hot water supply to the rating plate. ENVIRONMENT CONCERNS Recycle the...
... and human health and to a water tap with a 3/4'' thread. 2) If the hot water comes from alternative sources of electrical and electronic appliances. Fill the rinse aid dispenser. 11. TECHNICAL INFORMATION Dimensions Width / Height / Depth (mm) 596 / 818 - 898 / 550 Electrical connection Refer to decrease energy consumption. 12. Adjust the released quantity of rinse aid. 7. solar panels, aeolian energy), use the hot water supply to the rating plate. ENVIRONMENT CONCERNS Recycle the...


