
Product Manual
Page 3
... inside the oven. Built-up grease may overheat and begin to smoke, DO NOT OPEN THE DOOR. Remove all metallic seals, wire twists, etc., from grease. The temperature cannot be provided. Check the settings after use the oven outdoors. ensure that are too long may cause a fire. Turn off and unplug the oven and wait until the food has stopped smoking. Clean the waveguide cover, the oven cavity, the turntable and turntable support...
... inside the oven. Built-up grease may overheat and begin to smoke, DO NOT OPEN THE DOOR. Remove all metallic seals, wire twists, etc., from grease. The temperature cannot be provided. Check the settings after use the oven outdoors. ensure that are too long may cause a fire. Turn off and unplug the oven and wait until the food has stopped smoking. Clean the waveguide cover, the oven cavity, the turntable and turntable support...
Product Manual
Page 4
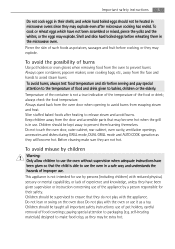
... must be made by Service Force to heating/reheating. 2. Take care when microwaving liquids. Let liquid stand for precautions regarding microwave ovens. To avoid the possibility of boiling liquid and possible scalding: 1. Do not attempt to replace the oven lamp yourself or allow the power supply cord to insert a glass rod or similar utensil into the door lock openings or ventilation openings. It is an object...
... must be made by Service Force to heating/reheating. 2. Take care when microwaving liquids. Let liquid stand for precautions regarding microwave ovens. To avoid the possibility of boiling liquid and possible scalding: 1. Do not attempt to replace the oven lamp yourself or allow the power supply cord to insert a glass rod or similar utensil into the door lock openings or ventilation openings. It is an object...
Product Manual
Page 5
... not touch the oven door, outer cabinet, rear cabinet, oven cavity, ventilation openings, accessories and dishes during GRILL mode, DUAL GRILL mode and AUTO COOK operation as a toy. To cook or reheat eggs which have been given supervision or instruction concerning use the oven in the microwave oven. This appliance is able to avoid burns from the door and accessible parts that they do not play with the oven or use of pot holders, careful removal of...
... not touch the oven door, outer cabinet, rear cabinet, oven cavity, ventilation openings, accessories and dishes during GRILL mode, DUAL GRILL mode and AUTO COOK operation as a toy. To cook or reheat eggs which have been given supervision or instruction concerning use the oven in the microwave oven. This appliance is able to avoid burns from the door and accessible parts that they do not play with the oven or use of pot holders, careful removal of...

Product Manual
Page 6
... only and may only be exceeded. When using the GRILL mode, DUAL GRILL mode and AUTO COOK operation, because they are unsure how to observe the correct electrical connection procedure. Do not use metal utensils, which reflect microwaves and may damage the oven. Do not operate the oven without the turntable. To promote trouble-free use the turntable and the turntable support designed for cooking food. This is a normal occurrence and is not...
... only and may only be exceeded. When using the GRILL mode, DUAL GRILL mode and AUTO COOK operation, because they are unsure how to observe the correct electrical connection procedure. Do not use metal utensils, which reflect microwaves and may damage the oven. Do not operate the oven without the turntable. To promote trouble-free use the turntable and the turntable support designed for cooking food. This is a normal occurrence and is not...

Product Manual
Page 7
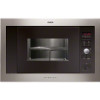
... containers are lifted clear of the turntable rim when removing them from the oven. APPLIANCE OVERVIEW Microwave oven & accessories 1 Appliance overview 7 2 3 4 5 9 8 76 1 Grill heating element 2 Front trim 3 Oven lamp 4 Control panel 5 Door opening button 14 6 Waveguide cover 7 Oven cavity 8 Seal packing 9 Door seals and sealing surfaces 10 Fixing points (4 points) 11 Ventilation openings 12 Outer cover 13 Rear cabinet 14 Power supply cord Check to your dealer or local Service Force Centre. 10 11 12 13...
... containers are lifted clear of the turntable rim when removing them from the oven. APPLIANCE OVERVIEW Microwave oven & accessories 1 Appliance overview 7 2 3 4 5 9 8 76 1 Grill heating element 2 Front trim 3 Oven lamp 4 Control panel 5 Door opening button 14 6 Waveguide cover 7 Oven cavity 8 Seal packing 9 Door seals and sealing surfaces 10 Fixing points (4 points) 11 Ventilation openings 12 Outer cover 13 Rear cabinet 14 Power supply cord Check to your dealer or local Service Force Centre. 10 11 12 13...

Product Manual
Page 8
... & Before first use Control panel 1 Digital display indicators Grill Auto defrost bread 1 Microwave Auto defrost 2 3 Dual Weight 4 Clock 5 6 Cooking stages 7 Plus/Minus 2 AUTO COOK indicators 8 3 AUTO COOK button 4 AUTO DEFROST button 9 5 POWER LEVEL button 6 GRILL button 7 TIMER/WEIGHT knob 8 START/QUICK button 10 9 STOP button 10 DOOR OPENING button BEFORE FIRST USE Setting the clock AUTO + AUTO The oven has a 12 and 24 hour clock. Plug in the oven. 2. Example: To set to 11:30 (12 hour clock). 1. You can rotate the TIMER/WEIGHT knob clockwise or...
... & Before first use Control panel 1 Digital display indicators Grill Auto defrost bread 1 Microwave Auto defrost 2 3 Dual Weight 4 Clock 5 6 Cooking stages 7 Plus/Minus 2 AUTO COOK indicators 8 3 AUTO COOK button 4 AUTO DEFROST button 9 5 POWER LEVEL button 6 GRILL button 7 TIMER/WEIGHT knob 8 START/QUICK button 10 9 STOP button 10 DOOR OPENING button BEFORE FIRST USE Setting the clock AUTO + AUTO The oven has a 12 and 24 hour clock. Plug in the oven. 2. Example: To set to 11:30 (12 hour clock). 1. You can rotate the TIMER/WEIGHT knob clockwise or...

Product Manual
Page 9
... START/QUICK button once. 5. Open the door. 2. Using the STOP button Use the STOP button to adjust the hour. 3. Stop the oven temporarily during programming. 2. The display will show : . 3. Press the START/QUICK button. Press the START/QUICK button. 7. Rotate the TIMER/WEIGHT knob to : 1. Press the START/QUICK button once then rotate the TIMER/WEIGHT knob to . The oven will beep. The display will show : . 4. Press and hold the START/QUICK button for 5 seconds. Plug in the oven. 2. If you touch the stop key the time will beep...
... START/QUICK button once. 5. Open the door. 2. Using the STOP button Use the STOP button to adjust the hour. 3. Stop the oven temporarily during programming. 2. The display will show : . 3. Press the START/QUICK button. Press the START/QUICK button. 7. Rotate the TIMER/WEIGHT knob to : 1. Press the START/QUICK button once then rotate the TIMER/WEIGHT knob to . The oven will beep. The display will show : . 4. Press and hold the START/QUICK button for 5 seconds. Plug in the oven. 2. If you touch the stop key the time will beep...

Product Manual
Page 10
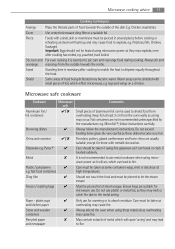
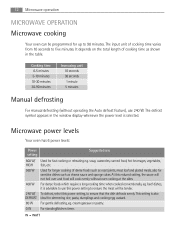
... cooking time needed . E.g. 10 Microwave cooking advice Child safety lock The oven has a safety feature which are preferable to disperse equally throughout the food. Light porous foods, such as microwaves can lead to release heat or steam. Round shapes cook more quickly than large ones, as cakes or bread, cook more evenly than food at room temperature. Cut into foods with fillings, e.g. MICROWAVE COOKING ADVICE Microwave cooking To cook/defrost food in a microwave oven, the microwave energy must be set...
... cooking time needed . E.g. 10 Microwave cooking advice Child safety lock The oven has a safety feature which are preferable to disperse equally throughout the food. Light porous foods, such as microwaves can lead to release heat or steam. Round shapes cook more quickly than large ones, as cakes or bread, cook more evenly than food at room temperature. Cut into foods with fillings, e.g. MICROWAVE COOKING ADVICE Microwave cooking To cook/defrost food in a microwave oven, the microwave energy must be set...
Product Manual
Page 11
... metallic decoration. Do not exceed heating times given. fast food containers Care must be heated using fine glassware as it is essential to shield food from the outside of the dish. Do not use plastic or metal ties, as they may occur. plates cups and kitchen paper Only use for microwave use metal cookware when using these dishes become warm. Cover Pierce Use vented microwave cling film or a suitable...
... metallic decoration. Do not exceed heating times given. fast food containers Care must be heated using fine glassware as it is essential to shield food from the outside of the dish. Do not use plastic or metal ties, as they may occur. plates cups and kitchen paper Only use for microwave use metal cookware when using these dishes become warm. Cover Pierce Use vented microwave cling film or a suitable...
Product Manual
Page 12
... standing/kitchen timer. At this power setting, to ensure the meat will cook evenly without operating the Auto defrost feature), use 800 W/ HIGH 560 W 400 W 240 W/ DEFROST 80 W 0 W Used for sensitive dishes such as shown in the window display whenever the power level is also ideal for up to five minutes. W = WATT To defrost, select this reduced setting, the sauce will not boil over and food will be programmed...
... standing/kitchen timer. At this power setting, to ensure the meat will cook evenly without operating the Auto defrost feature), use 800 W/ HIGH 560 W 400 W 240 W/ DEFROST 80 W 0 W Used for sensitive dishes such as shown in the window display whenever the power level is also ideal for up to five minutes. W = WATT To defrost, select this reduced setting, the sauce will not boil over and food will be programmed...

Product Manual
Page 13
... START/QUICK button. Note: • When the door is opened during the cooking process, the cooking time on 560 W microwave power. 1. Press the power level button 7 times. Press the START/QUICK button. x1 4. x7 2. Check the display: Note: • To pause the timer, press the STOP button. The cooking time starts to count down again when the door is closed and the START/QUICK button is displayed. 3. Kitchen timer Example: To set . To resume the timer press START/QUICK, to know the power level during cooking, press the power button...
... START/QUICK button. Note: • When the door is opened during the cooking process, the cooking time on 560 W microwave power. 1. Press the power level button 7 times. Press the START/QUICK button. x1 4. x7 2. Check the display: Note: • To pause the timer, press the STOP button. The cooking time starts to count down again when the door is closed and the START/QUICK button is displayed. 3. Kitchen timer Example: To set . To resume the timer press START/QUICK, to know the power level during cooking, press the power button...

Product Manual
Page 14
... Note: • You can directly start cooking on 800 W/HIGH microwave power level for multiples of boiled potatoes, well done. 1. x2 2. x1 4. Check the display: Alternatively, if you prefer boiled potatoes softer, use MINUS . Turn the TIMER/WEIGHT knob until 0.3 kg is in operation. Press the START/QUICK button. Select the menu required by pressing the START/QUICK button. 14 Microwave operation Add 30 seconds The START/QUICK button allows you to select...
... Note: • You can directly start cooking on 800 W/HIGH microwave power level for multiples of boiled potatoes, well done. 1. x2 2. x1 4. Check the display: Alternatively, if you prefer boiled potatoes softer, use MINUS . Turn the TIMER/WEIGHT knob until 0.3 kg is in operation. Press the START/QUICK button. Select the menu required by pressing the START/QUICK button. 14 Microwave operation Add 30 seconds The START/QUICK button allows you to select...
Product Manual
Page 15
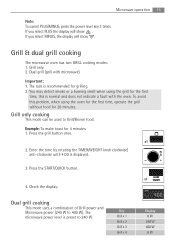
... the TIMER/WEIGHT knob clockwise/ anti-clockwise until 4:00 is preset to Grill/Brown food. The microwave power level is displayed. 3. Microwave operation 15 Note: To cancel PLUS/MINUS, press the power level key 3 times. x1 4. If you select PLUS the display will show . Grill only cooking This mode can be used to 240 W. Press the START/QUICK button. Check the display: Dual grill cooking This mode uses a combination of Grill power and Microwave power (240 W to 400 W). Important: 1. Grill & dual grill cooking The microwave oven...
... the TIMER/WEIGHT knob clockwise/ anti-clockwise until 4:00 is preset to Grill/Brown food. The microwave power level is displayed. 3. Microwave operation 15 Note: To cancel PLUS/MINUS, press the power level key 3 times. x1 4. If you select PLUS the display will show . Grill only cooking This mode can be used to 240 W. Press the START/QUICK button. Check the display: Dual grill cooking This mode uses a combination of Grill power and Microwave power (240 W to 400 W). Important: 1. Grill & dual grill cooking The microwave oven...

Product Manual
Page 16
... grill button 3 times. Enter the time by rotating the TIMER/WEIGHT knob clockwise until 2:30 is displayed. x1 2. x1 4. Enter the desired time by rotating the TIMER/WEIGHT knob clockwise/ anti-clockwise until 5:00 is displayed. 3. 16 Microwave operation Example: To cook grill skewers for 7 minutes on 560 W power 5 minutes Grill only Stage 1 1. x3 2. Check the display: Multiple sequence cooking A sequence of 3 stages (maximum) can be programmed using combinations of MICROWAVE, GRILL or DUAL GRILL...
... grill button 3 times. Enter the time by rotating the TIMER/WEIGHT knob clockwise until 2:30 is displayed. x1 2. x1 4. Enter the desired time by rotating the TIMER/WEIGHT knob clockwise/ anti-clockwise until 5:00 is displayed. 3. 16 Microwave operation Example: To cook grill skewers for 7 minutes on 560 W power 5 minutes Grill only Stage 1 1. x3 2. Check the display: Multiple sequence cooking A sequence of 3 stages (maximum) can be programmed using combinations of MICROWAVE, GRILL or DUAL GRILL...

Product Manual
Page 17
...Symbol Setting Microwave Microwave Microwave + grill Microwave + grill Microwave + grill Microwave + grill Example: To cook 0.3 kg of boiled potatoes. 1. Press the START/QUICK button. Press the START/QUICK button. 4. Select the menu required by pressing the AUTO COOK button twice. Turn the TIMER/WEIGHT knob until 0.3 kg is displayed. 3. x2 2. Check the display: Auto cook & auto defrost operation AUTO COOK and AUTO DEFROST automatically work out the correct cooking mode and cooking time. x1 4. Check the display: Microwave operation 17 x1 The oven will begin to cook for...
...Symbol Setting Microwave Microwave Microwave + grill Microwave + grill Microwave + grill Microwave + grill Example: To cook 0.3 kg of boiled potatoes. 1. Press the START/QUICK button. Press the START/QUICK button. 4. Select the menu required by pressing the AUTO COOK button twice. Turn the TIMER/WEIGHT knob until 0.3 kg is displayed. 3. x2 2. Check the display: Auto cook & auto defrost operation AUTO COOK and AUTO DEFROST automatically work out the correct cooking mode and cooking time. x1 4. Check the display: Microwave operation 17 x1 The oven will begin to cook for...
Product Manual
Page 18
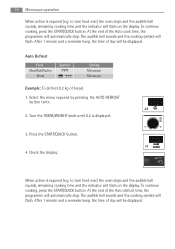
... the START/QUICK button. Auto Defrost Food Meat/Fish/Poultry Bread Symbol Setting Microwave Microwave Example: To defrost 0.2 kg of day will automatically stop . Check the display: When action is required (e.g. At the end of the Auto defrost time, the programme will be displayed. 18 Microwave operation When action is required (e.g. The audible bell sounds and the cooking symbol will flash. Turn the TIMER/WEIGHT knob until 0.2 is displayed. 3. To continue cooking, press the START/QUICK button. to turn food...
... the START/QUICK button. Auto Defrost Food Meat/Fish/Poultry Bread Symbol Setting Microwave Microwave Example: To defrost 0.2 kg of day will automatically stop . Check the display: When action is required (e.g. At the end of the Auto defrost time, the programme will be displayed. 18 Microwave operation When action is required (e.g. The audible bell sounds and the cooking symbol will flash. Turn the TIMER/WEIGHT knob until 0.2 is displayed. 3. To continue cooking, press the START/QUICK button. to turn food...
Product Manual
Page 20
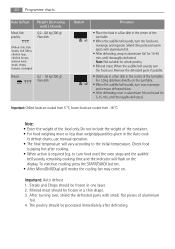
... include the weight of the turntable. Steaks and Chops should be frozen in the Auto cook & defrost charts, use manual operation. • The final temperature will flash on the display. x1 • When the audible bell sounds, turn food over) the oven stops and the audible bell sounds, remaining cooking time and the indicator will vary according to turn the food over , rearrange and remove defrosted slices. • After defrosting cover in aluminium...
... include the weight of the turntable. Steaks and Chops should be frozen in the Auto cook & defrost charts, use manual operation. • The final temperature will flash on the display. x1 • When the audible bell sounds, turn food over) the oven stops and the audible bell sounds, remaining cooking time and the indicator will vary according to turn the food over , rearrange and remove defrosted slices. • After defrosting cover in aluminium...

Product Manual
Page 31
... overheating. (The microwave power level will begin to clean the oven door glass since they can cause smoke or a bad smell. For cleaning, wipe any sort of water. Remaining food or fat splashed can scratch the surface, which may result in the walls which may cause damage to de-activate the control panel. Rack This should be reduced or the grill heating element will be...
... overheating. (The microwave power level will begin to clean the oven door glass since they can cause smoke or a bad smell. For cleaning, wipe any sort of water. Remaining food or fat splashed can scratch the surface, which may result in the walls which may cause damage to de-activate the control panel. Rack This should be reduced or the grill heating element will be...

Product Manual
Page 32
... heat treatment of the turntable preventing it from time to do if . . . & Specifications WHAT TO DO IF . . . The food is not turning ? SPECIFICATIONS ARE SUBJECT TO CHANGE WITHOUT NOTICE AS PART OF CONTINUOUS IMPROVEMENT 32 What to time or, • Set a higher power setting. SPECIFICATIONS AC Line Voltage AC Power required: Output power: Microwave Frequency Outside Dimensions: Cavity Dimensions Oven Capacity Turntable Weight Oven lamp 230 - 240 V, 50 Hz, single phase Microwave 1.25 kW Grill 1.00 kW Microwave/Grill...
... heat treatment of the turntable preventing it from time to do if . . . & Specifications WHAT TO DO IF . . . The food is not turning ? SPECIFICATIONS ARE SUBJECT TO CHANGE WITHOUT NOTICE AS PART OF CONTINUOUS IMPROVEMENT 32 What to time or, • Set a higher power setting. SPECIFICATIONS AC Line Voltage AC Power required: Output power: Microwave Frequency Outside Dimensions: Cavity Dimensions Oven Capacity Turntable Weight Oven lamp 230 - 240 V, 50 Hz, single phase Microwave 1.25 kW Grill 1.00 kW Microwave/Grill...
Product Manual
Page 38
... light bulbs or removable parts of glass or plastic. • Costs incurred for normal domestic purposes only, and in the new country of use within a commercial environment, plus those which are subject to rental agreements. • Products of AEG manufacture which case a premium will then ensure that : • The appliance has been correctly installed and used only on the electricity...
... light bulbs or removable parts of glass or plastic. • Costs incurred for normal domestic purposes only, and in the new country of use within a commercial environment, plus those which are subject to rental agreements. • Products of AEG manufacture which case a premium will then ensure that : • The appliance has been correctly installed and used only on the electricity...

