
Product Manual
Page 2
..., you'll find on ordinary appliances. features you might not find everything you need to keep all your AEG appliances looking spotless and working perfectly. We have created it . Along with innovative technologies that help make life simpler - Please spend a few minutes reading... bottle holders to give you impeccable performance for choosing this AEG product. Visit the webshop at: www.aeg.com/shop 2 FOR PERFECT RESULTS Thank you for many years, with a wide range of accessories designed and built to the high quality standards you would expect, from specialist cookware to cutlery...
..., you'll find on ordinary appliances. features you might not find everything you need to keep all your AEG appliances looking spotless and working perfectly. We have created it . Along with innovative technologies that help make life simpler - Please spend a few minutes reading... bottle holders to give you impeccable performance for choosing this AEG product. Visit the webshop at: www.aeg.com/shop 2 FOR PERFECT RESULTS Thank you for many years, with a wide range of accessories designed and built to the high quality standards you would expect, from specialist cookware to cutlery...

Product Manual
Page 3
CONTENTS Contents 3 4 Safety information 6 Installation 12 Product description 13 Operation 15 Helpful hints and tips 16 Care and cleaning 17 What to do if... 18 Technical data 19 Environment concerns The following symbols are used in this user manual: Important information concerning your personal safety and information on how to change without notice General information and tips Environmental information Subject to avoid damaging the appliance.
CONTENTS Contents 3 4 Safety information 6 Installation 12 Product description 13 Operation 15 Helpful hints and tips 16 Care and cleaning 17 What to do if... 18 Technical data 19 Environment concerns The following symbols are used in this user manual: Important information concerning your personal safety and information on how to change without notice General information and tips Environmental information Subject to avoid damaging the appliance.

Product Manual
Page 4
.... flames will heat up the pan handle. For your safety and correct operation of the glass plate (if applicable). • Do not use . They must fully know the operation and safety features of the stainless steel hob panel (if present) from children. Cookware and its contents can ignite very quickly. Use • Remove all packaging away from the appliance before installation and use the...
.... flames will heat up the pan handle. For your safety and correct operation of the glass plate (if applicable). • Do not use . They must fully know the operation and safety features of the stainless steel hob panel (if present) from children. Cookware and its contents can ignite very quickly. Use • Remove all packaging away from the appliance before installation and use the...
Product Manual
Page 5
... the power supply and gas system, setting up and maintenance must only be hit off the hob when you open the doors or windows. • Before installation, make sure that the local supply conditions (gas type and pressure) agree with the adjustment of appliance. There is necessary, speak to the supplier. • Only use the appliance (safety regulations, recycling regulations, electrical safety...
... the power supply and gas system, setting up and maintenance must only be hit off the hob when you open the doors or windows. • Before installation, make sure that the local supply conditions (gas type and pressure) agree with the adjustment of appliance. There is necessary, speak to the supplier. • Only use the appliance (safety regulations, recycling regulations, electrical safety...
Product Manual
Page 6
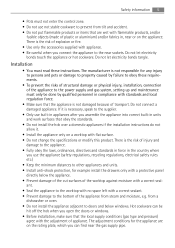
.... - INSTALLATION WARNING! The following instructions about installation, connection and maintenance must have correct isolation devices: line protecting cut-outs, fuses (screw type fuses removed from the electrical supply, before you do the maintenance work or you disconnect the appli- Make sure that the ventilation in the kitchen is good: keep natural ventilation holes open or install a mechanical ventilation device (mechanical extractor hood). • More ventilation (for electrical connections...
.... - INSTALLATION WARNING! The following instructions about installation, connection and maintenance must have correct isolation devices: line protecting cut-outs, fuses (screw type fuses removed from the electrical supply, before you do the maintenance work or you disconnect the appli- Make sure that the ventilation in the kitchen is good: keep natural ventilation holes open or install a mechanical ventilation device (mechanical extractor hood). • More ventilation (for electrical connections...

Product Manual
Page 7
... required. Location The hob may be located in a kitchen, a kitchen/diner or bed sitting room (with the Gas Safety (Installation and Use) Regulations (Current Edition) and the IEE Wiring Regulations (Current Edition). For appliances installed in the Republic of the hob. Any gas installation must be allowed from the edges of Ireland please refer to determine the requisite air vent requirements. Installation 7 Important safety requirements This hob must be installed...
... required. Location The hob may be located in a kitchen, a kitchen/diner or bed sitting room (with the Gas Safety (Installation and Use) Regulations (Current Edition) and the IEE Wiring Regulations (Current Edition). For appliances installed in the Republic of the hob. Any gas installation must be allowed from the edges of Ireland please refer to determine the requisite air vent requirements. Installation 7 Important safety requirements This hob must be installed...
Product Manual
Page 8
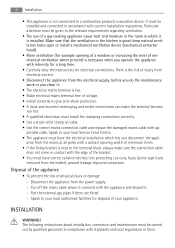
... the new type of gas you must fit an applicable pressure adjuster on the end of gas. Remove the pan supports. 2. Assemble the parts, follow the same procedure backwards. 5. 8 Installation 1 2 3 1 End of shaft with nut 2 Washer 3 Elbow Connection to the gas supply should be suitable for the type of gas supply. It is near the gas supply pipe) with the appliance. Injectors replacement 1. Remove the caps and crowns...
... the new type of gas you must fit an applicable pressure adjuster on the end of gas. Remove the pan supports. 2. Assemble the parts, follow the same procedure backwards. 5. 8 Installation 1 2 3 1 End of shaft with nut 2 Washer 3 Elbow Connection to the gas supply should be suitable for the type of gas supply. It is near the gas supply pipe) with the appliance. Injectors replacement 1. Remove the caps and crowns...
Product Manual
Page 9
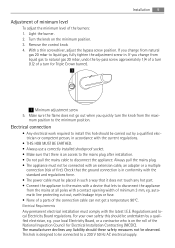
... liquid gas to liquid gas, fully tighten the adjustment screw in accordance with a contact opening width of the National Inspection Council for Triple Crown burner). 1 1 Minimum adjustment screw 5. Electrical connection • Any electrical work required to install this should be undertaken by -pass screw approximately 1/4 of a turn (1/2 of fire). Electrical Requirements Any permanent electrical installation must be placed in conformity with the standard and regulations force. • The power...
... liquid gas to liquid gas, fully tighten the adjustment screw in accordance with a contact opening width of the National Inspection Council for Triple Crown burner). 1 1 Minimum adjustment screw 5. Electrical connection • Any electrical work required to install this should be undertaken by -pass screw approximately 1/4 of a turn (1/2 of fire). Electrical Requirements Any permanent electrical installation must be placed in conformity with the standard and regulations force. • The power...
Product Manual
Page 10
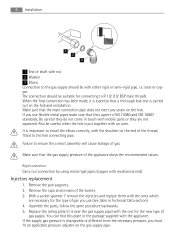
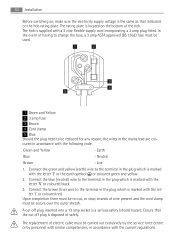
... cord incorporating a 3 amp plug fitted. Ensure that indicated on the hob rating plate. The hob is located on the bottom of the hob. Upon completion there must be no cut off plug inserted into a 13 amp socket is marked with the following code: Green and Yellow -...replacement of electric cable must be used. 1 2 3 4 5 1 Green and Yellow 2 3 amp fuse 3 Brown 4 Cord clamp 5 Blue Should the plug need to the terminal in accordance with the letter 'E' or the earth symbol or coloured green and yellow. 2. A cut off plug is the same as that the cut , or stray strands of wire...
... cord incorporating a 3 amp plug fitted. Ensure that indicated on the hob rating plate. The hob is located on the bottom of the hob. Upon completion there must be no cut off plug inserted into a 13 amp socket is marked with the following code: Green and Yellow -...replacement of electric cable must be used. 1 2 3 4 5 1 Green and Yellow 2 3 amp fuse 3 Brown 4 Cord clamp 5 Blue Should the plug need to the terminal in accordance with the letter 'E' or the earth symbol or coloured green and yellow. 2. A cut off plug is the same as that the cut , or stray strands of wire...
Product Manual
Page 11
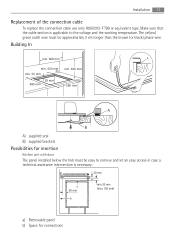
.... 650 mm 560 mm A B A) supplied seal B) supplied brackets Possibilities for connections Installation 11 Replacement of the connection cable To replace the connection cable use only H05V2V2-F T90 or equivalent type. Make sure that the cable section is necessary. 30 mm a 60 mm b min 20 mm (max 150 mm) a) Removable panel b) Space for insertion Kitchen unit with door The panel installed below the hob must be...
.... 650 mm 560 mm A B A) supplied seal B) supplied brackets Possibilities for connections Installation 11 Replacement of the connection cable To replace the connection cable use only H05V2V2-F T90 or equivalent type. Make sure that the cable section is necessary. 30 mm a 60 mm b min 20 mm (max 150 mm) a) Removable panel b) Space for insertion Kitchen unit with door The panel installed below the hob must be...
Product Manual
Page 12
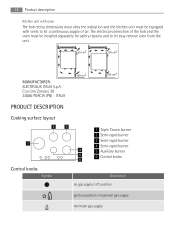
... Cooking surface layout 2 1 Control knobs Symbol 3 4 5 6 1 Triple Crown burner 2 Semi-rapid burner 3 Semi-rapid burner 4 Semi-rapid burner 5 Auxiliary burner 6 Control knobs Description no gas supply / off position ignition position / maximum gas supply minimum gas supply C.so Lino Zanussi, 30 33080 PORCIA (PN) - The electrical connection of the hob and the oven must be installed separately for safety reasons and to let a continuous supply of air. 12 Product description Kitchen unit with oven...
... Cooking surface layout 2 1 Control knobs Symbol 3 4 5 6 1 Triple Crown burner 2 Semi-rapid burner 3 Semi-rapid burner 4 Semi-rapid burner 5 Auxiliary burner 6 Control knobs Description no gas supply / off position ignition position / maximum gas supply minimum gas supply C.so Lino Zanussi, 30 33080 PORCIA (PN) - The electrical connection of the hob and the oven must be installed separately for safety reasons and to let a continuous supply of air. 12 Product description Kitchen unit with oven...
Product Manual
Page 13
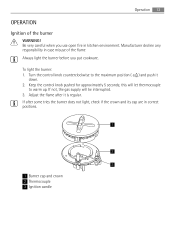
... its cap are in kitchen environment. Be very careful when you put cookware. Keep the control knob pushed for approximately 5 seconds; If not, the gas supply will let thermocouple to the maximum position ( ) and push it is regular. Operation 13 OPERATION Ignition of the flame Always light the burner before you use open fire in correct positions. 1 2 3 1 Burner cap and crown 2 Thermocouple 3 Ignition candle...
... its cap are in kitchen environment. Be very careful when you put cookware. Keep the control knob pushed for approximately 5 seconds; If not, the gas supply will let thermocouple to the maximum position ( ) and push it is regular. Operation 13 OPERATION Ignition of the flame Always light the burner before you use open fire in correct positions. 1 2 3 1 Burner cap and crown 2 Thermocouple 3 Ignition candle...
Product Manual
Page 14
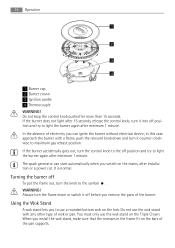
... pan supports. When you can start automatically when you to the symbol . in the frame fit on the mains, after minimum 1 minute. Do not use the wok stand with a flame, push the relevant knob down or switch it off position and try to the off To put the flame out, turn it counter-clockwise to light the burner again after installation or a power cut. Using the Wok Stand A wok...
... pan supports. When you can start automatically when you to the symbol . in the frame fit on the mains, after minimum 1 minute. Do not use the wok stand with a flame, push the relevant knob down or switch it off position and try to the off To put the flame out, turn it counter-clockwise to light the burner again after installation or a power cut. Using the Wok Stand A wok...
Product Manual
Page 15
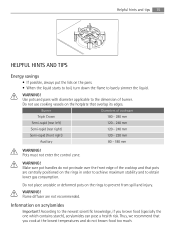
... must not enter the control zone. Do not place unstable or deformed pots on the rings to barely simmer the liquid. Flame diffuser are centrally positioned on the rings in order to achieve maximum stability and to obtain lower gas consumption. Do not use cooking vessels on the hotplate that...Energy savings • If possible, always put the lids on the pans. • When the liquid starts to boil, turn down the flame to prevent from spill and injury. Information on acrylamides Important! According to the dimension of cookware Triple Crown 180 - 280 mm Semi-rapid (rear left)...
... must not enter the control zone. Do not place unstable or deformed pots on the rings to barely simmer the liquid. Flame diffuser are centrally positioned on the rings in order to achieve maximum stability and to obtain lower gas consumption. Do not use cooking vessels on the hotplate that...Energy savings • If possible, always put the lids on the pans. • When the liquid starts to boil, turn down the flame to prevent from spill and injury. Information on acrylamides Important! According to the dimension of cookware Triple Crown 180 - 280 mm Semi-rapid (rear left)...
Product Manual
Page 16
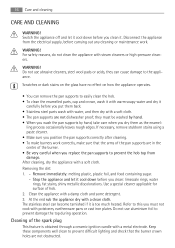
... the pan supports correctly after cleaning. • To make burners work correctly, make sure that the burner crown holes are not obstructed. Clean the appliance with a metal electrode. Cleaning of the spark plug This feature is too much heated. 16 Care and cleaning CARE AND CLEANING WARNING! Removing the dirt: 1. - At the end rub the appliance dry with steam cleaners or high-pressure cleaners. Do not use abrasive cleaners, steel...
... the pan supports correctly after cleaning. • To make burners work correctly, make sure that the burner crown holes are not obstructed. Clean the appliance with a metal electrode. Cleaning of the spark plug This feature is too much heated. 16 Care and cleaning CARE AND CLEANING WARNING! Removing the dirt: 1. - At the end rub the appliance dry with steam cleaners or high-pressure cleaners. Do not use abrasive cleaners, steel...
Product Manual
Page 17
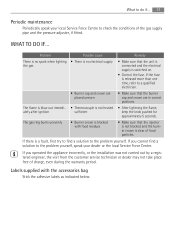
... to the problem yourself, speak your local Service Force Centre to check the conditions of charge, even during the warranty period. If there is not heated • After lightning the flame, ately after ignition sufficient keep the knob pushed for approximately 5 seconds. If the fuse is released more than one time, refer to a qualified electrician. • Burner cap and crown...
... to the problem yourself, speak your local Service Force Centre to check the conditions of charge, even during the warranty period. If there is not heated • After lightning the flame, ately after ignition sufficient keep the knob pushed for approximately 5 seconds. If the fuse is released more than one time, refer to a qualified electrician. • Burner cap and crown...
Product Manual
Page 18
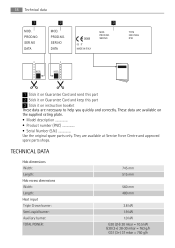
... part 3 Stick it on the supplied rating plate. • Model description • Product number (PNC • Serial Number (S.N Use the original spare parts only. They are necessary to help you quickly and correctly. SER.NO DATA 0049 03 IT MADE IN ITALY 3 MOD. These data are available on instruction booklet These data are available at Service Force Centre and approved spare parts...
... part 3 Stick it on the supplied rating plate. • Model description • Product number (PNC • Serial Number (S.N Use the original spare parts only. They are necessary to help you quickly and correctly. SER.NO DATA 0049 03 IT MADE IN ITALY 3 MOD. These data are available on instruction booklet These data are available at Service Force Centre and approved spare parts...
Product Manual
Page 19
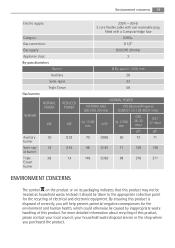
... Burner Auxiliary Semi-rapid Triple Crown Gas burners BURNER NORMAL POWER REDUCED POWER kW kW Auxiliary 1.0 0.33 burner Semi-rap- 1.9 0.45 id burner Triple 3.8 1.4 Crown burner 230 V ~ 50 Hz 3 core flexible cable with non rewireable plug fitted with a 3 amp cartridge fuse II2H3+ G 1/2" G20 (2H) 20 mbar 3 Ø By-pass in 1/100 mm 28 32 56 NORMAL POWER NATURAL GAS G20 (2H) 20 mbar LPG (Butane/Propane...
... Burner Auxiliary Semi-rapid Triple Crown Gas burners BURNER NORMAL POWER REDUCED POWER kW kW Auxiliary 1.0 0.33 burner Semi-rap- 1.9 0.45 id burner Triple 3.8 1.4 Crown burner 230 V ~ 50 Hz 3 core flexible cable with non rewireable plug fitted with a 3 amp cartridge fuse II2H3+ G 1/2" G20 (2H) 20 mbar 3 Ø By-pass in 1/100 mm 28 32 56 NORMAL POWER NATURAL GAS G20 (2H) 20 mbar LPG (Butane/Propane...


